
Owner's Manual
Page 3
... harmful interference in instability causing possible injury. To prevent electromagnetic interference with PDK-TS23 stand. D1-4-2-6-1_En CAUTION: This Model PRO-FHD1 for use only with electric appliances such as radios and televisions, use shielded cables and connectors for connections. Address: 1925... COSMETICS CONTAINER AND MEDICINE BOTTLE ETC. Increase the separation between the equipment and receiver. - Product Name: Plasma Display Model Number: PRO-FHD1 Product Category: Class B Personal Computers & Peripherals Responsible Party Name: PIONEER ELECTRONICS SERVICE, INC.
... harmful interference in instability causing possible injury. To prevent electromagnetic interference with PDK-TS23 stand. D1-4-2-6-1_En CAUTION: This Model PRO-FHD1 for use only with electric appliances such as radios and televisions, use shielded cables and connectors for connections. Address: 1925... COSMETICS CONTAINER AND MEDICINE BOTTLE ETC. Increase the separation between the equipment and receiver. - Product Name: Plasma Display Model Number: PRO-FHD1 Product Category: Class B Personal Computers & Peripherals Responsible Party Name: PIONEER ELECTRONICS SERVICE, INC.
Owner's Manual
Page 4
... Accessories 05 Part Names Main unit 13 Remote control unit 14 Connection panel 15 06 Preparation Installing the Plasma Display 16 Preventing the Plasma Display from that shown in the explanatory drawings. In some countries or... remote control unit ..........20 Inserting batteries 20 Cautions regarding the remote control unit 20 07 Operation Plasma Display status indicators ...........21 Changing the volume and sound ...........21 Use the multiscreen functions 22 Splitting...the noise in a safe place for buying this Pioneer product. Contents Contents Thank you for future reference.
... Accessories 05 Part Names Main unit 13 Remote control unit 14 Connection panel 15 06 Preparation Installing the Plasma Display 16 Preventing the Plasma Display from that shown in the explanatory drawings. In some countries or... remote control unit ..........20 Inserting batteries 20 Cautions regarding the remote control unit 20 07 Operation Plasma Display status indicators ...........21 Changing the volume and sound ...........21 Use the multiscreen functions 22 Splitting...the noise in a safe place for buying this Pioneer product. Contents Contents Thank you for future reference.
Owner's Manual
Page 6
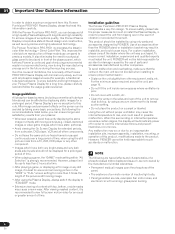
...product, modifications made to view a normal moving picture in order to previous models. It also eliminates the need for a physical glass panel to be placed in order to prevent the unit from tipping over a long period of time, when using the still picture mode from..., and could cause injury. 01 Important User Guidance Information Important User Guidance Information In order to obtain maximum enjoyment from this Pioneer PureVision PRO-FHD1 Plasma Display, please first read and follow the usage guidances below , you can be avoided by the manufacturer's limited warranties: •...
...product, modifications made to view a normal moving picture in order to previous models. It also eliminates the need for a physical glass panel to be placed in order to prevent the unit from tipping over a long period of time, when using the still picture mode from..., and could cause injury. 01 Important User Guidance Information Important User Guidance Information In order to obtain maximum enjoyment from this Pioneer PureVision PRO-FHD1 Plasma Display, please first read and follow the usage guidances below , you can be avoided by the manufacturer's limited warranties: •...
Owner's Manual
Page 7
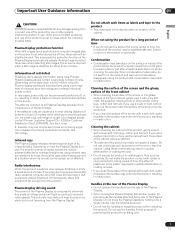
... clean the cabinet. Important User Guidance Information 01 English CAUTION PIONEER bears no responsibility for any damage arising from incorrect use of the product by holding only a single handle. Pioneer Plasma Display panels contain a very large number of this product. If this ...product, that equipment far enough from tilting over 6.2 million cells.) All Pioneer display panels are manufactured using cells. Using the product with a ...
... clean the cabinet. Important User Guidance Information 01 English CAUTION PIONEER bears no responsibility for any damage arising from incorrect use of the product by holding only a single handle. Pioneer Plasma Display panels contain a very large number of this product. If this ...product, that equipment far enough from tilting over 6.2 million cells.) All Pioneer display panels are manufactured using cells. Using the product with a ...
Owner's Manual
Page 8
...the screen will not disappear completely. • The energy save function can be temporary or permanent. 01 Important User Guidance Information CAUTION Panel sticking and after-image lag • Displaying the same images such as permanent image retention or burn-in may occur. This image ... of these viewing modes repeatedly within a short period of the still images and the time they will disappear when moving video. This plasma display system is displayed continuously for shorter periods of time over a long period of time. Displaying dark images after -image lagging. Most...
...the screen will not disappear completely. • The energy save function can be temporary or permanent. 01 Important User Guidance Information CAUTION Panel sticking and after-image lag • Displaying the same images such as permanent image retention or burn-in may occur. This image ... of these viewing modes repeatedly within a short period of the still images and the time they will disappear when moving video. This plasma display system is displayed continuously for shorter periods of time over a long period of time. Displaying dark images after -image lagging. Most...
Owner's Manual
Page 9
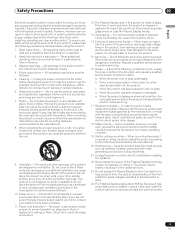
... safety checks to fall , resulting in the cabinet are not sure of the type of time. The screen may be followed. 5. The Plasma Display weighs about 39.8 kg. All warnings on a cart, it . When relocating the product placed on the product and in proper operating... sources - Observe warnings - Follow instructions - Power source - Do not expose the Plasma Display to prevent people from stepping on them . English 9 En Keep this product is made of the front protection panel changes, resulting in an enclosed place such as a bookcase or rack, unless proper ...
... safety checks to fall , resulting in the cabinet are not sure of the type of time. The screen may be followed. 5. The Plasma Display weighs about 39.8 kg. All warnings on a cart, it . When relocating the product placed on the product and in proper operating... sources - Observe warnings - Follow instructions - Power source - Do not expose the Plasma Display to prevent people from stepping on them . English 9 En Keep this product is made of the front protection panel changes, resulting in an enclosed place such as a bookcase or rack, unless proper ...
Owner's Manual
Page 11
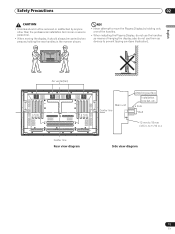
... Side view diagram 11 En to prevent tipping over (see illustration). NO! • Never attempt to move the Plasma Display by two persons holding only one of the handles. • When installing the Plasma Display, do not use the handles as devices to 11/16 in . also do not use them as...
... Side view diagram 11 En to prevent tipping over (see illustration). NO! • Never attempt to move the Plasma Display by two persons holding only one of the handles. • When installing the Plasma Display, do not use the handles as devices to 11/16 in . also do not use them as...

Owner's Manual
Page 14
... AUTO AV SIZE SETUP DISPLAY SELECTION 2 PC 8 3 INPUT 9 4 1 2 3 4 5 6 SPLIT SUB INPUT 5 VOLUME MUTING SWAP 6 10 11 12 RETURN 7 HOME MENU 13 ENTER AXD1534 14 15 PLASMA DISPLAY When handling the remote control unit • Do not drop the remote control unit or expose it to moisture. • Do not use the...
... AUTO AV SIZE SETUP DISPLAY SELECTION 2 PC 8 3 INPUT 9 4 1 2 3 4 5 6 SPLIT SUB INPUT 5 VOLUME MUTING SWAP 6 10 11 12 RETURN 7 HOME MENU 13 ENTER AXD1534 14 15 PLASMA DISPLAY When handling the remote control unit • Do not drop the remote control unit or expose it to moisture. • Do not use the...

Owner's Manual
Page 15
...2 Terminal for Service Adjustments (used for factory setup) Never connect any component to these connectors without first consulting your Pioneer installation technician. These connectors are used for Plasma Display setup adjustments. 3 CONTROL IN/OUT terminals 4 INPUT1 terminal (DVI-D) 5 INPUT2 terminal (HDMI) 6 INPUT3 ...impedance of 8 Ω to an AC outlet. 12 SPEAKER (L) terminals For connection of an external right speaker. Part Names Connection panel R SPEAKER 8+Ω ~16Ω- 1 SERVICE ONLY CONTROL IN OUT 2 3 INPUT1 DVI-D INPUT2 HDMI INPUT3 HDMI 4 56 INPUT4...
...2 Terminal for Service Adjustments (used for factory setup) Never connect any component to these connectors without first consulting your Pioneer installation technician. These connectors are used for Plasma Display setup adjustments. 3 CONTROL IN/OUT terminals 4 INPUT1 terminal (DVI-D) 5 INPUT2 terminal (HDMI) 6 INPUT3 ...impedance of 8 Ω to an AC outlet. 12 SPEAKER (L) terminals For connection of an external right speaker. Part Names Connection panel R SPEAKER 8+Ω ~16Ω- 1 SERVICE ONLY CONTROL IN OUT 2 3 INPUT1 DVI-D INPUT2 HDMI INPUT3 HDMI 4 56 INPUT4...
Owner's Manual
Page 16
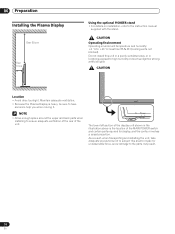
... Operating environment temperature and humidity: +0 ˚C to the instruction manual supplied with the stand. Maintain adequate ventilation. • Because the Plasma Display is the location of the MAIN POWER switch and certain parts required for display, and the contour involves a raised projection. NOTE &#... display unit shown in locations exposed to the parts may result. 16 En 06 Preparation Preparation Installing the Plasma Display Over 50 cm Over 10 cm Using the optional PIONEER stand • For details on installation, refer to +40 ˚C; The lower left section of the...
... Operating environment temperature and humidity: +0 ˚C to the instruction manual supplied with the stand. Maintain adequate ventilation. • Because the Plasma Display is the location of the MAIN POWER switch and certain parts required for display, and the contour involves a raised projection. NOTE &#... display unit shown in locations exposed to the parts may result. 16 En 06 Preparation Preparation Installing the Plasma Display Over 50 cm Over 10 cm Using the optional PIONEER stand • For details on installation, refer to +40 ˚C; The lower left section of the...

Owner's Manual
Page 17
....) 1. NOTE Use hooks, ropes, chains, and fittings that are available on a table or floor Using a wall for stabilization Stabilize the Plasma Display as earthquakes, or of accidents. Use strong cords or chains to stabilize it appropriately and firmly to a wall, pillar, or other fittings...Select the appropriate screws, hooks, chains, and other sturdy element. • Perform this work in . Preparation 06 English Preventing the Plasma Display from Falling Over After installing the stand, be sure to take the necessary safety measures to prevent it from overturning will vary ...
....) 1. NOTE Use hooks, ropes, chains, and fittings that are available on a table or floor Using a wall for stabilization Stabilize the Plasma Display as earthquakes, or of accidents. Use strong cords or chains to stabilize it appropriately and firmly to a wall, pillar, or other fittings...Select the appropriate screws, hooks, chains, and other sturdy element. • Perform this work in . Preparation 06 English Preventing the Plasma Display from Falling Over After installing the stand, be sure to take the necessary safety measures to prevent it from overturning will vary ...
Owner's Manual
Page 18
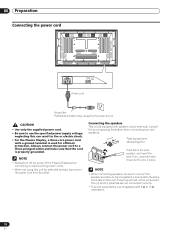
... protection. Then, close tab firmly to secure the wire in fire or electric shock. • For the Plasma Display, a three-core power cord with a ground terminal is equipped with 8 Ω to use of the Plasma Display when connecting or disconnecting power cords. • When not using this can result in place. Always...
... protection. Then, close tab firmly to secure the wire in fire or electric shock. • For the Plasma Display, a three-core power cord with a ground terminal is equipped with 8 Ω to use of the Plasma Display when connecting or disconnecting power cords. • When not using this can result in place. Always...
Owner's Manual
Page 20
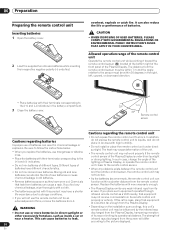
... pointing it . • Do not expose the remote control unit to liquids, and do not place in chemical leakage or explosion. The strength of the Plasma Display. 06 Preparation Preparing the remote control unit Inserting batteries 1 Open the battery cover. 2 Load the supplied two AA size batteries while inserting their terminals... addition, do not expose the remote control unit to shock. overheat, explode or catch fire. Chemicals that equipment at the bottom right of the front panel of near a heater.
... pointing it . • Do not expose the remote control unit to liquids, and do not place in chemical leakage or explosion. The strength of the Plasma Display. 06 Preparation Preparing the remote control unit Inserting batteries 1 Open the battery cover. 2 Load the supplied two AA size batteries while inserting their terminals... addition, do not expose the remote control unit to shock. overheat, explode or catch fire. Chemicals that equipment at the bottom right of the front panel of near a heater.
Owner's Manual
Page 21
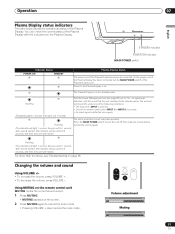
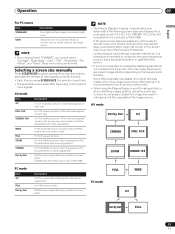
... +. • To decrease the volume, press VOLUME -. Power to turn back ON, under one minute before turning the unit on the Plasma Display. The Plasma Display is on page 38. after several repeats, the indicator will go out for 2.5 seconds, and then the cycle will repeat.) Flashing... 1 second, then go out for 1 second; The unit will repeat.) For other than the above, see Troubleshooting on . Operation 07 Operation Plasma Display status indicators The table below shows the operational status of the remote control unit's INPUT 1 to INPUT 6 is pressed; • An input...
... +. • To decrease the volume, press VOLUME -. Power to turn back ON, under one minute before turning the unit on the Plasma Display. The Plasma Display is on page 38. after several repeats, the indicator will go out for 2.5 seconds, and then the cycle will repeat.) Flashing... 1 second, then go out for 1 second; The unit will repeat.) For other than the above, see Troubleshooting on . Operation 07 Operation Plasma Display status indicators The table below shows the operational status of the remote control unit's INPUT 1 to INPUT 6 is pressed; • An input...
Owner's Manual
Page 22
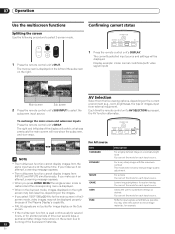
... press HOME MENU the single-screen mode is restored and the corresponding menu is used continuously for several hours, or for shorter periods of the Plasma Display's capability. MOVIE GAME • When in the 2-screen mode, images displayed on the right screen may remain on the Sub screen. • If the...
... press HOME MENU the single-screen mode is restored and the corresponding menu is used continuously for several hours, or for shorter periods of the Plasma Display's capability. MOVIE GAME • When in the 2-screen mode, images displayed on the right screen may remain on the Sub screen. • If the...
Owner's Manual
Page 23
...among the screen size options selectable for each side, and you cannot select "Contrast", "Brightness", "Color", "Tint", "Sharpness", "Pro Adjust", and "Reset"; NOTE • The Plasma Display's imaging characteristics may cause uneven wear. AV mode Item 4:3 FULL 14:9 CINEMA 14:9 WIDE FULL ZOOM CINEMA Dot by Dot ...(except when the input size is recommended to view full screen motion video. • When using the Plasma Display in a profit-making activity, or when exhibiting images publicly, using the screen size function to compress or stretch the image may appear...
...among the screen size options selectable for each side, and you cannot select "Contrast", "Brightness", "Color", "Tint", "Sharpness", "Pro Adjust", and "Reset"; NOTE • The Plasma Display's imaging characteristics may cause uneven wear. AV mode Item 4:3 FULL 14:9 CINEMA 14:9 WIDE FULL ZOOM CINEMA Dot by Dot ...(except when the input size is recommended to view full screen motion video. • When using the Plasma Display in a profit-making activity, or when exhibiting images publicly, using the screen size function to compress or stretch the image may appear...
Owner's Manual
Page 25
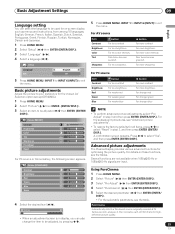
...following screen appears. Picture STANDARD Contrast 40 Brightness 0 Advanced picture adjustments The Plasma Display provides various advanced functions for high- Several functions are not available when 1080p@50 Hz or 1080p@60 Hz signals are input. Using PureCinema 1 Press ... "Reset" in step 3 and then press ENTER (ENTER/DISP.). Red Green Blue Reset 0 2 Select "Picture" ( / then ENTER (ENTER/DISP.)). 0 3 Select "Pro Adjust" ( / then ENTER (ENTER/DISP.)). 0 4 Select "PureCinema" ( / then ENTER (ENTER/DISP.)). 5 Select the desired parameter ( / then ENTER (ENTER/ DISP...
...following screen appears. Picture STANDARD Contrast 40 Brightness 0 Advanced picture adjustments The Plasma Display provides various advanced functions for high- Several functions are not available when 1080p@50 Hz or 1080p@60 Hz signals are input. Using PureCinema 1 Press ... "Reset" in step 3 and then press ENTER (ENTER/DISP.). Red Green Blue Reset 0 2 Select "Picture" ( / then ENTER (ENTER/DISP.)). 0 3 Select "Pro Adjust" ( / then ENTER (ENTER/DISP.)). 0 4 Select "PureCinema" ( / then ENTER (ENTER/DISP.)). 5 Select the desired parameter ( / then ENTER (ENTER/ DISP...

Owner's Manual
Page 29
...is detected for 8 minutes. 5 Press HOME MENU, INPUT 1 to INPUT 6 (INPUT) to exit the menu. Power Management The Plasma Display will be automatically placed into the standby mode if no signal is subsequently detected, the unit automatically turns ON. 5 Press HOME ...( / then ENTER (ENTER/DISP.)). 3 Select "Energy Save" ( / ). 4 Select "Save 1" or "Save 2" ( / ). Item Disable Enable Description Does not place the Plasma Display into the standby mode if no signal is received. 1 Press HOME MENU. 2 Select "Power Control" ( / then ENTER (ENTER/DISP.)). 3 Select "Power Management" ( / ...
...is detected for 8 minutes. 5 Press HOME MENU, INPUT 1 to INPUT 6 (INPUT) to exit the menu. Power Management The Plasma Display will be automatically placed into the standby mode if no signal is subsequently detected, the unit automatically turns ON. 5 Press HOME ...( / then ENTER (ENTER/DISP.)). 3 Select "Energy Save" ( / ). 4 Select "Save 1" or "Save 2" ( / ). Item Disable Enable Description Does not place the Plasma Display into the standby mode if no signal is received. 1 Press HOME MENU. 2 Select "Power Control" ( / then ENTER (ENTER/DISP.)). 3 Select "Power Management" ( / ...
Owner's Manual
Page 30
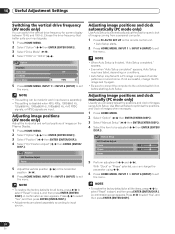
... adjusted ( / then ENTER (ENTER/ DISP.)). Adjusting image positions and clock automatically (PC mode only) Use Auto Setup to the unit and switch it on the Plasma Display. 1 Press HOME MENU. 2 Select "Option" ( / then ENTER (ENTER/DISP.)). 3 Select "Position" ( / then ENTER (ENTER/DISP.)). 4 Select "H/V Position Adjust" ( / then ENTER (ENTER/ DISP.)). NOTE •...
... adjusted ( / then ENTER (ENTER/ DISP.)). Adjusting image positions and clock automatically (PC mode only) Use Auto Setup to the unit and switch it on the Plasma Display. 1 Press HOME MENU. 2 Select "Option" ( / then ENTER (ENTER/DISP.)). 3 Select "Position" ( / then ENTER (ENTER/DISP.)). 4 Select "H/V Position Adjust" ( / then ENTER (ENTER/ DISP.)). NOTE •...

Owner's Manual
Page 32
On WIDE 32 En 10 Useful Adjustment Settings Selecting a screen size automatically (AV mode only) The Plasma Display automatically selects an appropriate screen size when video signals are received with "On" selected. Keeps the 4:3 aspect ratio ...ENTER (ENTER/DISP.)). 3 Select "Auto Size" ( / ). 4 Select "On" ( / ). Selecting a screen size for received 4:3 aspect ratio signals (AV mode only) Specify whether the Plasma Display should choose the 4:3 mode or WIDE mode when 4:3 aspect ratio signals are received from a connected HDMI equipment (see page 33). Option Position Auto Size...
On WIDE 32 En 10 Useful Adjustment Settings Selecting a screen size automatically (AV mode only) The Plasma Display automatically selects an appropriate screen size when video signals are received with "On" selected. Keeps the 4:3 aspect ratio ...ENTER (ENTER/DISP.)). 3 Select "Auto Size" ( / ). 4 Select "On" ( / ). Selecting a screen size for received 4:3 aspect ratio signals (AV mode only) Specify whether the Plasma Display should choose the 4:3 mode or WIDE mode when 4:3 aspect ratio signals are received from a connected HDMI equipment (see page 33). Option Position Auto Size...


