Owner's Manual
Page 2
... frequencies 18 Selecting stations from theft 9 - Attaching the front panel 9 Resetting the microprocessor 10 Switching the DSP setting mode 10 About the demo mode 10 - FUNCTION button and AUDIO button 12 What's What Head unit 13 Remote control 13 Basic Operations Turning the unit on CD TEXT discs 24 - Before You Start Information to operate your unit from the preset channel list 19 Tuning in strong signals 19 Built-in CD Player Playing a CD 20 Selecting a track directly 20 Introduction of advanced built-in CD player operation...
... frequencies 18 Selecting stations from theft 9 - Attaching the front panel 9 Resetting the microprocessor 10 Switching the DSP setting mode 10 About the demo mode 10 - FUNCTION button and AUDIO button 12 What's What Head unit 13 Remote control 13 Basic Operations Turning the unit on CD TEXT discs 24 - Before You Start Information to operate your unit from the preset channel list 19 Tuning in strong signals 19 Built-in CD Player Playing a CD 20 Selecting a track directly 20 Introduction of advanced built-in CD player operation...

Owner's Manual
Page 3
... folder 28 Displaying text information on CD TEXT discs 37 - Entering disc titles 35 - Selecting tracks from the preset channel list 44 SIRIUS Satellite Radio tuner Listening to XM Satellite Radio 42 Selecting an XM channel directly 42 Introduction of advanced SIRIUS tuner operation 46 En 3 Channel category select setting 44 Selecting stations from the track title list 37 Playing songs on iPod Listening to songs on iPod 39 Introduction of advanced iPod adapter operation 40 Repeating play 33 Playing tracks in...
... folder 28 Displaying text information on CD TEXT discs 37 - Entering disc titles 35 - Selecting tracks from the preset channel list 44 SIRIUS Satellite Radio tuner Listening to XM Satellite Radio 42 Selecting an XM channel directly 42 Introduction of advanced SIRIUS tuner operation 46 En 3 Channel category select setting 44 Selecting stations from the track title list 37 Playing songs on iPod Listening to songs on iPod 39 Introduction of advanced iPod adapter operation 40 Repeating play 33 Playing tracks in...

Owner's Manual
Page 4
... 67 Adjusting source levels 67 Auto TA and EQ (auto-time alignment and auto-equalizing) 68 Entering disc titles 54 Audio Adjustments Operation modes 55 - Adjustable parameters 60 - Adjusting low pass filter attenuation slope 63 Using the high pass filter 63 - Contents Switching the SIRIUS display 46 Switching the scroll setting 46 Storing and recalling broadcast stations 46 Selecting the SIRIUS channel select mode 47 - Adjusting the audio easily 55 - Adjusting the audio finely 55 4 En Standard mode 55 - Using subwoofer output 62 - Muting the speaker units (filters...
... 67 Adjusting source levels 67 Auto TA and EQ (auto-time alignment and auto-equalizing) 68 Entering disc titles 54 Audio Adjustments Operation modes 55 - Adjustable parameters 60 - Adjusting low pass filter attenuation slope 63 Using the high pass filter 63 - Contents Switching the SIRIUS display 46 Switching the scroll setting 46 Storing and recalling broadcast stations 46 Selecting the SIRIUS channel select mode 47 - Adjusting the audio easily 55 - Adjusting the audio finely 55 4 En Standard mode 55 - Using subwoofer output 62 - Muting the speaker units (filters...
Owner's Manual
Page 5
... Selecting the display language 71 Setting the clock 71 Switching the warning tone 72 Switching the face auto open 72 Switching the auxiliary setting 72 Switching the dimmer setting 72 Adjusting the brightness 73 Selecting the illumination color 73 Correcting distorted sound 73 Resetting the audio functions 73 Switching the sound muting/attenuation 73 Setting the internal power amplifier 74 Switching the feature demo 74 Switching the reverse mode 74 Switching the Ever Scroll 75 Other Functions Turning the clock display on or off 76 Using the AUX source...
... Selecting the display language 71 Setting the clock 71 Switching the warning tone 72 Switching the face auto open 72 Switching the auxiliary setting 72 Switching the dimmer setting 72 Adjusting the brightness 73 Selecting the illumination color 73 Correcting distorted sound 73 Resetting the audio functions 73 Switching the sound muting/attenuation 73 Setting the internal power amplifier 74 Switching the feature demo 74 Switching the reverse mode 74 Switching the Ever Scroll 75 Other Functions Turning the clock display on or off 76 Using the AUX source...
Owner's Manual
Page 8
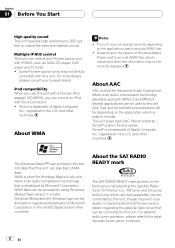
... used with IP-BUS, such as Multi-CD player, DVD player and TV tuner. ! WMA data can be encoded by Microsoft Corporation. Section 01 Before You Start High quality sound This unit features high performance DSP system to the satellite radio tuner owner's manual. 8 En Some Pioneer source units may not be used to encode WMA files. ! iPod is short for Advanced Audio Coding and refers to an audio compression technology standard used...
... used with IP-BUS, such as Multi-CD player, DVD player and TV tuner. ! WMA data can be encoded by Microsoft Corporation. Section 01 Before You Start High quality sound This unit features high performance DSP system to the satellite radio tuner owner's manual. 8 En Some Pioneer source units may not be used to encode WMA files. ! iPod is short for Advanced Audio Coding and refers to an audio compression technology standard used...
Owner's Manual
Page 14
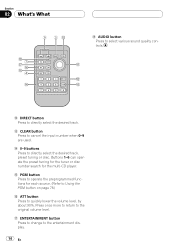
... the entertainment display. 14 En h ENTERTAINMENT button Press to change to directly select the desired track, preset tuning or disc. b c d c DIRECT button Press to quickly lower the volume level, by about 90%. Buttons 1-6 can operate the preset tuning for the tuner or disc number search for each source. (Refer to Using the PGM button on page 78.) g ATT button Press to directly select the desired track. f PGM button Press to operate the preprogrammed functions for the multi-CD player. d CLEAR button Press...
... the entertainment display. 14 En h ENTERTAINMENT button Press to change to directly select the desired track, preset tuning or disc. b c d c DIRECT button Press to quickly lower the volume level, by about 90%. Buttons 1-6 can operate the preset tuning for the tuner or disc number search for each source. (Refer to Using the PGM button on page 78.) g ATT button Press to directly select the desired track. f PGM button Press to operate the preprogrammed functions for the multi-CD player. d CLEAR button Press...
Owner's Manual
Page 24
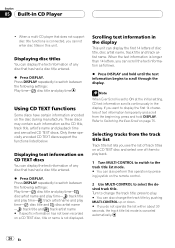
... play time Using CD TEXT functions Some discs have certain information encoded on the remote control. 2 Use MULTI-CONTROL to switch between the following settings: Play time- : disc title and play time- : disc artist name and play time- : track title and play time- : track artist name and play back. 1 Turn MULTI-CONTROL to switch to Switching the Ever Scroll on a CD TEXT disc, title or name is longer than 14 letters, you can also perform this unit. Press DISPLAY repeatedly to select...
... play time Using CD TEXT functions Some discs have certain information encoded on the remote control. 2 Use MULTI-CONTROL to switch between the following settings: Play time- : disc title and play time- : disc artist name and play time- : track title and play time- : track artist name and play back. 1 Turn MULTI-CONTROL to switch to Switching the Ever Scroll on a CD TEXT disc, title or name is longer than 14 letters, you can also perform this unit. Press DISPLAY repeatedly to select...

Owner's Manual
Page 57
... channel when left channel and right channel. 4 Adjust these functions as the source, you cannot switch to SLA. # When selecting TA OFF in TA1, you do not operate the audio function within about 30 seconds, the display is turned on /off)- Each pressing MULTI-CONTROL selects left /right independent mode has been selected. Audio Adjustments Section 13 English F/B (balance adjustment)-POSI (position selector)-TA1 (time alignment setting)-TA2 (time alignment adjusting)-LOUD (loudness) -EQ 1 (graphic equalizer...
... channel when left channel and right channel. 4 Adjust these functions as the source, you cannot switch to SLA. # When selecting TA OFF in TA1, you do not operate the audio function within about 30 seconds, the display is turned on /off)- Each pressing MULTI-CONTROL selects left /right independent mode has been selected. Audio Adjustments Section 13 English F/B (balance adjustment)-POSI (position selector)-TA1 (time alignment setting)-TA2 (time alignment adjusting)-LOUD (loudness) -EQ 1 (graphic equalizer...

Owner's Manual
Page 58
.... Each time MULTI-CONTROL is to clearly position the stereo image, putting you automatically adjust the speakers' output levels and inserts a delay time to match the number and position of the sound field. TA1 appears in the following order: 58 En Section 13 Audio Adjustments Using the position selector One way to assure a more natural sound is pushed up or down, the front/rear speaker balance moves...
.... Each time MULTI-CONTROL is to clearly position the stereo image, putting you automatically adjust the speakers' output levels and inserts a delay time to match the number and position of the sound field. TA1 appears in the following order: 58 En Section 13 Audio Adjustments Using the position selector One way to assure a more natural sound is pushed up or down, the front/rear speaker balance moves...

Owner's Manual
Page 63
... filter are outputted from the front or rear speakers, turn on , you do not want low sounds from the subwoofer output frequency range to select monaural and MONO appears in the display. Audio Adjustments Section 13 English 3 Push MULTI-CONTROL left or right to select stereo and Stereo appears in the display. Push MULTI-CONTROL right to select stereo or monaural. Adjusting subwoofer settings When the subwoofer output is on , you can mute front and rear speaker units (filters...
... filter are outputted from the front or rear speakers, turn on , you do not want low sounds from the subwoofer output frequency range to select monaural and MONO appears in the display. Audio Adjustments Section 13 English 3 Push MULTI-CONTROL left or right to select stereo and Stereo appears in the display. Push MULTI-CONTROL right to select stereo or monaural. Adjusting subwoofer settings When the subwoofer output is on , you can mute front and rear speaker units (filters...

Owner's Manual
Page 66
... control). 1 Use MULTI-CONTROL to select EQ 1. Adjusting 16-band graphic equalizer For Custom 1 and Custom 2 equalizer curves, you want to adjust. Flat-Custom 1-Custom 2 Adjusting equalizer curves The factory supplied equalizer curves, with all sources. If you make adjustments when a curve other than Custom 2 is selected, the equalizer curve settings will be made to the sound. A separate Custom 1 curve can be memorized in the display. 66 En Section 13 Audio Adjustments...
... control). 1 Use MULTI-CONTROL to select EQ 1. Adjusting 16-band graphic equalizer For Custom 1 and Custom 2 equalizer curves, you want to adjust. Flat-Custom 1-Custom 2 Adjusting equalizer curves The factory supplied equalizer curves, with all sources. If you make adjustments when a curve other than Custom 2 is selected, the equalizer curve settings will be made to the sound. A separate Custom 1 curve can be memorized in the display. 66 En Section 13 Audio Adjustments...

Owner's Manual
Page 68
... a power amp with input level control, auto TA and EQ may damage the speakers. When the reflected sound within a vehicle is not connected, auto TA and EQ cannot be carried out. (Refer to page 63.) ! When a speaker is connected to a subwoofer output.) - Section 13 Audio Adjustments Auto TA and EQ (auto-time alignment and autoequalizing) The auto-time alignment is automatically adjusted for the circumstances, so please continue to use this value. - The auto-equalizer...
... a power amp with input level control, auto TA and EQ may damage the speakers. When the reflected sound within a vehicle is not connected, auto TA and EQ cannot be carried out. (Refer to page 63.) ! When a speaker is connected to a subwoofer output.) - Section 13 Audio Adjustments Auto TA and EQ (auto-time alignment and autoequalizing) The auto-time alignment is automatically adjusted for the circumstances, so please continue to use this value. - The auto-equalizer...

Owner's Manual
Page 69
... EQ. # Press SOURCE to turn the source on if this unit is turned off. 4 Select the position for measurement. When connecting tweeters, please confirm the tweeter's usable frequency range. The front panel opens automatically. The graphic equalizer curve switches to Flat. (Refer to page 58.) - When you carry out auto TA and EQ when a previous setting of the driver's seat, facing forward, using the tweeter that...
... EQ. # Press SOURCE to turn the source on if this unit is turned off. 4 Select the position for measurement. When connecting tweeters, please confirm the tweeter's usable frequency range. The front panel opens automatically. The graphic equalizer curve switches to Flat. (Refer to page 58.) - When you carry out auto TA and EQ when a previous setting of the driver's seat, facing forward, using the tweeter that...
Owner's Manual
Page 71
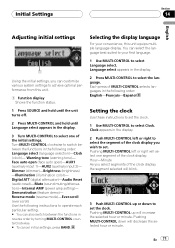
... 14 English Adjusting initial settings 1 Using the initial settings, you can also switch between the functions in the following order: Language select (language selection)-Clock (clock)- En 71 Face auto open (face auto open)-AUX1 (auxiliary input 1)-AUX2 (auxiliary input 2)- Digital ATT (digital attenuator)-Audio Reset (audio reset)-Mute (sound muting/attenuation)-Internal AMP (power amp setting)- You can select the language best suited to your convenience, this unit. 1 Function display Shows the function status. 1 Press SOURCE and hold until the unit turns off. 2 Press MULTI-CONTROL and...
... 14 English Adjusting initial settings 1 Using the initial settings, you can also switch between the functions in the following order: Language select (language selection)-Clock (clock)- En 71 Face auto open (face auto open)-AUX1 (auxiliary input 1)-AUX2 (auxiliary input 2)- Digital ATT (digital attenuator)-Audio Reset (audio reset)-Mute (sound muting/attenuation)-Internal AMP (power amp setting)- You can select the language best suited to your convenience, this unit. 1 Function display Shows the function status. 1 Press SOURCE and hold until the unit turns off. 2 Press MULTI-CONTROL and...
Owner's Manual
Page 76
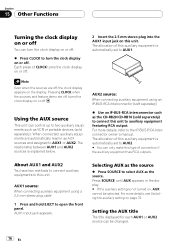
... Other Functions Turning the clock display on or off You can turn the clock display on or off. % Press CLOCK to turn the clock display on this unit. Each press of this unit. Note Even when the sources are automatically read in the display. # If the auxiliary setting is automatically set to two auxiliary equipments such as the CD-RB20/CD-RB10 (sold separately). AUX2 source: When connecting auxiliary equipment using a 2.5 mm stereo plug cable 1 Press and hold EJECT...
... Other Functions Turning the clock display on or off You can turn the clock display on or off. % Press CLOCK to turn the clock display on this unit. Each press of this unit. Note Even when the sources are automatically read in the display. # If the auxiliary setting is automatically set to two auxiliary equipments such as the CD-RB20/CD-RB10 (sold separately). AUX2 source: When connecting auxiliary equipment using a 2.5 mm stereo plug cable 1 Press and hold EJECT...
Owner's Manual
Page 79
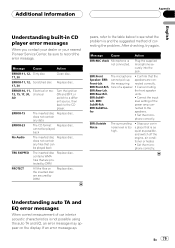
.... Cancel muting ERR:Rear-Lch, the front speaker ERR:Rear-Rch, units. ERR:Outside Noise The surrounding noise level is not connected. Stop your car in CD player error messages When you contact your dealer or your nearest Pioneer Service Center, be played back No Audio The inserted disc Replace disc. If an error message ap- Message Cause Action ERROR-11, 12, Dirty disc 17, 30 Clean disc. Set the micro- phone correctly. En...
.... Cancel muting ERR:Rear-Lch, the front speaker ERR:Rear-Rch, units. ERR:Outside Noise The surrounding noise level is not connected. Stop your car in CD player error messages When you contact your dealer or your nearest Pioneer Service Center, be played back No Audio The inserted disc Replace disc. If an error message ap- Message Cause Action ERROR-11, 12, Dirty disc 17, 30 Clean disc. Set the micro- phone correctly. En...
Other Manual
Page 1
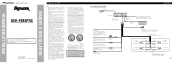
... through the blue/white lead. When connecting this lead separately from the vehicle for vehicles with ignition switch ON/OFF operations. If not, keep the Audio Mute lead free of any connections Yellow To terminal always supplied with this system, be highpower with insulating tape. INSTALLATION MANUAL OF OF DEH-P880PRS This product conforms to an external power amp's system remote control or the car's Auto-antenna relay control terminal...
... through the blue/white lead. When connecting this lead separately from the vehicle for vehicles with ignition switch ON/OFF operations. If not, keep the Audio Mute lead free of any connections Yellow To terminal always supplied with this system, be highpower with insulating tape. INSTALLATION MANUAL OF OF DEH-P880PRS This product conforms to an external power amp's system remote control or the car's Auto-antenna relay control terminal...

Other Manual
Page 2
... Auto-antenna relay control terminal (max. 300 mA 12 V DC). + Subwoofer ≠ + Subwoofer ≠ Perform this unit's internal amp is turned off. Connecting the Units Connection diagram for standard mode without internal amp Note: • If using this system, we recommend that this connection when using the optional amplifier. For more details, refer to Fig. 2.) White White/black Green Green/black Speaker leads Not used. Fig. 3 Power cable (For details, refer to operation manual...
... Auto-antenna relay control terminal (max. 300 mA 12 V DC). + Subwoofer ≠ + Subwoofer ≠ Perform this unit's internal amp is turned off. Connecting the Units Connection diagram for standard mode without internal amp Note: • If using this system, we recommend that this connection when using the optional amplifier. For more details, refer to Fig. 2.) White White/black Green Green/black Speaker leads Not used. Fig. 3 Power cable (For details, refer to operation manual...

Other Manual
Page 3
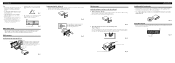
... system control terminal of the power amp or Auto-antenna relay control terminal (max. 300 mA 12 V DC). Middle range output (MID/FRONT OUTPUT) Connecting cords with RCA pin plugs (sold separately) Power amp (sold separately) Power amp (sold separately) Power amp (sold separately) Connection diagram for 3-way network mode with RCA pin plugs (sold separately) Power amp (sold separately) Power cable (For details, refer to Fig. 2.) System remote control Blue/white To system control terminal of the power amp or Auto-antenna relay control terminal...
... system control terminal of the power amp or Auto-antenna relay control terminal (max. 300 mA 12 V DC). Middle range output (MID/FRONT OUTPUT) Connecting cords with RCA pin plugs (sold separately) Power amp (sold separately) Power amp (sold separately) Power amp (sold separately) Connection diagram for 3-way network mode with RCA pin plugs (sold separately) Power amp (sold separately) Power cable (For details, refer to Fig. 2.) System remote control Blue/white To system control terminal of the power amp or Auto-antenna relay control terminal...
Other Manual
Page 4
... if there is set to the standard mode (STD). • After switching, reset the microprocessor. (Refer to operation manual.) • Use a thin standard tip screwdriver to remove the frame if the front panel is released. Frame Fig. 12 2. for instance, near a heater outlet. • If installation angle exceeds 60° from "Front" (conventional DIN Front-mount) or "Rear" (DIN Rear-mount installation, utilizing threaded screw...
... if there is set to the standard mode (STD). • After switching, reset the microprocessor. (Refer to operation manual.) • Use a thin standard tip screwdriver to remove the frame if the front panel is released. Frame Fig. 12 2. for instance, near a heater outlet. • If installation angle exceeds 60° from "Front" (conventional DIN Front-mount) or "Rear" (DIN Rear-mount installation, utilizing threaded screw...


