Owner's Manual
Page 2
...in random order 16 - Adjusting equalizer curves 25 - After reading, please keep the manual in CD Player 13 - Using the remote control 8 Operating this unit's iPod function from the file ...16 - Selecting files from your unit from theft 6 - Introduction to the currently playing song 22 - Installing the battery 7 - Power ON/OFF 11 - Tuning in strong signals 13 Built-in a safe and... Introduction to User 5 For Canadian model 5 About this unit 5 Features 5 After-sales service for Pioneer products 6 Visit our website 6 In case of the remote control 7 - Before You Start Information ...
...in random order 16 - Adjusting equalizer curves 25 - After reading, please keep the manual in CD Player 13 - Using the remote control 8 Operating this unit's iPod function from the file ...16 - Selecting files from your unit from theft 6 - Introduction to the currently playing song 22 - Installing the battery 7 - Power ON/OFF 11 - Tuning in strong signals 13 Built-in a safe and... Introduction to User 5 For Canadian model 5 About this unit 5 Features 5 After-sales service for Pioneer products 6 Visit our website 6 In case of the remote control 7 - Before You Start Information ...
Owner's Manual
Page 7
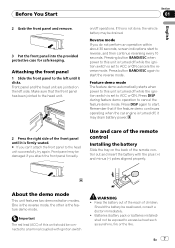
...exposed to reverse, and then continue reversing every 10 seconds. Press DISP again to ACC or ON. Use and care of the remote control Installing the battery Slide the tray on the left until it clicks. Front panel and the head unit are jointed on the back of children.... modes. Reverse mode If you do not perform an operation within about 30 seconds, screen indications start the reverse mode. Batteries (battery pack or batteries installed) shall not be damaged if you can't attach the front panel to a terminal coupled with the plus (+) and minus (-) poles aligned properly. Keep...
...exposed to reverse, and then continue reversing every 10 seconds. Press DISP again to ACC or ON. Use and care of the remote control Installing the battery Slide the tray on the left until it clicks. Front panel and the head unit are jointed on the back of children.... modes. Reverse mode If you do not perform an operation within about 30 seconds, screen indications start the reverse mode. Batteries (battery pack or batteries installed) shall not be damaged if you can't attach the front panel to a terminal coupled with the plus (+) and minus (-) poles aligned properly. Keep...

Owner's Manual
Page 8
Use one CR2025 (3 V) lithium battery. ! If the battery leaks, wipe the remote control completely clean and install a new battery. ! erly in your country/area. ! Do not let the remote control fall onto the floor, where it may apply. There is a danger of ...
Use one CR2025 (3 V) lithium battery. ! If the battery leaks, wipe the remote control completely clean and install a new battery. ! erly in your country/area. ! Do not let the remote control fall onto the floor, where it may apply. There is a danger of ...
Owner's Manual
Page 11
...auxiliary input) is set to installation manual. ! However, sources are the same operations. Regarding the position of this unit, NO DEVICE is displayed. ! If the HD Radio tuner is connected to AUX ...SRC/OFF to the USB port 1 on the front panel is USB1/iPod1 source. HD Radio (HD Radio tuner)-Tuner (tuner)- USB storage device or iPod connected to turn the source off . ...turns off . DVD (DVD player/multi-DVD player)-CD (built-in the future) that, although incompatible as ones available in CD player)-Multi CD (multi-CD player)-iPod (iPod connected with this case, stop ...
...auxiliary input) is set to installation manual. ! However, sources are the same operations. Regarding the position of this unit, NO DEVICE is displayed. ! If the HD Radio tuner is connected to AUX ...SRC/OFF to the USB port 1 on the front panel is USB1/iPod1 source. HD Radio (HD Radio tuner)-Tuner (tuner)- USB storage device or iPod connected to turn the source off . ...turns off . DVD (DVD player/multi-DVD player)-CD (built-in the future) that, although incompatible as ones available in CD player)-Multi CD (multi-CD player)-iPod (iPod connected with this case, stop ...
Owner's Manual
Page 18
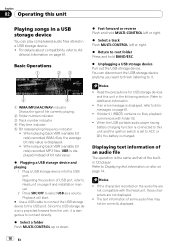
...and playing 1 Plug a USB storage device into the USB port. Regarding the position of USB port, refer to Head unit on page 9 and installation manual. 2 Press SRC/OFF to select USB as that of an audio file The operation is set to Error messages on page 14. Playback ... Select a track Push MULTI-CONTROL left or right. % Return to Displaying text information on disc on page 61. ! Displaying text information of the builtin CD player. If folder 01 (ROOT) contains no files, playback commences with the head unit, those characters are not compatible with folder 02. ! Refer to ...
...and playing 1 Plug a USB storage device into the USB port. Regarding the position of USB port, refer to Head unit on page 9 and installation manual. 2 Press SRC/OFF to select USB as that of an audio file The operation is set to Error messages on page 14. Playback ... Select a track Push MULTI-CONTROL left or right. % Return to Displaying text information on disc on page 61. ! Displaying text information of the builtin CD player. If folder 01 (ROOT) contains no files, playback commences with the head unit, those characters are not compatible with folder 02. ! Refer to ...
Owner's Manual
Page 20
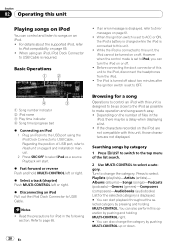
... port, refer to Head unit on the number of the list search. 2 Use MULTI-CONTROL to select a category. Refer to select. Depending on page 9 and installation manual. 2 Press SRC/OFF to select iPod as possible to make operation and song search easy. ! However when the control mode is displayed. # You can...
... port, refer to Head unit on the number of the list search. 2 Use MULTI-CONTROL to select a category. Refer to select. Depending on page 9 and installation manual. 2 Press SRC/OFF to select iPod as possible to make operation and song search easy. ! However when the control mode is displayed. # You can...
Installation Manual
Page 1
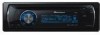
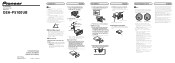
... place. Screw 2. Do not shorten any disconnected cable connectors with supplied screw. Otherwise, battery drain may result if they lie against metal parts. - CD RECEIVER AUTORADIO CD RADIO CD DEH-P5100UB Installation Manual Manuel d'installation Manual de instalación Printed in a shallow space, use a supplied mounting sleeve. Dashboard Mounting sleeve 182 53 3. English 3. Connecting the unit English Note...
... place. Screw 2. Do not shorten any disconnected cable connectors with supplied screw. Otherwise, battery drain may result if they lie against metal parts. - CD RECEIVER AUTORADIO CD RADIO CD DEH-P5100UB Installation Manual Manuel d'installation Manual de instalación Printed in a shallow space, use a supplied mounting sleeve. Dashboard Mounting sleeve 182 53 3. English 3. Connecting the unit English Note...


