Owner's Manual
Page 3
... Adjusting source levels 27 Initial Settings Adjusting initial settings 28 Selecting the display language 28 Setting the date 28 Setting the clock 28 Switching the warning tone 29 Switching the auxiliary setting 29 Switching the dimmer setting 29 Adjusting the brightness 29 Setting... unit 33 - Introduction to 6 keys 34 - Deleting a registered phone 43 - AUX1 source: 33 - Advanced operations 34 Turning the clock display on or off 34 Switching the display indication and button illumination 34 Using different entertainment displays 34 Available accessories Playing songs on a Bluetooth...
... Adjusting source levels 27 Initial Settings Adjusting initial settings 28 Selecting the display language 28 Setting the date 28 Setting the clock 28 Switching the warning tone 29 Switching the auxiliary setting 29 Switching the dimmer setting 29 Adjusting the brightness 29 Setting... unit 33 - Introduction to 6 keys 34 - Deleting a registered phone 43 - AUX1 source: 33 - Advanced operations 34 Turning the clock display on or off 34 Switching the display indication and button illumination 34 Using different entertainment displays 34 Available accessories Playing songs on a Bluetooth...
Owner's Manual
Page 9
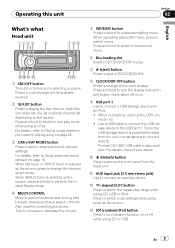
... while using tuner as the source, press and hold to switch to bass boost menu. 6 Disc loading slot Insert a CD/CD-R/CD-RW to play. 7 h (eject) button Press to eject a CD/CD-R/CD-RW. 8 CLOCK/DISP OFF button Press to change the channel select mode. Operating this unit Section 02 English What's what Head unit 1 ... details, refer to display the disc title list, track title list, folder list, file list or preset channel list depending on by selecting a source. Pioneer CD-U50E USB cable is turned on the source. c (repeat)/LOC button Press to switch the repeat play mode while using...
... while using tuner as the source, press and hold to switch to bass boost menu. 6 Disc loading slot Insert a CD/CD-R/CD-RW to play. 7 h (eject) button Press to eject a CD/CD-R/CD-RW. 8 CLOCK/DISP OFF button Press to change the channel select mode. Operating this unit Section 02 English What's what Head unit 1 ... details, refer to display the disc title list, track title list, folder list, file list or preset channel list depending on by selecting a source. Pioneer CD-U50E USB cable is turned on the source. c (repeat)/LOC button Press to switch the repeat play mode while using...
Owner's Manual
Page 28
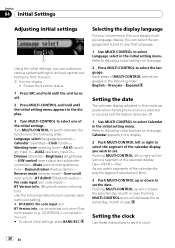
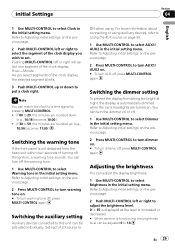
... Use MULTI-CONTROL to operate each particular setting. # BT AUDIO, Pin code input and BT Version info. Calendar (calendar)-Clock (clock)- can be selected only when Bluetooth adapter (e.g., CD-BTB200) is selected or sources and the feature demo are off . 2 Press MULTI-CONTROL and hold until the initial setting... menu appears in the display. 3 Turn MULTI-CONTROL to set the clock. 28 En You can select the language ...
... Use MULTI-CONTROL to operate each particular setting. # BT AUDIO, Pin code input and BT Version info. Calendar (calendar)-Clock (clock)- can be selected only when Bluetooth adapter (e.g., CD-BTB200) is selected or sources and the feature demo are off . 2 Press MULTI-CONTROL and hold until the initial setting... menu appears in the display. 3 Turn MULTI-CONTROL to set the clock. 28 En You can select the language ...
Owner's Manual
Page 29
...press MULTI-CONTROL again. Refer to turn AUX1/ AUX2 on the previous page. 2 Push MULTI-CONTROL left or right will select one segment of the clock display, the selected segment blinks. 3 Push MULTI-CONTROL up . (e.g., 10:36 becomes 11:00.) Switching the warning tone If the front panel is...off , press MULTI-CONTROL again. En 29 You can be activated individually. Switching the auxiliary setting Auxiliary devices connected to this unit can match the clock to 10. Refer to Adjusting initial settings on the previous page. 2 Press MULTI-CONTROL to turn dimmer on. # To turn AUX off . 1...
...press MULTI-CONTROL again. Refer to turn AUX1/ AUX2 on the previous page. 2 Push MULTI-CONTROL left or right will select one segment of the clock display, the selected segment blinks. 3 Push MULTI-CONTROL up . (e.g., 10:36 becomes 11:00.) Switching the warning tone If the front panel is...off , press MULTI-CONTROL again. En 29 You can be activated individually. Switching the auxiliary setting Auxiliary devices connected to this unit can match the clock to 10. Refer to Adjusting initial settings on the previous page. 2 Press MULTI-CONTROL to turn dimmer on. # To turn AUX off . 1...
Owner's Manual
Page 34
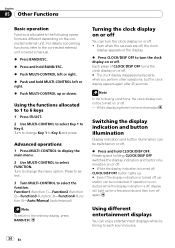
...illumination on or off. # While the display indication is turned off, operation can turn the clock display on or off again. Turn to change Key 1 to Key 6 and press. Turning the clock display on or off You can be conducted. Using different entertainment displays You can be switched on... the connected external unit's owner's manual. % Press BAND/ESC. % Press and hold BAND/ESC. % Push MULTI-CONTROL left or right. % Push and hold CLOCK/DISP OFF. For details concerning functions, refer to each sound source. 34 En Using the functions allocated to 1 to 6 keys 1 Press /LIST. 2 Use MULTI...
...illumination on or off. # While the display indication is turned off, operation can turn the clock display on or off again. Turn to change Key 1 to Key 6 and press. Turning the clock display on or off You can be conducted. Using different entertainment displays You can be switched on... the connected external unit's owner's manual. % Press BAND/ESC. % Press and hold BAND/ESC. % Push MULTI-CONTROL left or right. % Push and hold CLOCK/DISP OFF. For details concerning functions, refer to each sound source. 34 En Using the functions allocated to 1 to 6 keys 1 Press /LIST. 2 Use MULTI...
Owner's Manual
Page 40
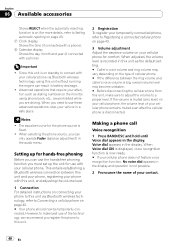
... of your cellular phone for more details, refer to Registering a connected cellular phone on page 43. 3 Volume adjustment Adjust the earpiece volume on page 47). 7 Clock display Shows the time (if connected with a phone). 8 Calendar display Shows the day, month and year (if connected with a phone). Voice dial appears in the...
... of your cellular phone for more details, refer to Registering a connected cellular phone on page 43. 3 Volume adjustment Adjust the earpiece volume on page 47). 7 Clock display Shows the time (if connected with a phone). 8 Calendar display Shows the day, month and year (if connected with a phone). Voice dial appears in the...

