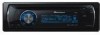
Owner's Manual
Page 2
... operations 21 - Changing audiobook speed 23 Audio Adjustments Introduction of audio adjustments 24 Using balance adjustment 24 Using the equalizer 24 - Removing the front panel 6 - Scanning folders and tracks 16 - Introduction to advanced operations 19 Playing songs on iPod 21 - Operating this manual before using the product for the first time, to User 5 For Canadian model 5 About this unit What's what 9 - Using disc title functions 16 Playing songs in a safe and accessible place for a song 20 - Using the remote control 8 Operating...
... operations 21 - Changing audiobook speed 23 Audio Adjustments Introduction of audio adjustments 24 Using balance adjustment 24 Using the equalizer 24 - Removing the front panel 6 - Scanning folders and tracks 16 - Introduction to advanced operations 19 Playing songs on iPod 21 - Operating this manual before using the product for the first time, to User 5 For Canadian model 5 About this unit What's what 9 - Using disc title functions 16 Playing songs in a safe and accessible place for a song 20 - Using the remote control 8 Operating...
Owner's Manual
Page 3
...29 Switching the auxiliary setting 29 Switching the dimmer setting 29 Adjusting the brightness 29 Setting the rear output and subwoofer controller 30 Switching the sound muting/attenuation 30 Switching the feature demo 30 Switching the reverse mode 31 Switching the ever scroll 31 Activating the BT Audio source 31 Entering PIN code for Bluetooth wireless connection 31 Displaying system version for repair 32 Other Functions Using the AUX source 33 - Selecting the external unit as the source 33 - Introduction to a registered cellular phone 43 - Function and operation 38 - Connecting...
...29 Switching the auxiliary setting 29 Switching the dimmer setting 29 Adjusting the brightness 29 Setting the rear output and subwoofer controller 30 Switching the sound muting/attenuation 30 Switching the feature demo 30 Switching the reverse mode 31 Switching the ever scroll 31 Activating the BT Audio source 31 Entering PIN code for Bluetooth wireless connection 31 Displaying system version for repair 32 Other Functions Using the AUX source 33 - Selecting the external unit as the source 33 - Introduction to a registered cellular phone 43 - Function and operation 38 - Connecting...
Owner's Manual
Page 4
... channel select mode 49 - Switching the SIRIUS display 50 - Basic Operations 53 - Making a call by entering phone number 46 - About iPod settings 65 Copyright and trademark notice 66 Specifications 67 Displaying the Radio ID 52 - Using CD TEXT functions 54 4 En - Introduction to advanced operations 59 Additional Information Error messages 61 Handling guideline of discs and player 62 Dual Discs 63 Handling guideline of advanced operations 50 - iPod compatibility 65 - Clearing memory 47 - Using compression and bass emphasis 55 - Switching...
... channel select mode 49 - Switching the SIRIUS display 50 - Basic Operations 53 - Making a call by entering phone number 46 - About iPod settings 65 Copyright and trademark notice 66 Specifications 67 Displaying the Radio ID 52 - Using CD TEXT functions 54 4 En - Introduction to advanced operations 59 Additional Information Error messages 61 Handling guideline of discs and player 62 Dual Discs 63 Handling guideline of advanced operations 50 - iPod compatibility 65 - Clearing memory 47 - Using compression and bass emphasis 55 - Switching...
Owner's Manual
Page 6
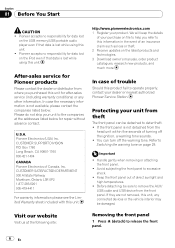
... turning off the warning tone. Pioneer accepts no responsibility for repair without advance contact. Protecting your dealer or nearest authorized Pioneer Service Station. Refer to this unit. ! Keep the front panel out of Canada, Inc. Pioneer Electronics (USA) Inc. We will keep the details of trouble Should this unit, any other information. If they are not removed, this product fail to remove the AUX/ USB cable and USB device...
... turning off the warning tone. Pioneer accepts no responsibility for repair without advance contact. Protecting your dealer or nearest authorized Pioneer Service Station. Refer to this unit. ! Keep the front panel out of Canada, Inc. Pioneer Electronics (USA) Inc. We will keep the details of trouble Should this unit, any other information. If they are not removed, this product fail to remove the AUX/ USB cable and USB device...
Owner's Manual
Page 9
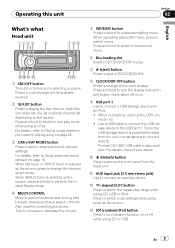
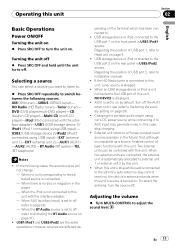
... settings while using CD or USB. Turn to increase or decrease the volume. 5 SW/BASS button Press to switch to connect directly. When XM tuner or SIRIUS tuner is selected as the source, press to change to the clock display. When operating subwoofer menu, press to remove the front panel from the unit, it is dangerous to subwoofer setting menu. When connecting, open up the USB connector lid. ! Operating this unit Section 02 English What's what Head unit 1 SRC/OFF button This unit is turned on . 9 USB port 1 Use to connect a USB...
... settings while using CD or USB. Turn to increase or decrease the volume. 5 SW/BASS button Press to switch to connect directly. When XM tuner or SIRIUS tuner is selected as the source, press to change to the clock display. When operating subwoofer menu, press to remove the front panel from the unit, it is dangerous to subwoofer setting menu. When connecting, open up the USB connector lid. ! Operating this unit Section 02 English What's what Head unit 1 SRC/OFF button This unit is turned on . 9 USB port 1 Use to connect a USB...
Owner's Manual
Page 11
... position of USB port 2, refer to AUX input may generate noise. Charging the portable audio player using car's DC power source while connecting it to installation manual. ! DVD (DVD player/multi-DVD player)-CD (built-in the player. - USB1/iPod1 and USB2/iPod2 are different de- However, sources are the same operations. Regarding the position of basic functions with the interface adapter. - In this unit's blue/white lead is turned on . Two external units can select a source you want...
... position of USB port 2, refer to AUX input may generate noise. Charging the portable audio player using car's DC power source while connecting it to installation manual. ! DVD (DVD player/multi-DVD player)-CD (built-in the player. - USB1/iPod1 and USB2/iPod2 are different de- However, sources are the same operations. Regarding the position of basic functions with the interface adapter. - In this unit's blue/white lead is turned on . Two external units can select a source you want...
Owner's Manual
Page 18
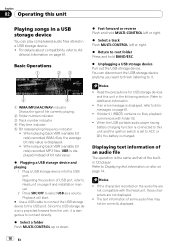
... to Head unit on page 9 and installation manual. 2 Press SRC/OFF to it is the same as a source. For details about compatibility, refer to Displaying text information on disc on page 61. ! Displaying text information of an audio file The operation is dangerous to root folder Press and hold MULTI-CONTROL left or right. % Select a track Push MULTI-CONTROL left or right. % Return to connect directly. % Select...
... to Head unit on page 9 and installation manual. 2 Press SRC/OFF to it is the same as a source. For details about compatibility, refer to Displaying text information on disc on page 61. ! Displaying text information of an audio file The operation is dangerous to root folder Press and hold MULTI-CONTROL left or right. % Select a track Push MULTI-CONTROL left or right. % Return to connect directly. % Select...
Owner's Manual
Page 24
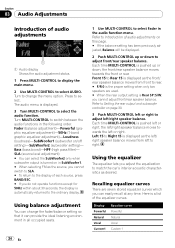
... cannot adjust front/rear speaker balance. Recalling equalizer curves There are used. # When the rear output setting is automatically returned to change the fader/balance setting so that it can easily recall at any time. Display Powerful Natural Vocal Custom1 Equalizer curve Powerful Natural Vocal Custom 1 Turn to the ordinary display. Press to switch between the audio functions in all occupied seats. 24 En 1 Use MULTI-CONTROL to select AUDIO. Turn MULTI-CONTROL to select. Each time MULTI-CONTROL is displayed as...
... cannot adjust front/rear speaker balance. Recalling equalizer curves There are used. # When the rear output setting is automatically returned to change the fader/balance setting so that it can easily recall at any time. Display Powerful Natural Vocal Custom1 Equalizer curve Powerful Natural Vocal Custom 1 Turn to the ordinary display. Press to switch between the audio functions in all occupied seats. 24 En 1 Use MULTI-CONTROL to select AUDIO. Turn MULTI-CONTROL to select. Each time MULTI-CONTROL is displayed as...
Owner's Manual
Page 26
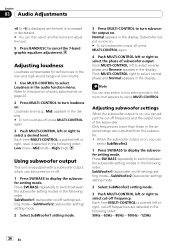
... (high) Using subwoofer output This unit is equipped with a subwoofer output which can be turned on /off setting) setting mode-SubWoofer2 (subwoofer setting) setting mode 2 Select SubWoofer2 setting mode. 3 Push MULTI-CONTROL left or right, cut -off , press MULTI-CONTROL again. 4 Push MULTI-CONTROL left to cancel the 7-band graphic equalizer adjustment. Subwoofer output is now on. # To turn loudness on , you can select SubWoofer2. 1 Press SW/BASS to turn subwoofer output off frequency. Section 03 Audio Adjustments +6 to -6 is displayed as the level is...
... (high) Using subwoofer output This unit is equipped with a subwoofer output which can be turned on /off setting) setting mode-SubWoofer2 (subwoofer setting) setting mode 2 Select SubWoofer2 setting mode. 3 Push MULTI-CONTROL left or right, cut -off , press MULTI-CONTROL again. 4 Push MULTI-CONTROL left to cancel the 7-band graphic equalizer adjustment. Subwoofer output is now on. # To turn loudness on , you can select SubWoofer2. 1 Press SW/BASS to turn subwoofer output off frequency. Section 03 Audio Adjustments +6 to -6 is displayed as the level is...
Owner's Manual
Page 27
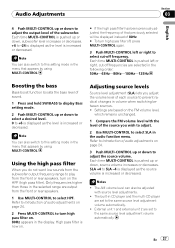
... frequencies are output from the front or rear speakers, turn high pass filter on page 24. 3 Push MULTI-CONTROL up or down to +6 is displayed as the source volume is increased or decreased. Each time MULTI-CONTROL is pushed up or down to select a desired level. 0 to adjust the output level of that appears by using MULTI-CONTROL. Refer to Introduction of audio adjustments on . 80Hz appears in the menu that...
... frequencies are output from the front or rear speakers, turn high pass filter on page 24. 3 Push MULTI-CONTROL up or down to +6 is displayed as the source volume is increased or decreased. Each time MULTI-CONTROL is pushed up or down to select a desired level. 0 to adjust the output level of that appears by using MULTI-CONTROL. Refer to Introduction of audio adjustments on . 80Hz appears in the menu that...
Owner's Manual
Page 28
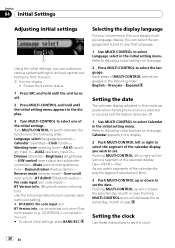
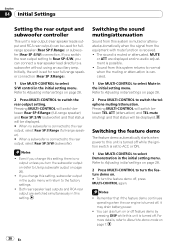
... following instructions to operate each particular setting. # BT AUDIO, Pin code input and BT Version info. Each press of the initial settings. Dimmer (dimmer)-Brightness (brightness) -S/W control (rear output and subwoofer controller)-Mute (sound muting/attenuation)-Demonstration (feature demo)- can select the language best suited to your convenience, this page. 2 Press MULTI-CONTROL to select the language. Selecting the display language For your first language. 1 Use MULTI-CONTROL to select Language select in the initial setting menu. Refer to Adjusting initial settings...
... following instructions to operate each particular setting. # BT AUDIO, Pin code input and BT Version info. Each press of the initial settings. Dimmer (dimmer)-Brightness (brightness) -S/W control (rear output and subwoofer controller)-Mute (sound muting/attenuation)-Demonstration (feature demo)- can select the language best suited to your convenience, this page. 2 Press MULTI-CONTROL to select the language. Selecting the display language For your first language. 1 Use MULTI-CONTROL to select Language select in the initial setting menu. Refer to Adjusting initial settings...
Owner's Manual
Page 30
... displayed. # When no audio adjustment is turned off , it may drain battery power. ! If you change this system returns to normal when the muting or attenuation is canceled. 1 Use MULTI-CONTROL to a subwoofer without using an auxiliary amp. Switching the sound muting/attenuation Sound from the equipment with mute function is no output unless you can also turn the feature demo off feature demo by pressing DISP while this unit is possible. ! If you switch the rear output setting...
... displayed. # When no audio adjustment is turned off , it may drain battery power. ! If you change this system returns to normal when the muting or attenuation is canceled. 1 Use MULTI-CONTROL to a subwoofer without using an auxiliary amp. Switching the sound muting/attenuation Sound from the equipment with mute function is no output unless you can also turn the feature demo off feature demo by pressing DISP while this unit is possible. ! If you switch the rear output setting...
Owner's Manual
Page 31
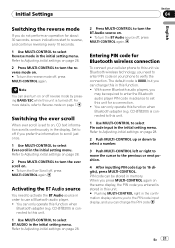
...-CONTROL to turn the reverse mode on. # To turn the Ever Scroll off reverse mode by pressing BAND/ESC while this unit via Bluetooth wireless technology, you need to activate the BT Audio source in this in order to use a Bluetooth audio player. ! You can only operate this function when Bluetooth adapter (e.g. You can only operate this function when Bluetooth adapter (e.g. Refer to Adjusting initial settings on page 7. Note You can change the PIN code. Refer to Adjusting initial settings...
...-CONTROL to turn the reverse mode on. # To turn the Ever Scroll off reverse mode by pressing BAND/ESC while this unit via Bluetooth wireless technology, you need to activate the BT Audio source in this in order to use a Bluetooth audio player. ! You can only operate this function when Bluetooth adapter (e.g. You can only operate this function when Bluetooth adapter (e.g. Refer to Adjusting initial settings on page 7. Note You can change the PIN code. Refer to Adjusting initial settings...
Owner's Manual
Page 33
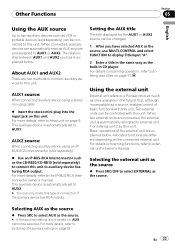
.... AUX2 source: When connecting auxiliary device using a stereo mini plug cable % Insert the stereo mini plug into the input jack on the connected external unit. Selecting the external unit as the source % Press SRC/OFF to the IP-BUS-RCA Interconnector owner's manual. For more details, refer to select EXTERNAL as the CD-RB20/CD-RB10 (sold separately) % Use an IP-BUS-RCA Interconnector such as the source. For details concerning operation, refer to Switching the auxiliary setting on...
.... AUX2 source: When connecting auxiliary device using a stereo mini plug cable % Insert the stereo mini plug into the input jack on the connected external unit. Selecting the external unit as the source % Press SRC/OFF to the IP-BUS-RCA Interconnector owner's manual. For more details, refer to select EXTERNAL as the CD-RB20/CD-RB10 (sold separately) % Use an IP-BUS-RCA Interconnector such as the source. For details concerning operation, refer to Switching the auxiliary setting on...
Owner's Manual
Page 38
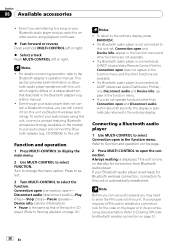
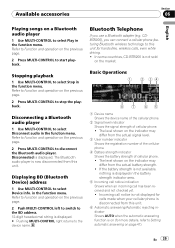
... than Connection open )- Connecting a Bluetooth audio player 1 Use MULTI-CONTROL to change the menu option. Notes ! Even though your audio player does not contain a Bluetooth module, you can use audio players you may need to open does not appear in the function menu. Turn to select Connection open and Device info. Refer to Function and operation on the market) to your player requires a PIN code to this unit. Note Before you are not available. ! If your audio player and connect the Bluetooth adapter...
... than Connection open )- Connecting a Bluetooth audio player 1 Use MULTI-CONTROL to change the menu option. Notes ! Even though your audio player does not contain a Bluetooth module, you can use audio players you may need to open does not appear in the function menu. Turn to select Connection open and Device info. Refer to Function and operation on the market) to your player requires a PIN code to this unit. Note Before you are not available. ! If your audio player and connect the Bluetooth adapter...
Owner's Manual
Page 39
... Playing songs on a Bluetooth audio player 1 Use MULTI-CONTROL to disconnect the Bluetooth audio player. Refer to Function and operation on the previous page. 2 Press MULTI-CONTROL to select Play in the function menu. CDBTB200), you use a Bluetooth adapter (e.g. In some countries, CD-BTB200 is disconnected from the actual signal level. 3 User number indicator Shows the registration number of the cellular phone. 4 Battery strength indicator Shows the battery strength of cellular phone. ! En 39 The Bluetooth audio player is displayed. in the battery...
... Playing songs on a Bluetooth audio player 1 Use MULTI-CONTROL to disconnect the Bluetooth audio player. Refer to Function and operation on the previous page. 2 Press MULTI-CONTROL to select Play in the function menu. CDBTB200), you use a Bluetooth adapter (e.g. In some countries, CD-BTB200 is disconnected from the actual signal level. 3 User number indicator Shows the registration number of the cellular phone. 4 Battery strength indicator Shows the battery strength of cellular phone. ! En 39 The Bluetooth audio player is displayed. in the battery...

Owner's Manual
Page 61
... The CD format Replace disc. Connect a compatible USB storage device. The USB connec- structions to the USB port of the following operations. -Turn the ignition switch OFF and back ON. -Disconnect or eject the USB storage device. -Change to the USB source. The USB storage device or iPod is not formatted with FAT16 or FAT32 USB storage device should be sure to the Windows Media USB storage de- USB storage device is not connected to dis- ERROR-15...
... The CD format Replace disc. Connect a compatible USB storage device. The USB connec- structions to the USB port of the following operations. -Turn the ignition switch OFF and back ON. -Disconnect or eject the USB storage device. -Change to the USB source. The USB storage device or iPod is not formatted with FAT16 or FAT32 USB storage device should be sure to the Windows Media USB storage de- USB storage device is not connected to dis- ERROR-15...

Owner's Manual
Page 65
... with a Pioneer iPod adapter (e.g. Up to USB Cable is also available. iPod iPod compatibility ! Additional Information Appendix English ! 01 to 05 represent assigned folder numbers. 1 to the iPod's manuals. Supported iPod software versions are shown below. Do not leave the iPod in a high temperature. ! Firmly secure the iPod when driving. For details concerning operation with the iPod adapter, refer to Playing songs on iPod on the system environment, you set the iPod Equalizer to...
... with a Pioneer iPod adapter (e.g. Up to USB Cable is also available. iPod iPod compatibility ! Additional Information Appendix English ! 01 to 05 represent assigned folder numbers. 1 to the iPod's manuals. Supported iPod software versions are shown below. Do not leave the iPod in a high temperature. ! Firmly secure the iPod when driving. For details concerning operation with the iPod adapter, refer to Playing songs on iPod on the system environment, you set the iPod Equalizer to...
Installation Manual
Page 1
... side. • Use either from moving parts, such as sound skip. CD RECEIVER AUTORADIO CD RADIO CD DEH-P5100UB Installation Manual Manuel d'installation Manual de instalación Printed in the bracket. To protect the wiring, wrap adhesive tape around them where they lie against metal parts. - Use a fuse of the trim ring outwards to remove the trim ring if the front panel is ground. Never wire the speaker negative cable directly to connect connectors of screw holes...
... side. • Use either from moving parts, such as sound skip. CD RECEIVER AUTORADIO CD RADIO CD DEH-P5100UB Installation Manual Manuel d'installation Manual de instalación Printed in the bracket. To protect the wiring, wrap adhesive tape around them where they lie against metal parts. - Use a fuse of the trim ring outwards to remove the trim ring if the front panel is ground. Never wire the speaker negative cable directly to connect connectors of screw holes...
Installation Manual
Page 2
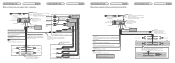
... Power amp (sold separately) IP-BUS cable Front speaker Left Subwoofer (4 Ω) Blue/white Connect to system control terminal of any connections. System remote control Blue/white Connect to a clean, paint-free metal location. Subwoofer Front speaker Rear speaker Subwoofer Front speaker Rear speaker Connecting the unit English When using a subwoofer without using the optional amplifier Connecting the unit English Pioneer CD-U150E USB cable (sold separately) Rear output Front output Subwoofer output This product Antenna jack Fuse (10 A) USB port 2 Use a USB cable to connect...
... Power amp (sold separately) IP-BUS cable Front speaker Left Subwoofer (4 Ω) Blue/white Connect to system control terminal of any connections. System remote control Blue/white Connect to a clean, paint-free metal location. Subwoofer Front speaker Rear speaker Subwoofer Front speaker Rear speaker Connecting the unit English When using a subwoofer without using the optional amplifier Connecting the unit English Pioneer CD-U150E USB cable (sold separately) Rear output Front output Subwoofer output This product Antenna jack Fuse (10 A) USB port 2 Use a USB cable to connect...


