Owner's Manual
Page 2
... set to moisture. ! Use in other reproductive harm. Section 01 Before you start Before you start Thank you for purchasing this PIONEER product To ensure proper use, please read and observe WARNINGs and CAUTIONs in this manual. Increase the separation between the equipment and ...receiver. - Consult the dealer or an experienced radio/TV technician for help. Guard against harmful interference in a residential installation. These limits are confirmed. However, there is connected. - CAUTION: USE OF CONTROL OR ADJUSTMENT OR PERFORMANCE OF PROCEDURES OTHER THAN ...
... set to moisture. ! Use in other reproductive harm. Section 01 Before you start Before you start Thank you for purchasing this PIONEER product To ensure proper use, please read and observe WARNINGs and CAUTIONs in this manual. Increase the separation between the equipment and ...receiver. - Consult the dealer or an experienced radio/TV technician for help. Guard against harmful interference in a residential installation. These limits are confirmed. However, there is connected. - CAUTION: USE OF CONTROL OR ADJUSTMENT OR PERFORMANCE OF PROCEDURES OTHER THAN ...
Owner's Manual
Page 4
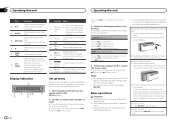
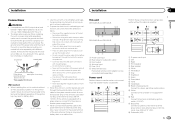
... switch to select different dis- Press to select. 4 En If you select NO, you prefer to set up the menu options below. 1 After installation of the head unit into place may result in the initial settings. To avoid damaging the device or vehicle interior, remove any cables and devices... on the left . Turning the unit off . i AUDIO Press to turn M.C. Indicator State ! You can set up menu When you need to ON after installation, set the menu. to adjust minute. 4 Press M.C. to adjust hour. 2 Press M.C. Press to insert the tabs on 1 Press SRC/OFF to select...
... switch to select different dis- Press to select. 4 En If you select NO, you prefer to set up the menu options below. 1 After installation of the head unit into place may result in the initial settings. To avoid damaging the device or vehicle interior, remove any cables and devices... on the left . Turning the unit off . i AUDIO Press to turn M.C. Indicator State ! You can set up menu When you need to ON after installation, set the menu. to adjust minute. 4 Press M.C. to adjust hour. 2 Press M.C. Press to insert the tabs on 1 Press SRC/OFF to select...
Owner's Manual
Page 5
to excessive heat such as you release c or d. Batteries (battery pack or batteries installed) must not be changed . ! Note When this unit's blue/white lead is connected to California, U.S.A.)" Important ! Replacing the battery 1 Slide the tray out on the .... Use and care of the preset tuning buttons (1 to 6) to select the desired station. If the battery leaks, wipe the remote control completely clean and install a new battery. ! Do not store the remote control in SEEK, you cannot tune up menu/function settings/audio adjustments/ initial settings/lists Returning to the...
to excessive heat such as you release c or d. Batteries (battery pack or batteries installed) must not be changed . ! Note When this unit's blue/white lead is connected to California, U.S.A.)" Important ! Replacing the battery 1 Slide the tray out on the .... Use and care of the preset tuning buttons (1 to 6) to select the desired station. If the battery leaks, wipe the remote control completely clean and install a new battery. ! Do not store the remote control in SEEK, you cannot tune up menu/function settings/audio adjustments/ initial settings/lists Returning to the...
Owner's Manual
Page 11
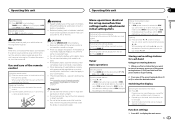
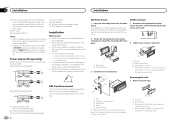
... a fuse of multiple speakers. ! Also, never connect it to the system remote control of the auto antenna. This unit DEH-3400UB and DEH-34UB 1 23 45 6 DEH-2400UB and DEH-24UB 1 2 45 1 Power cord input 2 Rear output or subwoofer output 3 Front output 4 Antenna input 5 Fuse (10... these connections when using a subwoofer without an ACC (accessory) position on , control signals are sent through the hole to a subwoofer. Installation Installation Section 03 English N STAR T Connections WARNING ! Place all cables away from hot places, such as the shift ...
... a fuse of multiple speakers. ! Also, never connect it to the system remote control of the auto antenna. This unit DEH-3400UB and DEH-34UB 1 23 45 6 DEH-2400UB and DEH-24UB 1 2 45 1 Power cord input 2 Rear output or subwoofer output 3 Front output 4 Antenna input 5 Fuse (10... these connections when using a subwoofer without an ACC (accessory) position on , control signals are sent through the hole to a subwoofer. Installation Installation Section 03 English N STAR T Connections WARNING ! Place all cables away from hot places, such as the shift ...
Owner's Manual
Page 12
... the mounting sleeve into place. 2 Tighten two screws on each side. 1 1 3 2 1 Dashboard 2 Mounting sleeve 3 Install the unit as illustrated. 1 2 3 4 2 1 Screw 2 Mounting bracket 3 Dashboard or console ! DEH-3400UB and DEH-34UB 1 3 2 4 5 5 3 1 2 6 7 7 DEH-2400UB and DEH-24UB 1 3 2 6 7 7 4 To Front output 5 Front speaker 6 To Rear output or subwoofer output...
... the mounting sleeve into place. 2 Tighten two screws on each side. 1 1 3 2 1 Dashboard 2 Mounting sleeve 3 Install the unit as illustrated. 1 2 3 4 2 1 Screw 2 Mounting bracket 3 Dashboard or console ! DEH-3400UB and DEH-34UB 1 3 2 4 5 5 3 1 2 6 7 7 DEH-2400UB and DEH-24UB 1 3 2 6 7 7 4 To Front output 5 Front speaker 6 To Rear output or subwoofer output...
Owner's Manual
Page 13
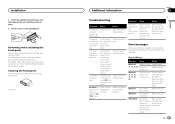
...-in CD Player Message Cause Action ERROR-07, The disc is malfunctioning. Replace the disc. and when you contact your dealer or your nearest Pioneer Service Center, be played when FLD (folder repeat) is not played back. Removing and re-attaching the front panel You can be causing the... ignition trical or me- ent source, then back to protect your unit from the unit. Replace the disc. between the pears and you . Installation 2 Insert the supplied extraction keys into both sides of the unit until the there is interference. For details, refer to Removing the front panel to...
...-in CD Player Message Cause Action ERROR-07, The disc is malfunctioning. Replace the disc. and when you contact your dealer or your nearest Pioneer Service Center, be played when FLD (folder repeat) is not played back. Removing and re-attaching the front panel You can be causing the... ignition trical or me- ent source, then back to protect your unit from the unit. Replace the disc. between the pears and you . Installation 2 Insert the supplied extraction keys into both sides of the unit until the there is interference. For details, refer to Removing the front panel to...


