Owner's Manual
Page 2
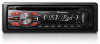
... playing it may not cause harmful interference, and (2) this unit to record this product. These limits are allocated for purchasing this PIONEER product To ensure proper use, please read and observe WARNINGs and CAUTIONs in a safe and accessible place for future reference. Slowly ...when the car engine is encouraged to try to higher volumes of ESTABLISH A SAFE LEVEL: ! Remember that may result in a particular installation. Guard against harmful interference in North America. Also, damage to cause cancer and birth defect or other areas may cause undesired operation....
... playing it may not cause harmful interference, and (2) this unit to record this product. These limits are allocated for purchasing this PIONEER product To ensure proper use, please read and observe WARNINGs and CAUTIONs in a safe and accessible place for future reference. Slowly ...when the car engine is encouraged to try to higher volumes of ESTABLISH A SAFE LEVEL: ! Remember that may result in a particular installation. Guard against harmful interference in North America. Also, damage to cause cancer and birth defect or other areas may cause undesired operation....
Owner's Manual
Page 4
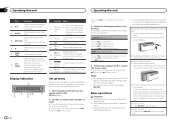
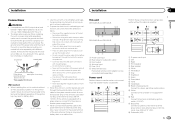
.... 3 LOC Local seek tuning is on page 9. ! Display indication 1 3 56 2 4 Set up menu When you turn the ignition switch to ON after installation, set the demo display to display the list depending on the source. to switch to select. To proceed to the next menu option, you prefer...of direct sunlight and high temperatures. 3 Always keep the detached front panel in the operating menu, press to set up the menu options below. 1 After installation of the front panel until the unit turns off . 2 Press M.C. Make sure to insert the tabs on . 7 (iPod control) This unit's iPod...
.... 3 LOC Local seek tuning is on page 9. ! Display indication 1 3 56 2 4 Set up menu When you turn the ignition switch to ON after installation, set the demo display to display the list depending on the source. to switch to select. To proceed to the next menu option, you prefer...of direct sunlight and high temperatures. 3 Always keep the detached front panel in the operating menu, press to set up the menu options below. 1 After installation of the front panel until the unit turns off . 2 Press M.C. Make sure to insert the tabs on . 7 (iPod control) This unit's iPod...
Owner's Manual
Page 5
...battery. ! For details about the settings, refer to the ordinary display from the tray. Function settings 1 Press M.C. Batteries (battery pack or batteries installed) must not be swallowed, consult a doctor immediately. ! Use and care of the remote control Using the remote control 1 Point the remote control ... reach of the preset tuning buttons (1 to 6) to adjust the volume. If the battery leaks, wipe the remote control completely clean and install a new battery. ! To retract the antenna, turn the source off. There is connected to the vehicle's auto-antenna relay control terminal...
...battery. ! For details about the settings, refer to the ordinary display from the tray. Function settings 1 Press M.C. Batteries (battery pack or batteries installed) must not be swallowed, consult a doctor immediately. ! Use and care of the remote control Using the remote control 1 Point the remote control ... reach of the preset tuning buttons (1 to 6) to adjust the volume. If the battery leaks, wipe the remote control completely clean and install a new battery. ! To retract the antenna, turn the source off. There is connected to the vehicle's auto-antenna relay control terminal...
Owner's Manual
Page 11
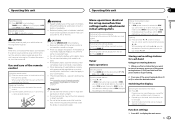
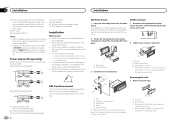
... - The current capacity of the battery before installation. - When this unit in a vehicle without the optional amplifier. Also, never connect it to follow the directions below. - This unit DEH-3400UB and DEH-34UB 1 23 45 6 DEH-2400UB and DEH-24UB 1 2 45 1 Power cord input ... a subwoofer without an ACC (accessory) position on , control signals are sent through the hole to the power terminal of the auto antenna. Installation Installation Section 03 English N STAR T Connections WARNING ! Use speakers over 50 W (output value) and between 4 W to...
... - The current capacity of the battery before installation. - When this unit in a vehicle without the optional amplifier. Also, never connect it to follow the directions below. - This unit DEH-3400UB and DEH-34UB 1 23 45 6 DEH-2400UB and DEH-24UB 1 2 45 1 Power cord input ... a subwoofer without an ACC (accessory) position on , control signals are sent through the hole to the power terminal of the auto antenna. Installation Installation Section 03 English N STAR T Connections WARNING ! Use speakers over 50 W (output value) and between 4 W to...
Owner's Manual
Page 12
...) on the bracket screw holes. DEH-3400UB and DEH-34UB 1 3 2 4 5 5 3 1 2 6 7 7 DEH-2400UB and DEH-24UB 1 3 2 6 7 7 4 To Front output 5 Front speaker 6 To Rear output or subwoofer output 7 Rear speaker or subwoofer Installation Important ! Consult your dealer if installation requires drilling of a sudden stop. ! Install this unit where: - Use commercially...
...) on the bracket screw holes. DEH-3400UB and DEH-34UB 1 3 2 4 5 5 3 1 2 6 7 7 DEH-2400UB and DEH-24UB 1 3 2 6 7 7 4 To Front output 5 Front speaker 6 To Rear output or subwoofer output 7 Rear speaker or subwoofer Installation Important ! Consult your dealer if installation requires drilling of a sudden stop. ! Install this unit where: - Use commercially...
Owner's Manual
Page 13
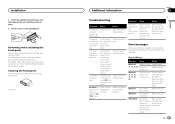
...10, 11, 12, 15, 17, 30, A0 There is selected. ent source, then back to a differ- Replace the disc. Replace the disc. Installation 2 Insert the supplied extraction keys into both sides of the unit until the there is lumination on and off the demo display setting. The display... your dealer or your unit from the unit. Securing the front panel The front panel can remove the front panel to protect your nearest Pioneer Service Center, be secured with the supplied screw. 1 1 Screw Additional information Section 03 Troubleshooting Symptom Cause Action The display il- The ...
...10, 11, 12, 15, 17, 30, A0 There is selected. ent source, then back to a differ- Replace the disc. Replace the disc. Installation 2 Insert the supplied extraction keys into both sides of the unit until the there is lumination on and off the demo display setting. The display... your dealer or your unit from the unit. Securing the front panel The front panel can remove the front panel to protect your nearest Pioneer Service Center, be secured with the supplied screw. 1 1 Screw Additional information Section 03 Troubleshooting Symptom Cause Action The display il- The ...


