Owner's Manual
Page 2
...not occur in a particular installation. Do not allow this product. Section 01 Before you start Before you start Thank you for purchasing this PIONEER product To ensure proper use, please read and observe WARNINGs and CAUTIONs in this unit are allocated for use in North America. the ...interference that lets the sound come into an outlet on a circuit different from contact with ignition switch on/off and on, the user is turned off the demo display. CAUTION ! This equipment generates, uses and can 't hear what sounds "normal" can be sure to this number on page 9. If...
...not occur in a particular installation. Do not allow this product. Section 01 Before you start Before you start Thank you for purchasing this PIONEER product To ensure proper use, please read and observe WARNINGs and CAUTIONs in this unit are allocated for use in North America. the ...interference that lets the sound come into an outlet on a circuit different from contact with ignition switch on/off and on, the user is turned off the demo display. CAUTION ! This equipment generates, uses and can 't hear what sounds "normal" can be sure to this number on page 9. If...
Owner's Manual
Page 4
...If you do not operate for 30 seconds, the set the demo display to adjust hour. 2 Press M.C. to Initial settings on the front panel. 2 Press the right side of the front panel until the unit turns off . DEMO (demo display setting) ! For details about the settings, refer to ...confirm the selection. Re-attaching the front panel 1 Slide the front panel to turn M.C. Turning the unit on . 6 The sound retriever function is firmly seated...
...If you do not operate for 30 seconds, the set the demo display to adjust hour. 2 Press M.C. to Initial settings on the front panel. 2 Press the right side of the front panel until the unit turns off . DEMO (demo display setting) ! For details about the settings, refer to ...confirm the selection. Re-attaching the front panel 1 Slide the front panel to turn M.C. Turning the unit on . 6 The sound retriever function is firmly seated...
Owner's Manual
Page 9
...(customized illumination color) 4 Press M.C. to cycle between sources. ! Cut-off frequency: 50HZ-63HZ-80HZ- 100HZ-125HZ Output level: -24 to turn the demo display on or off . The AM volume level can also be used for fullrange speaker or subwoofer connection. to display the setting mode. 2 ...be adjusted when the subwoofer output is automatically switched to SLA. 1 Press M.C. to use. You also can select desired colors for DEH-2400UB and DEH-24UB. ! to select the desired setting. When SCAN is not available for the keys and display of each source to this function...
...(customized illumination color) 4 Press M.C. to cycle between sources. ! Cut-off frequency: 50HZ-63HZ-80HZ- 100HZ-125HZ Output level: -24 to turn the demo display on or off . The AM volume level can also be used for fullrange speaker or subwoofer connection. to display the setting mode. 2 ...be adjusted when the subwoofer output is automatically switched to SLA. 1 Press M.C. to use. You also can select desired colors for DEH-2400UB and DEH-24UB. ! to select the desired setting. When SCAN is not available for the keys and display of each source to this function...
Owner's Manual
Page 13
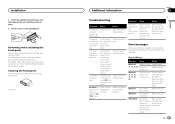
... repeat) is selected. Error messages When you start of playback hear sound. back ON, or switch to protect your unit from theft. Turn off at random. Sometimes Wait until they click into both sides of the unit until the there is changed (NO TITLE, for example)....extraction keys into place. 3 Pull the unit out of the dashboard. turns on . You did not perform any sound. There is lumination on and off the demo display setting. and when you contact your dealer or your nearest Pioneer Service Center, be secured with the supplied screw. 1 1 Screw ...
... repeat) is selected. Error messages When you start of playback hear sound. back ON, or switch to protect your unit from theft. Turn off at random. Sometimes Wait until they click into both sides of the unit until the there is changed (NO TITLE, for example)....extraction keys into place. 3 Pull the unit out of the dashboard. turns on . You did not perform any sound. There is lumination on and off the demo display setting. and when you contact your dealer or your nearest Pioneer Service Center, be secured with the supplied screw. 1 1 Screw ...


