Owner's Manual
Page 2
... Consult the dealer or an experienced radio/TV technician for use , please read and observe WARNINGs and CAUTIONs in a particular installation. These limits are designed to correct the interference by setting your equipment at a safe level-a level that lets the sound come into... or temporarily discontinue use in a safe and accessible place for a Class B digital device, pursuant to record this PIONEER product To ensure proper use in a residential installation. WARNING Handling the cord on this unit, smoke, and overheating could result. CAUTION ! Demo mode Important ! Sound...
... Consult the dealer or an experienced radio/TV technician for use , please read and observe WARNINGs and CAUTIONs in a particular installation. These limits are designed to correct the interference by setting your equipment at a safe level-a level that lets the sound come into... or temporarily discontinue use in a safe and accessible place for a Class B digital device, pursuant to record this PIONEER product To ensure proper use in a residential installation. WARNING Handling the cord on this unit, smoke, and overheating could result. CAUTION ! Demo mode Important ! Sound...
Owner's Manual
Page 4
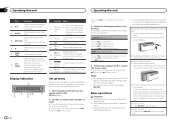
... M.C. While in - Tuner: band and frequency Main dis- ! Display indication 1 3 56 2 4 Set up menu When you turn the ignition switch to ON after installation, set up at this time, turn M.C. to select. # If you do not operate for 30 seconds, the set up menu. 3 Perform the following procedures to...function. For details about the settings, refer to Initial settings on the source. You can set up the menu options below. 1 After installation of the head unit into place may result in the initial settings. Keep the front panel out of the front panel until the unit turns...
... M.C. While in - Tuner: band and frequency Main dis- ! Display indication 1 3 56 2 4 Set up menu When you turn the ignition switch to ON after installation, set up at this time, turn M.C. to select. # If you do not operate for 30 seconds, the set up menu. 3 Perform the following procedures to...function. For details about the settings, refer to Initial settings on the source. You can set up the menu options below. 1 After installation of the head unit into place may result in the initial settings. Keep the front panel out of the front panel until the unit turns...
Owner's Manual
Page 5
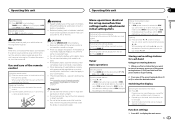
... d, and then release. Should the battery be exposed to SEEK (left /right key setting) on the area. Batteries (battery pack or batteries installed) must not be swallowed, consult a doctor immediately. ! CAUTION For safety reasons, park your country/area. ! Note When this unit's source is...environmental public institutions' rules that you cannot tune up or down manually. If the battery leaks, wipe the remote control completely clean and install a new battery. ! When disposing of explosion if the battery is selected in SEEK. "Perchlorate Material - See www.dtsc.ca.gov...
... d, and then release. Should the battery be exposed to SEEK (left /right key setting) on the area. Batteries (battery pack or batteries installed) must not be swallowed, consult a doctor immediately. ! CAUTION For safety reasons, park your country/area. ! Note When this unit's source is...environmental public institutions' rules that you cannot tune up or down manually. If the battery leaks, wipe the remote control completely clean and install a new battery. ! When disposing of explosion if the battery is selected in SEEK. "Perchlorate Material - See www.dtsc.ca.gov...
Owner's Manual
Page 11
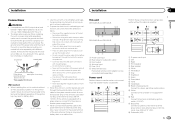
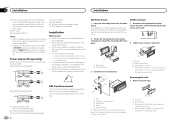
... shorten any other devices. The current capacity of the rating prescribed. - When this unit or any cables. - This unit DEH-3400UB and DEH-34UB 1 23 45 6 DEH-2400UB and DEH-24UB 1 2 45 1 Power cord input 2 Rear output or subwoofer output 3 Front output 4 Antenna input 5 Fuse (10...or a malfunction. Wrap adhesive tape around wiring that comes into contact with different screws. Use a fuse of the cable is ground. Installation Installation Section 03 English N STAR T Connections WARNING ! Do not use 1 W to metal parts of this unit ...
... shorten any other devices. The current capacity of the rating prescribed. - When this unit or any cables. - This unit DEH-3400UB and DEH-34UB 1 23 45 6 DEH-2400UB and DEH-24UB 1 2 45 1 Power cord input 2 Rear output or subwoofer output 3 Front output 4 Antenna input 5 Fuse (10...or a malfunction. Wrap adhesive tape around wiring that comes into contact with different screws. Use a fuse of the cable is ground. Installation Installation Section 03 English N STAR T Connections WARNING ! Do not use 1 W to metal parts of this unit ...
Owner's Manual
Page 12
... REAR-SP (rear output setting) on page 9. Refer to PREOUT (preout setting) on page 9. Install this unit away from hot places such as this unit. DEH-3400UB and DEH-34UB 1 3 2 4 5 5 3 1 2 6 7 7 DEH-2400UB and DEH-24UB 1 3 2 6 7 7 4 To Front output 5 Front speaker 6 To Rear output or subwoofer output...
... REAR-SP (rear output setting) on page 9. Refer to PREOUT (preout setting) on page 9. Install this unit away from hot places such as this unit. DEH-3400UB and DEH-34UB 1 3 2 4 5 5 3 1 2 6 7 7 DEH-2400UB and DEH-24UB 1 3 2 6 7 7 4 To Front output 5 Front speaker 6 To Rear output or subwoofer output...
Owner's Manual
Page 13
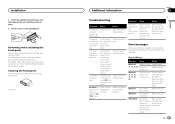
...when a display is Replace the disc. There is an elec- ERROR-07, 10, 11, 12, 15, 17, 30, A0 There is interference. Installation 2 Insert the supplied extraction keys into place. 3 Pull the unit out of the dashboard. turns on . ERROR-15 ERROR-23 FRMT READ The inserted... on Select the repeat the repeat play play range. Removing and re-attaching the front panel You can be sure to protect your nearest Pioneer Service Center, be secured with the supplied screw. 1 1 Screw Additional information Section 03 Troubleshooting Symptom Cause Action The display il- Demo ...
...when a display is Replace the disc. There is an elec- ERROR-07, 10, 11, 12, 15, 17, 30, A0 There is interference. Installation 2 Insert the supplied extraction keys into place. 3 Pull the unit out of the dashboard. turns on . ERROR-15 ERROR-23 FRMT READ The inserted... on Select the repeat the repeat play play range. Removing and re-attaching the front panel You can be sure to protect your nearest Pioneer Service Center, be secured with the supplied screw. 1 1 Screw Additional information Section 03 Troubleshooting Symptom Cause Action The display il- Demo ...


