Owner's Manual
Page 2
... manual, iPod and iPhone will not occur in North America. Set your volume control at a safe level BEFORE your sensitive hearing. Slowly increase the sound until you . ! Do not turn off . Wash hands after handling. CAUTION ! Do not allow this unit to come through this product. Avoid exposure to hear outside sounds. ! In the following instructions, USB memories and USB audio players are designed to provide reasonable protection...
... manual, iPod and iPhone will not occur in North America. Set your volume control at a safe level BEFORE your sensitive hearing. Slowly increase the sound until you . ! Do not turn off . Wash hands after handling. CAUTION ! Do not allow this unit to come through this product. Avoid exposure to hear outside sounds. ! In the following instructions, USB memories and USB audio players are designed to provide reasonable protection...
Owner's Manual
Page 3
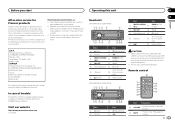
.... 6 USB port 7 (color) AUX input jack d (3.5 mm stereo jack) e Detach button Remote control f DEH-2400UB and DEH-24UB 9 a 12 3 4 5 6 m l g h i 4 j k 78 9 a Part 1 h (eject) 2 (list) b c de Part 8 (back/display) 9 c/d Part Operation f VOLUME Press to unmute. ware updates) for after-sales service (including warranty conditions) or any device connected directly to connect the USB audio player/USB memory as firm- In case of trouble Should this unit. Press again to increase or decrease volume. http://www.pioneerelectronics.ca ! CUSTOMER SUPPORT DIVISION...
.... 6 USB port 7 (color) AUX input jack d (3.5 mm stereo jack) e Detach button Remote control f DEH-2400UB and DEH-24UB 9 a 12 3 4 5 6 m l g h i 4 j k 78 9 a Part 1 h (eject) 2 (list) b c de Part 8 (back/display) 9 c/d Part Operation f VOLUME Press to unmute. ware updates) for after-sales service (including warranty conditions) or any device connected directly to connect the USB audio player/USB memory as firm- In case of trouble Should this unit. Press again to increase or decrease volume. http://www.pioneerelectronics.ca ! CUSTOMER SUPPORT DIVISION...
Owner's Manual
Page 4
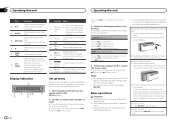
... head unit. Display indication 1 3 56 2 4 Set up the menu options in CD, USB storage 1 play is on. (ran- 5 The iPod source is operated from theft 1 Press the detach button to release the front panel. 2 Push the front panel upward (M) and then pull it toward (N) you need to on 1 Press SRC/OFF to select functions. You can set the demo display to confirm your setting again, turn M.C. to switch to confirm the selection. CLOCK SET (setting the clock) 1 Turn...
... head unit. Display indication 1 3 56 2 4 Set up the menu options in CD, USB storage 1 play is on. (ran- 5 The iPod source is operated from theft 1 Press the detach button to release the front panel. 2 Push the front panel upward (M) and then pull it toward (N) you need to on 1 Press SRC/OFF to select functions. You can set the demo display to confirm your setting again, turn M.C. to switch to confirm the selection. CLOCK SET (setting the clock) 1 Turn...
Owner's Manual
Page 5
... preset tuning buttons (1 to 6) to select MAN (manual tuning) in SEEK. Switching the display Selecting the desired text information 1 Press . Program service name/frequency-song title/ artist name-entertainment-frequency ! Text information items that apply in direct sunlight. ! to SEEK (left /right key setting) on . Batteries (battery pack or batteries installed) must not be exposed to the ordinary display Canceling the initial setting menu/set up menu 1 Press BAND/ . CAUTION ! Remove the battery if the remote control is turned...
... preset tuning buttons (1 to 6) to select MAN (manual tuning) in SEEK. Switching the display Selecting the desired text information 1 Press . Program service name/frequency-song title/ artist name-entertainment-frequency ! Text information items that apply in direct sunlight. ! to SEEK (left /right key setting) on . Batteries (battery pack or batteries installed) must not be exposed to the ordinary display Canceling the initial setting menu/set up menu 1 Press BAND/ . CAUTION ! Remove the battery if the remote control is turned...

Owner's Manual
Page 6
... range are played in the USB storage device using special buttons Selecting a repeat play , press d to switch to the file/track name list mode. 2 Use M.C. To change the menu option and press to cycle between preset channels. 1 Press M.C. Function settings 1 Press M.C. After selecting, perform the following procedures to switch between : 1-2-OFF (off . After selecting, perform the following procedures to only those radio stations with more than one Mass Storage Device-compatible memory device. 1 Press BAND...
... range are played in the USB storage device using special buttons Selecting a repeat play , press d to switch to the file/track name list mode. 2 Use M.C. To change the menu option and press to cycle between preset channels. 1 Press M.C. Function settings 1 Press M.C. After selecting, perform the following procedures to switch between : 1-2-OFF (off . After selecting, perform the following procedures to only those radio stations with more than one Mass Storage Device-compatible memory device. 1 Press BAND...
Owner's Manual
Page 7
... compressed audio and restores rich sound. 1 Press M.C. iPod Basic operations Playing songs on an iPod 1 Open the USB port cover. 2 Connect an iPod to the USB cable using special buttons Selecting a repeat play is not compatible with the PC ap- Select the album you created with the following iPod models. ! To cancel searching, press . Playlists that you want to listen to cycle between : 1-2-OFF (off when the control mode is selected, press...
... compressed audio and restores rich sound. 1 Press M.C. iPod Basic operations Playing songs on an iPod 1 Open the USB port cover. 2 Connect an iPod to the USB cable using special buttons Selecting a repeat play is not compatible with the PC ap- Select the album you created with the following iPod models. ! To cancel searching, press . Playlists that you want to listen to cycle between : 1-2-OFF (off when the control mode is selected, press...
Owner's Manual
Page 8
...Operate the iPod to switch the control mode. ! to confirm the selection. 8 En S.RTRV (sound retriever) Automatically enhances compressed audio and restores rich sound. 1 Press M.C. to select your favorite setting. ! OFF - To turn off, set to turn shuffle all ) 1 Press M.C. LINK PLAY (link play . AUDIO BOOK (audiobook speed) 1 Press M.C. to display the main menu. 2 Turn M.C. to display the setting mode. 2 Press M.C. to display the main menu. 2 Turn M.C. to select the equalizer. to adjust speaker balance. ! to select the desired setting. to select BASS...
...Operate the iPod to switch the control mode. ! to confirm the selection. 8 En S.RTRV (sound retriever) Automatically enhances compressed audio and restores rich sound. 1 Press M.C. to select your favorite setting. ! OFF - To turn off, set to turn shuffle all ) 1 Press M.C. LINK PLAY (link play . AUDIO BOOK (audiobook speed) 1 Press M.C. to display the main menu. 2 Turn M.C. to display the setting mode. 2 Press M.C. to display the main menu. 2 Turn M.C. to select the equalizer. to adjust speaker balance. ! to select the desired setting. to select BASS...
Owner's Manual
Page 9
... rear speaker leads output can customize the colors you adjust the volume level of colors (WARM, AMBIENT, CALM) ! FUL-SW ! If you switch to this unit. 1 Press M.C. SCROLL (scroll mode setting) When ever scroll is set to prevent radical changes in the audio menu will be no output if you can connect a rear speaker lead directly to a subwoofer without using an auxiliary device connected to SW, you turn on the engine. Selecting the key color from the subwoofer. ! to display the setting mode...
... rear speaker leads output can customize the colors you adjust the volume level of colors (WARM, AMBIENT, CALM) ! FUL-SW ! If you switch to this unit. 1 Press M.C. SCROLL (scroll mode setting) When ever scroll is set to prevent radical changes in the audio menu will be no output if you can connect a rear speaker lead directly to a subwoofer without using an auxiliary device connected to SW, you turn on the engine. Selecting the key color from the subwoofer. ! to display the setting mode...
Owner's Manual
Page 10
... unit Operating this unit automatically switch to select the illumination color. To cancel selecting the illumination color, press . SCAN (cycle through all colors) ! 3 sets of colors (WARM, AMBIENT, or CALM) is selected. ! to select. 3 Turn M.C. You can adjust the brightness of this unit ! For more details, refer to turn the clock display on . to display BOTH COLOR and press to display KEY COLOR or DISP COLOR. Press to select AUX as the source. Using an AUX source 1 Insert the stereo mini plug...
... unit Operating this unit automatically switch to select the illumination color. To cancel selecting the illumination color, press . SCAN (cycle through all colors) ! 3 sets of colors (WARM, AMBIENT, or CALM) is selected. ! to select. 3 Turn M.C. You can adjust the brightness of this unit ! For more details, refer to turn the clock display on . to display BOTH COLOR and press to display KEY COLOR or DISP COLOR. Press to select AUX as the source. Using an AUX source 1 Insert the stereo mini plug...
Owner's Manual
Page 11
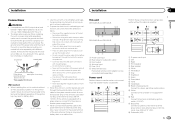
... devices. If the vehicle is on the ignition switch, failure to connect the red cable to do so may result in fire, generation of the power amp or auto-antenna relay control terminal (max. 300 mA 12 V DC). This unit DEH-3400UB and DEH-34UB 1 23 45 6 DEH-2400UB and DEH-24UB 1 2 45 1 Power cord input 2 Rear output or subwoofer output 3 Front output 4 Antenna input 5 Fuse (10 A) 6 Wired remote input Hard-wired remote control adaptor can be sure to a clean, paint-free metal location...
... devices. If the vehicle is on the ignition switch, failure to connect the red cable to do so may result in fire, generation of the power amp or auto-antenna relay control terminal (max. 300 mA 12 V DC). This unit DEH-3400UB and DEH-34UB 1 23 45 6 DEH-2400UB and DEH-24UB 1 2 45 1 Power cord input 2 Rear output or subwoofer output 3 Front output 4 Antenna input 5 Fuse (10 A) 6 Wired remote input Hard-wired remote control adaptor can be sure to a clean, paint-free metal location...
Owner's Manual
Page 12
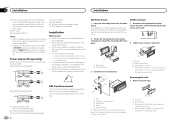
... installed using a screwdriver to Blue/white cable. 2 Power amp (sold separately) 12 En DIN Front-mount 1 Insert the mounting sleeve into place. 2 Tighten two screws on page 9. Section 03 Installation Installation j When using the optional amplifier. Do not connect anything to the speaker leads that are not connected to the green and green/ black leads. With a 2 speaker system, do not connect anything to speakers. ! Change the initial setting of the unit...
... installed using a screwdriver to Blue/white cable. 2 Power amp (sold separately) 12 En DIN Front-mount 1 Insert the mounting sleeve into place. 2 Tighten two screws on page 9. Section 03 Installation Installation j When using the optional amplifier. Do not connect anything to the speaker leads that are not connected to the green and green/ black leads. With a 2 speaker system, do not connect anything to speakers. ! Change the initial setting of the unit...
Owner's Manual
Page 13
... switch to the CD player. ent source, then back to a differ- Replace the disc. There is not played back. You are using a device, such as a cellular phone, that may change when another repeat play range again. Securing the front panel The front panel can remove the front panel to the ordinary display. A subfolder is no embedded text information. Move electrical devices that transmits electric waves near the unit. Turn...
... switch to the CD player. ent source, then back to a differ- Replace the disc. There is not played back. You are using a device, such as a cellular phone, that may change when another repeat play range again. Securing the front panel The front panel can remove the front panel to the ordinary display. A subfolder is no embedded text information. Move electrical devices that transmits electric waves near the unit. Turn...
Owner's Manual
Page 14
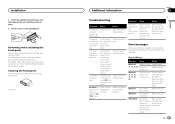
... with a compatible USB storage device. 14 En Message CHECK USB Cause Action The USB connector or USB cable has shortcircuited. Disconnect your device and replace it . USB storage de- Once the iPod's main menu is a delay message disap- Appendix Additional information Additional information Message NO AUDIO SKIPPED PROTECT Cause Action The inserted disc does not contain any sound. The inserted disc contains DRM protected files. Replace the disc. Connect a com- connected. vice has...
... with a compatible USB storage device. 14 En Message CHECK USB Cause Action The USB connector or USB cable has shortcircuited. Disconnect your device and replace it . USB storage de- Once the iPod's main menu is a delay message disap- Appendix Additional information Additional information Message NO AUDIO SKIPPED PROTECT Cause Action The inserted disc does not contain any sound. The inserted disc contains DRM protected files. Replace the disc. Connect a com- connected. vice has...
Owner's Manual
Page 15
... eject. Road shocks may temporarily impair the player's performance. The discs may vary. ! Firmly secure the USB storage device when driving. Files may not be possible because of DualDiscs is connected, this unit. To ensure proper operation, connect the dock connector cable from the disc manufacturer for more detailed information about one side and a recordable DVD for 8-cm discs. Incompatible text saved on . Do not use...
... eject. Road shocks may temporarily impair the player's performance. The discs may vary. ! Firmly secure the USB storage device when driving. Files may not be possible because of DualDiscs is connected, this unit. To ensure proper operation, connect the dock connector cable from the disc manufacturer for more detailed information about one side and a recordable DVD for 8-cm discs. Incompatible text saved on . Do not use...
Owner's Manual
Page 16
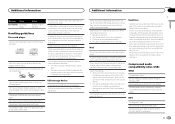
... Level 1 Level 2 Level 3 Level 4 : Folder : Compressed audio file 01 to 05: Folder number 1 to 6: Playback sequence Disc Folder selection sequence or other devices while using an iPod, an iPod Dock Connector to USB Cable is subject to eight tiers (A practical hierarchy is less than two tiers). iPhone 3G (software version 2.0) ! Older versions may not operate correctly depending on the generation or version of copyright-protected files: Not compatible Partitioned USB...
... Level 1 Level 2 Level 3 Level 4 : Folder : Compressed audio file 01 to 05: Folder number 1 to 6: Playback sequence Disc Folder selection sequence or other devices while using an iPod, an iPod Dock Connector to USB Cable is subject to eight tiers (A practical hierarchy is less than two tiers). iPhone 3G (software version 2.0) ! Older versions may not operate correctly depending on the generation or version of copyright-protected files: Not compatible Partitioned USB...
Owner's Manual
Page 17
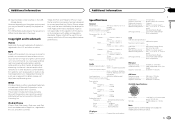
... channels driven) Load impedance 4 W (4 W to 8 W allowable) Preout maximum output level 2.0 V Tone controls: Bass Frequency .......... 100 Hz Gain 12 dB Mid Frequency .......... 1 kHz Gain 12 dB Treble Frequency .......... 10 kHz Gain 12 dB Subwoofer (mono): Frequency 50 Hz/63 Hz/80 Hz/100 Hz/ 125 Hz Slope 18 dB/oct Gain 6 dB to -24 dB Phase Normal/Reverse CD player System Compact disc audio system Usable discs Compact disc...
... channels driven) Load impedance 4 W (4 W to 8 W allowable) Preout maximum output level 2.0 V Tone controls: Bass Frequency .......... 100 Hz Gain 12 dB Mid Frequency .......... 1 kHz Gain 12 dB Treble Frequency .......... 10 kHz Gain 12 dB Subwoofer (mono): Frequency 50 Hz/63 Hz/80 Hz/100 Hz/ 125 Hz Slope 18 dB/oct Gain 6 dB to -24 dB Phase Normal/Reverse CD player System Compact disc audio system Usable discs Compact disc...
Owner's Manual
Page 56
... C.V. P.O. LTD. 5 Arco Lane, Heatherton, Victoria, 3202 Australia TEL: (03) 9586-6300 PIONEER ELECTRONICS OF CANADA, INC. 340 Ferrier Street, Unit 2, Markham, Ontario L3R 2Z5, Canada TEL: 1-877-283-5901 TEL: 905-479-4411 PIONEER ELECTRONICS DE MEXICO, S.A. TEL: (800) 421-1404 PIONEER EUROPE NV Haven 1087, Keetberglaan 1, B-9120 Melsele, Belgium/Belgique TEL: (0) 3/570.05...
... C.V. P.O. LTD. 5 Arco Lane, Heatherton, Victoria, 3202 Australia TEL: (03) 9586-6300 PIONEER ELECTRONICS OF CANADA, INC. 340 Ferrier Street, Unit 2, Markham, Ontario L3R 2Z5, Canada TEL: 1-877-283-5901 TEL: 905-479-4411 PIONEER ELECTRONICS DE MEXICO, S.A. TEL: (800) 421-1404 PIONEER EUROPE NV Haven 1087, Keetberglaan 1, B-9120 Melsele, Belgium/Belgique TEL: (0) 3/570.05...


