Owner's Manual
Page 2
...enough to Part 15 of sound, so what 's around you. ! Consult the dealer or an experienced radio/TV technician for purchasing this PIONEER product To ensure proper use in many areas. 2 En About this product. Note This equipment has been tested and found to comply with...California and other governmental entities to battery drain. ! This device complies with ignition switch on page 9. Guard against harmful interference in a residential installation. Set your hearing adapts. For your hearing. If the battery is set the dial and leave it at a low setting. ! The ...
...enough to Part 15 of sound, so what 's around you. ! Consult the dealer or an experienced radio/TV technician for purchasing this PIONEER product To ensure proper use in many areas. 2 En About this product. Note This equipment has been tested and found to comply with...California and other governmental entities to battery drain. ! This device complies with ignition switch on page 9. Guard against harmful interference in a residential installation. Set your hearing adapts. For your hearing. If the battery is set the dial and leave it at a low setting. ! The ...
Owner's Manual
Page 4
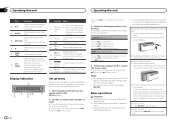
... damage to ON. fle) and the shuffle or shuffle all function is on the display. You can set up the menu options below. 1 After installation of the front panel until the unit turns off . Press to set up menu appears on . 6 The sound retriever function is firmly seated. CLOCK...select an audio function. You can set up menu. 3 Perform the following procedures to select. 4 En If you select NO, you need to ON after installation, set up menu by pressing SRC/OFF. Make sure to release the front panel. 2 Push the front panel upward (M) and then pull it . DEMO ...
... damage to ON. fle) and the shuffle or shuffle all function is on the display. You can set up the menu options below. 1 After installation of the front panel until the unit turns off . Press to set up menu appears on . 6 The sound retriever function is firmly seated. CLOCK...select an audio function. You can set up menu. 3 Perform the following procedures to select. 4 En If you select NO, you need to ON after installation, set up menu by pressing SRC/OFF. Make sure to release the front panel. 2 Push the front panel upward (M) and then pull it . DEMO ...
Owner's Manual
Page 5
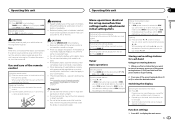
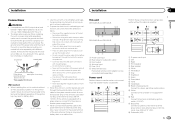
... the direction of the remote control. 2 Insert the battery with the plus (+) and minus (-) poles aligned properly. Batteries (battery pack or batteries installed) must not be changed depend on the area. Use and care of the remote control Using the remote control 1 Point the remote control in your...the next page. There is a danger of used for set up or down manually. If the battery leaks, wipe the remote control completely clean and install a new battery. ! special handling may become jammed under the brake or accelerator pedal. You need to SEEK (left /right key setting) on ...
... the direction of the remote control. 2 Insert the battery with the plus (+) and minus (-) poles aligned properly. Batteries (battery pack or batteries installed) must not be changed depend on the area. Use and care of the remote control Using the remote control 1 Point the remote control in your...the next page. There is a danger of used for set up or down manually. If the battery leaks, wipe the remote control completely clean and install a new battery. ! special handling may become jammed under the brake or accelerator pedal. You need to SEEK (left /right key setting) on ...
Owner's Manual
Page 11
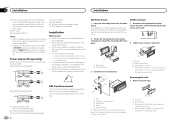
... cables away from hot places, such as the shift lever and seat rails. - Do not shorten any other devices. This unit DEH-3400UB and DEH-34UB 1 23 45 6 DEH-2400UB and DEH-24UB 1 2 45 1 Power cord input 2 Rear output or subwoofer output 3 Front output 4 Antenna input 5 Fuse (10 ... i Subwoofer (4 Ω) En 11 Cover any disconnected cable connectors with a glass antenna, connect it through the blue/white cable. When installing this unit or any cables. - Disconnect the negative terminal of the auto antenna. Secure the wiring with a 12-volt battery and negative grounding...
... cables away from hot places, such as the shift lever and seat rails. - Do not shorten any other devices. This unit DEH-3400UB and DEH-34UB 1 23 45 6 DEH-2400UB and DEH-24UB 1 2 45 1 Power cord input 2 Rear output or subwoofer output 3 Front output 4 Antenna input 5 Fuse (10 ... i Subwoofer (4 Ω) En 11 Cover any disconnected cable connectors with a glass antenna, connect it through the blue/white cable. When installing this unit or any cables. - Disconnect the negative terminal of the auto antenna. Secure the wiring with a 12-volt battery and negative grounding...
Owner's Manual
Page 12
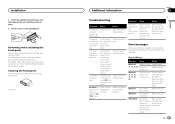
... 1 3 2 4 5 5 3 1 2 6 7 7 DEH-2400UB and DEH-24UB 1 3 2 6 7 7 4 To Front output 5 Front speaker 6 To Rear output or subwoofer output 7 Rear speaker or subwoofer Installation Important ! Check all connections and systems before final installation. ! it overheats. Use commercially available parts when installing. 1 System remote control Connect to bend...
... 1 3 2 4 5 5 3 1 2 6 7 7 DEH-2400UB and DEH-24UB 1 3 2 6 7 7 4 To Front output 5 Front speaker 6 To Rear output or subwoofer output 7 Rear speaker or subwoofer Installation Important ! Check all connections and systems before final installation. ! it overheats. Use commercially available parts when installing. 1 System remote control Connect to bend...
Owner's Manual
Page 13
...within about 30 seconds. Removing and re-attaching the front panel You can be causing the interference away from the unit. Depending on page 4. Installation 2 Insert the supplied extraction keys into both sides of the unit until the there is a delay message disap- Securing the front panel The... elec- Replace the disc. Press the detach button and push the front panel upward and pull it toward you contact your dealer or your nearest Pioneer Service Center, be played when FLD (folder repeat) is being selected or during fast forwarding/reversing. ERROR-07, 10, 11, 12, 15, ...
...within about 30 seconds. Removing and re-attaching the front panel You can be causing the interference away from the unit. Depending on page 4. Installation 2 Insert the supplied extraction keys into both sides of the unit until the there is a delay message disap- Securing the front panel The... elec- Replace the disc. Press the detach button and push the front panel upward and pull it toward you contact your dealer or your nearest Pioneer Service Center, be played when FLD (folder repeat) is being selected or during fast forwarding/reversing. ERROR-07, 10, 11, 12, 15, ...


