
Owner's Manual
Page 1
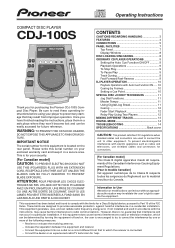
...the rear panel. To prevent electromagnetic interference with the limits for purchasing the Pioneer CDJ-100S Compact Disc Player. However, there is located on your enclosed warranty card and keep it ...CONNECTIONS 5 PANEL FACILITIES 7 Top Panel 7 Display Window 8 DISC LOADING/UNLOADING 8 ORDINARY CD PLAYER OPERATIONS 9 Setting the Auto Cue Function ON/OFF 9 Playback Operations 9 To Stop Play 9 To Pause... Play 9 Track Cueing 9 Fast-Forward/Fast-Reverse 9 DJ PLAYER OPERATION 10 Playback Operations with the instructions, may invalidate the user's right to ...
...the rear panel. To prevent electromagnetic interference with the limits for purchasing the Pioneer CDJ-100S Compact Disc Player. However, there is located on your enclosed warranty card and keep it ...CONNECTIONS 5 PANEL FACILITIES 7 Top Panel 7 Display Window 8 DISC LOADING/UNLOADING 8 ORDINARY CD PLAYER OPERATIONS 9 Setting the Auto Cue Function ON/OFF 9 Playback Operations 9 To Stop Play 9 To Pause... Play 9 Track Cueing 9 Fast-Forward/Fast-Reverse 9 DJ PLAYER OPERATION 10 Playback Operations with the instructions, may invalidate the user's right to ...
Owner's Manual
Page 4
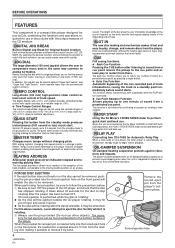
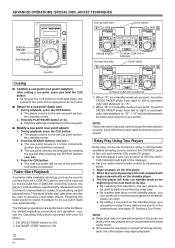
... function (JET, ZIP, WAH). RELAY PLAY Connecting two CDJ-100S for Original Sound Creation Each of digital medium enabling track speed to be sure to follow the precautions below. 1 Be sure to turn OFF the power of the player. When performing forced ejection, be changed with the clamp unstable... component is a compact disc player designed for use by DJs, combining the functions and operations required for use in disco clubs with the fingertips allows you to find the precise entry point for tracks, moving needle position on an analog record. Normal CD players require up to one -frame...
... function (JET, ZIP, WAH). RELAY PLAY Connecting two CDJ-100S for Original Sound Creation Each of digital medium enabling track speed to be sure to follow the precautions below. 1 Be sure to turn OFF the power of the player. When performing forced ejection, be changed with the clamp unstable... component is a compact disc player designed for use by DJs, combining the functions and operations required for use in disco clubs with the fingertips allows you to find the precise entry point for tracks, moving needle position on an analog record. Normal CD players require up to one -frame...

Owner's Manual
Page 5
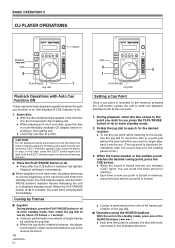
AUDIO OUTPUT CONNECTION A Stereo amplifier connection (without DJ mixer) Make sure that the white plugs are connected to the left (L) jacks and the red plugs to the CD or AUX input jacks. BEFORE OPERATIONS CONNECTIONS ÷ Before making or changing the connections... the PHONO jacks CDJ-100S Audio cable (accessory) B When using the DJ mixer DJM-300 CDJ-100S Audio cable (accessory) C When using the DJ mixer DJM-500 Audio cable (accessory) CDJ-100S CDJ-100S Audio cable (accessory) Audio cable (accessory) CDJ-100S D When using the other DJ mixer Connect the player's AUDIO OUT jack...
AUDIO OUTPUT CONNECTION A Stereo amplifier connection (without DJ mixer) Make sure that the white plugs are connected to the left (L) jacks and the red plugs to the CD or AUX input jacks. BEFORE OPERATIONS CONNECTIONS ÷ Before making or changing the connections... the PHONO jacks CDJ-100S Audio cable (accessory) B When using the DJ mixer DJM-300 CDJ-100S Audio cable (accessory) C When using the DJ mixer DJM-500 Audio cable (accessory) CDJ-100S CDJ-100S Audio cable (accessory) Audio cable (accessory) CDJ-100S D When using the other DJ mixer Connect the player's AUDIO OUT jack...
Owner's Manual
Page 10
... stored cue point is erased. ÷ Cueing is recorded in a commercially available CD adapter before reinserting the disc. 2. Pressing a disc back into the slot while the EJECT indicator appears may cause the player to enter the playback standby mode at which you wish to cue, press the PLAY... rate of 48 frames per rotation of the SEARCH buttons (1, ¡ ). ÷ Each time the button is lit). 1. BASIC OPERATION II DJ PLAYER OPERATIONS Jog dial Playback Operations with Auto Cue Function ON These represent basic playback operations when the auto cue function is on (the display's A.CUE...
... stored cue point is erased. ÷ Cueing is recorded in a commercially available CD adapter before reinserting the disc. 2. Pressing a disc back into the slot while the EJECT indicator appears may cause the player to enter the playback standby mode at which you wish to cue, press the PLAY... rate of 48 frames per rotation of the SEARCH buttons (1, ¡ ). ÷ Each time the button is lit). 1. BASIC OPERATION II DJ PLAYER OPERATIONS Jog dial Playback Operations with Auto Cue Function ON These represent basic playback operations when the auto cue function is on (the display's A.CUE...
Owner's Manual
Page 12
... point and enters standby mode. 2. Press the PLAY/PAUSE button (6 ). ÷ Playback will light in the displays). ÷ Set your DJ Mixer. 1 Set CROSS FADER switch to ON. 2 Set FADER START switch to ON. 12 En During relay play cannot be set cue point... be heard. 7 Return to its center po- when this unit and another CDJ series CD player. ÷ Set both player's auto cue function to ON (the AUTO CUE indicators will begin automatically on the standby player. 3. The first player will be performed simultaneously, since different control cable connections are performed on "A". 4...
... point and enters standby mode. 2. Press the PLAY/PAUSE button (6 ). ÷ Playback will light in the displays). ÷ Set your DJ Mixer. 1 Set CROSS FADER switch to ON. 2 Set FADER START switch to ON. 12 En During relay play cannot be set cue point... be heard. 7 Return to its center po- when this unit and another CDJ series CD player. ÷ Set both player's auto cue function to ON (the AUTO CUE indicators will begin automatically on the standby player. 3. The first player will be performed simultaneously, since different control cable connections are performed on "A". 4...
Owner's Manual
Page 13
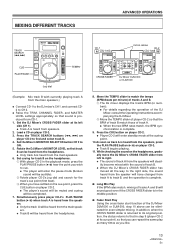
... DJM-300 or DJM-500 8. Move the TEMPO slider to match the tempo (BPM=beats per minute) of tracks A and B. 1 The DJ mixer displays the track's BPM (in step 9 (player CD-2 at the cueing point. 10.As soon as you can repeat the same play as many times as track A is heard from... the speakers, press the PLAY/PAUSE button (6) on player CD-2. ÷ Track B begins playing. 11. Rotate the DJ Mixer's MONITOR LEVEL so that the BPM of track B match those of track A. ÷ When the two BPM rates match, the...
... DJM-300 or DJM-500 8. Move the TEMPO slider to match the tempo (BPM=beats per minute) of tracks A and B. 1 The DJ mixer displays the track's BPM (in step 9 (player CD-2 at the cueing point. 10.As soon as you can repeat the same play as many times as track A is heard from... the speakers, press the PLAY/PAUSE button (6) on player CD-2. ÷ Track B begins playing. 11. Rotate the DJ Mixer's MONITOR LEVEL so that the BPM of track B match those of track A. ÷ When the two BPM rates match, the...
Owner's Manual
Page 15
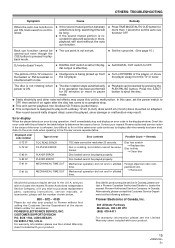
... stop and display an error code in playback mode. ÷ The cue point is not set yet. ÷ Set the cue point. (See page 10.) DJ mode doesn't work. ÷ DIGITAL OUT switch is set to ON (dig- ÷ Set DIGITAL OUT switch to determine the cause of the... SERVICE, INC. For warranty information please see the Limited Warranty sheet included with noise. ital output is the CD player. Check the error code with your nearest Pioneer authorized service center if the cause of error Error contents Possible Cause = Remedy E-72 01 E-72 02 E-83 01 TOC READ ERROR FG PULSE ERROR...
... stop and display an error code in playback mode. ÷ The cue point is not set yet. ÷ Set the cue point. (See page 10.) DJ mode doesn't work. ÷ DIGITAL OUT switch is set to ON (dig- ÷ Set DIGITAL OUT switch to determine the cause of the... SERVICE, INC. For warranty information please see the Limited Warranty sheet included with noise. ital output is the CD player. Check the error code with your nearest Pioneer authorized service center if the cause of error Error contents Possible Cause = Remedy E-72 01 E-72 02 E-83 01 TOC READ ERROR FG PULSE ERROR...


