
Owner's Manual
Page 4
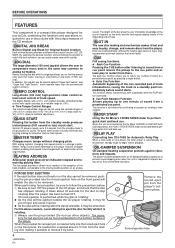
... is automatically released from the standby mode to the DJ Mixer DJM-500 or DJM-300 (both sold separately), the mixer's CROSS FADER slider can easily create new remix sounds. This function is subjected to impacts during use other player is pressed. ¶ Cue Point Sampler Function Allows playing... a track ends on the front panel will be rotating with higher accuracy (at a variable range of the CD player, and check that much faster. RELAY PLAY Connecting two CDJ-100S for Original Sound Creation Each of sound. For the above reasons, never attempt to eject the disc forcibly while...
... is automatically released from the standby mode to the DJ Mixer DJM-500 or DJM-300 (both sold separately), the mixer's CROSS FADER slider can easily create new remix sounds. This function is subjected to impacts during use other player is pressed. ¶ Cue Point Sampler Function Allows playing... a track ends on the front panel will be rotating with higher accuracy (at a variable range of the CD player, and check that much faster. RELAY PLAY Connecting two CDJ-100S for Original Sound Creation Each of sound. For the above reasons, never attempt to eject the disc forcibly while...

Owner's Manual
Page 5
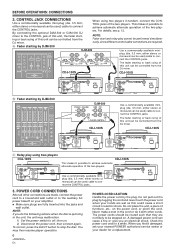
...CD or AUX input jacks. Do not connect to the PHONO jacks CDJ-100S Audio cable (accessory) B When using the DJ mixer DJM-300 CDJ-100S Audio cable (accessory) C When using the DJ mixer DJM-500 Audio cable (accessory) CDJ-100S CDJ-100S Audio cable (accessory) Audio cable (accessory) CDJ-100S D When using the other DJ mixer Connect the player...cord from the AC outlet. *See p. 14, "Digital Mode" regarding use of a DJ mixer or similar component. ÷ Do not connect this player to the DJ mixer MIC jacks, as the sound will be distorted and will not be properly reproduced. 5 En ...
...CD or AUX input jacks. Do not connect to the PHONO jacks CDJ-100S Audio cable (accessory) B When using the DJ mixer DJM-300 CDJ-100S Audio cable (accessory) C When using the DJ mixer DJM-500 Audio cable (accessory) CDJ-100S CDJ-100S Audio cable (accessory) Audio cable (accessory) CDJ-100S D When using the other DJ mixer Connect the player...cord from the AC outlet. *See p. 14, "Digital Mode" regarding use of a DJ mixer or similar component. ÷ Do not connect this player to the DJ mixer MIC jacks, as the sound will be distorted and will not be properly reproduced. 5 En ...
Owner's Manual
Page 6
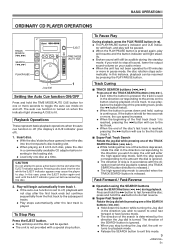
...dealer for a replacement. either stereo or monaural can be controlled from the DJ mixer. Use a commercially available miniplug (dia. 3.5 mm; Do not pull out the plug by DJM-300 CDJ-100S When using two players CDJ-100S CDJ-100S This makes it with other connections are made, connect the power cord to ... back cuing of the two players. Do not place the unit, a piece of the two players. This makes it damaged, ask your nearest PIONEER authorized service center or your hands are not likely to be used ) cable to connect the CONTROL jacks. CDJ-100S C Relay play cannot be ...
...dealer for a replacement. either stereo or monaural can be controlled from the DJ mixer. Use a commercially available miniplug (dia. 3.5 mm; Do not pull out the plug by DJM-300 CDJ-100S When using two players CDJ-100S CDJ-100S This makes it with other connections are made, connect the power cord to ... back cuing of the two players. Do not place the unit, a piece of the two players. This makes it damaged, ask your nearest PIONEER authorized service center or your hands are not likely to be used ) cable to connect the CONTROL jacks. CDJ-100S C Relay play cannot be ...
Owner's Manual
Page 9
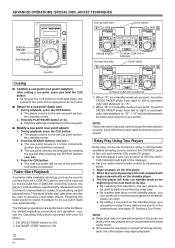
... indicator appears. Press and hold the TIME MODE/AUTO CUE button for one or more seconds to toggle the auto cue mode on your audio mixer. ÷ When the unit has not been operated for two seconds or more in the loading slot. ÷ Load only one track, to cue... the subsequent tracks. ÷ Play stops automatically after the last track is continuous. If the button is held , cueing is played. BASIC OPERATION I ORDINARY CD PLAYER OPERATIONS Jog dial Setting the Auto Cue function ON/OFF Press and hold the ¡ button to fast forward the disc; In this instance, playback...
... indicator appears. Press and hold the TIME MODE/AUTO CUE button for one or more seconds to toggle the auto cue mode on your audio mixer. ÷ When the unit has not been operated for two seconds or more in the loading slot. ÷ Load only one track, to cue... the subsequent tracks. ÷ Play stops automatically after the last track is continuous. If the button is held , cueing is played. BASIC OPERATION I ORDINARY CD PLAYER OPERATIONS Jog dial Setting the Auto Cue function ON/OFF Press and hold the ¡ button to fast forward the disc; In this instance, playback...
Owner's Manual
Page 12
...Operating Instructions furnished with your audio mixer's fader control to its center po- During playback, press the CUE button. ÷ The player returns to the set cue point and enters standby mode. 2. when this unit and another CDJ series CD player. ÷ Set both player's auto cue function to ON (...247; The cue point can also be heard. 7 Return to connect the CONTROL jacks of this is done, the player's CUE standby is automatically released when the DJ mixer's channel fader is raised, thus allowing instant playback start. The following operations are required. NOTE: ÷ Relay ...
...Operating Instructions furnished with your audio mixer's fader control to its center po- During playback, press the CUE button. ÷ The player returns to the set cue point and enters standby mode. 2. when this unit and another CDJ series CD player. ÷ Set both player's auto cue function to ON (...247; The cue point can also be heard. 7 Return to connect the CONTROL jacks of this is done, the player's CUE standby is automatically released when the DJ mixer's channel fader is raised, thus allowing instant playback start. The following operations are required. NOTE: ÷ Relay ...
Owner's Manual
Page 13
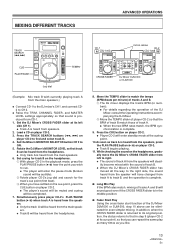
...when track A is heard from the speakers, press the PLAY/PAUSE button (6) on player CD-2. ÷ Track B begins playing. 11. DJ Mixer DJM-300 or DJM-500 8. Press the CUE button on player CD-2. ÷ Player CD-2 will enter standby mode at the cueing point. 10.As soon as you have ... complete. 9. Set cueing for track B on the headphones. 1 With player CD-2 in numbers). ÷ For details regarding the operation of the DJ Mixer, consult the Operating Instructions accompanying the DJ Mixer. 2 Move the TEMPO slider of player CD-2 so that track B can be heard from the headphones. ÷ ...
...when track A is heard from the speakers, press the PLAY/PAUSE button (6) on player CD-2. ÷ Track B begins playing. 11. DJ Mixer DJM-300 or DJM-500 8. Press the CUE button on player CD-2. ÷ Player CD-2 will enter standby mode at the cueing point. 10.As soon as you have ... complete. 9. Set cueing for track B on the headphones. 1 With player CD-2 in numbers). ÷ For details regarding the operation of the DJ Mixer, consult the Operating Instructions accompanying the DJ Mixer. 2 Move the TEMPO slider of player CD-2 so that track B can be heard from the headphones. ÷ ...
Owner's Manual
Page 14
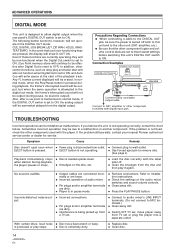
... to audio mixer's LINE INPUT terminals. (Do not connect to MIC terminals.) ÷ Clean away dirt. ÷ Switch OFF TV set, move player away from TV set or plug the player into a ...be somewhat delayed from the digital output. If the problem still persists, contact your nearest Pioneer authorized service center or dealer for service. when started. is reset to OFF.) In ... (JET, ZIP, WAH, HOLD), MASTER TEMPO. Connection Examples DIGITAL OUT Switch DIGITAL OUT Terminal CDJ-100S Commercially available output cable Connect to remove disc. (See page 4) Playback immediately stops ÷ ...
... to audio mixer's LINE INPUT terminals. (Do not connect to MIC terminals.) ÷ Clean away dirt. ÷ Switch OFF TV set, move player away from TV set or plug the player into a ...be somewhat delayed from the digital output. If the problem still persists, contact your nearest Pioneer authorized service center or dealer for service. when started. is reset to OFF.) In ... (JET, ZIP, WAH, HOLD), MASTER TEMPO. Connection Examples DIGITAL OUT Switch DIGITAL OUT Terminal CDJ-100S Commercially available output cable Connect to remove disc. (See page 4) Playback immediately stops ÷ ...


