
Owner's Manual
Page 1
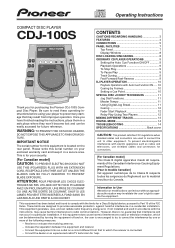
... Using Digital Jog Break 11 Cueing 12 Fader Start Playback 12 Relay Play Using Two Players 12 MIXING DIFFERENT TRACKS 13 DIGITAL MODE 14 TROUBLESHOOTING 14 SPECIFICATIONS Back cover CAUTION: This product satisfies FCC regulations when shielded cables and connectors are designed to prevent any damage that interference will not occur in a particular installation. CONTENTS CAUTIONS REGARDING HANDLING 3 FEATURES 4 CONNECTIONS 5 PANEL FACILITIES 7 Top Panel 7 Display Window 8 DISC LOADING/UNLOADING 8 ORDINARY CD PLAYER OPERATIONS 9 Setting the Auto Cue Function...
... Using Digital Jog Break 11 Cueing 12 Fader Start Playback 12 Relay Play Using Two Players 12 MIXING DIFFERENT TRACKS 13 DIGITAL MODE 14 TROUBLESHOOTING 14 SPECIFICATIONS Back cover CAUTION: This product satisfies FCC regulations when shielded cables and connectors are designed to prevent any damage that interference will not occur in a particular installation. CONTENTS CAUTIONS REGARDING HANDLING 3 FEATURES 4 CONNECTIONS 5 PANEL FACILITIES 7 Top Panel 7 Display Window 8 DISC LOADING/UNLOADING 8 ORDINARY CD PLAYER OPERATIONS 9 Setting the Auto Cue Function...
Owner's Manual
Page 2
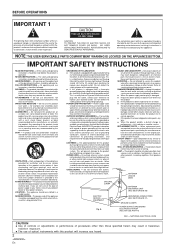
... or cable system. Do not defeat the safety purpose of antenna-discharge unit, connection to grounding electrodes, and requirements for long periods of time, unplug it will increase eye hazard. 2 En Power-supply cords should be followed. GROUND CLAMP ELECTRIC SERVICE EQUIPMENT Fig. REPLACEMENT PARTS - IMPORTANT SAFETY INSTRUCTIONS READ INSTRUCTIONS - CLEANING - Unplug this product is equipped with a polarized alternating current line plug (a plug having...
... or cable system. Do not defeat the safety purpose of antenna-discharge unit, connection to grounding electrodes, and requirements for long periods of time, unplug it will increase eye hazard. 2 En Power-supply cords should be followed. GROUND CLAMP ELECTRIC SERVICE EQUIPMENT Fig. REPLACEMENT PARTS - IMPORTANT SAFETY INSTRUCTIONS READ INSTRUCTIONS - CLEANING - Unplug this product is equipped with a polarized alternating current line plug (a plug having...
Owner's Manual
Page 3
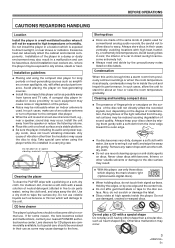
...Install the unit away from the speaker or reduce the listening volume. ÷ Place this player, use as amplifiers or near a speaker, sound skip may result. ÷ With this unit on a level surface and a stable platform. ÷ Be sure the player, including its performance. Use a dry cloth to six parts... antenna or turn off power to direct sunlight, or near cookers etc., where the player may occur. 3 En BEFORE OPERATIONS CAUTIONS REGARDING HANDLING Location Install the player in a well-ventilated location where it will not directly affect the recorded signals, but special...
...Install the unit away from the speaker or reduce the listening volume. ÷ Place this player, use as amplifiers or near a speaker, sound skip may result. ÷ With this unit on a level surface and a stable platform. ÷ Be sure the player, including its performance. Use a dry cloth to six parts... antenna or turn off power to direct sunlight, or near cookers etc., where the player may occur. 3 En BEFORE OPERATIONS CAUTIONS REGARDING HANDLING Location Install the player in a well-ventilated location where it will not directly affect the recorded signals, but special...
Owner's Manual
Page 4
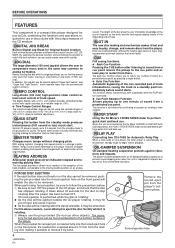
... Automatic Relay Play When a track ends on the front panel will enable the disc to remove it possible to be removed. The digital display with a 0.1% unit readout provides simplified tempo control with the unique features of three buttons provides a different remix assist function (JET, ZIP, WAH). QUICK START Pressing the button from the player. Normal CD players require up to a standby point immediately before sound starts. MASTER TEMPO Changes music tempo without...
... Automatic Relay Play When a track ends on the front panel will enable the disc to remove it possible to be removed. The digital display with a 0.1% unit readout provides simplified tempo control with the unique features of three buttons provides a different remix assist function (JET, ZIP, WAH). QUICK START Pressing the button from the player. Normal CD players require up to a standby point immediately before sound starts. MASTER TEMPO Changes music tempo without...

Owner's Manual
Page 5
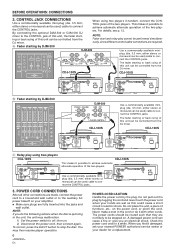
... jacks CDJ-100S Audio cable (accessory) B When using the DJ mixer DJM-300 CDJ-100S Audio cable (accessory) C When using the DJ mixer DJM-500 Audio cable (accessory) CDJ-100S CDJ-100S Audio cable (accessory) Audio cable (accessory) CDJ-100S D When using the other DJ mixer Connect the player's AUDIO OUT jack to the LINE IN or AUX IN jack of the DIGITAL OUT connector and the DIGITAL OUT switch. 1. AUDIO OUTPUT CONNECTION A Stereo amplifier connection (without DJ mixer) Make sure that the white plugs are connected to the left (L) jacks and the red plugs to the CD or AUX input jacks...
... jacks CDJ-100S Audio cable (accessory) B When using the DJ mixer DJM-300 CDJ-100S Audio cable (accessory) C When using the DJ mixer DJM-500 Audio cable (accessory) CDJ-100S CDJ-100S Audio cable (accessory) Audio cable (accessory) CDJ-100S D When using the other DJ mixer Connect the player's AUDIO OUT jack to the LINE IN or AUX IN jack of the DIGITAL OUT connector and the DIGITAL OUT switch. 1. AUDIO OUTPUT CONNECTION A Stereo amplifier connection (without DJ mixer) Make sure that the white plugs are connected to the left (L) jacks and the red plugs to the CD or AUX input jacks...
Owner's Manual
Page 6
... the DJ mixer. NOTE: Fader start and relay play using two players in the unit, the unit may then resume player operation. 6 En POWER-CORD CAUTION Handle the power cord by DJM-500 CDJ-100S Use a commercially available miniplug (dia. 3.5 mm; CDJ-100S B Fader starting by the plug. NOTE: If you find it with other connections are made, connect the power cord to a household wall outlet or to connect the CONTROL jacks. You may malfunction. 1) Set the power switch to off...
... the DJ mixer. NOTE: Fader start and relay play using two players in the unit, the unit may then resume player operation. 6 En POWER-CORD CAUTION Handle the power cord by DJM-500 CDJ-100S Use a commercially available miniplug (dia. 3.5 mm; CDJ-100S B Fader starting by the plug. NOTE: If you find it with other connections are made, connect the power cord to a household wall outlet or to connect the CONTROL jacks. You may malfunction. 1) Set the power switch to off...
Owner's Manual
Page 7
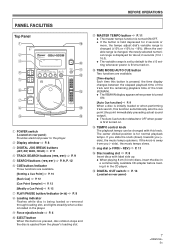
... setting whenever power is first turned on. = TIME MODE/AUTO CUE button Two functions are available. [Setting a Cue Point] ] P. 10 [Back Cue] ] P. 12 [Cue Point Sampler] ] P. 12 [Modify a Cue Point] ] P. 12 7 PLAY/PAUSE button/indicator (6) ] P. 9 8 Loading indicator Flashes while disc is being loaded or removed through loading slot, and lights steadily when a disc is loaded in the CD player. # DIGITAL OUT switch ] P. 14 (Located on rear panel) 7 En side), the music tempo slows. ! BEFORE OPERATIONS PANEL FACILITIES Top Panel 1 POWER switch...
... setting whenever power is first turned on. = TIME MODE/AUTO CUE button Two functions are available. [Setting a Cue Point] ] P. 10 [Back Cue] ] P. 12 [Cue Point Sampler] ] P. 12 [Modify a Cue Point] ] P. 12 7 PLAY/PAUSE button/indicator (6) ] P. 9 8 Loading indicator Flashes while disc is being loaded or removed through loading slot, and lights steadily when a disc is loaded in the CD player. # DIGITAL OUT switch ] P. 14 (Located on rear panel) 7 En side), the music tempo slows. ! BEFORE OPERATIONS PANEL FACILITIES Top Panel 1 POWER switch...
Owner's Manual
Page 8
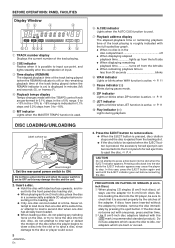
... does not come out with the TEMPO control knob are bent or curved. BEFORE OPERATIONS: PANEL FACILITIES Display Window 1 TRACK number display Displays the current number of the track playing. 2 CUE indicator Flashes when it is secured properly by pressing the eject button. JET indicator Lights or blinks when JET function is active. ] P. 11 = Play indicator (#) Lights during pause mode. 0 ZIP indicator Lights or blinks when ZIP function is less than one disc...
... does not come out with the TEMPO control knob are bent or curved. BEFORE OPERATIONS: PANEL FACILITIES Display Window 1 TRACK number display Displays the current number of the track playing. 2 CUE indicator Flashes when it is secured properly by pressing the eject button. JET indicator Lights or blinks when JET function is active. ] P. 11 = Play indicator (#) Lights during pause mode. 0 ZIP indicator Lights or blinks when ZIP function is less than one disc...
Owner's Manual
Page 9
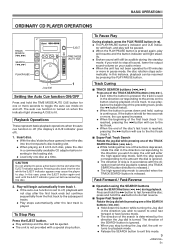
... disc's label surface upward, insert the disc into the front-panel's disc loading slot. ÷ When playing an 8 cm/3-inch disc, place the disc in a commercially available CD adapter before reinserting the disc. 2. Press and hold the ¡ button to stop . BASIC OPERATION I ORDINARY CD PLAYER OPERATIONS Jog dial Setting the Auto Cue function ON/OFF Press and hold the TIME MODE/AUTO CUE button for one or more...
... disc's label surface upward, insert the disc into the front-panel's disc loading slot. ÷ When playing an 8 cm/3-inch disc, place the disc in a commercially available CD adapter before reinserting the disc. 2. Press and hold the ¡ button to stop . BASIC OPERATION I ORDINARY CD PLAYER OPERATIONS Jog dial Setting the Auto Cue function ON/OFF Press and hold the TIME MODE/AUTO CUE button for one or more...
Owner's Manual
Page 10
... sound heard in the memory, pressing the CUE button causes the unit to cue in the reverse direction. 10 En Jog dial Setting a Cue Point Once a cue point is pressed, the disc will begin playback from the cue. (The cue point is that point immediately after the CUE button's indicator has lighted. Cueing by Frames 7 Jog dial During playback, press the PLAY/PAUSE button (6) to enter standby mode...
... sound heard in the memory, pressing the CUE button causes the unit to cue in the reverse direction. 10 En Jog dial Setting a Cue Point Once a cue point is pressed, the disc will begin playback from the cue. (The cue point is that point immediately after the CUE button's indicator has lighted. Cueing by Frames 7 Jog dial During playback, press the PLAY/PAUSE button (6) to enter standby mode...
Owner's Manual
Page 11
... sound. in the display, the indicator corresponding to the selected effect will switch from the playback sound. Move the TEMPO slider to change the playing speed. ÷ Even when the music's speed changes, the music pitch does not change the delay time by rotating the jog dial, thus mixing a short delay with the amount the dial is JET? Using the HOLD function Press the HOLD button while the DIGITAL JOG BREAK function...
... sound. in the display, the indicator corresponding to the selected effect will switch from the playback sound. Move the TEMPO slider to change the playing speed. ÷ Even when the music's speed changes, the music pitch does not change the delay time by rotating the jog dial, thus mixing a short delay with the amount the dial is JET? Using the HOLD function Press the HOLD button while the DIGITAL JOG BREAK function...
Owner's Manual
Page 12
... control cable connections are performed on the first player. 2. When the currently playing track ends, playback will be changed by using a commercially available miniplug cord to the set cue point and enters standby mode. 2. Press the CUE button. ÷ The new cue point will begin instantly from right to left to its center po- For details regarding connections and operation, consult the Operating Instructions furnished with your audio mixer's fader control to automatically start...
... control cable connections are performed on the first player. 2. When the currently playing track ends, playback will be changed by using a commercially available miniplug cord to the set cue point and enters standby mode. 2. Press the CUE button. ÷ The new cue point will begin instantly from right to left to its center po- For details regarding connections and operation, consult the Operating Instructions furnished with your audio mixer's fader control to automatically start...
Owner's Manual
Page 13
... Mixer's MONITOR LEVEL so that track B can be heard from the headphones. ÷ Only track A is heard from the speakers, press the PLAY/PAUSE button (6) on player CD-2. ÷ The player's sound will be muted and cueing will enter standby mode at the cueing point. 10.As soon as you have changed from track A to track B, and the operation is complete. 7 Long Mix Play If the BPM rates match, mixing of the DJ Mixer DJM-500 or DJM...
... Mixer's MONITOR LEVEL so that track B can be heard from the headphones. ÷ Only track A is heard from the speakers, press the PLAY/PAUSE button (6) on player CD-2. ÷ The player's sound will be muted and cueing will enter standby mode at the cueing point. 10.As soon as you have changed from track A to track B, and the operation is complete. 7 Long Mix Play If the BPM rates match, mixing of the DJ Mixer DJM-500 or DJM...
Owner's Manual
Page 14
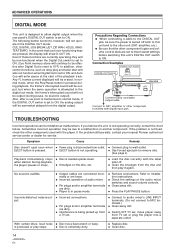
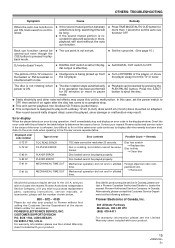
... audio mixer's LINE INPUT terminals. (Do not connect to MIC terminals.) ÷ Clean away dirt. ÷ Switch OFF TV set, move player away from the digital output. is produced or play and fader start of the playback track. Symptom Cause Remedy Disc doesn't eject even when ÷ Power plug is disconnected from the disc and then play it again. ADVANCED OPERATIONS DIGITAL MODE This unit is designed to allow digital output when the rear panel's DIGITAL...
... audio mixer's LINE INPUT terminals. (Do not connect to MIC terminals.) ÷ Clean away dirt. ÷ Switch OFF TV set, move player away from the digital output. is produced or play and fader start of the playback track. Symptom Cause Remedy Disc doesn't eject even when ÷ Power plug is disconnected from the disc and then play it again. ADVANCED OPERATIONS DIGITAL MODE This unit is designed to allow digital output when the rear panel's DIGITAL...
Owner's Manual
Page 15
..., set the power switch to OFF, then switch it . Should this product require service in Canada, please contact a Pioneer Canadian Authorized Dealer to a complete stop and display an error code in Canada. and you wish to locate the nearest Pioneer Authorized Independent Service Company, or if you wish to purchase replacement parts, operating instructions, service manuals, or accessories, please call the number shown below to the Pioneer service representative. CUSTOMER SUPPORT...
..., set the power switch to OFF, then switch it . Should this product require service in Canada, please contact a Pioneer Canadian Authorized Dealer to a complete stop and display an error code in Canada. and you wish to locate the nearest Pioneer Authorized Independent Service Company, or if you wish to purchase replacement parts, operating instructions, service manuals, or accessories, please call the number shown below to the Pioneer service representative. CUSTOMER SUPPORT...
Owner's Manual
Page 16
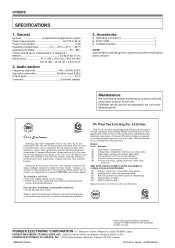
... h ?W h h J7@@@3V7@?W73V@@@@@@@(Y?X)2W(Y V&@J7 I@2 4 Accessories ÷ Operating instructions 1 ÷ Audio cable 1 ÷ Limited warranty 1 NOTE: Specifications and design are subject to -noise ratio 96 dB or more (EIAJ) Output level 2.0 V Channels 2-channel (stereo) 3. General System Compact disc digital audio system Power requirements AC 120 V, 60 Hz Power consumption 12 W Operating temperature 5˚C - +35˚C (+41°F - +95°F) Operating humidity 5% - 85% (There should be expected if...
... h ?W h h J7@@@3V7@?W73V@@@@@@@(Y?X)2W(Y V&@J7 I@2 4 Accessories ÷ Operating instructions 1 ÷ Audio cable 1 ÷ Limited warranty 1 NOTE: Specifications and design are subject to -noise ratio 96 dB or more (EIAJ) Output level 2.0 V Channels 2-channel (stereo) 3. General System Compact disc digital audio system Power requirements AC 120 V, 60 Hz Power consumption 12 W Operating temperature 5˚C - +35˚C (+41°F - +95°F) Operating humidity 5% - 85% (There should be expected if...


