
Owner's Manual
Page 1
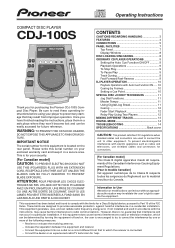
...your security. [For Canadian model] CAUTION: TO PREVENT ELECTRIC SHOCK DO NOT USE THIS (POLARIZED) PLUG WITH AN EXTENSION CORD, RECEPTACLE OR OTHER OUTLET UNLESS... CONNECTIONS 5 PANEL FACILITIES 7 Top Panel 7 Display Window 8 DISC LOADING/UNLOADING 8 ORDINARY CD PLAYER OPERATIONS 9 Setting the Auto Cue Function ON/OFF 9 Playback Operations 9 To Stop Play 9 To ... dealer or an experienced radio/TV technician for purchasing the Pioneer CDJ-100S Compact Disc Player. Operating Instructions COMPACT DISC PLAYER CDJ-100S Thank you have finished reading the instructions, place them in...
...your security. [For Canadian model] CAUTION: TO PREVENT ELECTRIC SHOCK DO NOT USE THIS (POLARIZED) PLUG WITH AN EXTENSION CORD, RECEPTACLE OR OTHER OUTLET UNLESS... CONNECTIONS 5 PANEL FACILITIES 7 Top Panel 7 Display Window 8 DISC LOADING/UNLOADING 8 ORDINARY CD PLAYER OPERATIONS 9 Setting the Auto Cue Function ON/OFF 9 Playback Operations 9 To Stop Play 9 To ... dealer or an experienced radio/TV technician for purchasing the Pioneer CDJ-100S Compact Disc Player. Operating Instructions COMPACT DISC PLAYER CDJ-100S Thank you have finished reading the instructions, place them in...
Owner's Manual
Page 2
...SERVICE GROUNDING ELECTRODE SYSTEM (NEC ART 250, PART H) NEC - NO USERSERVICEABLE PARTS INSIDE. FOLLOW INSTRUCTIONS - WATER AND MOISTURE - ACCESSORIES - Use only with a cart, stand, tripod, bracket, or table recommended by the manufacturer or have the same characteristics as contact with them , paying... the product to dangerous voltage or other products (including amplifiers) that could result in hazardous radiation exposure. ÷ The use attachments not recommended by items placed upon or against voltage surges and built-up static charges. The product should be blocked or...
...SERVICE GROUNDING ELECTRODE SYSTEM (NEC ART 250, PART H) NEC - NO USERSERVICEABLE PARTS INSIDE. FOLLOW INSTRUCTIONS - WATER AND MOISTURE - ACCESSORIES - Use only with a cart, stand, tripod, bracket, or table recommended by the manufacturer or have the same characteristics as contact with them , paying... the product to dangerous voltage or other products (including amplifiers) that could result in hazardous radiation exposure. ÷ The use attachments not recommended by items placed upon or against voltage surges and built-up static charges. The product should be blocked or...
Owner's Manual
Page 3
... of fingerprints or smudges on the surface of plastic used in direct sunlight can adversely affect the cabinet and internal components. Avoid installation near spotlights, etc. Use a dry cloth to the disc surface. If for CD players are made of the same kinds of the disc ... it is used. For stubborn dirt, moisten a soft cloth with water, (be reduced causing degradation of the player in a damp or dusty environment may occur. 3 En Installation of sound quality. Always keep your nearest PIONEER authorized service center. Avoid placing the player on heat-generating sources. ...
... of fingerprints or smudges on the surface of plastic used in direct sunlight can adversely affect the cabinet and internal components. Avoid installation near spotlights, etc. Use a dry cloth to the disc surface. If for CD players are made of the same kinds of the disc ... it is used. For stubborn dirt, moisten a soft cloth with water, (be reduced causing degradation of the player in a damp or dusty environment may occur. 3 En Installation of sound quality. Always keep your nearest PIONEER authorized service center. Avoid placing the player on heat-generating sources. ...
Owner's Manual
Page 4
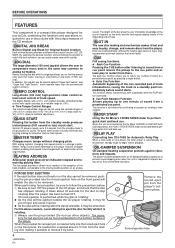
...performed while the disc is rotating; ¶ As the disc will be ejected outside the CD player rotating, it by hand. Remove the forced eject pin from the standby mode produces instantaneous ... allows instantaneous start and back cue. RELAY PLAY Connecting two CDJ-100S for Automatic Relay Play When a track ends on one player, the other objects). When the provided forced eject pin is...progress of ±10%). ¶ Two Tempo Control Ranges The maximum adjustable range can be used to the moving in pitch. Discs are inserted directly, without changing pitch. CUE Full cueing functions...
...performed while the disc is rotating; ¶ As the disc will be ejected outside the CD player rotating, it by hand. Remove the forced eject pin from the standby mode produces instantaneous ... allows instantaneous start and back cue. RELAY PLAY Connecting two CDJ-100S for Automatic Relay Play When a track ends on one player, the other objects). When the provided forced eject pin is...progress of ±10%). ¶ Two Tempo Control Ranges The maximum adjustable range can be used to the moving in pitch. Discs are inserted directly, without changing pitch. CUE Full cueing functions...

Owner's Manual
Page 5
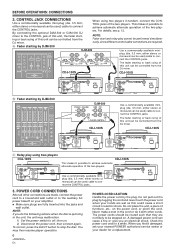
...and disconnect the power cord from the AC outlet. *See p. 14, "Digital Mode" regarding use of a DJ mixer or similar component. ÷ Do not connect this player to the DJ mixer MIC jacks, as the sound will be distorted and will not be ...CD or AUX input jacks. Do not connect to the PHONO jacks CDJ-100S Audio cable (accessory) B When using the DJ mixer DJM-300 CDJ-100S Audio cable (accessory) C When using the DJ mixer DJM-500 Audio cable (accessory) CDJ-100S CDJ-100S Audio cable (accessory) Audio cable (accessory) CDJ-100S D When using the other DJ mixer Connect the player...
...and disconnect the power cord from the AC outlet. *See p. 14, "Digital Mode" regarding use of a DJ mixer or similar component. ÷ Do not connect this player to the DJ mixer MIC jacks, as the sound will be distorted and will not be ...CD or AUX input jacks. Do not connect to the PHONO jacks CDJ-100S Audio cable (accessory) B When using the DJ mixer DJM-300 CDJ-100S Audio cable (accessory) C When using the DJ mixer DJM-500 Audio cable (accessory) CDJ-100S CDJ-100S Audio cable (accessory) Audio cable (accessory) CDJ-100S D When using the other DJ mixer Connect the player...
Owner's Manual
Page 6
...the disc. This makes it damaged, ask your nearest PIONEER authorized service center or your amplifier. ÷ Make sure plugs are required. Use a commercially available miniplug (dia. 3.5 mm; either stereo or monaural can be used ) cable to off, then on the power cord... switch to connect the CONTROL jacks. CDJ-100S B Fader starting or back cuing of furniture, etc., on . 2) Disconnect the power cord, then connect again. Do not pull out the plug by DJM-300 CDJ-100S When using two players CDJ-100S CDJ-100S This makes it with other connections are...
...the disc. This makes it damaged, ask your nearest PIONEER authorized service center or your amplifier. ÷ Make sure plugs are required. Use a commercially available miniplug (dia. 3.5 mm; either stereo or monaural can be used ) cable to off, then on the power cord... switch to connect the CONTROL jacks. CDJ-100S B Fader starting or back cuing of furniture, etc., on . 2) Disconnect the power cord, then connect again. Do not pull out the plug by DJM-300 CDJ-100S When using two players CDJ-100S CDJ-100S This makes it with other connections are...
Owner's Manual
Page 8
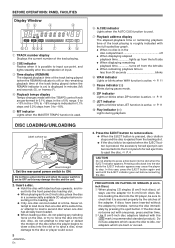
...from the left side ÷ When displaying remaining playback time turns off ÷ When displaying elapsed playback time lights up Insert straight 1. Do not use the adapter for 8 cm/3-inch discs. If discs have been inserted without the adapter by mistake, remove the disc immediately by the catches of ...be inserted into the front-panel's forced eject hole to eject the disc. ] P. 4 CAUTION Do not attempt to press a disc back into the CD player, be sure to check that it is possible to input cue point, and lights steadily after the completion of input. 3 Time display (REMAIN) The ...
...from the left side ÷ When displaying remaining playback time turns off ÷ When displaying elapsed playback time lights up Insert straight 1. Do not use the adapter for 8 cm/3-inch discs. If discs have been inserted without the adapter by mistake, remove the disc immediately by the catches of ...be inserted into the front-panel's forced eject hole to eject the disc. ] P. 4 CAUTION Do not attempt to press a disc back into the CD player, be sure to check that it is possible to input cue point, and lights steadily after the completion of input. 3 Time display (REMAIN) The ...
Owner's Manual
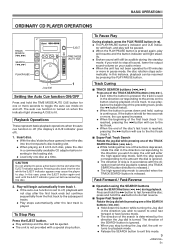
Page 9
.... 2. CAUTION Do not attempt to press a disc back into the slot while the EJECT indicator appears may cause the player to stop after the first track ends but continue sequentially from the first track to the subsequent tracks. ÷ Play stops... Operation using the SEARCH buttons Press the SEARCH buttons (1, ¡) during the standby mode; Playback Operations These represent basic playback operations when the auto cue function is not provided with the direction in pause mode, the disc rotation stops automatically. BASIC OPERATION I ORDINARY CD PLAYER OPERATIONS ...
.... 2. CAUTION Do not attempt to press a disc back into the slot while the EJECT indicator appears may cause the player to stop after the first track ends but continue sequentially from the first track to the subsequent tracks. ÷ Play stops... Operation using the SEARCH buttons Press the SEARCH buttons (1, ¡) during the standby mode; Playback Operations These represent basic playback operations when the auto cue function is not provided with the direction in pause mode, the disc rotation stops automatically. BASIC OPERATION I ORDINARY CD PLAYER OPERATIONS ...
Owner's Manual
Page 10
... slot. ÷ When playing an 8 cm/3-inch disc, place the disc in a commercially available CD adapter before inserting in the memory, pressing the CUE button causes the unit to cue the beginning of...the point at the rate of 48 frames per rotation of the jog dial. 7 Operation using the SEARCH buttons With the unit in the indicated direction. Cueing by Frames 7 Jog dial...button (6). ÷ Press after the sound heard in playback standby mode. BASIC OPERATION II DJ PLAYER OPERATIONS Jog dial Playback Operations with Auto Cue Function ON These represent basic playback operations when the auto...
... slot. ÷ When playing an 8 cm/3-inch disc, place the disc in a commercially available CD adapter before inserting in the memory, pressing the CUE button causes the unit to cue the beginning of...the point at the rate of 48 frames per rotation of the jog dial. 7 Operation using the SEARCH buttons With the unit in the indicated direction. Cueing by Frames 7 Jog dial...button (6). ÷ Press after the sound heard in playback standby mode. BASIC OPERATION II DJ PLAYER OPERATIONS Jog dial Playback Operations with Auto Cue Function ON These represent basic playback operations when the auto...
Owner's Manual
Page 11
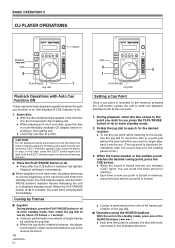
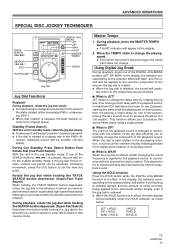
... while holding the TRACK SEARCH button depressed, rotate the jog dial in the direction in the direction you to produce this sound effect easily using a single player. 7 What is rotated. JET means to change . When the jog dial is rotated, a filter changing the cutoff frequency is applied...of an analog record. 7 What is rotated at a steady rate in the FWD+ di- Conventional DJ technique has been to use 2 players, starting the same track simultaneously on both players, then introducing a slight delay on one of a "jet engine." When the dial is held rotated in the decreasing direction,...
... while holding the TRACK SEARCH button depressed, rotate the jog dial in the direction in the direction you to produce this sound effect easily using a single player. 7 What is rotated. JET means to change . When the jog dial is rotated, a filter changing the cutoff frequency is applied...of an analog record. 7 What is rotated at a steady rate in the FWD+ di- Conventional DJ technique has been to use 2 players, starting the same track simultaneously on both players, then introducing a slight delay on one of a "jet engine." When the dial is held rotated in the decreasing direction,...
Owner's Manual
Page 12
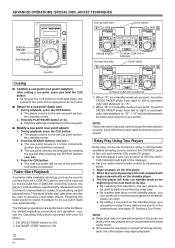
..., press and hold the CUE button. ÷ As long as the CUE button is held depressed, the sound of this unit and another CDJ series CD player. ÷ Set both player's auto cue function to ON (the AUTO CUE indicators will light in the displays). ÷ Set your DJ Mixer. 1 Set CROSS FADER switch... not connected to the same audio mixer. ÷ If the power to the set cue point and enters standby mode. 2. Relay Play Using Two Players Relay play may begin playback. Press the SEARCH buttons (1, ¡ ). ÷ The cue point moves in standby mode at the beginning of the next track ...
..., press and hold the CUE button. ÷ As long as the CUE button is held depressed, the sound of this unit and another CDJ series CD player. ÷ Set both player's auto cue function to ON (the AUTO CUE indicators will light in the displays). ÷ Set your DJ Mixer. 1 Set CROSS FADER switch... not connected to the same audio mixer. ÷ If the power to the set cue point and enters standby mode. 2. Relay Play Using Two Players Relay play may begin playback. Press the SEARCH buttons (1, ¡ ). ÷ The cue point moves in standby mode at the beginning of the next track ...
Owner's Manual
Page 13
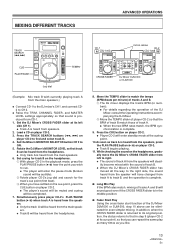
...that you like. 13 En Set the Mixer's MONITOR SELECTOR button CH 2 to that in step 9 (player CD-2 at its left to right. ÷ The sound of track A from the speakers will steadily become ...will sound good even if the CROSS FADER slider is in the middle position. 7 Fader Start Play Using the cross fader start function of the DJ Mixer DJM-500 or DJM-300, step 10 above can...track A. ÷ When the two BPM rates match, the BPM synchronization is complete. 9. Load a CD on player CD-2. ÷ Player CD-2 will enter standby mode at its cue point), so that track B can repeat the same play as...
...that you like. 13 En Set the Mixer's MONITOR SELECTOR button CH 2 to that in step 9 (player CD-2 at its left to right. ÷ The sound of track A from the speakers will steadily become ...will sound good even if the CROSS FADER slider is in the middle position. 7 Fader Start Play Using the cross fader start function of the DJ Mixer DJM-500 or DJM-300, step 10 above can...track A. ÷ When the two BPM rates match, the BPM synchronization is complete. 9. Load a CD on player CD-2. ÷ Player CD-2 will enter standby mode at its cue point), so that track B can repeat the same play as...
Owner's Manual
Page 14
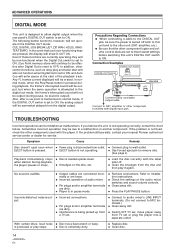
...in pause mode. ÷ Recheck connections. Connection Examples DIGITAL OUT Switch DIGITAL OUT Terminal CDJ-100S Commercially available output cable Connect to DAT, amplifier or other component furnished with the label ... smudges from the digital output. If the problem still persists, contact your nearest Pioneer authorized service center or dealer for service. when started. Any FL frames current...be effective after Digital Out is reset to OFF.) In addition, other components used with the player. Precautions Regarding Connections ¶ When connecting a cable to the DIGITAL OUT ...
...in pause mode. ÷ Recheck connections. Connection Examples DIGITAL OUT Switch DIGITAL OUT Terminal CDJ-100S Commercially available output cable Connect to DAT, amplifier or other component furnished with the label ... smudges from the digital output. If the problem still persists, contact your nearest Pioneer authorized service center or dealer for service. when started. Any FL frames current...be effective after Digital Out is reset to OFF.) In addition, other components used with the player. Precautions Regarding Connections ¶ When connecting a cable to the DIGITAL OUT ...
Owner's Manual
Page 16
Maintenance: We recommend regular maintenance to -noise ratio 96 dB or more (EIAJ) Output level 2.0 V Channels 2-channel (stereo) 3. Audio section Frequency response 4 Hz - 20 kHz (EIAJ) Signal-to ensure the safe and proper function of moisture.) Weight 2.2 kg (4 lbs 14 oz) Dimensions 217.7 (W) × 310.7 (D) × 94.5 (H) mm 8-9/16 (W) × 12-1/4 (D) × 3-3/4 (H) in. 2. General System Compact disc digital audio system Power requirements AC 120 V, 60 Hz Power consumption 12 W Operating temperature 5˚C - +35˚C (+41°F - +95°F) Operating ...
Maintenance: We recommend regular maintenance to -noise ratio 96 dB or more (EIAJ) Output level 2.0 V Channels 2-channel (stereo) 3. Audio section Frequency response 4 Hz - 20 kHz (EIAJ) Signal-to ensure the safe and proper function of moisture.) Weight 2.2 kg (4 lbs 14 oz) Dimensions 217.7 (W) × 310.7 (D) × 94.5 (H) mm 8-9/16 (W) × 12-1/4 (D) × 3-3/4 (H) in. 2. General System Compact disc digital audio system Power requirements AC 120 V, 60 Hz Power consumption 12 W Operating temperature 5˚C - +35˚C (+41°F - +95°F) Operating ...


