
Owner's Manual
Page 1
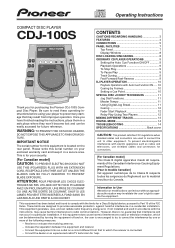
... 5 PANEL FACILITIES 7 Top Panel 7 Display Window 8 DISC LOADING/UNLOADING 8 ORDINARY CD PLAYER OPERATIONS 9 Setting the Auto Cue Function ON/OFF 9 Playback Operations 9 To Stop Play 9 To Pause... Play 9 Track Cueing 9 Fast-Forward/Fast-Reverse 9 DJ PLAYER OPERATION 10 Playback Operations with electric appliances such as radios and televisions, use shielded...warranty card and keep it in accordance with the limits for purchasing the Pioneer CDJ-100S Compact Disc Player. ATTENTION: POUR PREVENIR LES CHOCS ELEC- Increase the separation between the ...
... 5 PANEL FACILITIES 7 Top Panel 7 Display Window 8 DISC LOADING/UNLOADING 8 ORDINARY CD PLAYER OPERATIONS 9 Setting the Auto Cue Function ON/OFF 9 Playback Operations 9 To Stop Play 9 To Pause... Play 9 Track Cueing 9 Fast-Forward/Fast-Reverse 9 DJ PLAYER OPERATION 10 Playback Operations with electric appliances such as radios and televisions, use shielded...warranty card and keep it in accordance with the limits for purchasing the Pioneer CDJ-100S Compact Disc Player. ATTENTION: POUR PREVENIR LES CHOCS ELEC- Increase the separation between the ...
Owner's Manual
Page 4
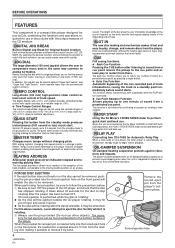
... Connecting two CDJ-100S for use in Digital Jog Break for Original Sound Creation Each of track speed. The length of the bar gives the user immediate knowledge of playback when the PLAY but- BEFORE OPERATIONS FEATURES This component is a compact disc player designed for use by DJs, combining the...disc has stopped rotating. If forced ejection is performed while the disc is rotating; ¶ As the disc will be ejected outside the CD player rotating, it is inserted fully into the forced ejection hole on an analog record. When the provided forced eject pin is rotating. 2 Always...
... Connecting two CDJ-100S for use in Digital Jog Break for Original Sound Creation Each of track speed. The length of the bar gives the user immediate knowledge of playback when the PLAY but- BEFORE OPERATIONS FEATURES This component is a compact disc player designed for use by DJs, combining the...disc has stopped rotating. If forced ejection is performed while the disc is rotating; ¶ As the disc will be ejected outside the CD player rotating, it is inserted fully into the forced ejection hole on an analog record. When the provided forced eject pin is rotating. 2 Always...

Owner's Manual
Page 5
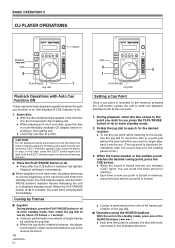
... using the DJ mixer DJM-500 Audio cable (accessory) CDJ-100S CDJ-100S Audio cable (accessory) Audio cable (accessory) CDJ-100S D When using the other DJ mixer Connect the player's AUDIO OUT jack to the LINE IN or AUX IN jack of the DIGITAL OUT connector and the DIGITAL OUT switch. 1. Stereo amplifier Connect to the CD or AUX input...
... using the DJ mixer DJM-500 Audio cable (accessory) CDJ-100S CDJ-100S Audio cable (accessory) Audio cable (accessory) CDJ-100S D When using the other DJ mixer Connect the player's AUDIO OUT jack to the LINE IN or AUX IN jack of the DIGITAL OUT connector and the DIGITAL OUT switch. 1. Stereo amplifier Connect to the CD or AUX input...
Owner's Manual
Page 10
... the jog dial. ÷ When the jog dial is that point immediately after the CUE button's indicator has lighted. BASIC OPERATION II DJ PLAYER OPERATIONS Jog dial Playback Operations with Auto Cue Function ON These represent basic playback operations when the auto cue function is on (the display's... indicator appears. In this case, press the EJECT button again and wait until the EJECT indicator goes out before inserting in a commercially available CD adapter before reinserting the disc. 2. Insert disc. ÷ With the disc's label surface upward, insert the disc into the slot while...
... the jog dial. ÷ When the jog dial is that point immediately after the CUE button's indicator has lighted. BASIC OPERATION II DJ PLAYER OPERATIONS Jog dial Playback Operations with Auto Cue Function ON These represent basic playback operations when the auto cue function is on (the display's... indicator appears. In this case, press the EJECT button again and wait until the EJECT indicator goes out before inserting in a commercially available CD adapter before reinserting the disc. 2. Insert disc. ÷ With the disc's label surface upward, insert the disc into the slot while...
Owner's Manual
Page 12
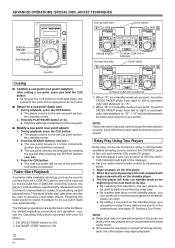
... using a commercially available miniplug cord to connect the CONTROL jacks of this unit and another CDJ series CD player. ÷ Set both player's auto cue function to ON (the AUTO CUE indicators will begin automatically on the standby player. 3. Fader Start Playback A commercially available mini-plug cord can be heard. 7 Return ...point moves in standby mode at cue point, move the CROSS FADER slider from right to left to right to one of the optional DJ mixers DJM-500 or DJM-300; The following operations are not connected to the same audio mixer. ÷ If the power to ...
... using a commercially available miniplug cord to connect the CONTROL jacks of this unit and another CDJ series CD player. ÷ Set both player's auto cue function to ON (the AUTO CUE indicators will begin automatically on the standby player. 3. Fader Start Playback A commercially available mini-plug cord can be heard. 7 Return ...point moves in standby mode at cue point, move the CROSS FADER slider from right to left to right to one of the optional DJ mixers DJM-500 or DJM-300; The following operations are not connected to the same audio mixer. ÷ If the power to ...
Owner's Manual
Page 13
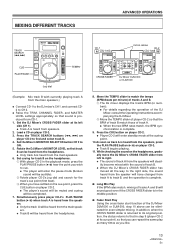
.... 5. Press the TRACK SEARCH buttons (4, ¢) on player CD-2. ÷ Player CD-2 will be eliminated for even simpler mixing. Set cueing for track B on player CD-2. ÷ Track B begins playing. 11. While checking the sound on the headphones, gradually move the DJ Mixer's CROSS FADER slider from left side (CH 1). &#...if the CROSS FADER slider is in numbers). ÷ For details regarding the operation of the DJ Mixer, consult the Operating Instructions accompanying the DJ Mixer. 2 Move the TEMPO slider of player CD-2 so that the BPM of track B match those of track A. ÷ When the two...
.... 5. Press the TRACK SEARCH buttons (4, ¢) on player CD-2. ÷ Player CD-2 will be eliminated for even simpler mixing. Set cueing for track B on player CD-2. ÷ Track B begins playing. 11. While checking the sound on the headphones, gradually move the DJ Mixer's CROSS FADER slider from left side (CH 1). &#...if the CROSS FADER slider is in numbers). ÷ For details regarding the operation of the DJ Mixer, consult the Operating Instructions accompanying the DJ Mixer. 2 Move the TEMPO slider of player CD-2 so that the BPM of track B match those of track A. ÷ When the two...
Owner's Manual
Page 15
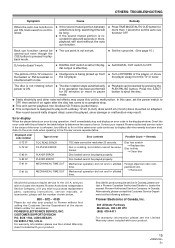
...÷ The cue point is not set yet. ÷ Set the cue point. (See page 10.) DJ mode doesn't work. ÷ DIGITAL OUT switch is dirty = Clean disc E-83 02 PLAYER ERROR Disc loaded cannot be played properly. Disc has scratch = Replace disc Disc is set to ON (dig-... rotating when power is the CD player. Error display When the player detects an error during operation, if will immediately stop . ¶ This unit cannot playback non-finalized CD-R discs (partial discs). ¶ This component is effective). Check the error code with your nearest Pioneer authorized service center if the ...
...÷ The cue point is not set yet. ÷ Set the cue point. (See page 10.) DJ mode doesn't work. ÷ DIGITAL OUT switch is dirty = Clean disc E-83 02 PLAYER ERROR Disc loaded cannot be played properly. Disc has scratch = Replace disc Disc is set to ON (dig-... rotating when power is the CD player. Error display When the player detects an error during operation, if will immediately stop . ¶ This unit cannot playback non-finalized CD-R discs (partial discs). ¶ This component is effective). Check the error code with your nearest Pioneer authorized service center if the ...


