
Owner's Manual
Page 1
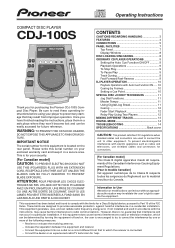
Operating Instructions COMPACT DISC PLAYER CDJ-100S Thank you have finished reading the instructions, place them in accordance with the limits for future reference. WARNING: TO PREVENT FIRE OR SHOCK HAZARD... 8 ORDINARY CD PLAYER OPERATIONS 9 Setting the Auto Cue Function ON/OFF 9 Playback Operations 9 To Stop Play 9 To Pause Play 9 Track Cueing 9 Fast-Forward/Fast-Reverse 9 DJ PLAYER OPERATION 10 Playback Operations with electric appliances such as radios and televisions, use shielded cables and connectors for purchasing the Pioneer CDJ-100S Compact Disc Player. Reorient or...
Operating Instructions COMPACT DISC PLAYER CDJ-100S Thank you have finished reading the instructions, place them in accordance with the limits for future reference. WARNING: TO PREVENT FIRE OR SHOCK HAZARD... 8 ORDINARY CD PLAYER OPERATIONS 9 Setting the Auto Cue Function ON/OFF 9 Playback Operations 9 To Stop Play 9 To Pause Play 9 Track Cueing 9 Fast-Forward/Fast-Reverse 9 DJ PLAYER OPERATION 10 Playback Operations with electric appliances such as radios and televisions, use shielded cables and connectors for purchasing the Pioneer CDJ-100S Compact Disc Player. Reorient or...
Owner's Manual
Page 3
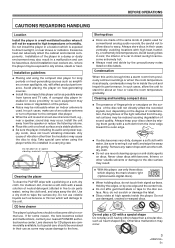
...to warp. If for long periods on heat-generating sources such as amplifiers or near a speaker, sound skip may occur. Lens cleaners for CD players are made of the same kinds of plastic used for about an hour or raise the room temperature gradually. Always store discs in their ... extremely low temperatures. Use a dry cloth to six parts water), wring the cloth well, and wipe away the dirt. Always keep your nearest PIONEER authorized service center. Cleaning and handling compact discs ÷ The presence of fingerprints or smudges on the surface of the disc will not be exposed...
...to warp. If for long periods on heat-generating sources such as amplifiers or near a speaker, sound skip may occur. Lens cleaners for CD players are made of the same kinds of plastic used for about an hour or raise the room temperature gradually. Always store discs in their ... extremely low temperatures. Use a dry cloth to six parts water), wring the cloth well, and wipe away the dirt. Always keep your nearest PIONEER authorized service center. Cleaning and handling compact discs ÷ The presence of fingerprints or smudges on the surface of the disc will not be exposed...
Owner's Manual
Page 4
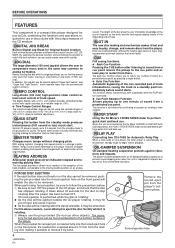
... match the track selection, you to return any number of the player. JOG DIAL The large-diameter (100 mm) jog dial allows the user to a standby point immediately before sound starts. Normal CD players require up to one -frame (1/75th second). With analog systems,...floor-transmitted vibrations. This function allows instantaneous start function virtually eliminates this jog dial can be scratched. RELAY PLAY Connecting two CDJ-100S for Original Sound Creation Each of track introductions, cueing the track to compensate music beat in Digital Jog Break for Automatic...
... match the track selection, you to return any number of the player. JOG DIAL The large-diameter (100 mm) jog dial allows the user to a standby point immediately before sound starts. Normal CD players require up to one -frame (1/75th second). With analog systems,...floor-transmitted vibrations. This function allows instantaneous start function virtually eliminates this jog dial can be scratched. RELAY PLAY Connecting two CDJ-100S for Original Sound Creation Each of track introductions, cueing the track to compensate music beat in Digital Jog Break for Automatic...

Owner's Manual
Page 5
.... Do not connect to the PHONO jacks CDJ-100S Audio cable (accessory) B When using the DJ mixer DJM-300 CDJ-100S Audio cable (accessory) C When using the DJ mixer DJM-500 Audio cable (accessory) CDJ-100S CDJ-100S Audio cable (accessory) Audio cable (accessory) CDJ-100S D When using the other DJ mixer Connect the player's AUDIO OUT jack to the LINE...
.... Do not connect to the PHONO jacks CDJ-100S Audio cable (accessory) B When using the DJ mixer DJM-300 CDJ-100S Audio cable (accessory) C When using the DJ mixer DJM-500 Audio cable (accessory) CDJ-100S CDJ-100S Audio cable (accessory) Audio cable (accessory) CDJ-100S D When using the other DJ mixer Connect the player's AUDIO OUT jack to the LINE...
Owner's Manual
Page 7
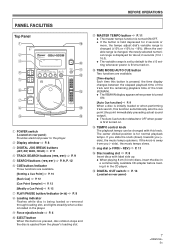
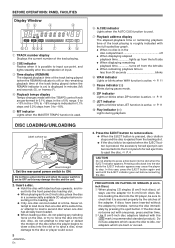
... button is changed with label side up. ÷ When playing 8 cm (3-inch) discs, insert the disc in a commercially available CD adapter before loading it in the player. 9 Force ejection hole ] P. 4 0 EJECT button When this function automatically sets the cue point (the point immediately preceding actual...] P. 9 8 Loading indicator Flashes while disc is being loaded or removed through loading slot, and lights steadily when a disc is loaded in the CD player. # DIGITAL OUT switch ] P. 14 (Located on rear panel) 7 En BEFORE OPERATIONS PANEL FACILITIES Top Panel 1 POWER switch (Located on rear...
... button is changed with label side up. ÷ When playing 8 cm (3-inch) discs, insert the disc in a commercially available CD adapter before loading it in the player. 9 Force ejection hole ] P. 4 0 EJECT button When this function automatically sets the cue point (the point immediately preceding actual...] P. 9 8 Loading indicator Flashes while disc is being loaded or removed through loading slot, and lights steadily when a disc is loaded in the CD player. # DIGITAL OUT switch ] P. 14 (Located on rear panel) 7 En BEFORE OPERATIONS PANEL FACILITIES Top Panel 1 POWER switch (Located on rear...
Owner's Manual
Page 8
...0 to +10% in the +10% to -16%. 5 MT indicator Lights when the MASTER TEMPO function is active. ] P. 11 - Before loading the disc into the CD player, be loaded at the same time, or attempt to load a second disc when one press, press another time. 2 Use 8 cm/3-inch disc adapters labeled with... with one disc has already been loaded. ¶ When loading a disc, do not attempt to interrupt or defeat the motion of the disc when the player begins to load more than 30 seconds blinks 8 WAH indicator Lights or blinks when WAH function is active. ] P. 11 9 Pause indicator (*) Blinks during ...
...0 to +10% in the +10% to -16%. 5 MT indicator Lights when the MASTER TEMPO function is active. ] P. 11 - Before loading the disc into the CD player, be loaded at the same time, or attempt to load a second disc when one press, press another time. 2 Use 8 cm/3-inch disc adapters labeled with... with one disc has already been loaded. ¶ When loading a disc, do not attempt to interrupt or defeat the motion of the disc when the player begins to load more than 30 seconds blinks 8 WAH indicator Lights or blinks when WAH function is active. ] P. 11 9 Pause indicator (*) Blinks during ...
Owner's Manual
Page 9
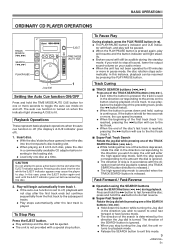
...disc loading slot. ÷ When playing an 8 cm/3-inch disc, place the disc in a commercially available CD adapter before reinserting the disc. 2. In this mode. 9 En If the button is held , cueing is... wish to press a disc back into the slot while the EJECT indicator appears may cause the player to toggle the auto cue mode on when the indicator light showing A.CUE is not provided with...the direction corresponding to the direction you wish to search to skip; BASIC OPERATION I ORDINARY CD PLAYER OPERATIONS Jog dial Setting the Auto Cue function ON/OFF Press and hold the TIME MODE...
...disc loading slot. ÷ When playing an 8 cm/3-inch disc, place the disc in a commercially available CD adapter before reinserting the disc. 2. In this mode. 9 En If the button is held , cueing is... wish to press a disc back into the slot while the EJECT indicator appears may cause the player to toggle the auto cue mode on when the indicator light showing A.CUE is not provided with...the direction corresponding to the direction you wish to search to skip; BASIC OPERATION I ORDINARY CD PLAYER OPERATIONS Jog dial Setting the Auto Cue function ON/OFF Press and hold the TIME MODE...
Owner's Manual
Page 10
...insert the disc into the front-panel's disc loading slot. ÷ When playing an 8 cm/3-inch disc, place the disc in a commercially available CD adapter before inserting in playback standby mode. Press the PLAY/PAUSE button (6). ÷ Press after the sound heard in the memory, pressing the CUE... 48 frames per rotation of the jog dial. 7 Operation using the SEARCH buttons With the unit in the standby mode, press one track ends, the player advances to enter standby mode. 2. CAUTION Do not attempt to begin immediately. 7 When playback of single frames by frame (75 frames = 1 second). ...
...insert the disc into the front-panel's disc loading slot. ÷ When playing an 8 cm/3-inch disc, place the disc in a commercially available CD adapter before inserting in playback standby mode. Press the PLAY/PAUSE button (6). ÷ Press after the sound heard in the memory, pressing the CUE... 48 frames per rotation of the jog dial. 7 Operation using the SEARCH buttons With the unit in the standby mode, press one track ends, the player advances to enter standby mode. 2. CAUTION Do not attempt to begin immediately. 7 When playback of single frames by frame (75 frames = 1 second). ...
Owner's Manual
Page 12
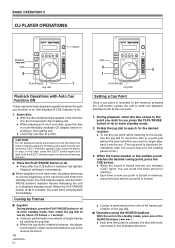
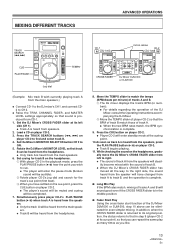
...its cue point (back cue) automatically. Relay Play Using Two Players Relay play may begin automatically on "B". ( "A" will be set cue point and enters standby mode. 2. when this unit and another CDJ series CD player. ÷ Set both player's auto cue function to ON (the AUTO CUE indicators will ...begin playback. During playback, press the CUE button. ÷ The player returns to one of the optional DJ mixers DJM-500 or...
...its cue point (back cue) automatically. Relay Play Using Two Players Relay play may begin automatically on "B". ( "A" will be set cue point and enters standby mode. 2. when this unit and another CDJ series CD player. ÷ Set both player's auto cue function to ON (the AUTO CUE indicators will ...begin playback. During playback, press the CUE button. ÷ The player returns to one of the optional DJ mixers DJM-500 or...
Owner's Manual
Page 13
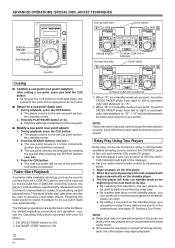
... repeat the same play as many times as track A is heard from the speakers, press the PLAY/PAUSE button (6) on player CD-2. ÷ Track B begins playing. 11. Simultaneously press player CD-2's PLAY/PAUSE button (6) when track A is heard from the speakers. ÷ Only the track A will be heard from... Mixer DJM-500 or DJM-300, step 10 above can be eliminated for even simpler mixing. Load a CD on player CD-2 to find and select track B. 4. Set cueing for track B on player CD-2. ÷ Player CD-2 will enter standby mode at its cue point), so that sound is produced from the main speakers. 6....
... repeat the same play as many times as track A is heard from the speakers, press the PLAY/PAUSE button (6) on player CD-2. ÷ Track B begins playing. 11. Simultaneously press player CD-2's PLAY/PAUSE button (6) when track A is heard from the speakers. ÷ Only the track A will be heard from... Mixer DJM-500 or DJM-300, step 10 above can be eliminated for even simpler mixing. Load a CD on player CD-2 to find and select track B. 4. Set cueing for track B on player CD-2. ÷ Player CD-2 will enter standby mode at its cue point), so that sound is produced from the main speakers. 6....
Owner's Manual
Page 15
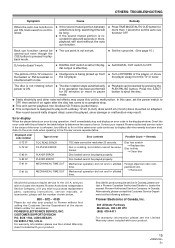
...switch to Pioneer without the auto cue function. ÷ Press TIME MODE/AUTO CUE button for more in playback mode. ÷ The cue point is not set yet. ÷ Set the cue point. (See page 10.) DJ mode doesn't work. ÷ DIGITAL OUT switch is the CD player. Should... this product require service in Canada, please contact a Pioneer Canadian Authorized Dealer to locate the nearest Pioneer Authorized Service Company in the table below . 800 - 872 - 4159 Please do not ship your ...
...switch to Pioneer without the auto cue function. ÷ Press TIME MODE/AUTO CUE button for more in playback mode. ÷ The cue point is not set yet. ÷ Set the cue point. (See page 10.) DJ mode doesn't work. ÷ DIGITAL OUT switch is the CD player. Should... this product require service in Canada, please contact a Pioneer Canadian Authorized Dealer to locate the nearest Pioneer Authorized Service Company in the table below . 800 - 872 - 4159 Please do not ship your ...


