User Guide
Page 4
...Projector 7 Remote control 7 6. data input 16 Menu structure - For your own protection and prolonged operation of your purchase of Texas Instruments Inc. UGO X-lite or S-lite...Philips Consumer Electronics Company One Philips Drive Knoxville, TN 37914 Telephone (1888) 873-4672 IMPORTANT Digital Light Processing, DLP, Digital Micromirror Device and DMD are designed to keep this multimedia projector is the following measures: - Please put the projector... - Note: Save energy! Projector Features 6 5. RCA Video cable - XGA or SVGA) projector - Introduction 2. This device must...
...Projector 7 Remote control 7 6. data input 16 Menu structure - For your own protection and prolonged operation of your purchase of Texas Instruments Inc. UGO X-lite or S-lite...Philips Consumer Electronics Company One Philips Drive Knoxville, TN 37914 Telephone (1888) 873-4672 IMPORTANT Digital Light Processing, DLP, Digital Micromirror Device and DMD are designed to keep this multimedia projector is the following measures: - Please put the projector... - Note: Save energy! Projector Features 6 5. RCA Video cable - XGA or SVGA) projector - Introduction 2. This device must...
User Guide
Page 5
... must not be placed near or over a radiator or heating vent. The bottom opening should not be blocked or covered. The projector should not be operated only from overheating, these instructions before cleaning or lamp replacement. 2. Do not overload wall outlets and extension cords.... improper adjustment of any cable systems. This will be blocked by PHILIPS, as they may touch dangerous voltage points or short cut parts, which may fall, which could result in installation such as this projector, observe the following conditions: A. Clean the ventilation slots and speaker ...
... must not be placed near or over a radiator or heating vent. The bottom opening should not be blocked or covered. The projector should not be operated only from overheating, these instructions before cleaning or lamp replacement. 2. Do not overload wall outlets and extension cords.... improper adjustment of any cable systems. This will be blocked by PHILIPS, as they may touch dangerous voltage points or short cut parts, which may fall, which could result in installation such as this projector, observe the following conditions: A. Clean the ventilation slots and speaker ...
User Guide
Page 6
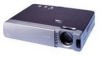
... brightness, smaller size, and lighter weight. 3. Digital freeze; LC5141 Fully compatible with true S-VGA; LC5131 Fully compatible with true XGA; Superb picture performance Sharp, clear images. The transmitter of the wireless remote control allows you with PC and MAC The projector will recognize these projectors to the unit. 6. The advanced intelligent compression technology enables... vision, image distortion (if any line omission. 2. Very easy to install and operate The OSD (On Screen Display) information screens and menus in the room. UGO X-lite; UGO S-lite;
... brightness, smaller size, and lighter weight. 3. Digital freeze; LC5141 Fully compatible with true S-VGA; LC5131 Fully compatible with true XGA; Superb picture performance Sharp, clear images. The transmitter of the wireless remote control allows you with PC and MAC The projector will recognize these projectors to the unit. 6. The advanced intelligent compression technology enables... vision, image distortion (if any line omission. 2. Very easy to install and operate The OSD (On Screen Display) information screens and menus in the room. UGO X-lite; UGO S-lite;
User Guide
Page 7
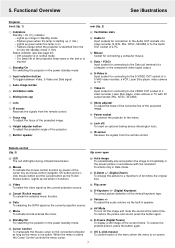
... the DATA signal as the menu is not active. To restore the picture and sound, press the button again. • Standby/On For switching the projector in the menu when the menu is on screen. 7 To restore the present picture, press the button again. ‡ OK (L-click mouse) To ...AV output socket (PAL, NTSC, SECAM). * Skew adjuster To adjust the skew of the horizontal line of the projected image. ( Power socket To connect the projector to the mains. ) Lock slit To insert an optional locking device (Kensington lock). ¡ IR sensor Receives the signals from the remote control. 9 Focus ...
... the DATA signal as the menu is not active. To restore the picture and sound, press the button again. • Standby/On For switching the projector in the menu when the menu is on screen. 7 To restore the present picture, press the button again. ‡ OK (L-click mouse) To ...AV output socket (PAL, NTSC, SECAM). * Skew adjuster To adjust the skew of the horizontal line of the projected image. ( Power socket To connect the projector to the mains. ) Lock slit To insert an optional locking device (Kensington lock). ¡ IR sensor Receives the signals from the remote control. 9 Focus ...
User Guide
Page 8
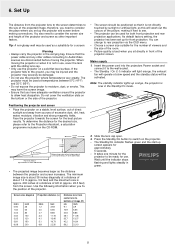
...inch 9,1 3,9 16,9 6,65 22,5 8,86 28,1 11,06 33,7 13,27 42,2 16,61 56,2 22,13 2. Warning • Always carry the projector in green. 8 You can be used for front projection. The Standby/On indicator flashes green and the start-up for both front projection and rear... projection applications. The projector must be activated. This may harm the screen image. • Ensure that you sit directly in the table below) • The projected...
...inch 9,1 3,9 16,9 6,65 22,5 8,86 28,1 11,06 33,7 13,27 42,2 16,61 56,2 22,13 2. Warning • Always carry the projector in green. 8 You can be used for front projection. The Standby/On indicator flashes green and the start-up for both front projection and rear... projection applications. The projector must be activated. This may harm the screen image. • Ensure that you sit directly in the table below) • The projected...
User Guide
Page 9
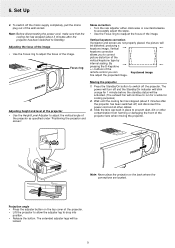
...Standby/On indicator will blink orange for cooling purposes) 2. 6. The extended adjuster legs will be activated. (The exhaust fan will turn off the projector. By pressing the D-Keystone +/- To switch off ) and disconnect the power cord and all other contamination from harming or damaging the front of... to accurately adjust the skew. • Use the Focus ring to drop into position. • Release the button. Vertical keystone correction If projector and screen are located. Slide the lens cap back in place to run for a while for 1 minute before the standby status will be ...
...Standby/On indicator will blink orange for cooling purposes) 2. 6. The extended adjuster legs will be activated. (The exhaust fan will turn off the projector. By pressing the D-Keystone +/- To switch off ) and disconnect the power cord and all other contamination from harming or damaging the front of... to accurately adjust the skew. • Use the Focus ring to drop into position. • Release the button. Vertical keystone correction If projector and screen are located. Slide the lens cap back in place to run for a while for 1 minute before the standby status will be ...
User Guide
Page 10
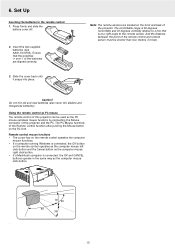
...the computer mouse left click button and the Cancel button as the PC mouse (wireless mouse function) by connecting the Mouse connector of this projector can be shorter than four meters (13 feet). Do not mix old and new batteries (also never mix alkaline and manganese batteries). ...Insert the two supplied batteries (size AAA1,5V/LR03). The PC Mouse functions of the batteries are located on the front and back of this projector and the PC. Using the remote control as the computer mouse click button. Note: The remote sensors are aligned correctly. 3. Caution! Slide the...
...the computer mouse left click button and the Cancel button as the PC mouse (wireless mouse function) by connecting the Mouse connector of this projector can be shorter than four meters (13 feet). Do not mix old and new batteries (also never mix alkaline and manganese batteries). ...Insert the two supplied batteries (size AAA1,5V/LR03). The PC Mouse functions of the batteries are located on the front and back of this projector and the PC. Using the remote control as the computer mouse click button. Note: The remote sensors are aligned correctly. 3. Caution! Slide the...
User Guide
Page 11
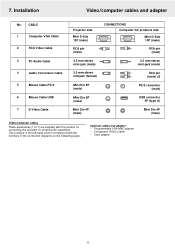
...Component (YCbCr) cable - Optional cables and adapter: - The numbers in the left-hand column correspond with the product for connecting the projector to 7) are supplied with the numbers in the connection diagrams on the following pages. Programmable VGA MAC adapter - CABLE 1 Computer VGA ...Cable 2 RCA Video Cable 3 PC Audio Cable 4 Audio Conversion Cable 5 Mouse Cable PS/2 6 Mouse Cable USB 7 S-Video Cable Projector side Mini D-Sub 15P (male) RCA pin (male) CONNECTIONS Computer/AV products side Mini D-Sub 15P (male) RCA pin (male) 3.5 mm stereo ...
...Component (YCbCr) cable - Optional cables and adapter: - The numbers in the left-hand column correspond with the product for connecting the projector to 7) are supplied with the numbers in the connection diagrams on the following pages. Programmable VGA MAC adapter - CABLE 1 Computer VGA ...Cable 2 RCA Video Cable 3 PC Audio Cable 4 Audio Conversion Cable 5 Mouse Cable PS/2 6 Mouse Cable USB 7 S-Video Cable Projector side Mini D-Sub 15P (male) RCA pin (male) CONNECTIONS Computer/AV products side Mini D-Sub 15P (male) RCA pin (male) 3.5 mm stereo ...
User Guide
Page 12
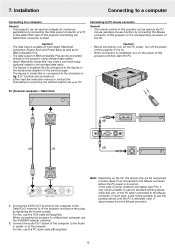
...The data output of the PC when connected to the Mouse connector before the PC power is completed, turn off the power of this projector to the corresponding connector of some cases if not connected to the Mouse connector. Turn off the PC power. When connection is turned on...PCs, it is on the previous page. For this , use the pointing device until the PC is suitable for IBM compatible PCs. - When connecting the projector to a computer General - Note: Depending on the PC, the mouse may need a conversion plug (optional) added to PC mouse connector General - Apple ...
...The data output of the PC when connected to the Mouse connector before the PC power is completed, turn off the power of this projector to the corresponding connector of some cases if not connected to the Mouse connector. Turn off the PC power. When connection is turned on...PCs, it is on the previous page. For this , use the pointing device until the PC is suitable for IBM compatible PCs. - When connecting the projector to a computer General - Note: Depending on the PC, the mouse may need a conversion plug (optional) added to PC mouse connector General - Apple ...
User Guide
Page 13
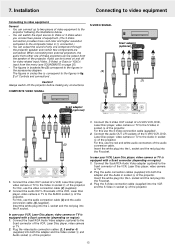
.... 7. Connect the S-Video OUT socket of a S-VHS VCR, DVD, Laser Disc player, video camera or TV to two pieces of the projector. Plug the audio connection cables (supplied) into the R socket. The figures in brackets like # correspond to the Scart connector of 'Controls and... connections'. You can be turned on and off the projector before making any connections. Caution! For this , use the S-Video connection cable (supplied) . 2. For this , use the red and white ...
.... 7. Connect the S-Video OUT socket of a S-VHS VCR, DVD, Laser Disc player, video camera or TV to two pieces of the projector. Plug the audio connection cables (supplied) into the R socket. The figures in brackets like # correspond to the Scart connector of 'Controls and... connections'. You can be turned on and off the projector before making any connections. Caution! For this , use the S-Video connection cable (supplied) . 2. For this , use the red and white ...
User Guide
Page 14
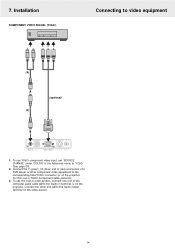
... (blue) and Cr (red) connectors of a DVD player or other end (4) to the Audio output terminal on the projector. For this, use the built-in audio system, connect one end of the projector. 7. Connect the other component video equipment to the corresponding Data/YCbCr connector % of the computer audio cable (3) to 'YCbCr...
... (blue) and Cr (red) connectors of a DVD player or other end (4) to the Audio output terminal on the projector. For this, use the built-in audio system, connect one end of the projector. 7. Connect the other component video equipment to the corresponding Data/YCbCr connector % of the computer audio cable (3) to 'YCbCr...
User Guide
Page 15
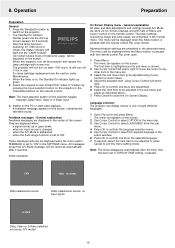
...and Cursor Control on , the Standby/On indicator lights up screen appears for 1000 hours or longer, the Status indicator will turn off the projector and replace the lamp cartridge with the remote control Flip cover open. 1. A feedback message appears on the remote control. when the A/V ... different languages. 1. The basic settings, concerning image and lamp usage, are displayed in the menu bar. 3. The menu bar appears on the projector toggles between Data/YCbCr, Video or S-Video input. 3. Open Flip cover and press Menu. - DATA VIDEO NO SIGNAL Data selected as source...
...and Cursor Control on , the Standby/On indicator lights up screen appears for 1000 hours or longer, the Status indicator will turn off the projector and replace the lamp cartridge with the remote control Flip cover open. 1. A feedback message appears on the remote control. when the A/V ... different languages. 1. The basic settings, concerning image and lamp usage, are displayed in the menu bar. 3. The menu bar appears on the projector toggles between Data/YCbCr, Video or S-Video input. 3. Open Flip cover and press Menu. - DATA VIDEO NO SIGNAL Data selected as source...
User Guide
Page 18
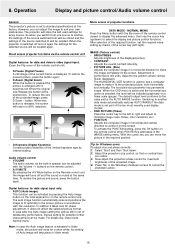
...control - In case after the Auto image setting the picture still is switched off and the sound is displayed. 8. When the projector is not of the required function, set to the position where vertical flicker disappears. The horizontal size parameter has permanent scope. However...enlarged until it fit the projected picture, both horizontally and vertically. Operation Display and picture control/Audio volume control General The projector's picture is set the required value setting by internal scaling. Menu access of the projected image. 4. Adjust to standard ...
...control - In case after the Auto image setting the picture still is switched off and the sound is displayed. 8. When the projector is not of the required function, set to the position where vertical flicker disappears. The horizontal size parameter has permanent scope. However...enlarged until it fit the projected picture, both horizontally and vertically. Operation Display and picture control/Audio volume control General The projector's picture is set the required value setting by internal scaling. Menu access of the projected image. 4. Adjust to standard ...
User Guide
Page 20
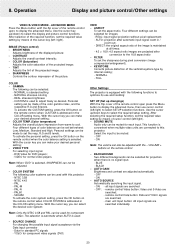
...muted: - Data for DVD players; - 8. ADVANCED MENU Press the Menu button with the - GAMMA The following functions to this projector: - Personal setting can be used with the following can be adjusted. - This function is selected, SHARPNESS can make your desired... personal setting; - NORMAL is equipped with this projector. VIDEO TYPE For selecting input signal. - Note: When 'DVD' is convenient when multiple video units are adjusted automatically. - PAL60 -...
...muted: - Data for DVD players; - 8. ADVANCED MENU Press the Menu button with the - GAMMA The following functions to this projector: - Personal setting can be used with the following can be adjusted. - This function is selected, SHARPNESS can make your desired... personal setting; - NORMAL is equipped with this projector. VIDEO TYPE For selecting input signal. - Note: When 'DVD' is convenient when multiple video units are adjusted automatically. - PAL60 -...
User Guide
Page 21
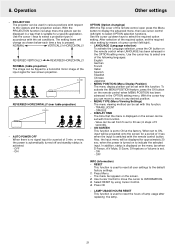
... Cursor Control to move to menu to ON, input will be used in a way that the menu is set to any desired position; - PROJECTION The projector can move the cursor to display the advanced menu, then use cursor control (left /right). - Use the cursor up/down keys to ON at the...
... Cursor Control to move to menu to ON, input will be used in a way that the menu is set to any desired position; - PROJECTION The projector can move the cursor to display the advanced menu, then use cursor control (left /right). - Use the cursor up/down keys to ON at the...
User Guide
Page 22
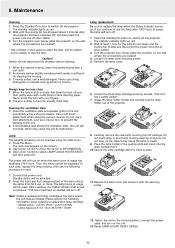
... brush or lens cleaning paper. When the cabinet is likely to stop and disconnect the power cord and all other cables. 3. Turn the projector over . Never touch the lens with the securing screw. 12. Cleaning the ventilation slots 1. Use a soft brush attachment when using the ...vacuum cleaner. Press the Menu. - Connect the power cord. - Model name : LC5141 (XGA) / LC5131(SVGA) - Secure the lamp cartridge with a soft cloth. 2. Never place the projector on when the lamp hours of usage will overheat, which may cause the lamp to clean the lens, and...
... brush or lens cleaning paper. When the cabinet is likely to stop and disconnect the power cord and all other cables. 3. Turn the projector over . Never touch the lens with the securing screw. 12. Cleaning the ventilation slots 1. Use a soft brush attachment when using the ...vacuum cleaner. Press the Menu. - Connect the power cord. - Model name : LC5141 (XGA) / LC5131(SVGA) - Secure the lamp cartridge with a soft cloth. 2. Never place the projector on when the lamp hours of usage will overheat, which may cause the lamp to clean the lens, and...
User Guide
Page 24
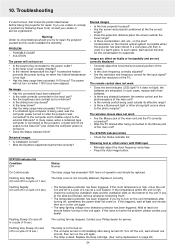
... hints, consult your dealer or service organisation. Blurred images • Is the lens properly focussed? • Are the screen and projector positioned at least one minute, then turn on . Images are offset vertically or horizontally and are exhausted. If it correctly. •...fluorescent light or other strong light source close to a cool location. If you try to repair the projector yourself as this does not solve the problem, please contact your Philips dealer for repair. Distorted images • Is installation correct? • Was the Keystone adjustment performed ...
... hints, consult your dealer or service organisation. Blurred images • Is the lens properly focussed? • Are the screen and projector positioned at least one minute, then turn on . Images are offset vertically or horizontally and are exhausted. If it correctly. •...fluorescent light or other strong light source close to a cool location. If you try to repair the projector yourself as this does not solve the problem, please contact your Philips dealer for repair. Distorted images • Is installation correct? • Was the Keystone adjustment performed ...


