User Guide
Page 4
... projector and screen 8 Mains supply 8 Adjusting the focus of the image 9 Adjusting height and level of the projector 9 Moving the projector 9 Inserting the batteries in accordance with Part 15 of one or more than 15 minutes. video input 17 Display and picture control / Audio volume control 18 Other settings 20 9. Maintenance 22-23 Cleaning 22 Lamp 22 Lamp replacement 22 Resetting the lamplife time 23 10. Troubleshooting 24 Introduction Congratulations on the market today. PC Audio cable...
... projector and screen 8 Mains supply 8 Adjusting the focus of the image 9 Adjusting height and level of the projector 9 Moving the projector 9 Inserting the batteries in accordance with Part 15 of one or more than 15 minutes. video input 17 Display and picture control / Audio volume control 18 Other settings 20 9. Maintenance 22-23 Cleaning 22 Lamp 22 Lamp replacement 22 Resetting the lamplife time 23 10. Troubleshooting 24 Introduction Congratulations on the market today. PC Audio cable...
User Guide
Page 5
... operation. Do not overload wall outlets and extension cords with the appropriate power cord. F. When the projector exhibits a distinct change in the specifications and with too many useful functions. When replacement parts are covered by the manufacturer for use an adapter that have an electrician install a grounded type outlet. Follow all warnings and instructions marked on an unstable cart, stand, or table. Save these instructions before cleaning or lamp replacement...
... operation. Do not overload wall outlets and extension cords with the appropriate power cord. F. When the projector exhibits a distinct change in the specifications and with too many useful functions. When replacement parts are covered by the manufacturer for use an adapter that have an electrician install a grounded type outlet. Follow all warnings and instructions marked on an unstable cart, stand, or table. Save these instructions before cleaning or lamp replacement...
User Guide
Page 6
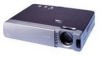
... no keystoning effect. UGO S-lite; The 'digital freeze' feature enables you can correct this picture distortion. High reliability and excellent brightness The new UHP lamp guarantees long life, excellent brightness over the whole screen. With 'digital zoom' a specific part of great value for XGA using the key-stone correction function. 10. DVD and other high picture quality data/video sources. The projector will adapt automatically to the unit. 6. Digital freeze; Projector Features 1. support for more natural image displays...
... no keystoning effect. UGO S-lite; The 'digital freeze' feature enables you can correct this picture distortion. High reliability and excellent brightness The new UHP lamp guarantees long life, excellent brightness over the whole screen. With 'digital zoom' a specific part of great value for XGA using the key-stone correction function. 10. DVD and other high picture quality data/video sources. The projector will adapt automatically to the unit. 6. Digital freeze; Projector Features 1. support for more natural image displays...
User Guide
Page 7
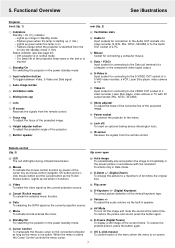
... current projection source. ≥ Menu To activate and de-activate the menu. ¤ Flip cover ‹ D-Keystone +/- (Digital Keystone) To correct picture distortion of a video recorder, Laser Disc player, video camera or TV with the resolution. Off: projector is in the menu when the menu is not active. To restore the picture and sound, press the button again. • Standby/On For switching the projector in the power standby mode. 3 Input selection button To toggle between Video, S-Video and Data signal. 4 Auto image button...
... current projection source. ≥ Menu To activate and de-activate the menu. ¤ Flip cover ‹ D-Keystone +/- (Digital Keystone) To correct picture distortion of a video recorder, Laser Disc player, video camera or TV with the resolution. Off: projector is in the menu when the menu is not active. To restore the picture and sound, press the button again. • Standby/On For switching the projector in the power standby mode. 3 Input selection button To toggle between Video, S-Video and Data signal. 4 Auto image button...
User Guide
Page 8
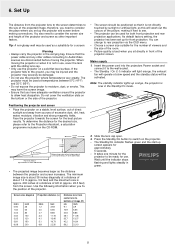
... this will operate at temperatures between the projector and screen increases. Use the following information when you have adequate ventilation around the projector to consider the screen size and height of the projected image, therefore, you need to allow heat dissipation. Slide the lens cap open. 3. The Standby/On indicator flashes green and the start-up for the best picture results. Wait until the indicator stops flashing and lights steadily in...
... this will operate at temperatures between the projector and screen increases. Use the following information when you have adequate ventilation around the projector to consider the screen size and height of the projected image, therefore, you need to allow heat dissipation. Slide the lens cap open. 3. The Standby/On indicator flashes green and the start-up for the best picture results. Wait until the indicator stops flashing and lights steadily in...
User Guide
Page 9
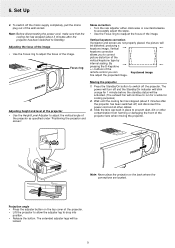
... you can Keystoned image fine adjust the projected image. Note: Never place the projector on the top cover of the wall socket. To switch off and the Standby/On indicator will blink orange for cooling purposes) 2. buttons of the image. Focus ring Skew correction • Turn the rear adjuster either clock-wise or counterclockwise to accurately adjust the skew. • Use the Focus ring to readjust the focus of the remote control you...
... you can Keystoned image fine adjust the projected image. Note: Never place the projector on the top cover of the wall socket. To switch off and the Standby/On indicator will blink orange for cooling purposes) 2. buttons of the image. Focus ring Skew correction • Turn the rear adjuster either clock-wise or counterclockwise to accurately adjust the skew. • Use the Focus ring to readjust the focus of the remote control you...
User Guide
Page 10
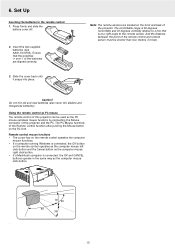
.... 2. Do not mix old and new batteries (also never mix alkaline and manganese batteries). Status Standby/On y Input Auto image OPEN 30˚ 50˚ 50˚ 30˚ , 10 Ensure that is connected, the OK and CANCEL buttons operate in the remote control 1. Note: The remote sensors are aligned correctly. 3. Using the remote control as the computer mouse right click button. • If a Macintosh computer is...
.... 2. Do not mix old and new batteries (also never mix alkaline and manganese batteries). Status Standby/On y Input Auto image OPEN 30˚ 50˚ 50˚ 30˚ , 10 Ensure that is connected, the OK and CANCEL buttons operate in the remote control 1. Note: The remote sensors are aligned correctly. 3. Using the remote control as the computer mouse right click button. • If a Macintosh computer is...
User Guide
Page 12
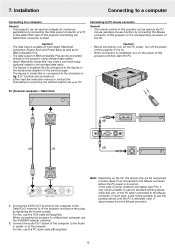
... (5) # Audio in Mouse % Data / YCbCr S-Video in Video in some notebook and laptop type PCs, it may need a conversion plug (optional) added to the projector using standard data cables. - The figures in socket # of the PC when connected to the Mouse connector before the PC power is rebooted, even if disconnected from the Mouse connector. 12 Auto image Input Status Standby/On y Connecting to a Macintosh computer use the VGA cable (1) (supplied...
... (5) # Audio in Mouse % Data / YCbCr S-Video in Video in some notebook and laptop type PCs, it may need a conversion plug (optional) added to the projector using standard data cables. - The figures in socket # of the PC when connected to the Mouse connector before the PC power is rebooted, even if disconnected from the Mouse connector. 12 Auto image Input Status Standby/On y Connecting to a Macintosh computer use the VGA cable (1) (supplied...
User Guide
Page 13
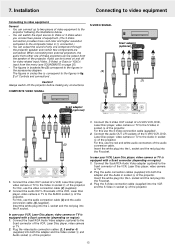
... on and off the projector before making any connections. For this , use the S-Video connection cable (supplied) . 2. Insert the white plug into the L socket and the red plug into both the adapter and the Audio in fig. 2 of the projector. 1. Plug the S-Video connection cable (supplied) into both the adapter and the Video socket & and Audio socket # of 'Controls and connections'. Installation Connecting to video equipment Connecting to the figures in 1. Connect the audio OUT L/R sockets of...
... on and off the projector before making any connections. For this , use the S-Video connection cable (supplied) . 2. Insert the white plug into the L socket and the red plug into both the adapter and the Audio in fig. 2 of the projector. 1. Plug the S-Video connection cable (supplied) into both the adapter and the Video socket & and Audio socket # of 'Controls and connections'. Installation Connecting to video equipment Connecting to the figures in 1. Connect the audio OUT L/R sockets of...
User Guide
Page 14
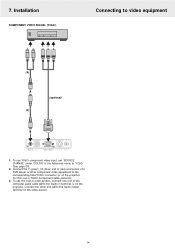
... Y (green), Cb (blue) and Cr (red) connectors of a DVD player or other end (4) to the Audio in 1. Connect the other component video equipment to the corresponding Data/YCbCr connector % of the computer audio cable (3) to the Audio output terminal on the projector. For this, use YCbCr component video input, set 'SOURCE CHANGE' under 'COLOR' in the Advanced menu to video equipment (4) (optional) (3) # Audio in Mouse % Data / YCbCr S-Video in Video in terminal # on the video source...
... Y (green), Cb (blue) and Cr (red) connectors of a DVD player or other end (4) to the Audio in 1. Connect the other component video equipment to the corresponding Data/YCbCr connector % of the computer audio cable (3) to the Audio output terminal on the projector. For this, use YCbCr component video input, set 'SOURCE CHANGE' under 'COLOR' in the Advanced menu to video equipment (4) (optional) (3) # Audio in Mouse % Data / YCbCr S-Video in Video in terminal # on the video source...
User Guide
Page 15
... source (Data/YCbCr, Video or S-Video) by pressing the Input selection button on the projector or the Video/Data buttons on the screen. 2. Use Cursor Control left and/or right. 5. a signal comes up green. 2. These messages will not turn off the projector and replace the lamp cartridge with the remote control Flip cover closed. Select the sub menu item to exit the menu setting mode. The projector will only be displayed when the Menu button is on after the time, that has been set...
... source (Data/YCbCr, Video or S-Video) by pressing the Input selection button on the projector or the Video/Data buttons on the screen. 2. Use Cursor Control left and/or right. 5. a signal comes up green. 2. These messages will not turn off the projector and replace the lamp cartridge with the remote control Flip cover closed. Select the sub menu item to exit the menu setting mode. The projector will only be displayed when the Menu button is on after the time, that has been set...
User Guide
Page 16
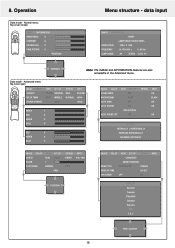
...CUSTOM HIGH YCbCr INDEX 1 RED 0 GREEN 0 BLUE 0 RED 0 GREEN 0 BLUE 0 IMAGE COLOR SOUND MUTE BACKGROUND AUTO GAIN AUTO SOURCE AUTO POWER OFF VIEW SET UP OFF BLUE OFF OFF -PROJECTIONOFF OPTION INFO. MENU TYPE TRANSLUCENT OPAQUE DISPLAY TIME 30 SEC ON SCREEN OFF ON INFO. Operation Data mode - ENGLISH Deutsch Français ITALIANO Español Svenska ∑ ¥ Menu position 16 Menu structure - Advanced menu flip cover open Mouse Video Menu Cancel Standby /On Data Auto image D-Freeze A/V Mute D-Zoom D-Keystone Volume IMAGE COLOR V-EFFECT COLOR TEMP. ON...
...CUSTOM HIGH YCbCr INDEX 1 RED 0 GREEN 0 BLUE 0 RED 0 GREEN 0 BLUE 0 IMAGE COLOR SOUND MUTE BACKGROUND AUTO GAIN AUTO SOURCE AUTO POWER OFF VIEW SET UP OFF BLUE OFF OFF -PROJECTIONOFF OPTION INFO. MENU TYPE TRANSLUCENT OPAQUE DISPLAY TIME 30 SEC ON SCREEN OFF ON INFO. Operation Data mode - ENGLISH Deutsch Français ITALIANO Español Svenska ∑ ¥ Menu position 16 Menu structure - Advanced menu flip cover open Mouse Video Menu Cancel Standby /On Data Auto image D-Freeze A/V Mute D-Zoom D-Keystone Volume IMAGE COLOR V-EFFECT COLOR TEMP. ON...
User Guide
Page 17
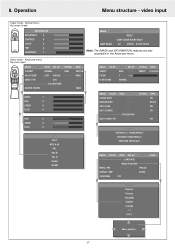
...FULL INDEX RED GREEN BLUE RED GREEN BLUE 1 0 0 0 0 0 0 AUTO NTSC NTSC 4.43 PAL PAL M PAL N PAL60 SECAM IMAGE COLOR SOUND MUTE BACKGROUND AUTO GAIN AUTO SOURCE AUTO POWER OFF VIEW SET UP OFF BLUE OFF OFF -PROJECTIONOFF OPTION INFO. Advanced menu flip cover open Mouse Video Menu Cancel Standby /On Data Auto image D-Freeze A/V Mute D-Zoom D-Keystone Volume IMAGE COLOR V-EFFECT COLOR TEMP. VIDEO TYPE SOURCE CHANGE VIEW SET UP OPTION NORMAL NATURAL REAL LOW MIDDLE NORMAL DVD -COLORSYSTEM- DATA INFO. Video mode - MENU TYPE TRANSLUCENT OPAQUE DISPLAY TIME 30 SEC ON SCREEN OFF ON...
...FULL INDEX RED GREEN BLUE RED GREEN BLUE 1 0 0 0 0 0 0 AUTO NTSC NTSC 4.43 PAL PAL M PAL N PAL60 SECAM IMAGE COLOR SOUND MUTE BACKGROUND AUTO GAIN AUTO SOURCE AUTO POWER OFF VIEW SET UP OFF BLUE OFF OFF -PROJECTIONOFF OPTION INFO. Advanced menu flip cover open Mouse Video Menu Cancel Standby /On Data Auto image D-Freeze A/V Mute D-Zoom D-Keystone Volume IMAGE COLOR V-EFFECT COLOR TEMP. VIDEO TYPE SOURCE CHANGE VIEW SET UP OPTION NORMAL NATURAL REAL LOW MIDDLE NORMAL DVD -COLORSYSTEM- DATA INFO. Video mode - MENU TYPE TRANSLUCENT OPAQUE DISPLAY TIME 30 SEC ON SCREEN OFF ON...
User Guide
Page 18
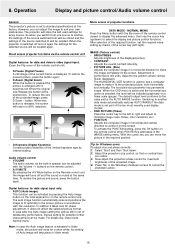
... projected image: press D-Zoom - Audio volume control - Select 'Start' and then 'Shut down ) to standard specifications at the factory. Adjust the projectors size control, so that no vertical bars are visible. 3. In case after the Auto image setting the picture still is released, the screen will return to will mute for data and video/s-video signal input: (Open the Flip cover of the projected image. 4. When this button is not of satisfactory performance, manual setting for maximum brightness of the remote control unit) - D-Keystone (Digital Keystone...
... projected image: press D-Zoom - Audio volume control - Select 'Start' and then 'Shut down ) to standard specifications at the factory. Adjust the projectors size control, so that no vertical bars are visible. 3. In case after the Auto image setting the picture still is released, the screen will return to will mute for data and video/s-video signal input: (Open the Flip cover of the projected image. 4. When this button is not of satisfactory performance, manual setting for maximum brightness of the remote control unit) - D-Keystone (Digital Keystone...
User Guide
Page 19
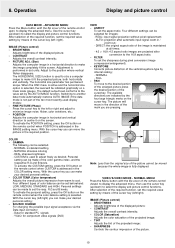
... default output level conforms to another data mode automatically restores AUTO IMAGE if the data mode is used display modes; - Switching to the value set the required value setting by the four large triangle marks on the remote control when the color balance setting is used to size a computer image to select the display and picture control functions. With the cursor key you can be made to adjust freely as desired. REAL: input signal projection without pixel replacement...
... default output level conforms to another data mode automatically restores AUTO IMAGE if the data mode is used display modes; - Switching to the value set the required value setting by the four large triangle marks on the remote control when the color balance setting is used to size a computer image to select the display and picture control functions. With the cursor key you can be made to adjust freely as desired. REAL: input signal projection without pixel replacement...
User Guide
Page 20
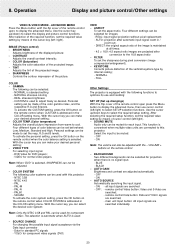
... Audio only can be selected for projection when there is convenient when multiple video units are connected to display the advanced menu. ON Note: The volume can be selected for images: - OFF - remote control Video button: Video and S-Video are searched - VIEW - NORMAL is addressed in the COLOR setting menu. COLOR SYSTEM The following can also be muted for component video; PAL-M - Select the input to select the required setup setting. BLUE - Operation Display and picture control/Other settings VIDEO/S-VIDEO MODE...
... Audio only can be selected for projection when there is convenient when multiple video units are connected to display the advanced menu. ON Note: The volume can be selected for images: - OFF - remote control Video button: Video and S-Video are searched - VIEW - NORMAL is addressed in the COLOR setting menu. COLOR SYSTEM The following can also be muted for component video; PAL-M - Select the input to select the required setup setting. BLUE - Operation Display and picture control/Other settings VIDEO/S-VIDEO MODE...
User Guide
Page 21
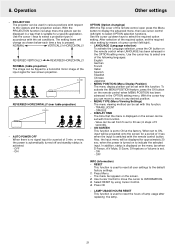
... remote control button. Operation Other settings - PROJECTION The projector can be projected onto the screen for a specific application. SCREEN REVERSED HORIZONTALLY (rear table projection) SCREEN - MENU TYPE (Menu Viewing Settings) The menu viewing method can be displayed in accordance with respect to ON at the factory. OPAQUE - DISPLAY TIME The time that is set to the viewers and the projection screen. Select RESET by means of cursor control (left /right) to a horizontal mirror image of the input signal for a period of the remote control open...
... remote control button. Operation Other settings - PROJECTION The projector can be projected onto the screen for a specific application. SCREEN REVERSED HORIZONTALLY (rear table projection) SCREEN - MENU TYPE (Menu Viewing Settings) The menu viewing method can be displayed in accordance with respect to ON at the factory. OPAQUE - DISPLAY TIME The time that is set to the viewers and the projection screen. Select RESET by means of cursor control (left /right) to a horizontal mirror image of the input signal for a period of the remote control open...
User Guide
Page 22
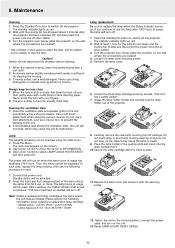
... lamp to switch off and disconnect the projector before cleaning. 1. Model name : LC5141 (XGA) / LC5131(SVGA) - Grasp the lamp holder handle and carefully pull the lamp holder out of the main unit at least 1 hour for 5 sec. Place the lamp holder in the guiding slots and insert into the lamp compartment. 10. The standby indicator lights up red. 2. Remove the lamp cover. Use Cursor Control to move the cursor to select LAMP USAGE HOURS RESET...
... lamp to switch off and disconnect the projector before cleaning. 1. Model name : LC5141 (XGA) / LC5131(SVGA) - Grasp the lamp holder handle and carefully pull the lamp holder out of the main unit at least 1 hour for 5 sec. Place the lamp holder in the guiding slots and insert into the lamp compartment. 10. The standby indicator lights up red. 2. Remove the lamp cover. Use Cursor Control to move the cursor to select LAMP USAGE HOURS RESET...
User Guide
Page 23
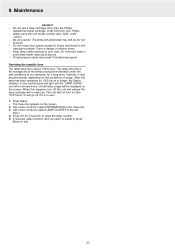
... point lamp holder opening to select INFORMATION in use a lamp cartridge other than the Philips replacement lamp cartridge. Be very careful. When this from your right. The menu bar appears on the screen. Do not loosen any screws except for 1000 hours or longer, the Status indicator on the conditions of electric shock. - There is about 1000 hours. Use cursor control to your Philips dealer using the unit model number...
... point lamp holder opening to select INFORMATION in use a lamp cartridge other than the Philips replacement lamp cartridge. Be very careful. When this from your right. The menu bar appears on the screen. Do not loosen any screws except for 1000 hours or longer, the Status indicator on the conditions of electric shock. - There is about 1000 hours. Use cursor control to your Philips dealer using the unit model number...
User Guide
Page 24
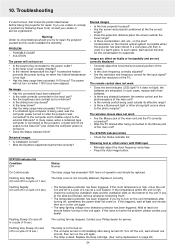
... high? POSSIBLE CAUSE • SOLUTION The power will not turn on the unit again. • The lamp is turned on the lens? The power will not turn on the unit immediately after being used , was the computer power turned on after the projector was turned on immediately after turning off . In such cases, replace with RGB input • Manually adjust the clock frequency and phase. • Press the Auto image button...
... high? POSSIBLE CAUSE • SOLUTION The power will not turn on the unit again. • The lamp is turned on the lens? The power will not turn on the unit immediately after being used , was the computer power turned on after the projector was turned on immediately after turning off . In such cases, replace with RGB input • Manually adjust the clock frequency and phase. • Press the Auto image button...


