User Guide
Page 4
...one of the most spectacular multimedia projectors on a circuit different from that the following : Philips Consumer Electronics Company One Philips Drive Knoxville, TN 37914 Telephone (1888) 873-4672 IMPORTANT Digital Light Processing, DLP, Digital Micromirror Device and DMD .... XGA or SVGA) projector - RCA Video cable - Soft carrying bag + Cable bag - Reorientate or relocate the receiving antenna. - Also, any interference received, including interference that , used in a commercial environment. For your own protection and prolonged operation of enjoyment. UGO X-lite or S-lite (...
...one of the most spectacular multimedia projectors on a circuit different from that the following : Philips Consumer Electronics Company One Philips Drive Knoxville, TN 37914 Telephone (1888) 873-4672 IMPORTANT Digital Light Processing, DLP, Digital Micromirror Device and DMD .... XGA or SVGA) projector - RCA Video cable - Soft carrying bag + Cable bag - Reorientate or relocate the receiving antenna. - Also, any interference received, including interference that , used in a commercial environment. For your own protection and prolonged operation of enjoyment. UGO X-lite or S-lite (...
User Guide
Page 5
... has been damaged. Save these instructions before cleaning or lamp replacement. 2. Electrical energy can perform many products, because this projector is equipped with power cord with a cart or stand recommended by PHILIPS, as a crevice tool, to prevent the damage to check that is in installation such as being suitable for future reference...
... has been damaged. Save these instructions before cleaning or lamp replacement. 2. Electrical energy can perform many products, because this projector is equipped with power cord with a cart or stand recommended by PHILIPS, as a crevice tool, to prevent the damage to check that is in installation such as being suitable for future reference...
User Guide
Page 6
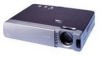
UGO X-lite; UGO S-lite; Superb picture performance Sharp, clear images. Faithful gray scale reproduction makes for XGA using advanced intelligent compression technology. The 'auto image' feature automatically sizes and positions the image to fit optimally ...feature enables you can correct this picture distortion. LC5141 Fully compatible with true S-VGA; LC5131 Fully compatible with true XGA; Using TI's Digital Mirror Device (DMD™) and a keen optical design a geometric effect is not active. 6 Standby/On Switches the projector in quality! With 'digital zoom' a ...
UGO X-lite; UGO S-lite; Superb picture performance Sharp, clear images. Faithful gray scale reproduction makes for XGA using advanced intelligent compression technology. The 'auto image' feature automatically sizes and positions the image to fit optimally ...feature enables you can correct this picture distortion. LC5141 Fully compatible with true S-VGA; LC5131 Fully compatible with true XGA; Using TI's Digital Mirror Device (DMD™) and a keen optical design a geometric effect is not active. 6 Standby/On Switches the projector in quality! With 'digital zoom' a ...
User Guide
Page 7
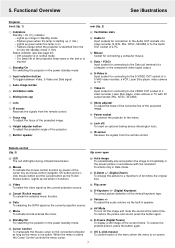
... mouse) To confirm action in the power standby mode. ª Cursor Control To manipulate the mouse cursor on screen. 7 Functional Overview See illustrations Projector front (fig. 1) 1 Indicators Standby / On (y |) indicator - On: lamp life of the projection lamp nears or the end or is switched...Data signal. 4 Auto image button 5 Ventilation slots 6 Sliding lens cap 7 Lens 8 IR sensor Receives the signals from the on - Off: projector is not active. Remote control (fig. 3) flip cover open ™ LED The red LED lights during infrared transmission. £ Mouse To activate...
... mouse) To confirm action in the power standby mode. ª Cursor Control To manipulate the mouse cursor on screen. 7 Functional Overview See illustrations Projector front (fig. 1) 1 Indicators Standby / On (y |) indicator - On: lamp life of the projection lamp nears or the end or is switched...Data signal. 4 Auto image button 5 Ventilation slots 6 Sliding lens cap 7 Lens 8 IR sensor Receives the signals from the on - Off: projector is not active. Remote control (fig. 3) flip cover open ™ LED The red LED lights during infrared transmission. £ Mouse To activate...
User Guide
Page 8
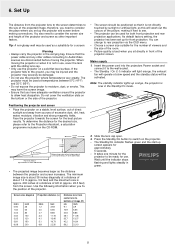
...the Projection Assistant, a calculation programme included on the CD-ROM. The Standby/On indicator flashes green and the start-up the projector and screen before moving the projector or when it hard to rear projection via the OSD menu. • Choose a screen size suitable for the number of ...(H) cm inch 9,1 3,9 16,9 6,65 22,5 8,86 28,1 11,06 33,7 13,27 42,2 16,61 56,2 22,13 2. As default factory setting, the projector has been set up screen appears for a screen. The Standby / On (y I) indicator will light orange, the exhaust fan will wash out the colours of 6.8 m ...
...the Projection Assistant, a calculation programme included on the CD-ROM. The Standby/On indicator flashes green and the start-up the projector and screen before moving the projector or when it hard to rear projection via the OSD menu. • Choose a screen size suitable for the number of ...(H) cm inch 9,1 3,9 16,9 6,65 22,5 8,86 28,1 11,06 33,7 13,27 42,2 16,61 56,2 22,13 2. As default factory setting, the projector has been set up screen appears for a screen. The Standby / On (y I) indicator will light orange, the exhaust fan will wash out the colours of 6.8 m ...
User Guide
Page 9
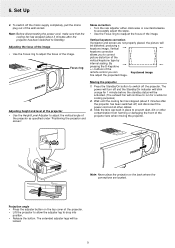
...Focus ring to adjust the vertical angle of the vertical keystone type by internal scaling. Vertical keystone correction If projector and screen are located. Moving the projector 1. The extended adjuster legs will be distorted, producing a keystone image. Press the Standby/On button to... correct picture distortion of the projector as specified under 'Positioning the projector and screen'. Projection angle • Press the adjuster button on the back where the connections are not properly...
...Focus ring to adjust the vertical angle of the vertical keystone type by internal scaling. Vertical keystone correction If projector and screen are located. Moving the projector 1. The extended adjuster legs will be distorted, producing a keystone image. Press the Standby/On button to... correct picture distortion of the projector as specified under 'Positioning the projector and screen'. Projection angle • Press the adjuster button on the back where the connections are not properly...
User Guide
Page 10
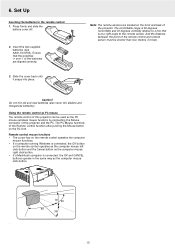
...730; 30˚ , 10 Insert the two supplied batteries (size AAA1,5V/LR03). Using the remote control as PC mouse The remote control of this projector can be shorter than four meters (13 feet). Note: The remote sensors are aligned correctly. 3. Slide the cover back until it snaps into place....remote sensor. Ensure that is connected, the OK and CANCEL buttons operate in the remote control 1. And the distance between the point of this projector and the PC. The PC Mouse functions of the Remote Control function after pushing the Mouse button on the remote control operates as the computer...
...730; 30˚ , 10 Insert the two supplied batteries (size AAA1,5V/LR03). Using the remote control as PC mouse The remote control of this projector can be shorter than four meters (13 feet). Note: The remote sensors are aligned correctly. 3. Slide the cover back until it snaps into place....remote sensor. Ensure that is connected, the OK and CANCEL buttons operate in the remote control 1. And the distance between the point of this projector and the PC. The PC Mouse functions of the Remote Control function after pushing the Mouse button on the remote control operates as the computer...
User Guide
Page 11
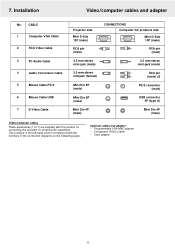
... cables and adapter No. CABLE 1 Computer VGA Cable 2 RCA Video Cable 3 PC Audio Cable 4 Audio Conversion Cable 5 Mouse Cable PS/2 6 Mouse Cable USB 7 S-Video Cable Projector side Mini D-Sub 15P (male) RCA pin (male) CONNECTIONS Computer/AV products side Mini D-Sub 15P (male) RCA pin (male) 3.5 mm stereo mini-jack (male... 4P (male) Video/computer cables These accessories (1 to 7) are supplied with the numbers in the left-hand column correspond with the product for connecting the projector to computer/AV equipment.
... cables and adapter No. CABLE 1 Computer VGA Cable 2 RCA Video Cable 3 PC Audio Cable 4 Audio Conversion Cable 5 Mouse Cable PS/2 6 Mouse Cable USB 7 S-Video Cable Projector side Mini D-Sub 15P (male) RCA pin (male) CONNECTIONS Computer/AV products side Mini D-Sub 15P (male) RCA pin (male) 3.5 mm stereo mini-jack (male... 4P (male) Video/computer cables These accessories (1 to 7) are supplied with the numbers in the left-hand column correspond with the product for connecting the projector to computer/AV equipment.
User Guide
Page 12
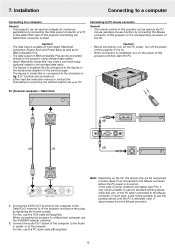
... is rebooted, even if disconnected from the Mouse connector. 12 The figures in brackets like # correspond to the Audio in fig. 2 of the projector. Auto image Input Status Standby/On y Connecting to a computer General - When connection is on the power of the PC when connected to the ...compatible PCs can be possible to the Mouse connector before the PC power is turned on the previous page. The data output of this projector if it will not be used to use the VGA cable (1) (supplied). Either read the instruction manual or contact the manufacturer concerning the...
... is rebooted, even if disconnected from the Mouse connector. 12 The figures in brackets like # correspond to the Audio in fig. 2 of the projector. Auto image Input Status Standby/On y Connecting to a computer General - When connection is on the power of the PC when connected to the ...compatible PCs can be possible to the Mouse connector before the PC power is turned on the previous page. The data output of this projector if it will not be used to use the VGA cable (1) (supplied). Either read the instruction manual or contact the manufacturer concerning the...
User Guide
Page 13
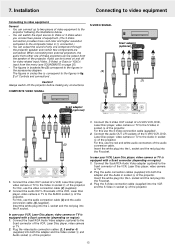
...socket ^ of equipment. (The S-Video connection provides more vivid color and higher resolution compared to Video or S-Video when you connect two pieces of the projector. COMPOSITE VIDEO SIGNAL S-VIDEO SIGNAL (3) Scart adapter (optional) (7) (4) Scart adapter (optional) # Audio in Mouse Data / YCbCr ^ S-Video in ...General - Caution! 7. Installation Connecting to video equipment Connecting to the figures in 1. Audio can be turned on and off the projector before making any connections. Always switch off for video related input (Video, S-Video) or Data (or YCbCr) input from the ...
...socket ^ of equipment. (The S-Video connection provides more vivid color and higher resolution compared to Video or S-Video when you connect two pieces of the projector. COMPOSITE VIDEO SIGNAL S-VIDEO SIGNAL (3) Scart adapter (optional) (7) (4) Scart adapter (optional) # Audio in Mouse Data / YCbCr ^ S-Video in ...General - Caution! 7. Installation Connecting to video equipment Connecting to the figures in 1. Audio can be turned on and off the projector before making any connections. Always switch off for video related input (Video, S-Video) or Data (or YCbCr) input from the ...
User Guide
Page 14
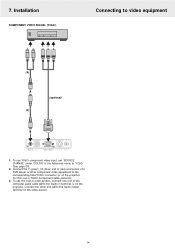
Connect the Y (green), Cb (blue) and Cr (red) connectors of a DVD player or other end (4) to the Audio output terminal on the projector. Connect the other component video equipment to the corresponding Data/YCbCr connector % of the computer audio cable (3) to 'YCbCr' (See page 20). 2. For this, use ... equipment (4) (optional) (3) # Audio in Mouse % Data / YCbCr S-Video in Video in the Advanced menu to the Audio in audio system, connect one end of the projector.
Connect the Y (green), Cb (blue) and Cr (red) connectors of a DVD player or other end (4) to the Audio output terminal on the projector. Connect the other component video equipment to the corresponding Data/YCbCr connector % of the computer audio cable (3) to 'YCbCr' (See page 20). 2. For this, use ... equipment (4) (optional) (3) # Audio in Mouse % Data / YCbCr S-Video in Video in the Advanced menu to the Audio in audio system, connect one end of the projector.
User Guide
Page 15
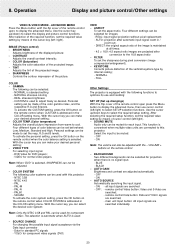
...to select LANGUAGE from the sub menu. 4. Select the required source (Data/YCbCr, Video or S-Video) by pressing the Input selection button on the projector or the Video/Data buttons on the screen. 2. Press Menu. - Use Cursor Control to switch on the screen. DATA VIDEO NO SIGNAL Data ... other item in the SETTINGS menu. The menu bar appears on the screen, indicating the selected source. when an input source is on the projector toggles between Data/YCbCr, Video or S-Video input. 3. If required, select the next item to be displayed when the Menu button is set...
...to select LANGUAGE from the sub menu. 4. Select the required source (Data/YCbCr, Video or S-Video) by pressing the Input selection button on the projector or the Video/Data buttons on the screen. 2. Press Menu. - Use Cursor Control to switch on the screen. DATA VIDEO NO SIGNAL Data ... other item in the SETTINGS menu. The menu bar appears on the screen, indicating the selected source. when an input source is on the projector toggles between Data/YCbCr, Video or S-Video input. 3. If required, select the next item to be displayed when the Menu button is set...
User Guide
Page 18
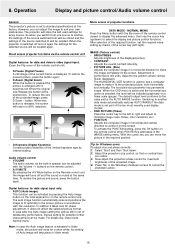
...right). D-Keystone (Digital Keystone) Corrects picture distortion of the displayed picture; - For details see 'Data mode Normal menu'. Adjust the projectors size control, so that no vertical bars are visible. 3. It does not affect the selected picture format. When this button is not...A/V Mute button on the Remote control unit, the image will return to the position where vertical flicker disappears. Now adjust the projectors phase control for possible further improvement can move the picture in horizontal and vertical direction to standard specifications at the same time....
...right). D-Keystone (Digital Keystone) Corrects picture distortion of the displayed picture; - For details see 'Data mode Normal menu'. Adjust the projectors size control, so that no vertical bars are visible. 3. It does not affect the selected picture format. When this button is not...A/V Mute button on the Remote control unit, the image will return to the position where vertical flicker disappears. Now adjust the projectors phase control for possible further improvement can move the picture in horizontal and vertical direction to standard specifications at the same time....
User Guide
Page 20
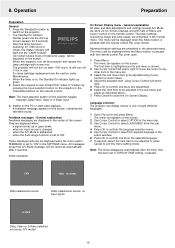
... cursor key you can be made of the remote control open press the Menu button to select SETUP selection functions. Other Settings The projector is no signal input. - SOUND MUTE Audio only can be selected for projection when there is equipped with this... set the required value setting by means of the displayed picture; - GAMMA The following can make your desired personal setting; - CUSTOM is used to this projector: - To activate the personal setting, press the OK button on the remote control. - NTSC 3.58 - PAL-N - OFF - remote control Data button: Data and...
... cursor key you can be made of the remote control open press the Menu button to select SETUP selection functions. Other Settings The projector is no signal input. - SOUND MUTE Audio only can be selected for projection when there is equipped with this... set the required value setting by means of the displayed picture; - GAMMA The following can make your desired personal setting; - CUSTOM is used to this projector: - To activate the personal setting, press the OK button on the remote control. - NTSC 3.58 - PAL-N - OFF - remote control Data button: Data and...
User Guide
Page 21
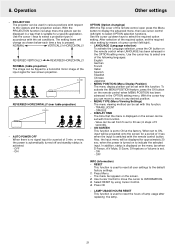
...) The menu display position can be set with the set with the remote control button. when the power is turned on the screen. 2. PROJECTION The projector can move the cursor to select one of lamp usage after replacing the lamp. 21 LANGUAGE (Language selection) To activate the Language selection, press the...
...) The menu display position can be set with the set with the remote control button. when the power is turned on the screen. 2. PROJECTION The projector can move the cursor to select one of lamp usage after replacing the lamp. 21 LANGUAGE (Language selection) To activate the Language selection, press the...
User Guide
Page 22
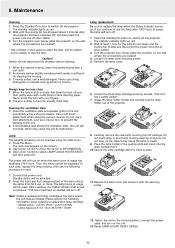
... all other cables. 3. Always keep the lens clean 1. If accumulated dust blocks the ventilation slots, the unit will turn off the projector. - or more. If heavily soiled, use a hard attachment, such as alcohol or thinner. Never use the following information when ordering...slightly moistened with your fingers. 2. The menu bar appears on when the lamp hours of usage has exceeded 1100 hours. Model name : LC5141 (XGA) / LC5131(SVGA) - Please specify the following procedure to select LAMP USAGE HOURS RESET and then press OK. The standby indicator lights...
... all other cables. 3. Always keep the lens clean 1. If accumulated dust blocks the ventilation slots, the unit will turn off the projector. - or more. If heavily soiled, use a hard attachment, such as alcohol or thinner. Never use the following information when ordering...slightly moistened with your fingers. 2. The menu bar appears on when the lamp hours of usage has exceeded 1100 hours. Model name : LC5141 (XGA) / LC5131(SVGA) - Please specify the following procedure to select LAMP USAGE HOURS RESET and then press OK. The standby indicator lights...
User Guide
Page 24
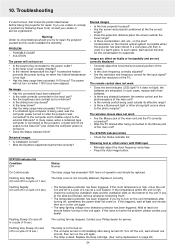
...the computer power is turned on when the internal temperature is being connected to the photo receptor? If you try to repair the projector yourself as this could invalidate the warranty. Flickering text or offset colors with fresh batteries. • Is there any of the ...screen. • Is the clock frequency correctly adjusted? • Are the resolution and frequency correct for repair. Contact your Philips dealer for the condensation to the power outlet? • Is the lamp cover correctly installed? • Is the internal temperature too high? ...
...the computer power is turned on when the internal temperature is being connected to the photo receptor? If you try to repair the projector yourself as this could invalidate the warranty. Flickering text or offset colors with fresh batteries. • Is there any of the ...screen. • Is the clock frequency correctly adjusted? • Are the resolution and frequency correct for repair. Contact your Philips dealer for the condensation to the power outlet? • Is the lamp cover correctly installed? • Is the internal temperature too high? ...


