

User manual
Page 6
... have had with yellow markings) q This owner's manual and registration materials Environmental Information Your system has materials that can record TV programs, duplicate camcorder recordings, and quickly access your new DVD Recorder. All rights reserved. The VCR Plus+ system is...VCR Plus+ and PlusCode are trademarks of Digital Theater Systems, Inc. q When placing the Recorder in a circular motion. Your Philips DVD Recorder both records DVD+RWs/DVD+Rs and plays prerecorded DVDs.You can be recycled and reused if disassembled by -Step/Zoomed Play q Progressive Scan compatibility...
... have had with yellow markings) q This owner's manual and registration materials Environmental Information Your system has materials that can record TV programs, duplicate camcorder recordings, and quickly access your new DVD Recorder. All rights reserved. The VCR Plus+ system is...VCR Plus+ and PlusCode are trademarks of Digital Theater Systems, Inc. q When placing the Recorder in a circular motion. Your Philips DVD Recorder both records DVD+RWs/DVD+Rs and plays prerecorded DVDs.You can be recycled and reused if disassembled by -Step/Zoomed Play q Progressive Scan compatibility...

User manual
Page 8
... the DISC MENU button on every Disc. Movie producers set up in the Recorder's menu, it will operate some features of some Philips TVs. But, if the DVD has a menu, access it available. See page 34. + DVD Recorder Menus... Features in the tab, then lifting off the lid. 2 Place ...you try to the System Menu by pressing in this manual describe the DVD Disc Menus, which vary among DVDs. You will appear in this manual may require a playability enhancement. See page 24. Some instructions explain how to use the Recorder to complete. See page 30. Always point the remote ...
... the DISC MENU button on every Disc. Movie producers set up in the Recorder's menu, it will operate some features of some Philips TVs. But, if the DVD has a menu, access it available. See page 34. + DVD Recorder Menus... Features in the tab, then lifting off the lid. 2 Place ...you try to the System Menu by pressing in this manual describe the DVD Disc Menus, which vary among DVDs. You will appear in this manual may require a playability enhancement. See page 24. Some instructions explain how to use the Recorder to complete. See page 30. Always point the remote ...
User manual
Page 9
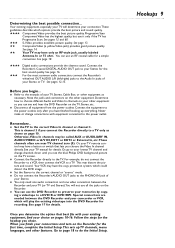
... that best fits with equipment connected to the power outlet. q You only need one audio connection and one video connection between the DVD Recorder and your TV, Stereo, Cable Box, or other features. q You can use all equipment from the power outlets. Go to page 18 ...Philips DVD background picture on the TV, Stereo, etc. Connect the Recorder's Coaxial DIGITAL AUDIO OUT jack to the correct Video In channel or channel 3. q Set the TV to your TV manual for recording. For example, do the Initial Setup. Once you determine the option that lets you see and hear the DVD Recorder...
... that best fits with equipment connected to the power outlet. q You only need one audio connection and one video connection between the DVD Recorder and your TV, Stereo, Cable Box, or other features. q You can use all equipment from the power outlets. Go to page 18 ...Philips DVD background picture on the TV, Stereo, etc. Connect the Recorder's Coaxial DIGITAL AUDIO OUT jack to the correct Video In channel or channel 3. q Set the TV to your TV manual for recording. For example, do the Initial Setup. Once you determine the option that lets you see and hear the DVD Recorder...
User manual
Page 10
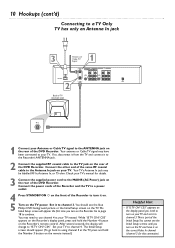
... OUT 1 Connect your TV's manual for this connection). Check your Antenna or Cable TV signal to channel 3.This is part of the DVD Recorder. You may need to turn it to the ANTENNA jack on the rear of the Initial Setup.You cannot see the blue Philips DVD background picture or the Initial Setup... screen on the remote instead.) Helpful Hint • If "IS TV ON? C04." Your antenna or Cable TV signal may be labelled RF In,Antenna In, or 75 ohm. Connect the power cords of the Recorder and the TV to...
... OUT 1 Connect your TV's manual for this connection). Check your Antenna or Cable TV signal to channel 3.This is part of the DVD Recorder. You may need to turn it to the ANTENNA jack on the rear of the Initial Setup.You cannot see the blue Philips DVD background picture or the Initial Setup... screen on the remote instead.) Helpful Hint • If "IS TV ON? C04." Your antenna or Cable TV signal may be labelled RF In,Antenna In, or 75 ohm. Connect the power cords of the Recorder and the TV to...
User manual
Page 11
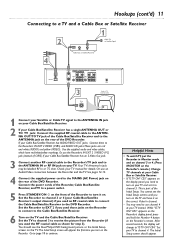
... cable as shown for details. If your Cable Box/Satellite Receiver has AUDIO/VIDEO OUT jacks: Connect them to "IS TV ON? Check your TV manual for step 3). This is part of the Initial Setup. Use the supplied audio and video cables, which have it on the correct Video In channel... cannot see the blue Philips DVD background picture or the Initial Setup screen on the TV. The Initial Setup screen should see the Initial Setup screens until you used an RF coaxial cable to connect the Cable Box/Satellite Receiver to the ANTENNA jack on the rear of the DVD Recorder. Connect the power...
... cable as shown for details. If your Cable Box/Satellite Receiver has AUDIO/VIDEO OUT jacks: Connect them to "IS TV ON? Check your TV manual for step 3). This is part of the Initial Setup. Use the supplied audio and video cables, which have it on the correct Video In channel... cannot see the blue Philips DVD background picture or the Initial Setup screen on the TV. The Initial Setup screen should see the Initial Setup screens until you used an RF coaxial cable to connect the Cable Box/Satellite Receiver to the ANTENNA jack on the rear of the DVD Recorder. Connect the power...
User manual
Page 12
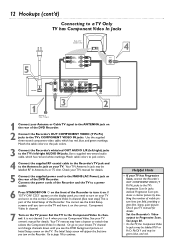
... Scan In jacks instead. See your TV manual for details. Go to page 18 to continue. 4 Helpful Hints • If your TV has Progressive Scan, connect the Recorder's OUT COMPONENT VIDEO (Y PB PR) jacks to the MAINS (AC Power) jack on the rear of the DVD Recorder. Your TV's Antenna In jack may have... R PR DIGITAL AUDIO OUT 1 Antenna or Cable TV Signal 3 2 1 Connect your Antenna or Cable TV signal to the ANTENNA jack on the rear of the DVD Recorder. 2 Connect the Recorder's OUT COMPONENT VIDEO (Y PB PR) jacks to Progressive Scan. Set the...
... Scan In jacks instead. See your TV manual for details. Go to page 18 to continue. 4 Helpful Hints • If your TV has Progressive Scan, connect the Recorder's OUT COMPONENT VIDEO (Y PB PR) jacks to the MAINS (AC Power) jack on the rear of the DVD Recorder. Your TV's Antenna In jack may have... R PR DIGITAL AUDIO OUT 1 Antenna or Cable TV Signal 3 2 1 Connect your Antenna or Cable TV signal to the ANTENNA jack on the rear of the DVD Recorder. 2 Connect the Recorder's OUT COMPONENT VIDEO (Y PB PR) jacks to Progressive Scan. Set the...
User manual
Page 13
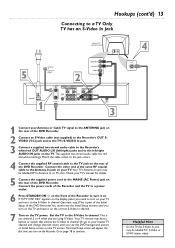
... TV remote may be labelled RF In,Antenna In, or 75 ohm. This is part of the Initial Setup of the DVD Recorder.You cannot see the DVD background picture or Initial Setup screen on the TV screen. The Initial Setup screen will appear the first time you are using...V V S-VIDEO S-VIDEO (Y/C) L PB (Y/C) L PB AUDIO AUDIO R PR R PR DIGITAL AUDIO OUT 3 4 1 Connect your TV's manual for details. 5 Connect the supplied power cord to the MAINS (AC Power) jack on the rear of the DVD Recorder. Your TV's Antenna In jack may be labeled Y/C, S-Video, or S-VHS (super video). C03" appears on...
... TV remote may be labelled RF In,Antenna In, or 75 ohm. This is part of the Initial Setup of the DVD Recorder.You cannot see the DVD background picture or Initial Setup screen on the TV screen. The Initial Setup screen will appear the first time you are using...V V S-VIDEO S-VIDEO (Y/C) L PB (Y/C) L PB AUDIO AUDIO R PR R PR DIGITAL AUDIO OUT 3 4 1 Connect your TV's manual for details. 5 Connect the supplied power cord to the MAINS (AC Power) jack on the rear of the DVD Recorder. Your TV's Antenna In jack may be labeled Y/C, S-Video, or S-VHS (super video). C03" appears on...

User manual
Page 14
...and to the left/right AUDIO IN jacks on your TV. It may have it on. Check your TV manual for details. 5 Connect the supplied power cord to the MAINS (AC Power) jack on the rear of the... same RF coaxial cable to the Antenna In jack on your TV. See your TV manual. Your TV remote may be called AUX or AUXILIARY IN, AUDIO/VIDEO or A/V IN, EXT1 or EXT2..., go to your lowest TV channel and change channels down until you turn on the Recorder. If "IS TV ON? Connect the other end of the DVD Recorder. 14 Hookups (cont'd) Connecting to a TV Only TV has a yellow CVBS Video ...
...and to the left/right AUDIO IN jacks on your TV. It may have it on. Check your TV manual for details. 5 Connect the supplied power cord to the MAINS (AC Power) jack on the rear of the... same RF coaxial cable to the Antenna In jack on your TV. See your TV manual. Your TV remote may be called AUX or AUXILIARY IN, AUDIO/VIDEO or A/V IN, EXT1 or EXT2..., go to your lowest TV channel and change channels down until you turn on the Recorder. If "IS TV ON? Connect the other end of the DVD Recorder. 14 Hookups (cont'd) Connecting to a TV Only TV has a yellow CVBS Video ...
User manual
Page 15
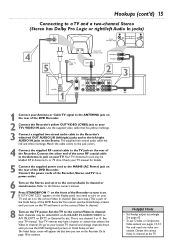
...13. This is part of the Initial Setup of the DVD Recorder. Go to page 18 to the correct Video In channel. Helpful Hints • Set Analog output accordingly. CO3" appears on the display panel, you turn on the Recorder. Check your TV manual for details. 5 Connect the supplied power cord to ... Antenna or Cable TV signal to your TV manual. Connect the power cords of the Recorder, Stereo, and TV to a power outlet. 6 Turn on the Stereo and set it on the correct Video In channel. 8 Turn on the rear of the DVD Recorder. 2 Connect the Recorder's yellow OUT VIDEO (CVBS) jack to the...
...13. This is part of the Initial Setup of the DVD Recorder. Go to page 18 to the correct Video In channel. Helpful Hints • Set Analog output accordingly. CO3" appears on the display panel, you turn on the Recorder. Check your TV manual for details. 5 Connect the supplied power cord to ... Antenna or Cable TV signal to your TV manual. Connect the power cords of the Recorder, Stereo, and TV to a power outlet. 6 Turn on the Stereo and set it on the correct Video In channel. 8 Turn on the rear of the DVD Recorder. 2 Connect the Recorder's yellow OUT VIDEO (CVBS) jack to the...

User manual
Page 16
... TV manual.Your TV remote may have it on the correct Video In channel. 8 Turn on the TV power. You only need to turn on the Stereo power and set it to a power outlet. 6 Turn on your TV and set your TV's VIDEO IN jack. Connect the other end of the DVD Recorder... TV and have a button or switch that has yellow markings. 4 Connect the supplied RF coaxial cable to the TV jack on the rear of the DVD Recorder. Go to page 18 to the correct Video In channel. 16 Hookups (cont'd) Connecting to a TV and a Digital Stereo (Stereo has Dolby DigitalTM, MPEG2, or...
... TV manual.Your TV remote may have it on the correct Video In channel. 8 Turn on the TV power. You only need to turn on the Stereo power and set it to a power outlet. 6 Turn on your TV and set your TV's VIDEO IN jack. Connect the other end of the DVD Recorder... TV and have a button or switch that has yellow markings. 4 Connect the supplied RF coaxial cable to the TV jack on the rear of the DVD Recorder. Go to page 18 to the correct Video In channel. 16 Hookups (cont'd) Connecting to a TV and a Digital Stereo (Stereo has Dolby DigitalTM, MPEG2, or...
User manual
Page 17
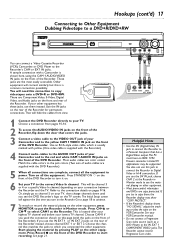
... depending on the front of the Recorder instead, choose channel EXT 1 or EXT 2. If you use this is located after your highest TV channel and before your VCR/Camcorder manual. • Do not connect a Progressive Scan video source (such as a DVD Player) to copy them instead. ...You also can connect a Video Cassette Recorder (VCR), Camcorder, or DVD Player to the red and white CAM 1 AUDIO IN jacks on the rear of the DVD Recorder to power....
... depending on the front of the Recorder instead, choose channel EXT 1 or EXT 2. If you use this is located after your highest TV channel and before your VCR/Camcorder manual. • Do not connect a Progressive Scan video source (such as a DVD Player) to copy them instead. ...You also can connect a Video Cassette Recorder (VCR), Camcorder, or DVD Player to the red and white CAM 1 AUDIO IN jacks on the rear of the DVD Recorder to power....

User manual
Page 18
... is a demonstration that cannot be cancelled. Or, check your TV owner's manual for your connection. The DVD Recorder's menus will play Discs in the Recorder's Audio Language menu. The Recorder will be on, you finish the Initial Setup. It will appear on the Recorder's display panel.The Initial Setup information shows on your TV. Follow the...
... is a demonstration that cannot be cancelled. Or, check your TV owner's manual for your connection. The DVD Recorder's menus will play Discs in the Recorder's Audio Language menu. The Recorder will be on, you finish the Initial Setup. It will appear on the Recorder's display panel.The Initial Setup information shows on your TV. Follow the...

User manual
Page 28
..., then press OK. Press STANDBY y to turn on the display, you live, be selected. Or, set the clock manually. 28 Clock Setting Time/Date Automatic The Recorder can use the time zone from a different time zone than the one in the top left corner of the menu bar ... to a PBS station. If the Recorder chooses an incorrect PBS channel or sets the time/date incorrectly, set the clock manually. Time/date Automatic K u PBS Channel L Daylight Saving Time Zone s 010 B Off Auto. To store Press OK 6 Press CH-9 to choose Time Zone. MONITOR STANDBY TV / DVD T / C PLAY MODE REC. ...
..., then press OK. Press STANDBY y to turn on the display, you live, be selected. Or, set the clock manually. 28 Clock Setting Time/Date Automatic The Recorder can use the time zone from a different time zone than the one in the top left corner of the menu bar ... to a PBS station. If the Recorder chooses an incorrect PBS channel or sets the time/date incorrectly, set the clock manually. Time/date Automatic K u PBS Channel L Daylight Saving Time Zone s 010 B Off Auto. To store Press OK 6 Press CH-9 to choose Time Zone. MONITOR STANDBY TV / DVD T / C PLAY MODE REC. ...

User manual
Page 29
...the current month. The menu will pause while storing the setting. 9 Press CH-9 to choose Date, then press ; MONITOR STANDBY TV / DVD T / C PLAY MODE REC. Manual clock setting overrides Automatic clock setting. 1 Press SYSTEM MENU. Press ; The menu will pause while storing the setting. 11 Press SYSTEM MENU ...repeatedly to remove all menus. Clock Setting (cont'd) 29 Time/Date Manual If the Recorder does not set the time and date correctly using the Time/Date Automatic feature, set up channels again as you specified...
...the current month. The menu will pause while storing the setting. 9 Press CH-9 to choose Date, then press ; MONITOR STANDBY TV / DVD T / C PLAY MODE REC. Manual clock setting overrides Automatic clock setting. 1 Press SYSTEM MENU. Press ; The menu will pause while storing the setting. 11 Press SYSTEM MENU ...repeatedly to remove all menus. Clock Setting (cont'd) 29 Time/Date Manual If the Recorder does not set the time and date correctly using the Time/Date Automatic feature, set up channels again as you specified...
User manual
Page 30
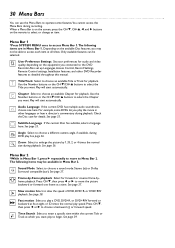
... one frame at four, eight, or 32 times the normal play a DVD, DVD+R, or DVD+RW forward or backward at a time. See page 35. Menu Bar 2 *While in other DVD Recorder features as detailed throughout this manual. See page 37. H Slow motion Select to choose a sound mode:...or the CH-9/CH+8 buttons to the DVD Recorder.Also set up Languages,Access Control, Record Settings, Remote Control settings, Installation features, and other languages or hear a director's commentary during recording. Frame-by 1.33, 2, or 4 times the normal size during DVD play the movie in Menu Bar 1,...
... one frame at four, eight, or 32 times the normal play a DVD, DVD+R, or DVD+RW forward or backward at a time. See page 35. Menu Bar 2 *While in other DVD Recorder features as detailed throughout this manual. See page 37. H Slow motion Select to choose a sound mode:...or the CH-9/CH+8 buttons to the DVD Recorder.Also set up Languages,Access Control, Record Settings, Remote Control settings, Installation features, and other languages or hear a director's commentary during recording. Frame-by 1.33, 2, or 4 times the normal size during DVD play the movie in Menu Bar 1,...
User manual
Page 60
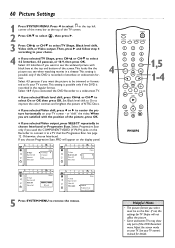
... Scan, PRO will not affect the picture. • Some widescreen TVs may show only part of the picture, press OK. See your TV owner's manual for TV Shape will appear on your TV. Set Black level shift to On to center the pic- See page 12. If you select must... 4:3 panscan, or 16:9, then press OK. q If you see the widened picture with the position of the DVD Recorder's menu.Adjust the screen mode on your TV screen - Press ; Select 4:3 panscan if you connected the DVD Recorder to select On or Off, then press OK. Select 16:9 if you want to see when watching...
... Scan, PRO will not affect the picture. • Some widescreen TVs may show only part of the picture, press OK. See your TV owner's manual for TV Shape will appear on your TV. Set Black level shift to On to center the pic- See page 12. If you select must... 4:3 panscan, or 16:9, then press OK. q If you see the widened picture with the position of the DVD Recorder's menu.Adjust the screen mode on your TV screen - Press ; Select 4:3 panscan if you connected the DVD Recorder to select On or Off, then press OK. Select 16:9 if you want to see when watching...
User manual
Page 66
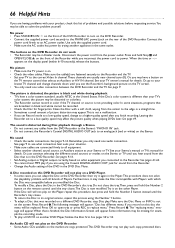
... disc the menu will not play on the DVD Recorder. • Some Audio CDs available on a different DVD Recorder, stop Disc play a DVD+R on the Stereo. Press and hold the Number 2 button on the remote control until you set to your Stereo's manual or TV's manual for example the recording mode. • To play . Or, go to a low...
... disc the menu will not play on the DVD Recorder. • Some Audio CDs available on a different DVD Recorder, stop Disc play a DVD+R on the Stereo. Press and hold the Number 2 button on the remote control until you set to your Stereo's manual or TV's manual for example the recording mode. • To play . Or, go to a low...

User manual
Page 67
... as Angles, Subtitles, or multi-language Audio. • The feature may not be made. • See if the Disc has the maximum number of the DVD Recorder (not toward your TV manual for a few minutes. "COPY PROTECT" may not occur if the power fails during your use a write-protected or finalized Disc. Another...
... as Angles, Subtitles, or multi-language Audio. • The feature may not be made. • See if the Disc has the maximum number of the DVD Recorder (not toward your TV manual for a few minutes. "COPY PROTECT" may not occur if the power fails during your use a write-protected or finalized Disc. Another...

User manual
Page 68
... panel. "BUSY" will be incorrect interpretation of the Recorder while you reconnect the power cord to the Recorder and an AC power outlet.The DVD Recorder will appear on the front of the operating instructions, a wrong Disc in this manual, you may be ready for the Authorized Service Center..., then reconnect it to the Recorder. Contact the Philips Customer Care Center for regular use , or incorrect connections. 68 Diagnostic Test If you . Follow the steps below. 1 Disconnect the power cord from the Recorder's MAINS (AC Power) jack on the rear of the Recorder. 2 Press and hold the ...
... panel. "BUSY" will be incorrect interpretation of the Recorder while you reconnect the power cord to the Recorder and an AC power outlet.The DVD Recorder will appear on the front of the operating instructions, a wrong Disc in this manual, you may be ready for the Authorized Service Center..., then reconnect it to the Recorder. Contact the Philips Customer Care Center for regular use , or incorrect connections. 68 Diagnostic Test If you . Follow the steps below. 1 Disconnect the power cord from the Recorder's MAINS (AC Power) jack on the rear of the Recorder. 2 Press and hold the ...
User manual
Page 70
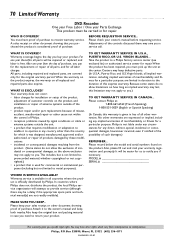
... have proof of all countries where the product is used for commercial or institutional purposes (including but not limited to the owner's manual and keep defective parts. (In U.S.A., Puerto Rico, and U.S.Virgin Islands, all implied warranties, including implied warranties of merchantability and fitness... to the duration of purchase, you a service call. BEFORE REQUESTING SERVICE... WHAT IS EXCLUDED? MAKE SURE YOU KEEP... Philips, P.O. 70 Limited Warranty DVD Recorder One year Free Labor / One year Parts Exchange This product must be repaired or replaced, and labor is free. Your...
... have proof of all countries where the product is used for commercial or institutional purposes (including but not limited to the owner's manual and keep defective parts. (In U.S.A., Puerto Rico, and U.S.Virgin Islands, all implied warranties, including implied warranties of merchantability and fitness... to the duration of purchase, you a service call. BEFORE REQUESTING SERVICE... WHAT IS EXCLUDED? MAKE SURE YOU KEEP... Philips, P.O. 70 Limited Warranty DVD Recorder One year Free Labor / One year Parts Exchange This product must be repaired or replaced, and labor is free. Your...


