
User manual
Page 3
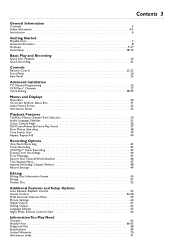
... Editing Editing: Disc Information Screen 50 Editing 51 Finalize Disc 52 Additional Features and Setup Options Auto Resume, Playback Control 53 Access Control 54-58 DVD Recorder Features Menu 59 Picture Settings 60 Digital Output 61 Analog Output 62 Language Settings 63 Night Mode, Remote Control Used 64 Information You May...
... Editing Editing: Disc Information Screen 50 Editing 51 Finalize Disc 52 Additional Features and Setup Options Auto Resume, Playback Control 53 Access Control 54-58 DVD Recorder Features Menu 59 Picture Settings 60 Digital Output 61 Analog Output 62 Language Settings 63 Night Mode, Remote Control Used 64 Information You May...

User manual
Page 6
...q Progressive Scan compatibility q Repeat and Repeat A-B playback q Time Search q VCR Plus+ Programming Package Contents q DVD Recorder q Remote control with two AA batteries q AC power cord q One blank Philips DVD+RW q One RF coaxial cable (black with silver tip, with a cleaning cloth.Wipe the Disc from Dolby ... the local regulations regarding the disposal of space all around the Recorder for analog discs. 6 Introduction Welcome! Your Philips DVD Recorder both records DVD+RWs/DVD+Rs and plays prerecorded DVDs.You can be recycled and reused if disassembled by a specialized company.
...q Progressive Scan compatibility q Repeat and Repeat A-B playback q Time Search q VCR Plus+ Programming Package Contents q DVD Recorder q Remote control with two AA batteries q AC power cord q One blank Philips DVD+RW q One RF coaxial cable (black with silver tip, with a cleaning cloth.Wipe the Disc from Dolby ... the local regulations regarding the disposal of space all around the Recorder for analog discs. 6 Introduction Welcome! Your Philips DVD Recorder both records DVD+RWs/DVD+Rs and plays prerecorded DVDs.You can be recycled and reused if disassembled by a specialized company.
User manual
Page 7
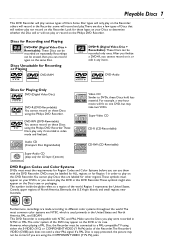
.... Furthermore, recordings are made according to a PAL-compatible TV using the Philips DVD Recorder. Look for Recording or Playing DVD-RAM DVD+R (Digital Video Disc + Recordable): These Discs can record again on the Philips DVD Recorder. Recordings can use them with NTSC and PAL. Discs Unsuitable for ...two VCDs. Playable Discs 7 This DVD Recorder will play Discs that will neither play the DVD in this DVD Recorder.These symbols might also appear on the Recorder; Some Disc types will only play .There are using the Philips DVD Recorder.These Discs play or record ...
.... Furthermore, recordings are made according to a PAL-compatible TV using the Philips DVD Recorder. Look for Recording or Playing DVD-RAM DVD+R (Digital Video Disc + Recordable): These Discs can record again on the Philips DVD Recorder. Recordings can use them with NTSC and PAL. Discs Unsuitable for ...two VCDs. Playable Discs 7 This DVD Recorder will play Discs that will neither play the DVD in this DVD Recorder.These symbols might also appear on the Recorder; Some Disc types will only play .There are using the Philips DVD Recorder.These Discs play or record ...

User manual
Page 8
...or the Disc.You get to access a feature that feature. Do not mix old and new batteries or different types of some Philips TVs. See page 24. See pages 22-23. _ DVD Disc Menus... 8 General Information Battery Installation 1 Remove the battery compartment lid on the front of the... available. You will not be available on the remote control. DVD Player Upgrades If a DVD does not play properly, please contact Philips at the remote sensor on the rear of the remote control by various Disc manufacturers, your DVD Recorder may not be available if the current Disc does not ...
...or the Disc.You get to access a feature that feature. Do not mix old and new batteries or different types of some Philips TVs. See page 24. See pages 22-23. _ DVD Disc Menus... 8 General Information Battery Installation 1 Remove the battery compartment lid on the front of the... available. You will not be available on the remote control. DVD Player Upgrades If a DVD does not play properly, please contact Philips at the remote sensor on the rear of the remote control by various Disc manufacturers, your DVD Recorder may not be available if the current Disc does not ...
User manual
Page 9
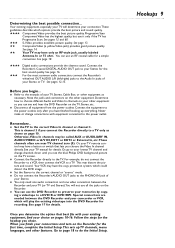
...Remember... For example, do the Initial Setup. Once you determine the option that lets you have the copy protection system, which could distort the DVD image. See page 13. 55 Composite Video (a yellow Video jack) provides good picture quality. See page 16. See your memories by copying a... videotape to the Audio In jacks of your Stereo. q Set the Stereo to the TV. q You can see the blue Philips DVD background picture on page 10. See page 17 for a simple connection. Hookups 9 Determining the best possible connection... See page 10. 5555 555 Digital...
...Remember... For example, do the Initial Setup. Once you determine the option that lets you have the copy protection system, which could distort the DVD image. See page 13. 55 Composite Video (a yellow Video jack) provides good picture quality. See page 16. See your memories by copying a... videotape to the Audio In jacks of your Stereo. q Set the Stereo to the TV. q You can see the blue Philips DVD background picture on page 10. See page 17 for a simple connection. Hookups 9 Determining the best possible connection... See page 10. 5555 555 Digital...
User manual
Page 10
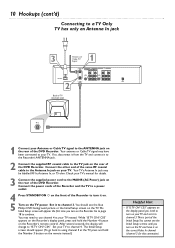
...and set it to channel 3.This is part of the Initial Setup.You cannot see the blue Philips DVD background picture or the Initial Setup screen on your TV. Connect the other end of the same... appears on the Recorder's display panel, press and hold the Number 3 button on the rear of the DVD Recorder. Set your TV to continue. If so, disconnect it from the TV and connect it on the ...for details. 3 Connect the supplied power cord to the MAINS (AC Power) jack on the rear of the DVD Recorder. Go to page 18 to channel 4. After several seconds, the display will appear the first time you ...
...and set it to channel 3.This is part of the Initial Setup.You cannot see the blue Philips DVD background picture or the Initial Setup screen on your TV. Connect the other end of the same... appears on the Recorder's display panel, press and hold the Number 3 button on the rear of the DVD Recorder. Set your TV to continue. If so, disconnect it from the TV and connect it on the ...for details. 3 Connect the supplied power cord to the MAINS (AC Power) jack on the rear of the DVD Recorder. Go to page 18 to channel 4. After several seconds, the display will appear the first time you ...
User manual
Page 11
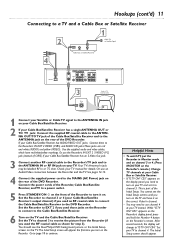
...the Recorder's IN EXT 2 VIDEO (CVBS) and AUDIO L/R jacks.These jacks are red and white (AUDIO) and yellow (VIDEO). You cannot see the blue Philips DVD background picture or the Initial Setup screen on the display panel, you used an RF coaxial cable to connect the Cable Box/Satellite Receiver to... the ANTENNA jack on the Recorder's remote. C03" appears on the Recorder's display panel, press and hold the Number 4 button on the rear of the DVD Recorder. Or, use the Recorder's IN EXT 2 S-VIDEO (Y-C) jack (instead of CVBS) if your Cable Box/Satellite Receiver has an S-Video Out jack. 3...
...the Recorder's IN EXT 2 VIDEO (CVBS) and AUDIO L/R jacks.These jacks are red and white (AUDIO) and yellow (VIDEO). You cannot see the blue Philips DVD background picture or the Initial Setup screen on the display panel, you used an RF coaxial cable to connect the Cable Box/Satellite Receiver to... the ANTENNA jack on the Recorder's remote. C03" appears on the Recorder's display panel, press and hold the Number 4 button on the rear of the DVD Recorder. Or, use the Recorder's IN EXT 2 S-VIDEO (Y-C) jack (instead of CVBS) if your Cable Box/Satellite Receiver has an S-Video Out jack. 3...
User manual
Page 12
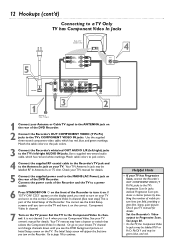
...ON y on the front of the Recorder to the TV's Progressive Scan In jacks instead. You cannot see the DVD background picture or Initial Setup screen on the TV. Go to page 18 to continue. 4 Helpful Hints •...Connect your Antenna or Cable TV signal to the ANTENNA jack on the rear of the DVD Recorder. 2 Connect the Recorder's OUT COMPONENT VIDEO (Y PB PR) jacks to the MAINS (AC Power) jack on the ...rear of the DVD Recorder. CO3" appears on the display panel, you use Component Video. Use the supplied three-strand...
...ON y on the front of the Recorder to the TV's Progressive Scan In jacks instead. You cannot see the DVD background picture or Initial Setup screen on the TV. Go to page 18 to continue. 4 Helpful Hints •...Connect your Antenna or Cable TV signal to the ANTENNA jack on the rear of the DVD Recorder. 2 Connect the Recorder's OUT COMPONENT VIDEO (Y PB PR) jacks to the MAINS (AC Power) jack on the ...rear of the DVD Recorder. CO3" appears on the display panel, you use Component Video. Use the supplied three-strand...
User manual
Page 13
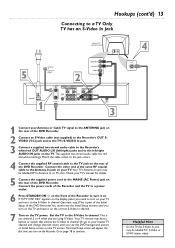
... to the Antenna In jack on your Antenna or Cable TV signal to the ANTENNA jack on the rear of the DVD Recorder. 2 Connect an S-Video cable (not supplied) to the Recorder's OUT SVIDEO (Y-C) jack and to the TV... TV power. Check your lowest TV channel and change channels down until you turn on the rear of the DVD Recorder. Your TV remote may have it on the correct S-Video In channel. 7 Turn on the Recorder....appear the first time you need to turn on your TV and set it on the rear of the DVD Recorder. Your TV's Antenna In jack may be labelled RF In,Antenna In, or 75 ohm. The...
... to the Antenna In jack on your Antenna or Cable TV signal to the ANTENNA jack on the rear of the DVD Recorder. 2 Connect an S-Video cable (not supplied) to the Recorder's OUT SVIDEO (Y-C) jack and to the TV... TV power. Check your lowest TV channel and change channels down until you turn on the rear of the DVD Recorder. Your TV remote may have it on the correct S-Video In channel. 7 Turn on the Recorder....appear the first time you need to turn on your TV and set it on the rear of the DVD Recorder. Your TV's Antenna In jack may be labelled RF In,Antenna In, or 75 ohm. The...

User manual
Page 14
Match the cable colors to the jack colors. 4 Connect the supplied RF coaxial cable to the TV jack on the rear of the DVD Recorder. Your TV's Antenna In jack may be labeled video, CVBS, composite, or baseband. Check your TV manual for details. 5 Connect the supplied power cord ... it to the correct Video In channel. (See next step.) This is part of the Initial Setup of the DVD Recorder.You cannot see the Initial Setup screens until you see the DVD background picture or Initial Setup screen. It may be called AUX or AUXILIARY IN, AUDIO/VIDEO or A/V IN, EXT1...
Match the cable colors to the jack colors. 4 Connect the supplied RF coaxial cable to the TV jack on the rear of the DVD Recorder. Your TV's Antenna In jack may be labeled video, CVBS, composite, or baseband. Check your TV manual for details. 5 Connect the supplied power cord ... it to the correct Video In channel. (See next step.) This is part of the Initial Setup of the DVD Recorder.You cannot see the Initial Setup screens until you see the DVD background picture or Initial Setup screen. It may be called AUX or AUXILIARY IN, AUDIO/VIDEO or A/V IN, EXT1...
User manual
Page 15
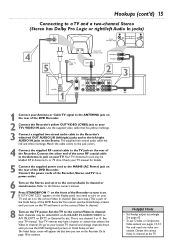
..., go to turn on the Recorder. The Initial Setup screen will appear the first time you see the DVD background picture or Initial Setup screen. Helpful Hints • Set Analog output accordingly. Choose the correct Video... channel. Refer to the Stereo owner's manual. 7 Press STANDBY-ON y on the front of the DVD Recorder. Your TV remote may have it on the TV power. You only need to the Antenna In... jack colors. 4 Connect the supplied RF coaxial cable to the TV jack on the rear of the DVD Recorder. 2 Connect the Recorder's yellow OUT VIDEO (CVBS) jack to the ANTENNA jack on the rear...
..., go to turn on the Recorder. The Initial Setup screen will appear the first time you see the DVD background picture or Initial Setup screen. Helpful Hints • Set Analog output accordingly. Choose the correct Video... channel. Refer to the Stereo owner's manual. 7 Press STANDBY-ON y on the front of the DVD Recorder. Your TV remote may have it on the TV power. You only need to the Antenna In... jack colors. 4 Connect the supplied RF coaxial cable to the TV jack on the rear of the DVD Recorder. 2 Connect the Recorder's yellow OUT VIDEO (CVBS) jack to the ANTENNA jack on the rear...

User manual
Page 16
.... 3 Connect the Recorder's yellow OUT VIDEO (CVBS) jack to your lowest TV channel and change channels down until you turn on the rear of the DVD Recorder.You cannot see the Initial Setup screens until you need one video connection. CO3" appears on the TV. If the Digital output setting does... labelled RF In,Antenna In, or 75 ohm. Use a coaxial digital audio cable (not supplied).You can use S-Video or Component Video instead, see the DVD background picture or Initial Setup screen on the display panel, you see pages 12-13. Go to page 18 to the TV jack on the...
.... 3 Connect the Recorder's yellow OUT VIDEO (CVBS) jack to your lowest TV channel and change channels down until you turn on the rear of the DVD Recorder.You cannot see the Initial Setup screens until you need one video connection. CO3" appears on the TV. If the Digital output setting does... labelled RF In,Antenna In, or 75 ohm. Use a coaxial digital audio cable (not supplied).You can use S-Video or Component Video instead, see the DVD background picture or Initial Setup screen on the display panel, you see pages 12-13. Go to page 18 to the TV jack on the...
User manual
Page 17
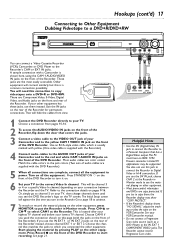
... you use them , the Recorder display may be channel 3 or 4 or a specific Video In channel, depending on the front and rear of the DVD Recorder to start recording. The Initial Setup screen will be supported. Start playing the material by pressing PLAY on the Recorder. See your TV. Choose...your TV to turn on the other equipment. If you try to copy them instead. If your other equipment. • Most prerecorded videotapes and DVDs are Component Video, S-Video, Digital Video, and Audio jacks on your TV, then change channels down the door that matches the jacks to ...
... you use them , the Recorder display may be channel 3 or 4 or a specific Video In channel, depending on the front and rear of the DVD Recorder to start recording. The Initial Setup screen will be supported. Start playing the material by pressing PLAY on the Recorder. See your TV. Choose...your TV to turn on the other equipment. If you try to copy them instead. If your other equipment. • Most prerecorded videotapes and DVDs are Component Video, S-Video, Digital Video, and Audio jacks on your TV, then change channels down the door that matches the jacks to ...

User manual
Page 18
... to choose English, Espanol, or Francais, then press the OK button. CO3" appears. ("INSTALL RECORDER FIRST" will show on your connection. The DVD Recorder's menus will be cancelled. Some Discs require you selected. During Initial Setup,"IS TV ON? The Recorder will play Discs in this language if... may be on, you first connect the power cord.This is on the Recorder. Even though your TV may override your TV. MONITOR STANDBY TV / DVD T / C PLAY MODE REC. MODE 1 123 456 789 DISC SELECT 0 MENU CH SYSTEM OK 2-3 CH TIMER FSS TV VOLUME RETURN CLEAR PLAY I I...
... to choose English, Espanol, or Francais, then press the OK button. CO3" appears. ("INSTALL RECORDER FIRST" will show on your connection. The DVD Recorder's menus will be cancelled. Some Discs require you selected. During Initial Setup,"IS TV ON? The Recorder will play Discs in this language if... may be on, you first connect the power cord.This is on the Recorder. Even though your TV may override your TV. MONITOR STANDBY TV / DVD T / C PLAY MODE REC. MODE 1 123 456 789 DISC SELECT 0 MENU CH SYSTEM OK 2-3 CH TIMER FSS TV VOLUME RETURN CLEAR PLAY I I...

User manual
Page 19
...;ais Português Italiano Press OK to choose the preferred TV Shape, then press OK. When the channel search finishes, "Auto ch. Some DVDs require you to choose the language you have connected the antenna - To change the TV Shape later or for subtitles, then press OK. To ... OK to continue 6 "If you have not connected the Antenna or Cable TV signal, take a few minutes, depending on TV Shapes, see a blue Philips DVD background screen and some Information Boxes. (See page 33.) The Recorder is connected, press OK. The Recorder automatically turns off, then turns on the screen...
...;ais Português Italiano Press OK to choose the preferred TV Shape, then press OK. When the channel search finishes, "Auto ch. Some DVDs require you to choose the language you have connected the antenna - To change the TV Shape later or for subtitles, then press OK. To ... OK to continue 6 "If you have not connected the Antenna or Cable TV signal, take a few minutes, depending on TV Shapes, see a blue Philips DVD background screen and some Information Boxes. (See page 33.) The Recorder is connected, press OK. The Recorder automatically turns off, then turns on the screen...
User manual
Page 20
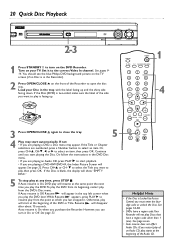
...the blue Philips DVD background picture on the front of the DVD or Title. Load your TV. MODE 1 123 456 789 DISC SELECT 0 MENU CH SYSTEM OK 4 CH TIMER FSS TV VOLUME RETURN CLEAR PLAY 3 Press OPEN/CLOSE A again to open the disc tray. If the Disc (DVD) is in the DVD Disc ... Recorder will disappear after about 15 seconds. See page seven. • Auto resume does not affect Audio CDs. POWER ON/OFF OPEN MONITOR STANDBY TV / DVD T / C PLAY MODE REC. Or, press CH+8, CH-9, ;, or : to play will resume at the beginning of the Recorder to close the tray. 5 4 ...
...the blue Philips DVD background picture on the front of the DVD or Title. Load your TV. MODE 1 123 456 789 DISC SELECT 0 MENU CH SYSTEM OK 4 CH TIMER FSS TV VOLUME RETURN CLEAR PLAY 3 Press OPEN/CLOSE A again to open the disc tray. If the Disc (DVD) is in the DVD Disc ... Recorder will disappear after about 15 seconds. See page seven. • Auto resume does not affect Audio CDs. POWER ON/OFF OPEN MONITOR STANDBY TV / DVD T / C PLAY MODE REC. Or, press CH+8, CH-9, ;, or : to play will resume at the beginning of the Recorder to close the tray. 5 4 ...

User manual
Page 21
...The Index Picture Screen will appear. If you are on pages 41-52. 1 Press OPEN/CLOSE A on page 47. • You cannot duplicate copyrighted DVDs, videotapes, or TV broadcasts using a Cable Box/Satellite Receiver, set up . However, editing changes may appear on other equipment. See page 17. See ... 456 789 DISC SELECT 0 MENU CH SYSTEM OK 5 3,5 CH TIMER FSS TV VOLUME RETURN CLEAR PLAY I STOP AUDIO REC/OTR PAUSE I to a DVD+RW/DVD+R. Choose the output channel of the Disc, so you do not need to select an Empty Title box.You cannot overwrite recordings on page 52...
...The Index Picture Screen will appear. If you are on pages 41-52. 1 Press OPEN/CLOSE A on page 47. • You cannot duplicate copyrighted DVDs, videotapes, or TV broadcasts using a Cable Box/Satellite Receiver, set up . However, editing changes may appear on other equipment. See page 17. See ... 456 789 DISC SELECT 0 MENU CH SYSTEM OK 5 3,5 CH TIMER FSS TV VOLUME RETURN CLEAR PLAY I STOP AUDIO REC/OTR PAUSE I to a DVD+RW/DVD+R. Choose the output channel of the Disc, so you do not need to select an Empty Title box.You cannot overwrite recordings on page 52...
User manual
Page 22
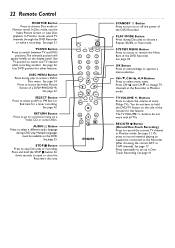
... to access the Index Picture Screen of the DVD Recorder. MONITOR STANDBY TV / DVD T / C PLAY MODE REC. Or, press to adjust the volume of the DVD Recorder. See page 41. Buttons Press to record material playing on a Video CD or some Philips TVs. In Disc mode, use the Index ...channels at the Recorder in Monitor mode. 22 Remote Control MONITOR Button Press to acknowledge or approve a menu selection. SELECT Button Press to access a DVD's Disc menu. MODE 123 456 789 DISC SELECT 0 MENU CH SYSTEM OK CH TIMER FSS TV VOLUME RETURN CLEAR PLAY I I Button (Record...
... to access the Index Picture Screen of the DVD Recorder. MONITOR STANDBY TV / DVD T / C PLAY MODE REC. Or, press to adjust the volume of the DVD Recorder. See page 41. Buttons Press to record material playing on a Video CD or some Philips TVs. In Disc mode, use the Index ...channels at the Recorder in Monitor mode. 22 Remote Control MONITOR Button Press to acknowledge or approve a menu selection. SELECT Button Press to access a DVD's Disc menu. MODE 123 456 789 DISC SELECT 0 MENU CH SYSTEM OK CH TIMER FSS TV VOLUME RETURN CLEAR PLAY I I Button (Record...
User manual
Page 23
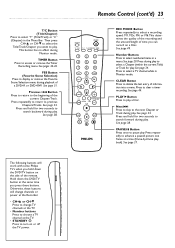
... on or off the TV power. Then press CH+8 or CH-9 to select the Title/Track/Chapter you press these buttons will work with some Philips TVs when you can record on the side of the remote. TIMER Button Press to previous Chapters/Tracks. FSS Button (Favorite Scene Selection) Press to... MODE Button Press repeatedly to select a recording speed: M1, M2x, M4, or M6.This determines the quality of the recording and the amount/length of a DVD+R or DVD+RW. Press during play to select a Chapter (within the current Title) or Track for two seconds to search forward during play . Next G Press to...
... on or off the TV power. Then press CH+8 or CH-9 to select the Title/Track/Chapter you press these buttons will work with some Philips TVs when you can record on the side of the remote. TIMER Button Press to previous Chapters/Tracks. FSS Button (Favorite Scene Selection) Press to... MODE Button Press repeatedly to select a recording speed: M1, M2x, M4, or M6.This determines the quality of the recording and the amount/length of a DVD+R or DVD+RW. Press during play to select a Chapter (within the current Title) or Track for two seconds to search forward during play . Next G Press to...
User manual
Page 24
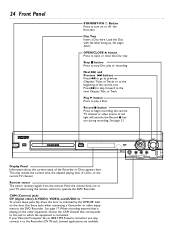
... remote control to turn on or off the Recorder. Press G to skip forward to open or close the Disc tray. Play : button Press to the DVD Recorder. Point the remote here, not at your Personal Computer has an IEEE 1394 Firewire connector, you may include the current time, the elapsed playing... that corresponds to the jack to begin recording the current TV channel or video source. 24 Front Panel STANDBY-ON y Button Press to operate the DVD Recorder.
... remote control to turn on or off the Recorder. Press G to skip forward to open or close the Disc tray. Play : button Press to the DVD Recorder. Point the remote here, not at your Personal Computer has an IEEE 1394 Firewire connector, you may include the current time, the elapsed playing... that corresponds to the jack to begin recording the current TV channel or video source. 24 Front Panel STANDBY-ON y Button Press to operate the DVD Recorder.


