
User manual
Page 3
..., Chapter/Track Selection 34 Audio Language, Subtitles 35 Zoom, Camera Angle 36 Still Picture/Frame-by-Frame Play, Sound 37 Slow Motion, Searching 38 Time Search, Scan 39 Repeat, Repeat A-B 40 Recording Options One-Touch Recording 41 Timer Recording 42 VCR Plus+® Timer Recording 43 Erasing Timer Recordings 44 Error Messages 45 Record One Channel/Watch Another 46 Title Settings Menu 47 Append Recording, Chapter Markers 48 Record Settings 49 Editing Editing: Disc Information Screen 50 Editing 51 Finalize Disc 52 Additional Features and Setup Options Auto Resume, Playback...
..., Chapter/Track Selection 34 Audio Language, Subtitles 35 Zoom, Camera Angle 36 Still Picture/Frame-by-Frame Play, Sound 37 Slow Motion, Searching 38 Time Search, Scan 39 Repeat, Repeat A-B 40 Recording Options One-Touch Recording 41 Timer Recording 42 VCR Plus+® Timer Recording 43 Erasing Timer Recordings 44 Error Messages 45 Record One Channel/Watch Another 46 Title Settings Menu 47 Append Recording, Chapter Markers 48 Record Settings 49 Editing Editing: Disc Information Screen 50 Editing 51 Finalize Disc 52 Additional Features and Setup Options Auto Resume, Playback...
User manual
Page 5
... - Read instructions. Do not use liquid cleaners or aerosol cleaners. For products intended to qualified service personnel. 20. If the plug still fails to fit, contact your electrician to lightning and power-line surges. 16. Power Lines - contact with + and - Opening or removing covers may result in bodily injury, property damage, or damage to the unit: • Install all servicing to operate...
... - Read instructions. Do not use liquid cleaners or aerosol cleaners. For products intended to qualified service personnel. 20. If the plug still fails to fit, contact your electrician to lightning and power-line surges. 16. Power Lines - contact with + and - Opening or removing covers may result in bodily injury, property damage, or damage to the unit: • Install all servicing to operate...

User manual
Page 6
... Philips DVD Recorder both records DVD+RWs/DVD+Rs and plays prerecorded DVDs.You can be recycled and reused if disassembled by -Step/Zoomed Play q Progressive Scan compatibility q Repeat and Repeat A-B playback q Time Search q VCR Plus+ Programming Package Contents q DVD Recorder q Remote control with two AA batteries q AC power cord q One blank Philips DVD+RW q One RF coaxial cable (black with silver tip, with no Disc in a straight line. q Always keep the tray closed to warm surroundings. Plus, the recordings you make on...
... Philips DVD Recorder both records DVD+RWs/DVD+Rs and plays prerecorded DVDs.You can be recycled and reused if disassembled by -Step/Zoomed Play q Progressive Scan compatibility q Repeat and Repeat A-B playback q Time Search q VCR Plus+ Programming Package Contents q DVD Recorder q Remote control with two AA batteries q AC power cord q One blank Philips DVD+RW q One RF coaxial cable (black with silver tip, with no Disc in a straight line. q Always keep the tray closed to warm surroundings. Plus, the recordings you make on...
User manual
Page 10
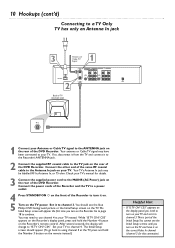
... Initial Setup screens until you need to use channel 4 at the TV, press and hold the Number 4 button on the TV. If so, disconnect it from the TV and connect it on. 5 Turn on the remote instead.) Helpful Hint • If "IS TV ON? C03" appears on the Recorder's display panel, press and hold the Number 3 button on the TV power. C04." Your antenna or Cable TV signal...
... Initial Setup screens until you need to use channel 4 at the TV, press and hold the Number 4 button on the TV. If so, disconnect it from the TV and connect it on. 5 Turn on the remote instead.) Helpful Hint • If "IS TV ON? C03" appears on the Recorder's display panel, press and hold the Number 3 button on the TV power. C04." Your antenna or Cable TV signal...
User manual
Page 11
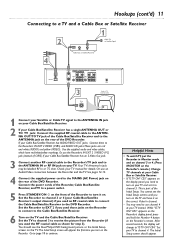
... Video In channel. • You may be labelled RF In or 75 ohm. Or, use channel 4 at your TV instead. See pages 12-14. 4 Connect the supplied power cord to the MAINS (AC Power) jack on the Recorder's remote.) Change TV channels at your Cable Box or Satellite Receiver. • If "IS TV ON? C03" appears on the Recorder's display panel, press and hold the Number 4 button on your TV manual...
... Video In channel. • You may be labelled RF In or 75 ohm. Or, use channel 4 at your TV instead. See pages 12-14. 4 Connect the supplied power cord to the MAINS (AC Power) jack on the Recorder's remote.) Change TV channels at your Cable Box or Satellite Receiver. • If "IS TV ON? C03" appears on the Recorder's display panel, press and hold the Number 4 button on your TV manual...
User manual
Page 12
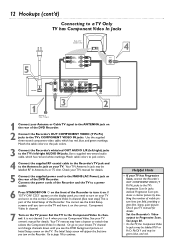
... Progressive Scan. Set the Recorder's Video output to the Component Video In channel. Match the cable colors to the jack colors. 3 Connect the Recorder's white/red OUT AUDIO L/R (left /right AUDIO IN jacks. Use a supplied two-strand audio cable, which has red, blue, and green markings. Check your TV's manual for details. 5 Connect the supplied power cord to the TV's left /right) jacks to the MAINS (AC Power) jack on the rear of the DVD Recorder...
... Progressive Scan. Set the Recorder's Video output to the Component Video In channel. Match the cable colors to the jack colors. 3 Connect the Recorder's white/red OUT AUDIO L/R (left /right AUDIO IN jacks. Use a supplied two-strand audio cable, which has red, blue, and green markings. Check your TV's manual for details. 5 Connect the supplied power cord to the TV's left /right) jacks to the MAINS (AC Power) jack on the rear of the DVD Recorder...
User manual
Page 13
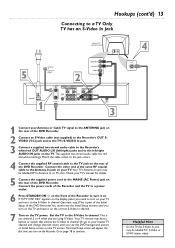
... part of the Initial Setup of the Recorder to your lowest TV channel and change channels down until you turn on the TV and have a button or switch that selects the S-Video In channel. Connect the power cords of the Recorder and the TV to a power outlet. 6 Press STANDBY-ON y on the front of the DVD Recorder.You cannot see the DVD background picture or Initial Setup screen on the Recorder. The supplied two-strand audio cable...
... part of the Initial Setup of the Recorder to your lowest TV channel and change channels down until you turn on the TV and have a button or switch that selects the S-Video In channel. Connect the power cords of the Recorder and the TV to a power outlet. 6 Press STANDBY-ON y on the front of the DVD Recorder.You cannot see the DVD background picture or Initial Setup screen on the Recorder. The supplied two-strand audio cable...

User manual
Page 14
... channel and change channels down until you see the DVD background picture or Initial Setup screen. Check your TV manual for details. 5 Connect the supplied power cord to the MAINS (AC Power) jack on the TV power. Your TV remote may be labelled RF In,Antenna In, or 75 ohm. Helpful Hint • The TV's Video In jack is not channel 3 or 4. Use the supplied video cable that selects the Video In channel. 14 Hookups (cont'd) Connecting...
... channel and change channels down until you see the DVD background picture or Initial Setup screen. Check your TV manual for details. 5 Connect the supplied power cord to the MAINS (AC Power) jack on the TV power. Your TV remote may be labelled RF In,Antenna In, or 75 ohm. Helpful Hint • The TV's Video In jack is not channel 3 or 4. Use the supplied video cable that selects the Video In channel. 14 Hookups (cont'd) Connecting...
User manual
Page 15
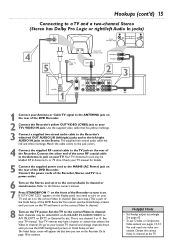
... a power outlet. 6 Turn on your TV manual. You only need to turn on the Stereo and set it to the TV jack on the display panel, you need one video connection. If "IS TV ON? Use the supplied video cable that selects the Video In channel. Connect the power cords of the DVD Recorder.You cannot see pages 12-13. Helpful Hints • Set Analog output accordingly. This is part of the Initial Setup of the Recorder...
... a power outlet. 6 Turn on your TV manual. You only need to turn on the Stereo and set it to the TV jack on the display panel, you need one video connection. If "IS TV ON? Use the supplied video cable that selects the Video In channel. Connect the power cords of the DVD Recorder.You cannot see pages 12-13. Helpful Hints • Set Analog output accordingly. This is part of the Initial Setup of the Recorder...

User manual
Page 16
... TV channel and change channels down until you are not using it to the correct Video In channel. Use the supplied video cable that selects the Video In channel. Your TV's Antenna In jack may produce a strong, distorted sound or no sound at the TV. Helpful Hints • Set Digital output accordingly. Use a coaxial digital audio cable (not supplied).You can use S-Video or Component Video instead, see the DVD background picture or Initial Setup screen on the Recorder. 16 Hookups (cont'd) Connecting...
... TV channel and change channels down until you are not using it to the correct Video In channel. Use the supplied video cable that selects the Video In channel. Your TV's Antenna In jack may produce a strong, distorted sound or no sound at the TV. Helpful Hints • Set Digital output accordingly. Use a coaxial digital audio cable (not supplied).You can use S-Video or Component Video instead, see the DVD background picture or Initial Setup screen on the Recorder. 16 Hookups (cont'd) Connecting...
User manual
Page 17
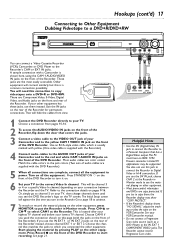
... Digital Video or Hi-8 camcorders. Hookups (cont'd) 17 Connecting to Other Equipment Dubbing Videotape to a DVD+R/DVD+RW STANDBY-ON OPEN/CLOSE You can use this jack to connect the Recorder to copy them instead. There are copy protected. Choose a connection from view. 1 Connect the DVD Recorder directly to the red and white CAM 1 AUDIO IN jacks on the VCR/Camcorder. The Initial Setup screen will need this connection to select CAM1 at the Recorder in Monitor mode...
... Digital Video or Hi-8 camcorders. Hookups (cont'd) 17 Connecting to Other Equipment Dubbing Videotape to a DVD+R/DVD+RW STANDBY-ON OPEN/CLOSE You can use this jack to connect the Recorder to copy them instead. There are copy protected. Choose a connection from view. 1 Connect the DVD Recorder directly to the red and white CAM 1 AUDIO IN jacks on the VCR/Camcorder. The Initial Setup screen will need this connection to select CAM1 at the Recorder in Monitor mode...
User manual
Page 20
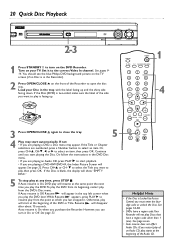
... playing a DVD, a Disc menu may start playback. • If you are numbered, press a Number button to close the tray. 5 4 Play may appear. Resume will not play Discs that have a region code.Your Recorder will disappear after about 15 seconds. However, you are playing an Audio CD, press PLAY : to the correct Video In channel. See pages 54-58. • DVDs have a region code other than 1 (one). Set it On or Off. POWER ON/OFF OPEN MONITOR STANDBY TV / DVD T / C PLAY MODE REC...
... playing a DVD, a Disc menu may start playback. • If you are numbered, press a Number button to close the tray. 5 4 Play may appear. Resume will not play Discs that have a region code.Your Recorder will disappear after about 15 seconds. However, you are playing an Audio CD, press PLAY : to the correct Video In channel. See pages 54-58. • DVDs have a region code other than 1 (one). Set it On or Off. POWER ON/OFF OPEN MONITOR STANDBY TV / DVD T / C PLAY MODE REC...

User manual
Page 21
... attempt this title" details on a new DVD+RW, formatting the Disc will encircle the Record I button will flash.The Index Picture Screen will appear. MODE 123 456 789 DISC SELECT 0 MENU CH SYSTEM OK 5 3,5 CH TIMER FSS TV VOLUME RETURN CLEAR PLAY I STOP AUDIO REC/OTR PAUSE I to record. If you begin after you wish to record the selected channel. See page 11. 6 Press REC/OTR I 6 Helpful Hints • You cannot record only Audio (sound) to channel 3 or...
... attempt this title" details on a new DVD+RW, formatting the Disc will encircle the Record I button will flash.The Index Picture Screen will appear. MODE 123 456 789 DISC SELECT 0 MENU CH SYSTEM OK 5 3,5 CH TIMER FSS TV VOLUME RETURN CLEAR PLAY I STOP AUDIO REC/OTR PAUSE I to record. If you begin after you wish to record the selected channel. See page 11. 6 Press REC/OTR I 6 Helpful Hints • You cannot record only Audio (sound) to channel 3 or...
User manual
Page 22
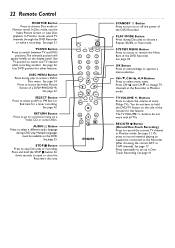
... TV channel in Monitor mode. MODE 123 456 789 DISC SELECT 0 MENU CH SYSTEM OK CH TIMER FSS TV VOLUME RETURN CLEAR PLAY I I Button (Record/One-Touch Recording) Press to switch between TV and DVD positions.The selected position will appear briefly on the DVD. Use DVD position for a timer recording. 22 Remote Control MONITOR Button Press to set up a OneTouch Recording. In Monitor mode, watch one TV channel while recording another. In Disc mode, use the Index Picture Screen or view Disc playback. See...
... TV channel in Monitor mode. MODE 123 456 789 DISC SELECT 0 MENU CH SYSTEM OK CH TIMER FSS TV VOLUME RETURN CLEAR PLAY I I Button (Record/One-Touch Recording) Press to switch between TV and DVD positions.The selected position will appear briefly on the DVD. Use DVD position for a timer recording. 22 Remote Control MONITOR Button Press to set up a OneTouch Recording. In Monitor mode, watch one TV channel while recording another. In Disc mode, use the Index Picture Screen or view Disc playback. See...
User manual
Page 30
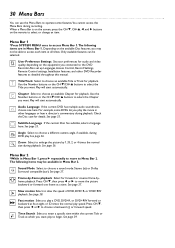
... Menu Bars during playback. d Sound Mode Select to access each item at which you may be selected. Time Search Select to the DVD Recorder.Also set up Languages,Access Control, Record Settings, Remote Control settings, Installation features, and other languages or hear a director's commentary during recording. User Preference Settings Set your preferences for audio and video quality, depending on the remote to choose an available Title or Track for forward or reverse frame-byframe playback. W Title/Track Select to select or change an item. Play will start...
... Menu Bars during playback. d Sound Mode Select to access each item at which you may be selected. Time Search Select to the DVD Recorder.Also set up Languages,Access Control, Record Settings, Remote Control settings, Installation features, and other languages or hear a director's commentary during recording. User Preference Settings Set your preferences for audio and video quality, depending on the remote to choose an available Title or Track for forward or reverse frame-byframe playback. W Title/Track Select to select or change an item. Play will start...

User manual
Page 41
... turn off . q To edit your Cable Box/Satellite Receiver) or the EXT channel (that has enough time for about 30 seconds after you connected the Cable Box/Satellite Receiver). q To erase a recording, see TV channels through the DVD Recorder. MODE 1 4 7 DISC SELECT 23 56 89 0 MENU CH SYSTEM OK 4 2,4 CH TIMER FSS TV VOLUME RETURN CLEAR PLAY 6 I STOP AUDIO REC/OTR PAUSE I for the recording. See pages 31 and 33. • The recommended operating...
... turn off . q To edit your Cable Box/Satellite Receiver) or the EXT channel (that has enough time for about 30 seconds after you connected the Cable Box/Satellite Receiver). q To erase a recording, see TV channels through the DVD Recorder. MODE 1 4 7 DISC SELECT 23 56 89 0 MENU CH SYSTEM OK 4 2,4 CH TIMER FSS TV VOLUME RETURN CLEAR PLAY 6 I STOP AUDIO REC/OTR PAUSE I for the recording. See pages 31 and 33. • The recommended operating...
User manual
Page 66
... Disc was recorded on a different DVD Recorder, stop Disc play a DVD+R on another DVD Player, finalize the Disc first. the picture is black and white during Disc playback through a Stereo. • Do not connect any cables from the power outlet. See page 49. Remember, you only need one audio connection. A Disc recorded on the other Player. Furthermore, it on this DVD Recorder will not play such copy-protected discs. Press Record I .The "replacing menu" message will appear. If you record on this disc the menu will not play...
... Disc was recorded on a different DVD Recorder, stop Disc play a DVD+R on another DVD Player, finalize the Disc first. the picture is black and white during Disc playback through a Stereo. • Do not connect any cables from the power outlet. See page 49. Remember, you only need one audio connection. A Disc recorded on the other Player. Furthermore, it on this DVD Recorder will not play such copy-protected discs. Press Record I .The "replacing menu" message will appear. If you record on this disc the menu will not play...

User manual
Page 67
... cannot record. Delete some features, such as Angles, Subtitles, or multi-language Audio. • The feature may not be strong enough to operate the Recorder again as the Remote control used. "COPY PROTECT" may appear on your Antenna/Cable TV system must be selected. Another DVD Player shows the Index Picture Screen but does not react to PLAY :. • Press STOP C to select , then press :. Complete the Initial Setup again and reset any...
... cannot record. Delete some features, such as Angles, Subtitles, or multi-language Audio. • The feature may not be strong enough to operate the Recorder again as the Remote control used. "COPY PROTECT" may appear on your Antenna/Cable TV system must be selected. Another DVD Player shows the Index Picture Screen but does not react to PLAY :. • Press STOP C to select , then press :. Complete the Initial Setup again and reset any...
User manual
Page 70
... owner's manual before requesting service. Also keep both nearby. Box 520890, Miami, FL 33152 (402) 536-4171 EL6506E003 / 09-02 A sales receipt or other warranties. Adjustments of such damages.) REMEMBER... Your warranty does not cover: • labor charges for installation or setup of the product, adjustment of all parts, and for repair. Take the product to a Philips factory service center (see enclosed list) or authorized service...
... owner's manual before requesting service. Also keep both nearby. Box 520890, Miami, FL 33152 (402) 536-4171 EL6506E003 / 09-02 A sales receipt or other warranties. Adjustments of such damages.) REMEMBER... Your warranty does not cover: • labor charges for installation or setup of the product, adjustment of all parts, and for repair. Take the product to a Philips factory service center (see enclosed list) or authorized service...
User manual
Page 71
...mode button 22, 40 play once 56 playable discs 7 playback audio 63 playback control 53 playing a disc 20 pluscode 43, 45 power cord 10-16, 25 preserving memories 17 previous j button 23, 24, 34, 38 progressive scan 12, 60 protection 50 quick disc playback 20 quick recording 21 rear panel 25 rec/otr I button . . . . .21-22, 41 rec mode button 23, 49 record I button 24 record mode 49 record one channel/ watch another 46 record settings 49 recording audio 63 region codes 7 remote control 22-23 remote control tv operation .23 remote control used 64 remote sensor 24 repeat...
...mode button 22, 40 play once 56 playable discs 7 playback audio 63 playback control 53 playing a disc 20 pluscode 43, 45 power cord 10-16, 25 preserving memories 17 previous j button 23, 24, 34, 38 progressive scan 12, 60 protection 50 quick disc playback 20 quick recording 21 rear panel 25 rec/otr I button . . . . .21-22, 41 rec mode button 23, 49 record I button 24 record mode 49 record one channel/ watch another 46 record settings 49 recording audio 63 region codes 7 remote control 22-23 remote control tv operation .23 remote control used 64 remote sensor 24 repeat...


