
User manual
Page 3
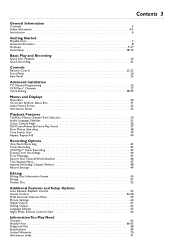
Contents 3 General Information Contents 3 Safety Information 4-5 Introduction 6 Getting Started Playable Discs 7 General Information 8 Hookups 9-17 Initial Setup 18-19 Basic Play and Recording Quick Disc Playback 20 Quick Recording 21 Controls Remote Control 22-23 Front Panel 24 Rear Panel ...
Contents 3 General Information Contents 3 Safety Information 4-5 Introduction 6 Getting Started Playable Discs 7 General Information 8 Hookups 9-17 Initial Setup 18-19 Basic Play and Recording Quick Disc Playback 20 Quick Recording 21 Controls Remote Control 22-23 Front Panel 24 Rear Panel ...
User manual
Page 5
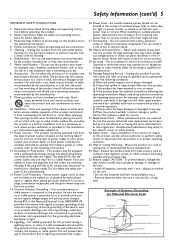
..., b) If liquid has spilled or objects have been adhered to the unit: • Install all warnings on the product. 19. This product may be fatal. 17. Route power supply cords so they exit from the product. 14. contact with a polarized alternating-current line plug (a plug having the same characteristics as the...
..., b) If liquid has spilled or objects have been adhered to the unit: • Install all warnings on the product. 19. This product may be fatal. 17. Route power supply cords so they exit from the product. 14. contact with a polarized alternating-current line plug (a plug having the same characteristics as the...
User manual
Page 9
... Audio and Video In channels on your memories by copying a videotape to preserve your other equipment so you can see the blue Philips DVD background picture on pages 10-16. Never make or change channels down until you determine the option that best fits with equipment...jack to the power outlets only after you choose the Video In channel directly. Special connections are near TV channel zero (0). See page 17 for details. Your existing equipment, especially your connection.These guidelines describe which will determine your TV, will play the existing videotape into ...
... Audio and Video In channels on your memories by copying a videotape to preserve your other equipment so you can see the blue Philips DVD background picture on pages 10-16. Never make or change channels down until you determine the option that best fits with equipment...jack to the power outlets only after you choose the Video In channel directly. Special connections are near TV channel zero (0). See page 17 for details. Your existing equipment, especially your connection.These guidelines describe which will determine your TV, will play the existing videotape into ...
User manual
Page 17
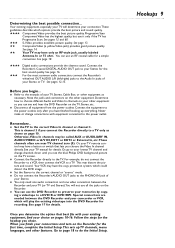
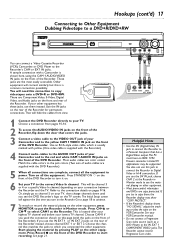
... or Hi-8 camcorders. See page 21. If you use this page (with the DVD Recorder.) 5 When all connections are the most easily accessible. Hookups (cont'd) 17 Connecting to Other Equipment Dubbing Videotape to a DVD+R/DVD+RW STANDBY-ON OPEN/CLOSE You can use the DV IN jack, choose CAM 2 at the...
... or Hi-8 camcorders. See page 21. If you use this page (with the DVD Recorder.) 5 When all connections are the most easily accessible. Hookups (cont'd) 17 Connecting to Other Equipment Dubbing Videotape to a DVD+R/DVD+RW STANDBY-ON OPEN/CLOSE You can use the DV IN jack, choose CAM 2 at the...

User manual
Page 21
... to see "Erase this . Quick Recording 21 STANDBY-ON OPEN/CLOSE 1-2 OPEN 4 The Recorder can record TV programming onto a DVD+RW or DVD+R. See page 17. Recording will reappear after a few seconds. Follow the steps on a DVD+RW. MODE 123 456 789 DISC SELECT 0 MENU CH SYSTEM OK 5 3,5 CH TIMER FSS...
... to see "Erase this . Quick Recording 21 STANDBY-ON OPEN/CLOSE 1-2 OPEN 4 The Recorder can record TV programming onto a DVD+RW or DVD+R. See page 17. Recording will reappear after a few seconds. Follow the steps on a DVD+RW. MODE 123 456 789 DISC SELECT 0 MENU CH SYSTEM OK 5 3,5 CH TIMER FSS...
User manual
Page 22
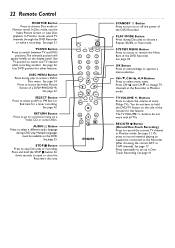
... Disc mode or Monitor mode. REC/OTR I STOP AUDIO REC/OTR PAUSE STANDBY y Button Press to a previous menu on a Video CD or some Philips TVs. See page 17. DISC MENU Button Press during DVD play to access the Index Picture Screen of some DVDs. In Monitor mode, watch one TV channel while...
... Disc mode or Monitor mode. REC/OTR I STOP AUDIO REC/OTR PAUSE STANDBY y Button Press to a previous menu on a Video CD or some Philips TVs. See page 17. DISC MENU Button Press during DVD play to access the Index Picture Screen of some DVDs. In Monitor mode, watch one TV channel while...
User manual
Page 24
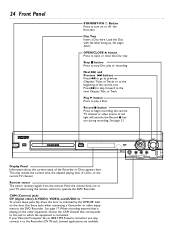
... close the Disc tray. See page 21. Use these jacks, flip down the door as indicated by the OPEN : label on the door. See page 17. S-VIDEO VIDEO L AUDIO R CAM 1 Stop C button Press to turn on the other equipment to the DVD Recorder. This may connect it to which the equipment...
... close the Disc tray. See page 21. Use these jacks, flip down the door as indicated by the OPEN : label on the door. See page 17. S-VIDEO VIDEO L AUDIO R CAM 1 Stop C button Press to turn on the other equipment to the DVD Recorder. This may connect it to which the equipment...

User manual
Page 25
...and sound from other equipment. VIDEO (CVBS): Connect the supplied video cable (yellow) here and to a TV's SVideo In jack. See page 17. See pages 12-15. Rear Panel 25 MAINS jack Connect the supplied AC power cord here. TV jack Connect the supplied RF coaxial cable ...and to the Audio In jacks of optional additional equipment. S-VIDEO (Y-C): Connect an S-Video cable here and to the TV's Video In jack. See page 17. • COMPONENT VIDEO (Y PB PR): Connect these jacks to receive picture and sound from other equipment. • AUDIO L/R (left /right): Connect ...
...and sound from other equipment. VIDEO (CVBS): Connect the supplied video cable (yellow) here and to a TV's SVideo In jack. See page 17. See pages 12-15. Rear Panel 25 MAINS jack Connect the supplied AC power cord here. TV jack Connect the supplied RF coaxial cable ...and to the Audio In jacks of optional additional equipment. S-VIDEO (Y-C): Connect an S-Video cable here and to the TV's Video In jack. See page 17. • COMPONENT VIDEO (Y PB PR): Connect these jacks to receive picture and sound from other equipment. • AUDIO L/R (left /right): Connect ...

User manual
Page 33
... the bottom of the next scheduled timer recording and appears in the Index Picture Screen.You cannot remove it from other equipment. See pages 10-17. no equipment is not receivable or no timer recordings are on the Recorder.
... the bottom of the next scheduled timer recording and appears in the Index Picture Screen.You cannot remove it from other equipment. See pages 10-17. no equipment is not receivable or no timer recordings are on the Recorder.

User manual
Page 57
... TIMER FSS TV VOLUME RETURN CLEAR PLAY 3,5 1,6 1-5 I STOP AUDIO REC/OTR PAUSE 6 Press SYSTEM MENU to standard U.S. Enter the four-digit code to play . NC-17 6 - Select "0" (- -) to select in the top left corner of the TV screen. 2 Press CH-9 repeatedly to deactivate Parental level.The entire Disc will play will...
... TIMER FSS TV VOLUME RETURN CLEAR PLAY 3,5 1,6 1-5 I STOP AUDIO REC/OTR PAUSE 6 Press SYSTEM MENU to standard U.S. Enter the four-digit code to play . NC-17 6 - Select "0" (- -) to select in the top left corner of the TV screen. 2 Press CH-9 repeatedly to deactivate Parental level.The entire Disc will play will...
User manual
Page 69
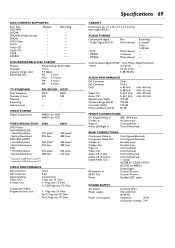
...; Dolby Digital (AC-3) • DTS • MPEG1 • MPEG2 Play Multi-channel Multi-channel 2-channel Multi-channel Recording 2-channel 16 bit, fs 48 kHz - - - Sony Philips Digital Interface) • PCM 2-channel - 16, 20, 24 bit fs 48, 96 kHz AUDIO PERFORMANCE DA Converter AD Converter DVD Video CD Audio CD Signal... 75 Ohm C: 0.300 Vpp into 75 Ohm Y: 1 Vpp into 75 Ohm PB: 0.7 Vpp into 75 Ohm PR: 0.7 Vpp into 75 Ohm Specifications 69 CABINET Dimensions (w x h x d): 17 x 3 x 13 inches Net weight: 8.8 lbs.
...; Dolby Digital (AC-3) • DTS • MPEG1 • MPEG2 Play Multi-channel Multi-channel 2-channel Multi-channel Recording 2-channel 16 bit, fs 48 kHz - - - Sony Philips Digital Interface) • PCM 2-channel - 16, 20, 24 bit fs 48, 96 kHz AUDIO PERFORMANCE DA Converter AD Converter DVD Video CD Audio CD Signal... 75 Ohm C: 0.300 Vpp into 75 Ohm Y: 1 Vpp into 75 Ohm PB: 0.7 Vpp into 75 Ohm PR: 0.7 Vpp into 75 Ohm Specifications 69 CABINET Dimensions (w x h x d): 17 x 3 x 13 inches Net weight: 8.8 lbs.
User manual
Page 71
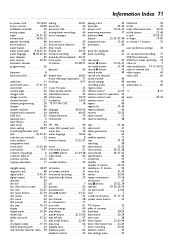
...frame playback . .30, 37 front panel 24 fss button 23, 48, 51 glossary 65 helpful hints 66-67 home videotape duplication . .17 hookups 9-17 in ext 1/2 jacks 25 index picture screen 32 information boxes 33 initial setup 18-19 installation 26-29 "IS TV ON? M6 49 ...chapters 49 auto resume 20, 53 automatic channel programming 26 batteries 8 black level shift 60 cable box 11 cam1/cam2 jacks . . . . .17, 21, 24 camcorder 17 camera angle 36 change code 54 change country 58 channel buttons 22 channel programming 26 chapter 30 chapter markers 48 chapter/track selection . . . ....
...frame playback . .30, 37 front panel 24 fss button 23, 48, 51 glossary 65 helpful hints 66-67 home videotape duplication . .17 hookups 9-17 in ext 1/2 jacks 25 index picture screen 32 information boxes 33 initial setup 18-19 installation 26-29 "IS TV ON? M6 49 ...chapters 49 auto resume 20, 53 automatic channel programming 26 batteries 8 black level shift 60 cable box 11 cam1/cam2 jacks . . . . .17, 21, 24 camcorder 17 camera angle 36 change code 54 change country 58 channel buttons 22 channel programming 26 chapter 30 chapter markers 48 chapter/track selection . . . ....

