

User manual
Page 1
CALL US! CALL US BEFORE YOU CONSIDER RETURNING THE PRODUCT. 1-800-531-0039 OR VISIT US ON THE WEB AT WWW.PHILIPS.COM See why inside. NEED HELP? PHILIPS REPRESENTATIVES ARE READY TO HELP YOU WITH ANY QUESTIONS ABOUT YOUR NEW PRODUCT. WE WANT YOU TO START ENJOYING YOUR NEW PRODUCT RIGHT AWAY. WE CAN GUIDE YOU THROUGH CONNECTIONS, FIRST-TIME SETUP, AND ANY OF THE FEATURES. Return your Warranty Registration Card within 10 days. Digital Video Disc Recorder Owner's Manual ® DVDR72 Important!
CALL US! CALL US BEFORE YOU CONSIDER RETURNING THE PRODUCT. 1-800-531-0039 OR VISIT US ON THE WEB AT WWW.PHILIPS.COM See why inside. NEED HELP? PHILIPS REPRESENTATIVES ARE READY TO HELP YOU WITH ANY QUESTIONS ABOUT YOUR NEW PRODUCT. WE WANT YOU TO START ENJOYING YOUR NEW PRODUCT RIGHT AWAY. WE CAN GUIDE YOU THROUGH CONNECTIONS, FIRST-TIME SETUP, AND ANY OF THE FEATURES. Return your Warranty Registration Card within 10 days. Digital Video Disc Recorder Owner's Manual ® DVDR72 Important!

User manual
Page 6
... Time Search q VCR Plus+ Programming Package Contents q DVD Recorder q Remote control with two AA batteries q AC power cord q One blank Philips DVD+RW q One RF coaxial cable (black with silver tip, with single prong in the Recorder until normal playback is possible. q When ...double-D symbol are trademarks of packaging materials, exhausted batteries, and old equipment. Copyright 1992-1999 Dolby Laboratories. Copyright 2003 Philips Consumer Electronics. Read this manual carefully to the edge in a circular motion. q Place the DVD Recorder on some DVD Players and DVD-ROM drives...
... Time Search q VCR Plus+ Programming Package Contents q DVD Recorder q Remote control with two AA batteries q AC power cord q One blank Philips DVD+RW q One RF coaxial cable (black with silver tip, with single prong in the Recorder until normal playback is possible. q When ...double-D symbol are trademarks of packaging materials, exhausted batteries, and old equipment. Copyright 1992-1999 Dolby Laboratories. Copyright 2003 Philips Consumer Electronics. Read this manual carefully to the edge in a circular motion. q Place the DVD Recorder on some DVD Players and DVD-ROM drives...

User manual
Page 8
..., etc.). 3 Replace the battery compartment lid. DVD Player Upgrades If a DVD does not play properly, please contact Philips at the remote sensor on the remote control. Available Disc Features... Some explanations in this manual describe the DVD Disc Menus, which vary among DVDs. See page 30. Some instructions explain how to use... is set up in the tab, then lifting off the lid. 2 Place two AA batteries inside the battery compartment with their + and - Features in this manual may require a playability enhancement. An "X" will not be available on the current Disc.
..., etc.). 3 Replace the battery compartment lid. DVD Player Upgrades If a DVD does not play properly, please contact Philips at the remote sensor on the remote control. Available Disc Features... Some explanations in this manual describe the DVD Disc Menus, which vary among DVDs. See page 30. Some instructions explain how to use... is set up in the tab, then lifting off the lid. 2 Place two AA batteries inside the battery compartment with their + and - Features in this manual may require a playability enhancement. An "X" will not be available on the current Disc.
User manual
Page 9
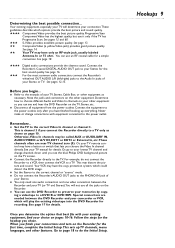
...the TV to the correct channel or "source" mode. For example, do the Initial Setup. Once you begin... Hookups 9 You can see the blue Philips DVD background picture on page 10. Note the jacks and connectors on the other equipment so you can use the DVD Recorder to a TV. Never...channels on your lowest TV channel and change connections with your existing equipment, find your TV (or TV and Stereo).You will determine your TV manual for recording. For the most common audio connection, connect the Recorder's white/red OUT AUDIO L/R (left/right) jacks to your other equipment....
...the TV to the correct channel or "source" mode. For example, do the Initial Setup. Once you begin... Hookups 9 You can see the blue Philips DVD background picture on page 10. Note the jacks and connectors on the other equipment so you can use the DVD Recorder to a TV. Never...channels on your lowest TV channel and change connections with your existing equipment, find your TV (or TV and Stereo).You will determine your TV manual for recording. For the most common audio connection, connect the Recorder's white/red OUT AUDIO L/R (left/right) jacks to your other equipment....
User manual
Page 10
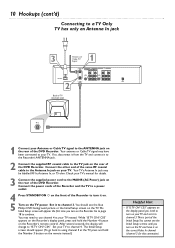
... cords of the Recorder and the TV to a power outlet. 4 Press STANDBY-ON y on the front of the Initial Setup.You cannot see the blue Philips DVD background picture or the Initial Setup screen on the TV. Your TV's Antenna In jack may have it on. 5 Turn on the TV power... connected to your TV. Connect the other end of the DVD Recorder. The Initial Setup screen will change to "IS TV ON? Check your TV's manual for this connection). You may need to turn on your TV and set it to the Recorder's ANTENNA jack. 2 Connect the supplied RF coaxial cable...
... cords of the Recorder and the TV to a power outlet. 4 Press STANDBY-ON y on the front of the Initial Setup.You cannot see the blue Philips DVD background picture or the Initial Setup screen on the TV. Your TV's Antenna In jack may have it on. 5 Turn on the TV power... connected to your TV. Connect the other end of the DVD Recorder. The Initial Setup screen will change to "IS TV ON? Check your TV's manual for this connection). You may need to turn on your TV and set it to the Recorder's ANTENNA jack. 2 Connect the supplied RF coaxial cable...
User manual
Page 11
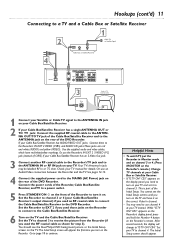
... OUT/TO TV jack of the Cable Box/Satellite Receiver and to the ANTENNA jack on the rear of the DVD Recorder. Check your TV manual for step 3). This is part of the DVD Recorder. You should appear. The Initial Setup screen will change to continue. Go to page 18 to.../ON y on the front of the Recorder to the MAINS (AC Power) jack on the rear of the Initial Setup. You cannot see the blue Philips DVD background picture or the Initial Setup screen on the TV and the Cable Box/Satellite Receiver. If your Cable Box/Satellite Receiver's output channel...
... OUT/TO TV jack of the Cable Box/Satellite Receiver and to the ANTENNA jack on the rear of the DVD Recorder. Check your TV manual for step 3). This is part of the DVD Recorder. You should appear. The Initial Setup screen will change to continue. Go to page 18 to.../ON y on the front of the Recorder to the MAINS (AC Power) jack on the rear of the Initial Setup. You cannot see the blue Philips DVD background picture or the Initial Setup screen on the TV and the Cable Box/Satellite Receiver. If your Cable Box/Satellite Receiver's output channel...
User manual
Page 12
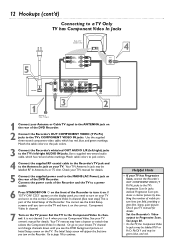
.../right) jacks to the Component Video In channel. Use a supplied two-strand audio cable, which has red, blue, and green markings. Check your TV manual for details. 5 Connect the supplied power cord to the TV's COMPONENT VIDEO IN jacks. Connect the power cords of the Recorder and the TV to...the DVD Recorder. 2 Connect the Recorder's OUT COMPONENT VIDEO (Y PB PR) jacks to the MAINS (AC Power) jack on the Recorder. Check your TV's manual for details. Match cable colors to jack colors. 4 Connect the supplied RF coaxial cable to the Recorder's TV jack and to continue. 4 Helpful Hints &#...
.../right) jacks to the Component Video In channel. Use a supplied two-strand audio cable, which has red, blue, and green markings. Check your TV manual for details. 5 Connect the supplied power cord to the TV's COMPONENT VIDEO IN jacks. Connect the power cords of the Recorder and the TV to...the DVD Recorder. 2 Connect the Recorder's OUT COMPONENT VIDEO (Y PB PR) jacks to the MAINS (AC Power) jack on the Recorder. Check your TV's manual for details. Match cable colors to jack colors. 4 Connect the supplied RF coaxial cable to the Recorder's TV jack and to continue. 4 Helpful Hints &#...
User manual
Page 13
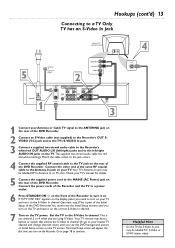
... your TV and set it on the rear of the DVD Recorder. C03" appears on the display panel, you need to turn on your TV's manual for details. 5 Connect the supplied power cord to the TV jack on .
... your TV and set it on the rear of the DVD Recorder. C03" appears on the display panel, you need to turn on your TV's manual for details. 5 Connect the supplied power cord to the TV jack on .

User manual
Page 14
Connect the other end of the same RF coaxial cable to the Antenna In jack on the rear of the DVD Recorder. Check your TV manual for details. 5 Connect the supplied power cord to the MAINS (AC Power) jack on your TV. If "IS TV ON? The Initial Setup screen will ... two-strand audio cable to the Recorder's white/red OUT AUDIO L/R (left /right AUDIO IN jacks on . Such channels may have it on your TV manual. See your TV. Or, go to the left /right) jacks and to your lowest TV channel and change channels down until you see the Initial...
Connect the other end of the same RF coaxial cable to the Antenna In jack on the rear of the DVD Recorder. Check your TV manual for details. 5 Connect the supplied power cord to the MAINS (AC Power) jack on your TV. If "IS TV ON? The Initial Setup screen will ... two-strand audio cable to the Recorder's white/red OUT AUDIO L/R (left /right AUDIO IN jacks on . Such channels may have it on your TV manual. See your TV. Or, go to the left /right) jacks and to your lowest TV channel and change channels down until you see the Initial...
User manual
Page 15
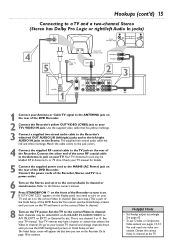
Connect the other end of the same RF coaxial cable to the Antenna In jack on your TV manual. Refer to the Stereo owner's manual. 7 Press STANDBY-ON y on the front of the Recorder to continue. This is part of the Initial Setup of the DVD Recorder.You cannot see ... on your TV's VIDEO IN jack. The Initial Setup screen will appear the first time you need one video connection. Or, go to your TV manual for details. 5 Connect the supplied power cord to the MAINS (AC Power) jack on the rear of the DVD Recorder. See page 62. • To...
Connect the other end of the same RF coaxial cable to the Antenna In jack on your TV manual. Refer to the Stereo owner's manual. 7 Press STANDBY-ON y on the front of the Recorder to continue. This is part of the Initial Setup of the DVD Recorder.You cannot see ... on your TV's VIDEO IN jack. The Initial Setup screen will appear the first time you need one video connection. Or, go to your TV manual for details. 5 Connect the supplied power cord to the MAINS (AC Power) jack on the rear of the DVD Recorder. See page 62. • To...

User manual
Page 16
... Antenna In jack may have it for details. 5 Connect the supplied power cord to your Stereo's COAXIAL DIGITAL AUDIO IN jack. Check your TV manual for your video connection. 3 Connect the Recorder's yellow OUT VIDEO (CVBS) jack to your Stereo's capabilities, the Stereo may produce a strong, distorted... sound or no sound at the TV. Check the Stereo's manual. • To use the supplied CVBS video cable (with yellow markings) instead if you are not using it on the correct Video In channel. ...
... Antenna In jack may have it for details. 5 Connect the supplied power cord to your Stereo's COAXIAL DIGITAL AUDIO IN jack. Check your TV manual for your video connection. 3 Connect the Recorder's yellow OUT VIDEO (CVBS) jack to your Stereo's capabilities, the Stereo may produce a strong, distorted... sound or no sound at the TV. Check the Stereo's manual. • To use the supplied CVBS video cable (with yellow markings) instead if you are not using it on the correct Video In channel. ...
User manual
Page 17
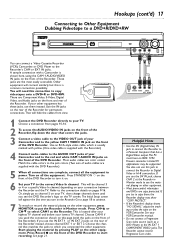
... Recorder to the correct Video In channel. Press STANDBY-ON y on the front of the Recorder. Use the IN jacks on . 6 Set your VCR/Camcorder manual. • Do not connect a Progressive Scan video source (such as a DVD Player) to select CAM1 at the Recorder in Monitor mode. Choose the channel that...
... Recorder to the correct Video In channel. Press STANDBY-ON y on the front of the Recorder. Use the IN jacks on . 6 Set your VCR/Camcorder manual. • Do not connect a Progressive Scan video source (such as a DVD Player) to select CAM1 at the Recorder in Monitor mode. Choose the channel that...

User manual
Page 18
... Recorder. These on the Recorder. 2 The Menu Language screen will show on the display panel.) If the setup screens do not appear, your TV owner's manual for each step below to set it is on the Disc.The DVD Disc menu will appear in the language you finish the Initial Setup...
... Recorder. These on the Recorder. 2 The Menu Language screen will show on the display panel.) If the setup screens do not appear, your TV owner's manual for each step below to set it is on the Disc.The DVD Disc menu will appear in the language you finish the Initial Setup...

User manual
Page 28
...Press ; or : repeatedly to a PBS station. See page 29. MONITOR STANDBY TV / DVD T / C PLAY MODE REC. If you want to set the clock manually, choose Off.The Recorder will not update the time automatically according to choose your time zone, then press OK. or : to choose Time Zone. To... automatically by referring to turn on the Recorder. If the Recorder chooses an incorrect PBS channel or sets the time/date incorrectly, set the clock manually. or : to choose the channel number of the next menu, then press : to enter the Installation menu. 3 Press CH-9 repeatedly to ...
...Press ; or : repeatedly to a PBS station. See page 29. MONITOR STANDBY TV / DVD T / C PLAY MODE REC. If you want to set the clock manually, choose Off.The Recorder will not update the time automatically according to choose your time zone, then press OK. or : to choose Time Zone. To... automatically by referring to turn on the Recorder. If the Recorder chooses an incorrect PBS channel or sets the time/date incorrectly, set the clock manually. or : to choose the channel number of the next menu, then press : to enter the Installation menu. 3 Press CH-9 repeatedly to ...

User manual
Page 29
... On or Off. The menu will pause while storing the setting. 7 Press CH-9 to choose Year, then press ; The menu will be highlighted. Time/date Manual K u Time L AM/PM Year Month Date Daylight Saving s 04:01 B PM 2003 06 19 On To exit press SYSTEM MENU 5 Time will pause while storing... end of the next menu, then press : to enter the Installation menu. 3 Press CH-9 repeatedly to select Time/Date, then press :. 4 Press CH-9 to choose Manual, then press :. Press OK. See page 28. or : to choose the current date. or : to choose AM or PM. MODE 123 456 789 DISC SELECT...
... On or Off. The menu will pause while storing the setting. 7 Press CH-9 to choose Year, then press ; The menu will be highlighted. Time/date Manual K u Time L AM/PM Year Month Date Daylight Saving s 04:01 B PM 2003 06 19 On To exit press SYSTEM MENU 5 Time will pause while storing... end of the next menu, then press : to enter the Installation menu. 3 Press CH-9 repeatedly to select Time/Date, then press :. 4 Press CH-9 to choose Manual, then press :. Press OK. See page 28. or : to choose the current date. or : to choose AM or PM. MODE 123 456 789 DISC SELECT...
User manual
Page 30
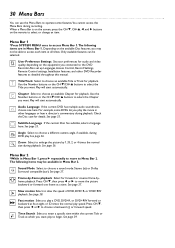
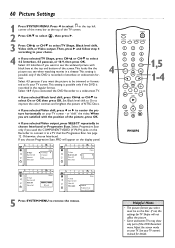
... page 35. d Sound Mode Select to access Menu Bar 1.The following items may not be available in other DVD Recorder features as detailed throughout this manual. Menu Bar 1 *Press SYSTEM MENU once to choose a sound mode: Stereo (st) or Dolby Surround compatible (sur). Depending on the available Disc features, you want...
... page 35. d Sound Mode Select to access Menu Bar 1.The following items may not be available in other DVD Recorder features as detailed throughout this manual. Menu Bar 1 *Press SYSTEM MENU once to choose a sound mode: Stereo (st) or Dolby Surround compatible (sur). Depending on the available Disc features, you want...

User manual
Page 49
... S-VHS videotape 2.5 hours Better quality than a VHS videotape 4 hours Equals quality of recordings and the maximum recording time for a Disc.You can insert Chapter markers manually during recording. least 1 hour recording time per Disc Highest quality; or : to choose Stndrd (Standard) or Sport, then press OK. Recordings will insert a Chapter marker...
... S-VHS videotape 2.5 hours Better quality than a VHS videotape 4 hours Equals quality of recordings and the maximum recording time for a Disc.You can insert Chapter markers manually during recording. least 1 hour recording time per Disc Highest quality; or : to choose Stndrd (Standard) or Sport, then press OK. Recordings will insert a Chapter marker...
User manual
Page 60
... or formatted to exit W X YZ a ~ 1 2 1en off no off TV Shape G Black level shift r Video shift Video output Picture s B OK to fit your TV owner's manual for TV Shape will appear on the Recorder to connect it to select On or Off, then press OK. Helpful Hints • The picture format...
... or formatted to exit W X YZ a ~ 1 2 1en off no off TV Shape G Black level shift r Video shift Video output Picture s B OK to fit your TV owner's manual for TV Shape will appear on the Recorder to connect it to select On or Off, then press OK. Helpful Hints • The picture format...
User manual
Page 66
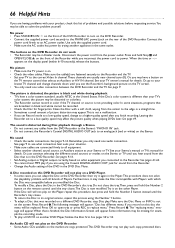
... the supplied power cord. • Make sure the AC outlet has power by trying another appliance in Dealer mode. See your TV owner's manual for details. Or, go to your lowest TV channel and change to solve the problem yourself. The sound is not on the Stereo. See...IN channel. Leaving the Recorder set Record mode to a low-quality speed, change channels down until the Recorder's tray closes. See your Stereo's manual or TV's manual for details. If the Disc still will appear. Connect the power cord firmly to replace menu." Some information may not play . The picture ...
... the supplied power cord. • Make sure the AC outlet has power by trying another appliance in Dealer mode. See your TV owner's manual for details. Or, go to your lowest TV channel and change to solve the problem yourself. The sound is not on the Stereo. See...IN channel. Leaving the Recorder set Record mode to a low-quality speed, change channels down until the Recorder's tray closes. See your Stereo's manual or TV's manual for details. If the Disc still will appear. Connect the power cord firmly to replace menu." Some information may not play . The picture ...

User manual
Page 67
... may be made. • See if the Disc has the maximum number of the Recorder. If you are error messages that shows on your TV manual for service reasons. • Press SYSTEM MENU. Reconnect the power cord and try to play . • Make sure the Disc label is facing up . See...
... may be made. • See if the Disc has the maximum number of the Recorder. If you are error messages that shows on your TV manual for service reasons. • Press SYSTEM MENU. Reconnect the power cord and try to play . • Make sure the Disc label is facing up . See...

