
User manual
Page 1
PHILIPS REPRESENTATIVES ARE READY TO HELP YOU WITH ANY QUESTIONS ABOUT YOUR NEW PRODUCT. NEED HELP? CALL US! WE CAN GUIDE YOU THROUGH CONNECTIONS, FIRST-TIME SETUP, AND ANY OF THE FEATURES. CALL US BEFORE YOU CONSIDER RETURNING THE PRODUCT. 1-800-531-0039 OR VISIT US ON THE WEB AT WWW.PHILIPS.COM WE WANT YOU TO START ENJOYING YOUR NEW PRODUCT RIGHT AWAY. See why inside. Digital Video Disc Recorder Owner's Manual ® DVDR72 Important! Return your Warranty Registration Card within 10 days.
PHILIPS REPRESENTATIVES ARE READY TO HELP YOU WITH ANY QUESTIONS ABOUT YOUR NEW PRODUCT. NEED HELP? CALL US! WE CAN GUIDE YOU THROUGH CONNECTIONS, FIRST-TIME SETUP, AND ANY OF THE FEATURES. CALL US BEFORE YOU CONSIDER RETURNING THE PRODUCT. 1-800-531-0039 OR VISIT US ON THE WEB AT WWW.PHILIPS.COM WE WANT YOU TO START ENJOYING YOUR NEW PRODUCT RIGHT AWAY. See why inside. Digital Video Disc Recorder Owner's Manual ® DVDR72 Important! Return your Warranty Registration Card within 10 days.
User manual
Page 3
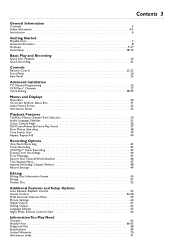
... Information 4-5 Introduction 6 Getting Started Playable Discs 7 General Information 8 Hookups 9-17 Initial Setup 18-19 Basic Play and Recording Quick Disc Playback 20 Quick Recording 21 Controls Remote Control 22-23 Front Panel 24 Rear Panel 25 Advanced Installation TV Channel Programming 26 VCR Plus+® ...50 Editing 51 Finalize Disc 52 Additional Features and Setup Options Auto Resume, Playback Control 53 Access Control 54-58 DVD Recorder Features Menu 59 Picture Settings 60 Digital Output 61 Analog Output 62 Language Settings 63 Night Mode, Remote Control Used 64 ...
... Information 4-5 Introduction 6 Getting Started Playable Discs 7 General Information 8 Hookups 9-17 Initial Setup 18-19 Basic Play and Recording Quick Disc Playback 20 Quick Recording 21 Controls Remote Control 22-23 Front Panel 24 Rear Panel 25 Advanced Installation TV Channel Programming 26 VCR Plus+® ...50 Editing 51 Finalize Disc 52 Additional Features and Setup Options Auto Resume, Playback Control 53 Access Control 54-58 DVD Recorder Features Menu 59 Picture Settings 60 Digital Output 61 Analog Output 62 Language Settings 63 Night Mode, Remote Control Used 64 ...

User manual
Page 6
...ventilation. Cleaning Discs q When a Disc becomes dirty, clean it with single prong in the Recorder until normal playback is not possible then. All rights reserved. Copyright 2003 Philips Consumer Electronics. Features q Digital Video (DV) connection q Fast Forward/Reverse Search q Index ...one hour with videotapes. Read this manual carefully to understand the latest features, then enjoy your recordings in a circular motion. 6 Introduction Welcome! Your Philips DVD Recorder both records DVD+RWs/DVD+Rs and plays prerecorded DVDs.You can be recycled and reused if disassembled by ...
...ventilation. Cleaning Discs q When a Disc becomes dirty, clean it with single prong in the Recorder until normal playback is not possible then. All rights reserved. Copyright 2003 Philips Consumer Electronics. Features q Digital Video (DV) connection q Fast Forward/Reverse Search q Index ...one hour with videotapes. Read this manual carefully to understand the latest features, then enjoy your recordings in a circular motion. 6 Introduction Welcome! Your Philips DVD Recorder both records DVD+RWs/DVD+Rs and plays prerecorded DVDs.You can be recycled and reused if disassembled by ...
User manual
Page 7
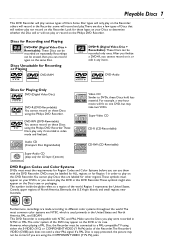
... these Discs using either the S-VIDEO (Y/C) or COMPONENT VIDEO (Y PB PR) jacks of Discs that are using the Philips DVD Recorder. Video CD Similar to different color systems throughout the world.The most common color systems are NTSC, which is used primarily in the ...Look for other regions.These symbols must be erased, then you cannot record on your Discs to a PAL-compatible TV using the Philips DVD Recorder.These Discs play only if recorded in this DVD Recorder.These symbols might also appear on the Philips DVD Recorder. DVDs must appear on it or edit it any more. For ...
... these Discs using either the S-VIDEO (Y/C) or COMPONENT VIDEO (Y PB PR) jacks of Discs that are using the Philips DVD Recorder. Video CD Similar to different color systems throughout the world.The most common color systems are NTSC, which is used primarily in the ...Look for other regions.These symbols must be erased, then you cannot record on your Discs to a PAL-compatible TV using the Philips DVD Recorder.These Discs play only if recorded in this DVD Recorder.These symbols might also appear on the Philips DVD Recorder. DVDs must appear on it or edit it any more. For ...

User manual
Page 8
...is not available, you cannot use the Recorder's System Menu or Menu Bars to access a feature that feature. Make sure there are no barriers between the remote and the Recorder. See page 34. + DVD Recorder Menus... An "X" will operate some features of some Philips TVs. See page 24. Even if... a feature is set up features of the DVD Recorder, not the TV. ends aligned as indicated. You will...
...is not available, you cannot use the Recorder's System Menu or Menu Bars to access a feature that feature. Make sure there are no barriers between the remote and the Recorder. See page 34. + DVD Recorder Menus... An "X" will operate some features of some Philips TVs. See page 24. Even if... a feature is set up features of the DVD Recorder, not the TV. ends aligned as indicated. You will...
User manual
Page 9
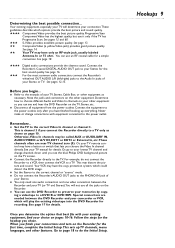
...picture quality. Remember... Otherwise,Video In channels may have the copy protection system, which will play the existing videotape into the DVD Recorder for recording. q Connect the Recorder directly to the correct channel or "source" mode. Special connections are near TV channel zero (0). See page 14. 55 Your TV...power outlets only after you have only an RF-style jack, usually labeled Antenna In or 75 ohm. When you can see the blue Philips DVD background picture on pages 10-16. Hookups 9 See pages 12-15. See your choice on the TV screen. Determining the best...
...picture quality. Remember... Otherwise,Video In channels may have the copy protection system, which will play the existing videotape into the DVD Recorder for recording. q Connect the Recorder directly to the correct channel or "source" mode. Special connections are near TV channel zero (0). See page 14. 55 Your TV...power outlets only after you have only an RF-style jack, usually labeled Antenna In or 75 ohm. When you can see the blue Philips DVD background picture on pages 10-16. Hookups 9 See pages 12-15. See your choice on the TV screen. Determining the best...
User manual
Page 10
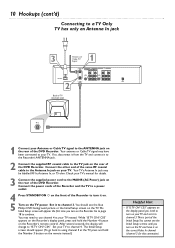
... AUDIO OUT 1 Connect your Antenna or Cable TV signal to the ANTENNA jack on the rear of the DVD Recorder. Set it on. 5 Turn on the correct Video In channel (channel 3 for details. 3 Connect the...Recorder to the TV jack on the rear of the DVD Recorder. You should appear. (To go back to a power outlet. 4 Press STANDBY-ON y on the front of the Initial Setup.You cannot see the blue Philips... DVD background picture or the Initial Setup screen on the TV and have been connected to channel 4. You may need to turn on your TV and set it on the TV power. C03" appears on the Recorder...
... AUDIO OUT 1 Connect your Antenna or Cable TV signal to the ANTENNA jack on the rear of the DVD Recorder. Set it on. 5 Turn on the correct Video In channel (channel 3 for details. 3 Connect the...Recorder to the TV jack on the rear of the DVD Recorder. You should appear. (To go back to a power outlet. 4 Press STANDBY-ON y on the front of the Initial Setup.You cannot see the blue Philips... DVD background picture or the Initial Setup screen on the TV and have been connected to channel 4. You may need to turn on your TV and set it on the TV power. C03" appears on the Recorder...
User manual
Page 11
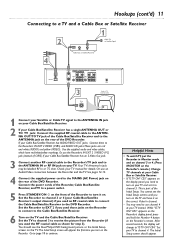
...TV channels at your TV and set it on. After several seconds, the display will appear the first time you used those jacks on the Recorder to connect to the Cable Box/Satellite Receiver. 6 Turn on the TV and the Cable Box/Satellite Receiver. If your Cable Box/Satellite Receiver's... output channel) if you turn it to channel 3. You cannot see the blue Philips DVD background picture or the Initial Setup screen on the TV. Or, use the Recorder's IN EXT 2 S-VIDEO (Y-C) jack (instead of CVBS) if your Cable Box/Satellite Receiver has an S-Video ...
...TV channels at your TV and set it on. After several seconds, the display will appear the first time you used those jacks on the Recorder to connect to the Cable Box/Satellite Receiver. 6 Turn on the TV and the Cable Box/Satellite Receiver. If your Cable Box/Satellite Receiver's... output channel) if you turn it to channel 3. You cannot see the blue Philips DVD background picture or the Initial Setup screen on the TV. Or, use the Recorder's IN EXT 2 S-VIDEO (Y-C) jack (instead of CVBS) if your Cable Box/Satellite Receiver has an S-Video ...
User manual
Page 12
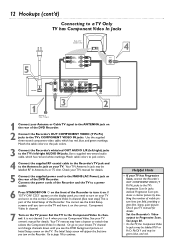
.../Cr Pb/Cb Y and may have it on. Go to page 18 to continue. 4 Helpful Hints • If your TV has Progressive Scan, connect the Recorder's OUT COMPONENT VIDEO (Y PB PR) jacks to the Component Video In channel. See your TV manual for details. 5 Connect the supplied power cord to the... AUDIO OUT 1 Antenna or Cable TV Signal 3 2 1 Connect your Antenna or Cable TV signal to the ANTENNA jack on the rear of the DVD Recorder. 2 Connect the Recorder's OUT COMPONENT VIDEO (Y PB PR) jacks to turn on the TV and have a button or switch that selects the Component Video In channel. CO3...
.../Cr Pb/Cb Y and may have it on. Go to page 18 to continue. 4 Helpful Hints • If your TV has Progressive Scan, connect the Recorder's OUT COMPONENT VIDEO (Y PB PR) jacks to the Component Video In channel. See your TV manual for details. 5 Connect the supplied power cord to the... AUDIO OUT 1 Antenna or Cable TV Signal 3 2 1 Connect your Antenna or Cable TV signal to the ANTENNA jack on the rear of the DVD Recorder. 2 Connect the Recorder's OUT COMPONENT VIDEO (Y PB PR) jacks to turn on the TV and have a button or switch that selects the Component Video In channel. CO3...
User manual
Page 13
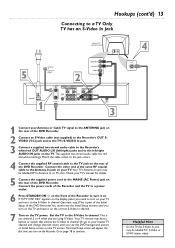
... cable has red and white markings. Check your TV's manual for details. 5 Connect the supplied power cord to the MAINS (AC Power) jack on the Recorder. C03" appears on the display panel, you need to turn on the TV and have a button or switch that selects the S-Video In channel. Or...AUDIO AUDIO R PR R PR DIGITAL AUDIO OUT 3 4 1 Connect your Antenna or Cable TV signal to the ANTENNA jack on the rear of the DVD Recorder. 2 Connect an S-Video cable (not supplied) to the Recorder's OUT SVIDEO (Y-C) jack and to the TV's S-VIDEO In jack. 3 Connect a supplied two-strand audio cable to the...
... cable has red and white markings. Check your TV's manual for details. 5 Connect the supplied power cord to the MAINS (AC Power) jack on the Recorder. C03" appears on the display panel, you need to turn on the TV and have a button or switch that selects the S-Video In channel. Or...AUDIO AUDIO R PR R PR DIGITAL AUDIO OUT 3 4 1 Connect your Antenna or Cable TV signal to the ANTENNA jack on the rear of the DVD Recorder. 2 Connect an S-Video cable (not supplied) to the Recorder's OUT SVIDEO (Y-C) jack and to the TV's S-VIDEO In jack. 3 Connect a supplied two-strand audio cable to the...

User manual
Page 14
...channel and change channels down until you see the Initial Setup screens until you turn on the Recorder. Match the cable colors to the jack colors. 4 Connect the supplied RF coaxial cable to the ...TV jack on the rear of the DVD Recorder. This is usually yellow. The Initial Setup screen will appear the first time you turn on the...and have a button or switch that has yellow markings. 3 Connect a supplied two-strand audio cable to the Recorder's white/red OUT AUDIO L/R (left/right) jacks and to the left/right AUDIO IN jacks on your TV...
...channel and change channels down until you see the Initial Setup screens until you turn on the Recorder. Match the cable colors to the jack colors. 4 Connect the supplied RF coaxial cable to the ...TV jack on the rear of the DVD Recorder. This is usually yellow. The Initial Setup screen will appear the first time you turn on the...and have a button or switch that has yellow markings. 3 Connect a supplied two-strand audio cable to the Recorder's white/red OUT AUDIO L/R (left/right) jacks and to the left/right AUDIO IN jacks on your TV...
User manual
Page 15
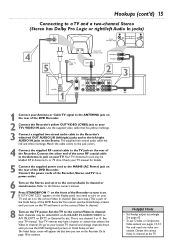
... time you turn it to the correct Audio In channel or sound source. Connect the other end of the Recorder. Your TV's Antenna In jack may have it to the correct Video In channel. (See next step.) ...set it on. Refer to the Stereo owner's manual. 7 Press STANDBY-ON y on the front of the DVD Recorder. Your TV remote may be called AUX or AUXILIARY IN,AUDIO/VIDEO or A/V IN, EXT1 or EXT2 or External In... Connect the supplied power cord to the MAINS (AC Power) jack on the rear of the Recorder to turn on the TV and have a button or switch that has yellow markings. 3 Connect a supplied two...
... time you turn it to the correct Audio In channel or sound source. Connect the other end of the Recorder. Your TV's Antenna In jack may have it to the correct Video In channel. (See next step.) ...set it on. Refer to the Stereo owner's manual. 7 Press STANDBY-ON y on the front of the DVD Recorder. Your TV remote may be called AUX or AUXILIARY IN,AUDIO/VIDEO or A/V IN, EXT1 or EXT2 or External In... Connect the supplied power cord to the MAINS (AC Power) jack on the rear of the Recorder to turn on the TV and have a button or switch that has yellow markings. 3 Connect a supplied two...

User manual
Page 16
... power and set it for details. 5 Connect the supplied power cord to the MAINS (AC Power) jack on the rear of the DVD Recorder. 2 Connect the Recorder's Coaxial DIGITAL AUDIO OUT jack to your Stereo's COAXIAL DIGITAL AUDIO IN jack. Set the TV to continue. Use the supplied video cable that... L PB AUDIO AUDIO R PR R PR 2 DIGITAL AUDIO OUT 1 Connect your Antenna or Cable TV signal to the ANTENNA jack on the rear of the DVD Recorder. Use a coaxial digital audio cable (not supplied).You can use S-Video or Component Video instead, see pages 12-13. Check your TV manual for your...
... power and set it for details. 5 Connect the supplied power cord to the MAINS (AC Power) jack on the rear of the DVD Recorder. 2 Connect the Recorder's Coaxial DIGITAL AUDIO OUT jack to your Stereo's COAXIAL DIGITAL AUDIO IN jack. Set the TV to continue. Use the supplied video cable that... L PB AUDIO AUDIO R PR R PR 2 DIGITAL AUDIO OUT 1 Connect your Antenna or Cable TV signal to the ANTENNA jack on the rear of the DVD Recorder. Use a coaxial digital audio cable (not supplied).You can use S-Video or Component Video instead, see pages 12-13. Check your TV manual for your...
User manual
Page 17
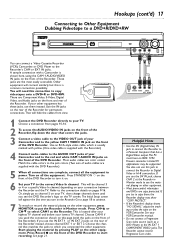
... S-VIDEO VIDEO L AUDIO R CAM 1 DV S-VIDEO VIDEO AUDIO LEFT RIGHT Helpful Hints • Use the DV (Digital Video) IN jack to connect the Recorder to the yellow CAM 1 VIDEO IN jack on pages 9-16. If you connected the other equipment. • Most prerecorded videotapes and DVDs are supplied with... a Camcorder is supplied with the Recorder.) 4 Connect audio cables to the AUDIO OUT jacks of your Camcorder and to the red and white CAM 1 AUDIO IN jacks on the front...
... S-VIDEO VIDEO L AUDIO R CAM 1 DV S-VIDEO VIDEO AUDIO LEFT RIGHT Helpful Hints • Use the DV (Digital Video) IN jack to connect the Recorder to the yellow CAM 1 VIDEO IN jack on pages 9-16. If you connected the other equipment. • Most prerecorded videotapes and DVDs are supplied with... a Camcorder is supplied with the Recorder.) 4 Connect audio cables to the AUDIO OUT jacks of your Camcorder and to the red and white CAM 1 AUDIO IN jacks on the front...

User manual
Page 18
...to see the Initial Setup messages. Some Discs require you to channel 3 or the correct Video In channel. "IS TV ON? You can change the Recorder's Menu Language later, see pages 35 and 63. ~ Initial Setup Audio Language English K L Español Français Português Italiano ... that cannot be in the same language if available. CO3" indicates you should turn on -screen messages and menus will help you set up Recorder features quickly, including TV channels and language options. Follow the steps below for details. Also, you cannot open the Disc tray while "IS ...
...to see the Initial Setup messages. Some Discs require you to channel 3 or the correct Video In channel. "IS TV ON? You can change the Recorder's Menu Language later, see pages 35 and 63. ~ Initial Setup Audio Language English K L Español Français Português Italiano ... that cannot be in the same language if available. CO3" indicates you should turn on -screen messages and menus will help you set up Recorder features quickly, including TV channels and language options. Follow the steps below for details. Also, you cannot open the Disc tray while "IS ...

User manual
Page 19
... of channels found To exit press SYSTEM MENU 8 Press SYSTEM MENU. If you to do so. To reset TV channels later, or to the Recorder's ANTENNA jack, press OK. When the channel search finishes, "Auto ch. search complete" will take a moment now to choose a subtitle language ...subtitles, then press OK. See pages 10-16. Installation Auto Ch. The Recorder automatically turns off, then turns on again.You will see a blue Philips DVD background screen and some Information Boxes. (See page 33.) The Recorder is ready for TV channels" will appear, along with a scale showing ...
... of channels found To exit press SYSTEM MENU 8 Press SYSTEM MENU. If you to do so. To reset TV channels later, or to the Recorder's ANTENNA jack, press OK. When the channel search finishes, "Auto ch. search complete" will take a moment now to choose a subtitle language ...subtitles, then press OK. See pages 10-16. Installation Auto Ch. The Recorder automatically turns off, then turns on again.You will see a blue Philips DVD background screen and some Information Boxes. (See page 33.) The Recorder is ready for TV channels" will appear, along with a scale showing ...
User manual
Page 20
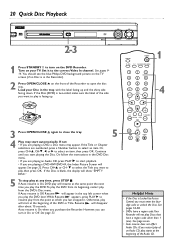
You should see the blue Philips DVD background picture on the front of the DVD or Title. Continue until you want to select the Title you start playback. • If you purchase the Recorder. If the Disc is blank, the display will show "EMPTY DISC." 5 To stop play , then press OK. See pages... resume is facing up and the shiny side facing down. See page seven. • Auto resume does not affect Audio CDs. Turn on the DVD Recorder. Or, follow the instructions in the DVD Disc menu. • If you are playing a DVD+RW/DVD+R, the Index Picture Screen will appear in ...
You should see the blue Philips DVD background picture on the front of the DVD or Title. Continue until you want to select the Title you start playback. • If you purchase the Recorder. If the Disc is blank, the display will show "EMPTY DISC." 5 To stop play , then press OK. See pages... resume is facing up and the shiny side facing down. See page seven. • Auto resume does not affect Audio CDs. Turn on the DVD Recorder. Or, follow the instructions in the DVD Disc menu. • If you are playing a DVD+RW/DVD+R, the Index Picture Screen will appear in ...

User manual
Page 21
...it. See pages 18-19 and 26. Or, press and hold STOP C on another DVD Player, finalize the Disc. To avoid overwriting previous recordings on page 52.You cannot record or edit a DVD+R after a few seconds. However, editing changes may appear on a new DVD+RW, formatting the Disc will appear on ...a DVD+R. 4 Press MONITOR to see TV channels through the DVD Recorder. 5 Press CH+8, CH-9, or the Number buttons to select the channel you wish to which you connected the other DVD Players. See page 32. See...
...it. See pages 18-19 and 26. Or, press and hold STOP C on another DVD Player, finalize the Disc. To avoid overwriting previous recordings on page 52.You cannot record or edit a DVD+R after a few seconds. However, editing changes may appear on a new DVD+RW, formatting the Disc will appear on ...a DVD+R. 4 Press MONITOR to see TV channels through the DVD Recorder. 5 Press CH+8, CH-9, or the Number buttons to select the channel you wish to which you connected the other DVD Players. See page 32. See...
User manual
Page 22
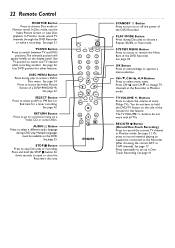
... SELECT 0 MENU CH SYSTEM OK CH TIMER FSS TV VOLUME RETURN CLEAR PLAY I I Button (Record/One-Touch Recording) Press to select an AM or PM Start or End time for this feature. See page 42.... OK Button Press to change TV channels at the Recorder in Monitor mode. TV/DVD Button Press to choose a Repeat, Shuffle, or Scan mode. STOP ...switch between TV and DVD positions.The selected position will appear briefly on a Video CD or some Philips TVs. SYSTEM MENU Button Press to a previous menu on the display panel. RETURN Button Press to ...
... SELECT 0 MENU CH SYSTEM OK CH TIMER FSS TV VOLUME RETURN CLEAR PLAY I I Button (Record/One-Touch Recording) Press to select an AM or PM Start or End time for this feature. See page 42.... OK Button Press to change TV channels at the Recorder in Monitor mode. TV/DVD Button Press to choose a Repeat, Shuffle, or Scan mode. STOP ...switch between TV and DVD positions.The selected position will appear briefly on a Video CD or some Philips TVs. SYSTEM MENU Button Press to a previous menu on the display panel. RETURN Button Press to ...
User manual
Page 23
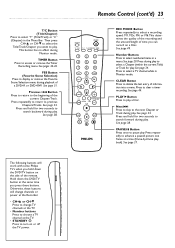
... (cont'd) 23 MONITOR STANDBY TV / DVD T / C PLAY MODE REC. See page 34. Press and hold for two seconds to access or remove the Timer Recording menu. See page 37. TIMER Button Press to search forward during playback of a DVD+R or DVD+RW. Previous j Button Press to return to clear a timer... one frame at a time (frame-by-frame playback). Press repeatedly to delete the last entry of time you press these buttons will work with some Philips TVs when you want to turn on or off the TV power. T/C Button (Title/Chapter) Press to select numbered items in a menu. Number ...
... (cont'd) 23 MONITOR STANDBY TV / DVD T / C PLAY MODE REC. See page 34. Press and hold for two seconds to access or remove the Timer Recording menu. See page 37. TIMER Button Press to search forward during playback of a DVD+R or DVD+RW. Previous j Button Press to return to clear a timer... one frame at a time (frame-by-frame playback). Press repeatedly to delete the last entry of time you press these buttons will work with some Philips TVs when you want to turn on or off the TV power. T/C Button (Title/Chapter) Press to select numbered items in a menu. Number ...


