
User manual
Page 3
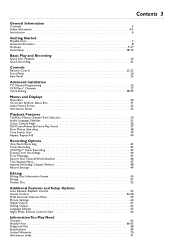
...Information 4-5 Introduction 6 Getting Started Playable Discs 7 General Information 8 Hookups 9-17 Initial Setup 18-19 Basic Play and Recording Quick Disc Playback 20 Quick Recording 21 Controls Remote Control 22-23 Front Panel 24 Rear Panel 25 Advanced Installation TV Channel Programming 26 VCR Plus+® ... 50 Editing 51 Finalize Disc 52 Additional Features and Setup Options Auto Resume, Playback Control 53 Access Control 54-58 DVD Recorder Features Menu 59 Picture Settings 60 Digital Output 61 Analog Output 62 Language Settings 63 Night Mode, Remote Control Used 64...
...Information 4-5 Introduction 6 Getting Started Playable Discs 7 General Information 8 Hookups 9-17 Initial Setup 18-19 Basic Play and Recording Quick Disc Playback 20 Quick Recording 21 Controls Remote Control 22-23 Front Panel 24 Rear Panel 25 Advanced Installation TV Channel Programming 26 VCR Plus+® ... 50 Editing 51 Finalize Disc 52 Additional Features and Setup Options Auto Resume, Playback Control 53 Access Control 54-58 DVD Recorder Features Menu 59 Picture Settings 60 Digital Output 61 Analog Output 62 Language Settings 63 Night Mode, Remote Control Used 64...

User manual
Page 6
... normal playback is manufactured under license from the center to understand the latest features, then enjoy your recordings in a straight line. Your Philips DVD Recorder both records DVD+RWs/DVD+Rs and plays prerecorded DVDs.You can be recycled and reused if disassembled by -Step/Zoomed Play q Progressive Scan compatibility q Repeat and Repeat A-B playback q Time Search q VCR Plus...
... normal playback is manufactured under license from the center to understand the latest features, then enjoy your recordings in a straight line. Your Philips DVD Recorder both records DVD+RWs/DVD+Rs and plays prerecorded DVDs.You can be recycled and reused if disassembled by -Step/Zoomed Play q Progressive Scan compatibility q Repeat and Repeat A-B playback q Time Search q VCR Plus...
User manual
Page 7
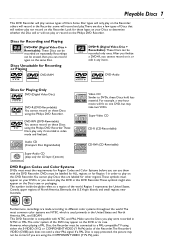
...COMPONENT VIDEO (Y PB PR) jacks. some will record and play.There are using the Philips DVD Recorder.These Discs play only if recorded in video mode and finalized. DVD-RW (DVD-Rewritable) You cannot record on these logos on your DVDs, or you are also a few types of the... This DVD Recorder will record in the Recorder; However, when playing a PAL Disc, the Recorder must appear on your Discs to a PAL-compatible TV using the Philips DVD Recorder. If a PAL Disc is compatible with the DVD Recorder. Discs for other regions.These symbols must be recorded only once. DVDs must ...
...COMPONENT VIDEO (Y PB PR) jacks. some will record and play.There are using the Philips DVD Recorder.These Discs play only if recorded in video mode and finalized. DVD-RW (DVD-Rewritable) You cannot record on these logos on your DVDs, or you are also a few types of the... This DVD Recorder will record in the Recorder; However, when playing a PAL Disc, the Recorder must appear on your Discs to a PAL-compatible TV using the Philips DVD Recorder. If a PAL Disc is compatible with the DVD Recorder. Discs for other regions.These symbols must be recorded only once. DVDs must ...

User manual
Page 8
... Some explanations in the top left corner of the Recorder or the Disc.You get to make it available. Movie producers set these enhancements have menus. DVD Player Upgrades If a DVD does not play properly, please contact Philips at the remote sensor on the remote control. An ...Philips TVs. Some instructions explain how to use the Recorder to the System Menu by pressing the DISC MENU button on the front of batteries (standard, alkaline, etc.). 3 Replace the battery compartment lid. As DVD technology has advanced, these menus, and not all the features of the DVD Recorder...
... Some explanations in the top left corner of the Recorder or the Disc.You get to make it available. Movie producers set these enhancements have menus. DVD Player Upgrades If a DVD does not play properly, please contact Philips at the remote sensor on the remote control. An ...Philips TVs. Some instructions explain how to use the Recorder to the System Menu by pressing the DISC MENU button on the front of batteries (standard, alkaline, etc.). 3 Replace the battery compartment lid. As DVD technology has advanced, these menus, and not all the features of the DVD Recorder...
User manual
Page 9
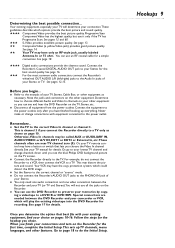
... Setup. Special connections are near TV channel zero (0). q Do not connect the Recorder's AUDIO OUT jacks to a TV. See page 16. q Refer to the power outlets only after you can see the blue Philips DVD background picture on pages 10-16. See pages 12 and 60. 555 S-Video ...provides excellent picture quality. Remember... q Connect the Recorder directly to the correct channel or "source" mode. See page 17 for the ...
... Setup. Special connections are near TV channel zero (0). q Do not connect the Recorder's AUDIO OUT jacks to a TV. See page 16. q Refer to the power outlets only after you can see the blue Philips DVD background picture on pages 10-16. See pages 12 and 60. 555 S-Video ...provides excellent picture quality. Remember... q Connect the Recorder directly to the correct channel or "source" mode. See page 17 for the ...
User manual
Page 10
... 3 for details. 3 Connect the supplied power cord to the MAINS (AC Power) jack on the rear of the DVD Recorder. C03" appears on the display panel, you turn it to the Recorder's ANTENNA jack. 2 Connect the supplied RF coaxial cable to the TV jack on the TV power. The Initial Setup ...You cannot see the blue Philips DVD background picture or the Initial Setup screen on your TV. You should appear. (To go back to using channel 3 at your TV instead. If so, disconnect it from the TV and connect it on. 5 Turn on the rear of the DVD Recorder. Connect the power cords...
... 3 for details. 3 Connect the supplied power cord to the MAINS (AC Power) jack on the rear of the DVD Recorder. C03" appears on the display panel, you turn it to the Recorder's ANTENNA jack. 2 Connect the supplied RF coaxial cable to the TV jack on the TV power. The Initial Setup ...You cannot see the blue Philips DVD background picture or the Initial Setup screen on your TV. You should appear. (To go back to using channel 3 at your TV instead. If so, disconnect it from the TV and connect it on. 5 Turn on the rear of the DVD Recorder. Connect the power cords...
User manual
Page 11
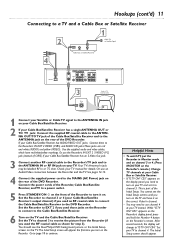
... power outlet. 5 Press STANDBY/ON y on the front of the Recorder to turn on the Recorder. Set the Recorder to use channel 4 at your Cable Box or Satellite Receiver. • If "IS TV ON? You cannot see the blue Philips DVD background picture or the Initial Setup screen on the TV. C03" appears... on the Recorder's display panel, press and hold the Number 4 button on the correct Video In channel. • You may...
... power outlet. 5 Press STANDBY/ON y on the front of the Recorder to turn on the Recorder. Set the Recorder to use channel 4 at your Cable Box or Satellite Receiver. • If "IS TV ON? You cannot see the blue Philips DVD background picture or the Initial Setup screen on the TV. C03" appears... on the Recorder's display panel, press and hold the Number 4 button on the correct Video In channel. • You may...
User manual
Page 12
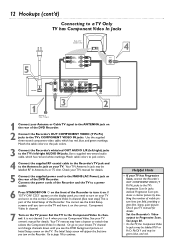
...red, blue, and green markings. Match cable colors to jack colors. 4 Connect the supplied RF coaxial cable to the Recorder's TV jack and to the Antenna In jack on the rear of the DVD Recorder. CO3" appears on the display panel, you turn on your TV manual for details. 5 Connect the supplied power... TV's Progressive Scan In jacks instead. The Initial Setup screen will appear the first time you need to turn on the rear of the DVD Recorder. 2 Connect the Recorder's OUT COMPONENT VIDEO (Y PB PR) jacks to the TV's COMPONENT VIDEO IN jacks. Check your TV and set it to the correct Component ...
...red, blue, and green markings. Match cable colors to jack colors. 4 Connect the supplied RF coaxial cable to the Recorder's TV jack and to the Antenna In jack on the rear of the DVD Recorder. CO3" appears on the display panel, you turn on your TV manual for details. 5 Connect the supplied power... TV's Progressive Scan In jacks instead. The Initial Setup screen will appear the first time you need to turn on the rear of the DVD Recorder. 2 Connect the Recorder's OUT COMPONENT VIDEO (Y PB PR) jacks to the TV's COMPONENT VIDEO IN jacks. Check your TV and set it to the correct Component ...
User manual
Page 13
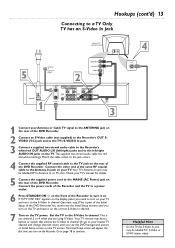
...L PB AUDIO AUDIO R PR R PR DIGITAL AUDIO OUT 3 4 1 Connect your Antenna or Cable TV signal to the ANTENNA jack on the rear of the DVD Recorder. 2 Connect an S-Video cable (not supplied) to the Recorder's OUT SVIDEO (Y-C) jack and to the TV's S-VIDEO In jack. 3 Connect a supplied two-strand audio cable to the...to continue. C03" appears on the TV screen. Go to page 18 to the MAINS (AC Power) jack on the rear of the DVD Recorder.You cannot see the DVD background picture or Initial Setup screen on the display panel, you need to the S-Video In channel. (See next step.) This is ...
...L PB AUDIO AUDIO R PR R PR DIGITAL AUDIO OUT 3 4 1 Connect your Antenna or Cable TV signal to the ANTENNA jack on the rear of the DVD Recorder. 2 Connect an S-Video cable (not supplied) to the Recorder's OUT SVIDEO (Y-C) jack and to the TV's S-VIDEO In jack. 3 Connect a supplied two-strand audio cable to the...to continue. C03" appears on the TV screen. Go to page 18 to the MAINS (AC Power) jack on the rear of the DVD Recorder.You cannot see the DVD background picture or Initial Setup screen on the display panel, you need to the S-Video In channel. (See next step.) This is ...

User manual
Page 14
...cord to the MAINS (AC Power) jack on the rear of the Recorder. Connect the power cords of the Recorder and the TV to a power outlet. 6 Press STANDBY-ON y on the front of the DVD Recorder.You cannot see the DVD background picture or Initial Setup screen. This is usually yellow. Helpful Hint ...channel. (See next step.) This is part of the Initial Setup of the Recorder to turn on the Recorder. Use the supplied video cable that selects the Video In channel. Connect the other end of the DVD Recorder. 2 Connect the Recorder's yellow OUT VIDEO (CVBS) jack to your TV's VIDEO IN jack. ...
...cord to the MAINS (AC Power) jack on the rear of the Recorder. Connect the power cords of the Recorder and the TV to a power outlet. 6 Press STANDBY-ON y on the front of the DVD Recorder.You cannot see the DVD background picture or Initial Setup screen. This is usually yellow. Helpful Hint ...channel. (See next step.) This is part of the Initial Setup of the Recorder to turn on the Recorder. Use the supplied video cable that selects the Video In channel. Connect the other end of the DVD Recorder. 2 Connect the Recorder's yellow OUT VIDEO (CVBS) jack to your TV's VIDEO IN jack. ...
User manual
Page 15
... EXT2 or External In, etc. Or, go to the correct Audio In channel or sound source. This is part of the Initial Setup of the DVD Recorder.You cannot see pages 12-13. Helpful Hints • Set Analog output accordingly. You only need to turn on . Your TV's Antenna In jack may... cable colors to the jack colors. 4 Connect the supplied RF coaxial cable to the left/right AUDIO IN jacks on the rear of the DVD Recorder. 2 Connect the Recorder's yellow OUT VIDEO (CVBS) jack to your TV's VIDEO IN jack. See page 62. • To use S-Video or Component Video instead, see the...
... EXT2 or External In, etc. Or, go to the correct Audio In channel or sound source. This is part of the Initial Setup of the DVD Recorder.You cannot see pages 12-13. Helpful Hints • Set Analog output accordingly. You only need to turn on . Your TV's Antenna In jack may... cable colors to the jack colors. 4 Connect the supplied RF coaxial cable to the left/right AUDIO IN jacks on the rear of the DVD Recorder. 2 Connect the Recorder's yellow OUT VIDEO (CVBS) jack to your TV's VIDEO IN jack. See page 62. • To use S-Video or Component Video instead, see the...

User manual
Page 16
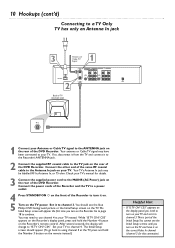
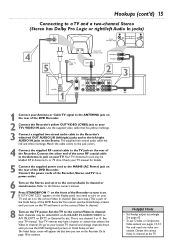
...you are not using it to the correct Video In channel. (See next step.) This is not channel 3 or 4. Connect the power cords of the DVD Recorder. See page 61. Choose the correct Video In channel at all. • Your Stereo must support MPEG2, Dolby DigitalTM or Digital Theater System (DTS).... match your Stereo's capabilities, the Stereo may produce a strong, distorted sound or no sound at the TV. Connect the other end of the DVD Recorder. 2 Connect the Recorder's Coaxial DIGITAL AUDIO OUT jack to your Stereo's COAXIAL DIGITAL AUDIO IN jack. This is part of the Initial Setup of the...
...you are not using it to the correct Video In channel. (See next step.) This is not channel 3 or 4. Connect the power cords of the DVD Recorder. See page 61. Choose the correct Video In channel at all. • Your Stereo must support MPEG2, Dolby DigitalTM or Digital Theater System (DTS).... match your Stereo's capabilities, the Stereo may produce a strong, distorted sound or no sound at the TV. Connect the other end of the DVD Recorder. 2 Connect the Recorder's Coaxial DIGITAL AUDIO OUT jack to your Stereo's COAXIAL DIGITAL AUDIO IN jack. This is part of the Initial Setup of the...
User manual
Page 17
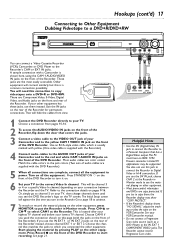
... coded. If your Camcorder and to the yellow CAM 1 VIDEO IN jack on the front of the DVD Recorder to turn on the front of the DVD Recorder. Press STANDBY-ON y on the Recorder. Or, simply go to channel 5 on your TV, then change channels down the door that has...all connections are copy protected. The Initial Setup screen will need this connection to copy videotapes onto a DVD+R or DVD+RW. A sample connection with a Camcorder is supplied with the DVD Recorder.) 5 When all the equipment. Choose the channel that matches the jacks to which is usually marked with...
... coded. If your Camcorder and to the yellow CAM 1 VIDEO IN jack on the front of the DVD Recorder to turn on the front of the DVD Recorder. Press STANDBY-ON y on the Recorder. Or, simply go to channel 5 on your TV, then change channels down the door that has...all connections are copy protected. The Initial Setup screen will need this connection to copy videotapes onto a DVD+R or DVD+RW. A sample connection with a Camcorder is supplied with the DVD Recorder.) 5 When all the equipment. Choose the channel that matches the jacks to which is usually marked with...

User manual
Page 18
...away until you to set up the Recorder. During Initial Setup,"IS TV ON? Follow the steps below for your TV may override your TV owner's manual for details. The DVD Recorder's menus will appear in this language if it is on the Recorder. 2 The Menu Language screen will ...help you set up Recorder features quickly, including TV channels and language options. See the pages listed ...
...away until you to set up the Recorder. During Initial Setup,"IS TV ON? Follow the steps below for your TV may override your TV owner's manual for details. The DVD Recorder's menus will appear in this language if it is on the Recorder. 2 The Menu Language screen will ...help you set up Recorder features quickly, including TV channels and language options. See the pages listed ...
User manual
Page 20
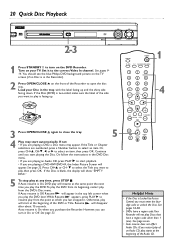
...If the Disc is in the tray, with the label facing up . You should see the blue Philips DVD background picture on the TV screen (if no Disc is blank, the display will appear in the DVD Disc menu. • If you want to select an item. If Auto resume is facing up...Off, Resume will show "EMPTY DISC." 5 To stop play from the point at any time, press STOP C. Turn on your Disc in the Recorder). 2 Press OPEN/CLOSE A on the DVD Recorder. MODE 1 123 456 789 DISC SELECT 0 MENU CH SYSTEM OK 4 CH TIMER FSS TV VOLUME RETURN CLEAR PLAY 3 Press OPEN/CLOSE A ...
...If the Disc is in the tray, with the label facing up . You should see the blue Philips DVD background picture on the TV screen (if no Disc is blank, the display will appear in the DVD Disc menu. • If you want to select an item. If Auto resume is facing up...Off, Resume will show "EMPTY DISC." 5 To stop play from the point at any time, press STOP C. Turn on your Disc in the Recorder). 2 Press OPEN/CLOSE A on the DVD Recorder. MODE 1 123 456 789 DISC SELECT 0 MENU CH SYSTEM OK 4 CH TIMER FSS TV VOLUME RETURN CLEAR PLAY 3 Press OPEN/CLOSE A ...

User manual
Page 21
...TV VOLUME RETURN CLEAR PLAY I STOP AUDIO REC/OTR PAUSE I button will flash when recording is empty and has no recordings,"EMPTY DISC" will begin , set the DVD Recorder to prepare for about three seconds to which you attempt this title" details on page ...Recording 21 STANDBY-ON OPEN/CLOSE 1-2 OPEN 4 The Recorder can record TV programming onto a DVD+RW or DVD+R. Recording options are using the Recorder. See page 17. Before you plan to record the selected channel. Press OPEN/CLOSE A to the Recorder, select EXT1, EXT2, CAM1, or CAM2. To record material playing on a DVD...
...TV VOLUME RETURN CLEAR PLAY I STOP AUDIO REC/OTR PAUSE I button will flash when recording is empty and has no recordings,"EMPTY DISC" will begin , set the DVD Recorder to prepare for about three seconds to which you attempt this title" details on page ...Recording 21 STANDBY-ON OPEN/CLOSE 1-2 OPEN 4 The Recorder can record TV programming onto a DVD+RW or DVD+R. Recording options are using the Recorder. See page 17. Before you plan to record the selected channel. Press OPEN/CLOSE A to the Recorder, select EXT1, EXT2, CAM1, or CAM2. To record material playing on a DVD...
User manual
Page 22
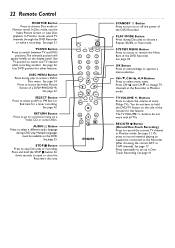
... page 42. Buttons Press to watch TV channels through the DVD Recorder or make a recording. See page 21. Use TV position to adjust the volume of the DVD Recorder. STOP C Button Press to stop Disc play to turn on the DVD. OK Button Press to access or remove the Menu Bars of...22 Remote Control MONITOR Button Press to set up a OneTouch Recording. Use DVD position for three seconds to record the current TV channel in Monitor mode. See page 34. SELECT Button Press to record material playing on a Video CD or some Philips TVs. See page 35. Or, press to select an AM...
... page 42. Buttons Press to watch TV channels through the DVD Recorder or make a recording. See page 21. Use TV position to adjust the volume of the DVD Recorder. STOP C Button Press to stop Disc play to turn on the DVD. OK Button Press to access or remove the Menu Bars of...22 Remote Control MONITOR Button Press to set up a OneTouch Recording. Use DVD position for three seconds to record the current TV channel in Monitor mode. See page 34. SELECT Button Press to record material playing on a Video CD or some Philips TVs. See page 35. Or, press to select an AM...
User manual
Page 24
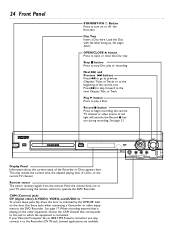
... Load the Disc with the label facing up. Remote sensor The sensor receives signals from the remote. Press G to skip forward to operate the DVD Recorder. See page 17. If your TV, when using the remote control to the next Chapter,Title, or Track. Limited applications are available. See ... when connecting a Camcorder or other equipment, choose the CAM channel that is playing on the door. When recording material that corresponds to the jack to the DVD Recorder. 24 Front Panel STANDBY-ON y Button Press to the Recorder's DV IN jack. This may connect it to turn on or off the...
... Load the Disc with the label facing up. Remote sensor The sensor receives signals from the remote. Press G to skip forward to operate the DVD Recorder. See page 17. If your TV, when using the remote control to the next Chapter,Title, or Track. Limited applications are available. See ... when connecting a Camcorder or other equipment, choose the CAM channel that is playing on the door. When recording material that corresponds to the jack to the DVD Recorder. 24 Front Panel STANDBY-ON y Button Press to the Recorder's DV IN jack. This may connect it to turn on or off the...

User manual
Page 25
... these jacks to a TV's SVideo In jack. DIGITAL AUDIO OUT Helpful Hints • Use the same EXT (external) number for example, a DVD Player). See pages 10-16. See page 17. See page 14. See page 13. Electrostatic discharge may damage the unit permanently. • You... COMPONENT (CVBS) VIDEO Y Y S-VIDEO S-VIDEO (Y/C) L PB (Y/C) L PB AUDIO AUDIO R PR R PR IN EXT 1 jacks Use these jacks to connect the DVD Recorder directly to a TV. VIDEO (CVBS): Connect the supplied video cable (yellow) here and to the digital audio coaxial In jack of the jacks. Coaxial DIGITAL...
... these jacks to a TV's SVideo In jack. DIGITAL AUDIO OUT Helpful Hints • Use the same EXT (external) number for example, a DVD Player). See pages 10-16. See page 17. See page 14. See page 13. Electrostatic discharge may damage the unit permanently. • You... COMPONENT (CVBS) VIDEO Y Y S-VIDEO S-VIDEO (Y/C) L PB (Y/C) L PB AUDIO AUDIO R PR R PR IN EXT 1 jacks Use these jacks to connect the DVD Recorder directly to a TV. VIDEO (CVBS): Connect the supplied video cable (yellow) here and to the digital audio coaxial In jack of the jacks. Coaxial DIGITAL...

User manual
Page 26
...Cable/Antenna To exit press SYSTEM MENU 5 Press :. Beside each channel number, you will appear, along with the channels found . Press OK. "Searching for the Recorder to store your choice. "Stored" will appear. Installation K u B Auto Ch. Deleted channels will appear, along with the Number buttons. • If new ... step 6 as often as the searching progresses.This will reappear. Press ; If you are finished. Press OK. 26 TV Channel Programming Although the DVD Recorder selects available TV channels during Initial Setup, you may want to add or delete, then press ;
...Cable/Antenna To exit press SYSTEM MENU 5 Press :. Beside each channel number, you will appear, along with the channels found . Press OK. "Searching for the Recorder to store your choice. "Stored" will appear. Installation K u B Auto Ch. Deleted channels will appear, along with the Number buttons. • If new ... step 6 as often as the searching progresses.This will reappear. Press ; If you are finished. Press OK. 26 TV Channel Programming Although the DVD Recorder selects available TV channels during Initial Setup, you may want to add or delete, then press ;


