Leaflet
Page 2
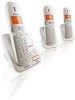
..., Integrated on call without notice. All Rights reserved. Thanks to a high-quality speaker, sophisticated technology and to a conventional power supply. www.philips.com Cordless phone with answering machine 3000-series 3 handsets Brilliant pearl Specifications Picture/Display • Backlight • Backlight color: Amber • ...; Mains power: AC 120V - 60Hz • Number of batteries: 2 per handset • Standby time: Up to 170 hours • Talk time: Up to 14 hours Accessories • Detachable belt-clip • CD3653Q/37 Highlights XHD sound No matter where you are, you can...
..., Integrated on call without notice. All Rights reserved. Thanks to a high-quality speaker, sophisticated technology and to a conventional power supply. www.philips.com Cordless phone with answering machine 3000-series 3 handsets Brilliant pearl Specifications Picture/Display • Backlight • Backlight color: Amber • ...; Mains power: AC 120V - 60Hz • Number of batteries: 2 per handset • Standby time: Up to 170 hours • Talk time: Up to 14 hours Accessories • Detachable belt-clip • CD3653Q/37 Highlights XHD sound No matter where you are, you can...
User manual
Page 3
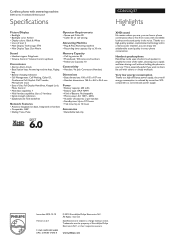
... station 12 Display icons 13 3 Get started 14 Connect the base station 14 Wall mount the base station 15 Install the handset 15 Check the battery level 16 Set the date and time 16 Set the date and time format 16 What is standby mode? 17 Check the signal strength 17...
... station 12 Display icons 13 3 Get started 14 Connect the base station 14 Wall mount the base station 15 Install the handset 15 Check the battery level 16 Set the date and time 16 Set the date and time format 16 What is standby mode? 17 Check the signal strength 17...
User manual
Page 5
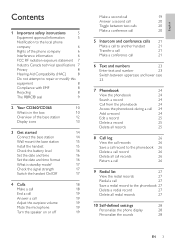
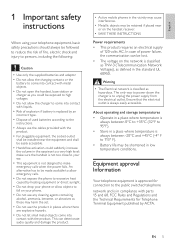
...176;F). • Store in a place where temperature is always between -20°C and +45°C (-4° F to 113° F). • Battery life may be retained if placed near the equipment and shall be easily accessible. •• Handsfree activation could be exposed to high voltages. •... Do not allow the charger to come into contact with liquids. •• Risk of explosion if battery is replaced by an incorrect type. •• Dispose of used batteries according to the instructions. •• Always use the product in the vicinity may cause interference. &#...
...176;F). • Store in a place where temperature is always between -20°C and +45°C (-4° F to 113° F). • Battery life may be retained if placed near the equipment and shall be easily accessible. •• Handsfree activation could be exposed to high voltages. •... Do not allow the charger to come into contact with liquids. •• Risk of explosion if battery is replaced by an incorrect type. •• Dispose of used batteries according to the instructions. •• Always use the product in the vicinity may cause interference. &#...
User manual
Page 9
... our environment and conserving natural resources. Philips's involvement in your area. Please call 1-800-8-BATTERY for you to collect and recycle these batteries at the end of their useful lives, when taken out of Rechargeable Battery Recycling Corporation. RBRC® is voluntarily...in an industry program to drop off the spent battery at local retailers participating in your area. Philips's participation in RBRC® makes it easy for information on the nickel metal hydride battery indicates that Philips Royal Electronics is a registered trademark of service within...
... our environment and conserving natural resources. Philips's involvement in your area. Please call 1-800-8-BATTERY for you to collect and recycle these batteries at the end of their useful lives, when taken out of Rechargeable Battery Recycling Corporation. RBRC® is voluntarily...in an industry program to drop off the spent battery at local retailers participating in your area. Philips's participation in RBRC® makes it easy for information on the nickel metal hydride battery indicates that Philips Royal Electronics is a registered trademark of service within...

User manual
Page 12
... the intercom Conference call key • Press and hold to make the conference call 15 Microphone 16 Loudspeaker 17 Belt clip 18 Headset jack 19 Battery door Overview of the base station CD360 a Key Name 1 handset locator CD365 Descriptions • Find handsets • Enter registration mode h 12 EN
... the intercom Conference call key • Press and hold to make the conference call 15 Microphone 16 Loudspeaker 17 Belt clip 18 Headset jack 19 Battery door Overview of the base station CD360 a Key Name 1 handset locator CD365 Descriptions • Find handsets • Enter registration mode h 12 EN

User manual
Page 13
... • Increase/decrease down for more options Scroll down key the speaker volume 3 On/Off key • Turn the answering machine on/off . The battery is on. The speaker is empty. The call is an unheard voice message. The ringer is off 4 Delete key • Delete messages 5 Forward/ ...In standby mode, the icons shown on the main screen tell you what features are available on the right. EN 13 Icon Descriptions The battery is activated. Scroll up to a base. Call log Answering machine There is in progress. It indicates if your handset. The alarm is ...
... • Increase/decrease down for more options Scroll down key the speaker volume 3 On/Off key • Turn the answering machine on/off . The battery is on. The speaker is empty. The call is an unheard voice message. The ringer is off 4 Delete key • Delete messages 5 Forward/ ...In standby mode, the icons shown on the main screen tell you what features are available on the right. EN 13 Icon Descriptions The battery is activated. Scroll up to a base. Call log Answering machine There is in progress. It indicates if your handset. The alarm is ...
User manual
Page 14
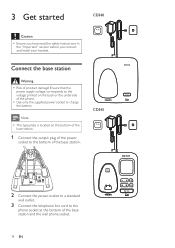
... back or the underside of the base station. CD365 2 Connect the power socket to a standard wall outlet. 3 Connect the telephone line cord to charge the battery. Ensure that the power supply voltage corresponds to the voltage printed on the bottom of the base station. 1 Connect the output plug of the power...
... back or the underside of the base station. CD365 2 Connect the power socket to a standard wall outlet. 3 Connect the telephone line cord to charge the battery. Ensure that the power supply voltage corresponds to the voltage printed on the bottom of the base station. 1 Connect the output plug of the power...

User manual
Page 15
.... »» The bracket from heat, sunshine or fire. Never discard batteries in fire. •• Use only the supplied batteries. •• Risk of explosion! Install the handset Caution •• Risk of decreased battery life! Note •• Charge the batteries for 24 hours before first use. English Wall mount the base.... 3 Re-insert the bracket into the back of the base station. 4 Insert screws (not included) into the wall. Never mix different brands or types of batteries.
.... »» The bracket from heat, sunshine or fire. Never discard batteries in fire. •• Use only the supplied batteries. •• Risk of explosion! Install the handset Caution •• Risk of decreased battery life! Note •• Charge the batteries for 24 hours before first use. English Wall mount the base.... 3 Re-insert the bracket into the back of the base station. 4 Insert screws (not included) into the wall. Never mix different brands or types of batteries.
User manual
Page 16
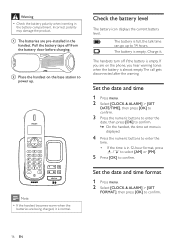
... the date, then press [OK] to confirm. »» On the handset, the time set menu is displayed. 4 Press the numeric buttons to confirm. a The batteries are pre-installed in 12-hour format, press call gets disconnected after the warning. Charge it is almost empty.The call ID / Ph.Book to...] or [PM]. 5 Press [OK] to enter the time. • If the time is full, the talk time can go up . Pull the battery tape off if the battery is empty. The battery is empty. Set the date and time format 1 Press menu. 2 Select [CLOCK & ALARM] > [SET FORMAT], then press [OK] to 14 hours...
... the date, then press [OK] to confirm. »» On the handset, the time set menu is displayed. 4 Press the numeric buttons to confirm. a The batteries are pre-installed in 12-hour format, press call gets disconnected after the warning. Charge it is almost empty.The call ID / Ph.Book to...] or [PM]. 5 Press [OK] to enter the time. • If the time is full, the talk time can go up . Pull the battery tape off if the battery is empty. The battery is empty. Set the date and time format 1 Press menu. 2 Select [CLOCK & ALARM] > [SET FORMAT], then press [OK] to 14 hours...
User manual
Page 17
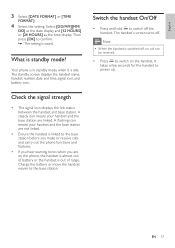
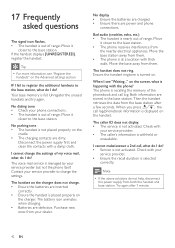
...handset and the base station are not linked. • Ensure the handset is linked to switch on the phone, the handset is almost out of battery or the handset is out of range. What is switched off, no call can be received. • Press exit END to the base station before... tones when you are linked. Check the signal strength • The signal icon displays the link status between the handset and base station. Charge the battery or move the handset nearer to power up. Note •• When the handset is standby mode? A flashing icon means your handset and the ...
...handset and the base station are not linked. • Ensure the handset is linked to switch on the phone, the handset is almost out of battery or the handset is out of range. What is switched off, no call can be received. • Press exit END to the base station before... tones when you are linked. Check the signal strength • The signal icon displays the link status between the handset and base station. Charge the battery or move the handset nearer to power up. Note •• When the handset is standby mode? A flashing icon means your handset and the ...
User manual
Page 18
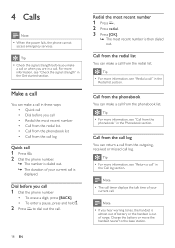
... a call from the phonebook You can make a call in a call log. Note •• If you hear warning tones, the handset is almost out of battery or the handset is out of your current call . Tip •• Check the signal strength before you make a call 1 Press . flash TALK 2 Dial the...;• When the power fails, the phone cannot access emergency services. Tip •• For more information, see "Call from the redial list. Charge the battery or move the handset nearer to dial out the call from the phonebook" in the Get started section.
... a call from the phonebook You can make a call in a call log. Note •• If you hear warning tones, the handset is almost out of battery or the handset is out of your current call . Tip •• Check the signal strength before you make a call 1 Press . flash TALK 2 Dial the...;• When the power fails, the phone cannot access emergency services. Tip •• For more information, see "Call from the redial list. Charge the battery or move the handset nearer to dial out the call from the phonebook" in the Get started section.

User manual
Page 41
... list and Call log • Phonebook list with 100 entries • Redial list with 10 entries • Call log with 20 entries Battery • 2 x AAA NiMH 1.2V Rechargeable 650mAh batteries Adaptor • Base: Input 120V 60Hz 0.1A, Output: 6V 0-0.58mA • Charger: Input 120V 60Hz 0.1A, Output: 6V 0-0.58mA Power consumption •...
... list and Call log • Phonebook list with 100 entries • Redial list with 10 entries • Call log with 20 entries Battery • 2 x AAA NiMH 1.2V Rechargeable 650mAh batteries Adaptor • Base: Input 120V 60Hz 0.1A, Output: 6V 0-0.58mA • Charger: Input 120V 60Hz 0.1A, Output: 6V 0-0.58mA Power consumption •...
User manual
Page 42
... see "Waiting..." Your base memory is not activated. The handset on the charger does not charge. •• Ensure the batteries are inserted correctly. •• Ensure the handset is placed properly on the Advanced settings section. Both information are defective. Check ... parking tone •• The handset is not placed properly on . The battery icon animates when charging. •• Batteries are stored in the base station. No display •• Ensure the batteries are charged. •• Ensure there are dirty. Bad audio (crackles, ...
... see "Waiting..." Your base memory is not activated. The handset on the charger does not charge. •• Ensure the batteries are inserted correctly. •• Ensure the handset is placed properly on the Advanced settings section. Both information are defective. Check ... parking tone •• The handset is not placed properly on . The battery icon animates when charging. •• Batteries are stored in the base station. No display •• Ensure the batteries are charged. •• Ensure there are dirty. Bad audio (crackles, ...
Quick start guide
Page 2
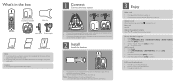
... line cord to the phone socket at the bottom of the base station and the wall phone socket. 2 Install Install the handset CD365 1 The batteries are additional handsets and chargers with power supply units. End a call 1 Press flash TALK and dial the phone number; What's in the box... Base station with bracket for 24 hours before charging. 2 Place the handset on the battery icon status, see the User Manual. 3 Enjoy Make a call Press . Answer a call When the phone rings, press flash TALK or to answer ...
... line cord to the phone socket at the bottom of the base station and the wall phone socket. 2 Install Install the handset CD365 1 The batteries are additional handsets and chargers with power supply units. End a call 1 Press flash TALK and dial the phone number; What's in the box... Base station with bracket for 24 hours before charging. 2 Place the handset on the battery icon status, see the User Manual. 3 Enjoy Make a call Press . Answer a call When the phone rings, press flash TALK or to answer ...
