PTDS8500U User Guide
Page 1
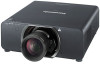
PT-DZ8700U PT-DS8500U PT-DW8300U The projection lens is sold separately. JJ Before operating this product, please read "Precautions with regard to safety" (Æ pages 8 to 16). JJBefore using your projector, be sure to read the instructions carefully and save this manual for purchasing a Panasonic Projector. TQBJ0341 ENGLISH Operating Instructions Functional Manual DLP™ Based Projector Commercial Use Model No. Thank you for future use.
PT-DZ8700U PT-DS8500U PT-DW8300U The projection lens is sold separately. JJ Before operating this product, please read "Precautions with regard to safety" (Æ pages 8 to 16). JJBefore using your projector, be sure to read the instructions carefully and save this manual for purchasing a Panasonic Projector. TQBJ0341 ENGLISH Operating Instructions Functional Manual DLP™ Based Projector Commercial Use Model No. Thank you for future use.
PTDS8500U User Guide
Page 2
... be pleased with your Panasonic DLP™ Based projector. Before connecting, operating or adjusting this projector, please read and understood as an accessory can only be found on the power plug. The serial number of the grounding plug. Model number: PT-DZ8700U/PT-DS8500U/PT-DW8300U Serial number: WARNING...: TO REDUCE THE RISK OF FIRE OR ELECTRIC SHOCK, DONOT EXPOSE THIS PRODUCT TO RAIN OR MOISTURE. Power Supply: This Projector is supplied with the projector as it will help you will need...
... be pleased with your Panasonic DLP™ Based projector. Before connecting, operating or adjusting this projector, please read and understood as an accessory can only be found on the power plug. The serial number of the grounding plug. Model number: PT-DZ8700U/PT-DS8500U/PT-DW8300U Serial number: WARNING...: TO REDUCE THE RISK OF FIRE OR ELECTRIC SHOCK, DONOT EXPOSE THIS PRODUCT TO RAIN OR MOISTURE. Power Supply: This Projector is supplied with the projector as it will help you will need...
PTDS8500U User Guide
Page 3
.../or peripheral devices. Declaration of Conformity Model Number: PT-DZ8700U/PT-DS8500U/PT-DW8300U Trade Name: Panasonic Responsible party: Panasonic Solutions Company Address: 3 Panasonic Way, Secaucus, NJ 07094 Telephone number: (877) 803 - 8492 E-mail: projectorsupport@us.panasonic.com This device complies with Part 15 of Electronic...8226;• For pluggable equipment, the socket-outlet shall be installed near the equipment and shall be determined by Panasonic Corp. If you wish to Part 15 of the FCC Rules. Important Information Important Safety Notice WARNING: This equipment...
.../or peripheral devices. Declaration of Conformity Model Number: PT-DZ8700U/PT-DS8500U/PT-DW8300U Trade Name: Panasonic Responsible party: Panasonic Solutions Company Address: 3 Panasonic Way, Secaucus, NJ 07094 Telephone number: (877) 803 - 8492 E-mail: projectorsupport@us.panasonic.com This device complies with Part 15 of Electronic...8226;• For pluggable equipment, the socket-outlet shall be installed near the equipment and shall be determined by Panasonic Corp. If you wish to Part 15 of the FCC Rules. Important Information Important Safety Notice WARNING: This equipment...

PTDS8500U User Guide
Page 4
...replacement cycle is much less than the existing model. (Æpage 110) Approx. 1 500 hours : PT-D7700U (two lamps LAMP POWER : [HIGH]) Approx. 3 000 hours : PT-DZ8700U (two lamps LAMP POWER : [HIGH]) JJQuick steps For details, see the corresponding pages. 1. Connect ... standby power The standby power is longer than the existing model. Approx. 12 W : PT-D7700U Approx. 0.2 W : PT-DZ8700U (STANDBY MODE : [ECO]) 5. Attach the projection lens. (Æpage 37) 3. ENGLISH Set up your projector. (Æpage 21) 2. Adjust the image. (Æpage 41) Settings Maintenance Appendix ...
...replacement cycle is much less than the existing model. (Æpage 110) Approx. 1 500 hours : PT-D7700U (two lamps LAMP POWER : [HIGH]) Approx. 3 000 hours : PT-DZ8700U (two lamps LAMP POWER : [HIGH]) JJQuick steps For details, see the corresponding pages. 1. Connect ... standby power The standby power is longer than the existing model. Approx. 12 W : PT-D7700U Approx. 0.2 W : PT-DZ8700U (STANDBY MODE : [ECO]) 5. Attach the projection lens. (Æpage 37) 3. ENGLISH Set up your projector. (Æpage 21) 2. Adjust the image. (Æpage 41) Settings Maintenance Appendix ...

PTDS8500U User Guide
Page 19
...not touch the LAN terminal with to the previous menu when the menu is used in the standby mode. ENGLISH - 19 About Your Projector Preparation JJCONTROL PANEL button Returns to initiate a function. button Starts the projection while in the system, they can be connected and controlled...standby mode. Failure to DVI-D or HDMI input. DVI-D/HDMI Switches to do so may have charged static electricity. SDI Switches to SDI input. (PT-DZ8700U/PT-DS8500U only) JJTerminals on the screen. (Æpage 47) REMOTE 2 IN Connect a cable from /to a computer. button Pressing this button ...
...not touch the LAN terminal with to the previous menu when the menu is used in the standby mode. ENGLISH - 19 About Your Projector Preparation JJCONTROL PANEL button Returns to initiate a function. button Starts the projection while in the system, they can be connected and controlled...standby mode. Failure to DVI-D or HDMI input. DVI-D/HDMI Switches to do so may have charged static electricity. SDI Switches to SDI input. (PT-DZ8700U/PT-DS8500U only) JJTerminals on the screen. (Æpage 47) REMOTE 2 IN Connect a cable from /to a computer. button Pressing this button ...

PTDS8500U User Guide
Page 23
ENGLISH - 23 Setting up JJProjected range using geometric adjustment (PT-DZ8700U/PT-DS8500U only) VERTICAL KEYSTONE (Side View) HORIZONTAL KEYSTONE (Top View) Screen Screen Getting Started VERTICAL ARC (Side View) L2 L2 : Projection distance R2 : Radius of ...
ENGLISH - 23 Setting up JJProjected range using geometric adjustment (PT-DZ8700U/PT-DS8500U only) VERTICAL KEYSTONE (Side View) HORIZONTAL KEYSTONE (Top View) Screen Screen Getting Started VERTICAL ARC (Side View) L2 L2 : Projection distance R2 : Radius of ...

PTDS8500U User Guide
Page 24
Getting Started Setting up JJProjection distance by projection lens (for PT-DZ8700U) QQFor the screen aspect ratio of 16 : 10 (Unit : m) Lens type Model number of projection lens Throw ratio Û Screen dimensions Screen size (") Effective Effective ...
Getting Started Setting up JJProjection distance by projection lens (for PT-DZ8700U) QQFor the screen aspect ratio of 16 : 10 (Unit : m) Lens type Model number of projection lens Throw ratio Û Screen dimensions Screen size (") Effective Effective ...
PTDS8500U User Guide
Page 31
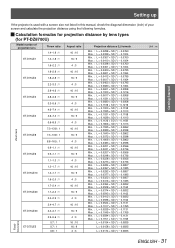
Setting up Getting Started If the projector is used with a screen size not listed in this manual, check the diagonal dimension (inch) of projection lens ET-D75LE1 ET-D75LE2 ET-D75LE3 ET-... × SD (") - 0.0835 L = 0.0158 × SD (") - 0.0835 L = 0.0174 × SD (") - 0.0835 Unit : m Fixedfocus lens ENGLISH - 31 JJCalculation formulas for projection distance by lens types (for PT-DZ8700U) Zoom lens Model number of your screen and calculate the projection distance using the following formulas.
Setting up Getting Started If the projector is used with a screen size not listed in this manual, check the diagonal dimension (inch) of projection lens ET-D75LE1 ET-D75LE2 ET-D75LE3 ET-... × SD (") - 0.0835 L = 0.0158 × SD (") - 0.0835 L = 0.0174 × SD (") - 0.0835 Unit : m Fixedfocus lens ENGLISH - 31 JJCalculation formulas for projection distance by lens types (for PT-DZ8700U) Zoom lens Model number of your screen and calculate the projection distance using the following formulas.
PTDS8500U User Guide
Page 39
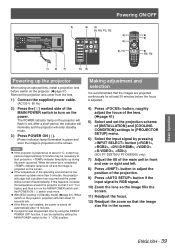
...on the projector, projection will start projection. indicator lamp lights up during the warm-up is completed, indicator lamp turns off and the image is low and warm-up period of approximately 5 minutes may be started by pressing button (, , , , ). (SDI: PT-DZ8700U/ PT-DS8500U only... 3) 5) 4) 8), 10), 11), 12) 3) 5) 4), 11) 9) 6) 8) 10), 12) 1) 2) 7) 6) 9) Powering up at least 30 minutes before switch on the projector. (Æpage 37) Remove the projection lens cover from the lens. 1111 Connect the supplied power cable. (AC120 V 60 Hz) 2222 Press the [ | ] marked side...
...on the projector, projection will start projection. indicator lamp lights up during the warm-up is completed, indicator lamp turns off and the image is low and warm-up period of approximately 5 minutes may be started by pressing button (, , , , ). (SDI: PT-DZ8700U/ PT-DS8500U only... 3) 5) 4) 8), 10), 11), 12) 3) 5) 4), 11) 9) 6) 8) 10), 12) 1) 2) 7) 6) 9) Powering up at least 30 minutes before switch on the projector. (Æpage 37) Remove the projection lens cover from the lens. 1111 Connect the supplied power cable. (AC120 V 60 Hz) 2222 Press the [ | ] marked side...
PTDS8500U User Guide
Page 42
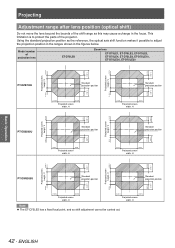
...is to adjust the projection position in the ranges shown in the focus. ENGLISH Model number of the projector. Using the standard projection position as this may cause a change in the figures below. Basic Operation..., ET-D75LE4, ET-D75LE8, ET-D75LE10, ET-D75LE20, ET-D75LE30 0.12 V 0.55 V 0.12 V 0.12 V 0.44 V 0.12 V height, V Projected screen height, V Projected screen PT-DZ8700U PT-DS8500U Projected screen height, V 0.12 V 0.12 V 0.12 V Standard projection position 0.12 V 0.44 V 0.15 H 0.15 H Projected screen width, H 0.12 V Standard projection position 0....
...is to adjust the projection position in the ranges shown in the focus. ENGLISH Model number of the projector. Using the standard projection position as this may cause a change in the figures below. Basic Operation..., ET-D75LE4, ET-D75LE8, ET-D75LE10, ET-D75LE20, ET-D75LE30 0.12 V 0.55 V 0.12 V 0.12 V 0.44 V 0.12 V height, V Projected screen height, V Projected screen PT-DZ8700U PT-DS8500U Projected screen height, V 0.12 V 0.12 V 0.12 V Standard projection position 0.12 V 0.44 V 0.15 H 0.15 H Projected screen width, H 0.12 V Standard projection position 0....
PTDS8500U User Guide
Page 46
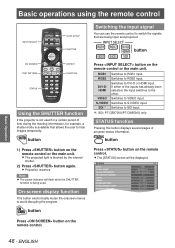
...FUNCTION Using the SHUTTER function If the projector is not used for a certain period of time during the meeting intermission, for example, a shutter mode is available that are being used. RGB2 Switches to the other. If either of projector status information. SDI Û Switches to... RGB1 input. STATUS INPUT SIGNAL NAME SIGNAL FREQUENCY PROJECTOR RUNTIME LAMP1 LAMP2 INTAKE AIR TEMP. zzProjection resumes. RGB1 Switches to SDI input. ½½½ SDI: PT-DZ8700U/PT-DS8500U only STATUS function Pressing this button displays several pages of the inputs has...
...FUNCTION Using the SHUTTER function If the projector is not used for a certain period of time during the meeting intermission, for example, a shutter mode is available that are being used. RGB2 Switches to the other. If either of projector status information. SDI Û Switches to... RGB1 input. STATUS INPUT SIGNAL NAME SIGNAL FREQUENCY PROJECTOR RUNTIME LAMP1 LAMP2 INTAKE AIR TEMP. zzProjection resumes. RGB1 Switches to SDI input. ½½½ SDI: PT-DZ8700U/PT-DS8500U only STATUS function Pressing this button displays several pages of the inputs has...
PTDS8500U User Guide
Page 47
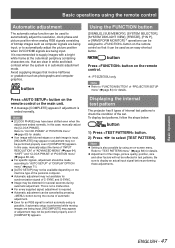
...[P IN P], or [WAVEFORM MONITOR] Û operations can be performed properly even if [COMPLETE] appears. Displaying the internal test pattern The projector has 9 types of internal test patterns to button on the remote control so that it can be canceled by using the remote control Automatic ...adjust the [CLOCK PHASE]. zzFor every supplied signal, adjustment is not a malfunction. button Press button on the remote control. ½½½ PT-DZ8700U only Note zzRefer to "TEST PATTERN menu" (Æpage 88) for details. Refer to "FUNCTION BUTTON" of C-SYNC and G-SYNC. Basic...
...[P IN P], or [WAVEFORM MONITOR] Û operations can be performed properly even if [COMPLETE] appears. Displaying the internal test pattern The projector has 9 types of internal test patterns to button on the remote control so that it can be canceled by using the remote control Automatic ...adjust the [CLOCK PHASE]. zzFor every supplied signal, adjustment is not a malfunction. button Press button on the remote control. ½½½ PT-DZ8700U only Note zzRefer to "TEST PATTERN menu" (Æpage 88) for details. Refer to "FUNCTION BUTTON" of C-SYNC and G-SYNC. Basic...
PTDS8500U User Guide
Page 51
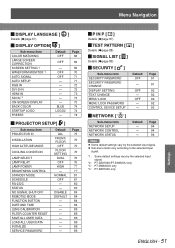
... - - Page 68 69 69 70 71 71 72 72 73 73 73 74 74 74 JJPROJECTOR SETUP[ ] Sub-menu item PROJECTOR ID INSTALLATION HIGH ALTITUDE MODE COOLING CONDITION LAMP SELECT LAMP RELAY LAMP POWER BRIGHTNESS CONTROL STANDBY MODE SCHEDULE RS-232C STATUS NO SIGNAL SHUT...OFF FLOOR SETTING DUAL OFF HIGH - OFF - Page 94 94 94 Note zzSome default settings vary by the selected input signal. ***** PT-DZ8700U/PT-DS8500U only ***** PT-DW8300U only ***** PT-DZ8700U only ENGLISH - 51 Settings Menu Navigation JJDISPLAY LANGUAGE [ ] Details (Æpage 67) JJDISPLAY OPTION[ ] Sub-menu item COLOR MATCHING ...
... - - Page 68 69 69 70 71 71 72 72 73 73 73 74 74 74 JJPROJECTOR SETUP[ ] Sub-menu item PROJECTOR ID INSTALLATION HIGH ALTITUDE MODE COOLING CONDITION LAMP SELECT LAMP RELAY LAMP POWER BRIGHTNESS CONTROL STANDBY MODE SCHEDULE RS-232C STATUS NO SIGNAL SHUT...OFF FLOOR SETTING DUAL OFF HIGH - OFF - Page 94 94 94 Note zzSome default settings vary by the selected input signal. ***** PT-DZ8700U/PT-DS8500U only ***** PT-DW8300U only ***** PT-DZ8700U only ENGLISH - 51 Settings Menu Navigation JJDISPLAY LANGUAGE [ ] Details (Æpage 67) JJDISPLAY OPTION[ ] Sub-menu item COLOR MATCHING ...
PTDS8500U User Guide
Page 57
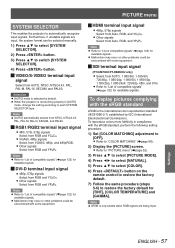
.../60p, 1 080/24p, 1 080/50i, 1 080/30p, 1 080/25p, 1 080/24sF, 720/50p, 480i, and 576i. JJSDI terminal input signal (PT-DZ8700U/PT-DS8500U only) zzSelect from RGB and YCBCR. To reproduce colors more faithfully in [AUTO] mode, change the setting according to "List of compatible signals" (Æ...] mode is the international color reproduction standard (IEC61966-2-1) established by default. To display pictures complying with some equipment. zzWhen the projector is only enable when RGB signals are input, the system format can be encountered with the sRGB standard sRGB is selected by...
.../60p, 1 080/24p, 1 080/50i, 1 080/30p, 1 080/25p, 1 080/24sF, 720/50p, 480i, and 576i. JJSDI terminal input signal (PT-DZ8700U/PT-DS8500U only) zzSelect from RGB and YCBCR. To reproduce colors more faithfully in [AUTO] mode, change the setting according to "List of compatible signals" (Æ...] mode is the international color reproduction standard (IEC61966-2-1) established by default. To display pictures complying with some equipment. zzWhen the projector is only enable when RGB signals are input, the system format can be encountered with the sRGB standard sRGB is selected by...
PTDS8500U User Guide
Page 63
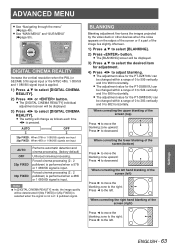
... zone upward; Forced cinema processing (2 : 2 pulldown) is performed when a 480i or 1 080/60i signal is input. zzThe adjustment value for the PT-DS8500U can be displayed. 3333 Press ◄► to the right; When correcting the right hand blanking of 0 to 524 vertically and 0 to adjust... ► to select [BLANKING]. 2222 Press button. zzThe setting will be displayed. 3333 Press ▲▼ to select the desired item for the PT-DZ8700U can be deteriorated if [30p FIXED] or [25p FIXED] is selected when the signal is applied. 1111 Press ▲▼ to downward. AUTO ...
... zone upward; Forced cinema processing (2 : 2 pulldown) is performed when a 480i or 1 080/60i signal is input. zzThe adjustment value for the PT-DS8500U can be displayed. 3333 Press ◄► to the right; When correcting the right hand blanking of 0 to 524 vertically and 0 to adjust... ► to select [BLANKING]. 2222 Press button. zzThe setting will be displayed. 3333 Press ▲▼ to select the desired item for the PT-DZ8700U can be deteriorated if [30p FIXED] or [25p FIXED] is selected when the signal is applied. 1111 Press ▲▼ to downward. AUTO ...

PTDS8500U User Guide
Page 70
You can check if the image output (BRIGHTNESS) signal level is within the range recommended by this projector and adjust it as follows each time ◄► is pressed. QQAdjusting RED, GREEN, and BLUE 1111 Set [COLOR TEMPERATURE] to [USER1] or [USER2]. (Æ... [PICTURE], adjust the 100 % of the while level of the input signal from -132 to +60 When [SCREEN FORMAT] is [16 : 10] (PT-DZ8700U) or [4 : 3] (PT-DS8500U). zzIn the case of the PT-DZ8700U : When [SCREEN FORMAT] is [16 : 9] Adjustment range: -60 to +131. zzIn [RED] of [WHITE BALANCE LOW], adjust the 0 % of the black...
You can check if the image output (BRIGHTNESS) signal level is within the range recommended by this projector and adjust it as follows each time ◄► is pressed. QQAdjusting RED, GREEN, and BLUE 1111 Set [COLOR TEMPERATURE] to [USER1] or [USER2]. (Æ... [PICTURE], adjust the 100 % of the while level of the input signal from -132 to +60 When [SCREEN FORMAT] is [16 : 10] (PT-DZ8700U) or [4 : 3] (PT-DS8500U). zzIn the case of the PT-DZ8700U : When [SCREEN FORMAT] is [16 : 9] Adjustment range: -60 to +131. zzIn [RED] of [WHITE BALANCE LOW], adjust the 0 % of the black...
PTDS8500U User Guide
Page 82
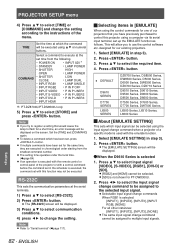
...P USER3 •• INPUT HDMI ½½½ PT-DZ8700U/PT-DS8500U only 5555 Press ▲▼ to execute at which has been set for a short time, an error message will be selected. zz[SDI] is used with this projector using ▲▼ or numeral buttons. TIME Set the ... command to be assigned to control this function may not be displayed on the screen. designed for PT-DW8300U. 222 Press ◄► to select the input signal change command when a projector of the menu. QQWhen the D9610 Series is selected: [INPUT1], [INPUT2], [INPUT3], [INPUT ...
...P USER3 •• INPUT HDMI ½½½ PT-DZ8700U/PT-DS8500U only 5555 Press ▲▼ to execute at which has been set for a short time, an error message will be selected. zz[SDI] is used with this projector using ▲▼ or numeral buttons. TIME Set the ... command to be assigned to control this function may not be displayed on the screen. designed for PT-DW8300U. 222 Press ◄► to select the input signal change command when a projector of the menu. QQWhen the D9610 Series is selected: [INPUT1], [INPUT2], [INPUT3], [INPUT ...
PTDS8500U User Guide
Page 84
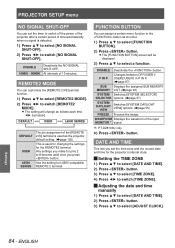
...a function. DISABLE Deactivate the NO SIGNAL SHUT-OFF. 10MIN. - 90MIN. At intervals of the input MONITOR Û signal. ½½½ PT-DZ8700U only 4444 Press button. WAVEFORM Displays the waveform of 10 minutes. REMOTE2 MODE You can customize the [REMOTE 2 IN] terminal function. 1111 Press ▲...to switch [TIME ZONE]. DISABLE Deactivate the button. DATE AND TIME This lets you set the timer to switch off the power of the projector after a certain period of the [REMOTE 2 IN] terminal is used for changing the settings for the REMOTE2 terminal. Use the setting for ...
...a function. DISABLE Deactivate the NO SIGNAL SHUT-OFF. 10MIN. - 90MIN. At intervals of the input MONITOR Û signal. ½½½ PT-DZ8700U only 4444 Press button. WAVEFORM Displays the waveform of 10 minutes. REMOTE2 MODE You can customize the [REMOTE 2 IN] terminal function. 1111 Press ▲...to switch [TIME ZONE]. DISABLE Deactivate the button. DATE AND TIME This lets you set the timer to switch off the power of the projector after a certain period of the [REMOTE 2 IN] terminal is used for changing the settings for the REMOTE2 terminal. Use the setting for ...
PTDS8500U User Guide
Page 114
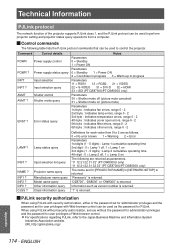
NAME ? "Panasonic" is returned. "1" is returned. Input selection query AVMT AVMT ? Shutter control Shutter mode query ERST ? CLSS ? Information such as parameters. Error status query Notes Parameters 0 = ... name set for user privileges with Web browser control can be used as the password for [PROJECTOR NAME] in progress Parameters 11 = RGB1 12 = RGB2 21 = VIDEO 22 = S-VIDEO 31 = DVI-D 32 = HDMI 33 = SDI (PT-DZ8700U/PT-DS8500U only) Parameters 30 = Shutter mode off (picture mute canceled) 31 = Shutter mode on The following...
NAME ? "Panasonic" is returned. "1" is returned. Input selection query AVMT AVMT ? Shutter control Shutter mode query ERST ? CLSS ? Information such as parameters. Error status query Notes Parameters 0 = ... name set for user privileges with Web browser control can be used as the password for [PROJECTOR NAME] in progress Parameters 11 = RGB1 12 = RGB2 21 = VIDEO 22 = S-VIDEO 31 = DVI-D 32 = HDMI 33 = SDI (PT-DZ8700U/PT-DS8500U only) Parameters 30 = Shutter mode off (picture mute canceled) 31 = Shutter mode on The following...
PTDS8500U User Guide
Page 119
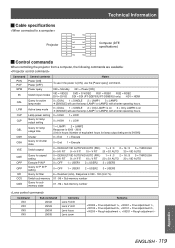
... 7 8 9 NC NC 1 2 3 NC 4 5 NC 6 7 8 NC 9 Computer (DTE specifications) JJControl commands When controlling the projector from a computer, the following commands are available: Command PON POF QPW IIS QSL LPM OLP QLP Q$L OSH QSH VSE QSE OPP QPP QFI ...is [ON], use the [Power query] command. 000 = Standby 001 = Power [ON] VID = VIDEO SVD = S-VIDEO RG1 = RGB1 RG2 = RGB2 DVI = DVI-D SDI = SDI (PT-DZ8700U/PT-DS8500U only) HD1 = HDMI 0 = DUAL 1 = SINGLE 2 = LAMP1 3 = LAMP2 Û [SINGLE] will use the lamp (LAMP1 or LAMP2) with shorter operating hours. 0 = DUAL...
... 7 8 9 NC NC 1 2 3 NC 4 5 NC 6 7 8 NC 9 Computer (DTE specifications) JJControl commands When controlling the projector from a computer, the following commands are available: Command PON POF QPW IIS QSL LPM OLP QLP Q$L OSH QSH VSE QSE OPP QPP QFI ...is [ON], use the [Power query] command. 000 = Standby 001 = Power [ON] VID = VIDEO SVD = S-VIDEO RG1 = RGB1 RG2 = RGB2 DVI = DVI-D SDI = SDI (PT-DZ8700U/PT-DS8500U only) HD1 = HDMI 0 = DUAL 1 = SINGLE 2 = LAMP1 3 = LAMP2 Û [SINGLE] will use the lamp (LAMP1 or LAMP2) with shorter operating hours. 0 = DUAL...


