
Operating Instructions
Page 1
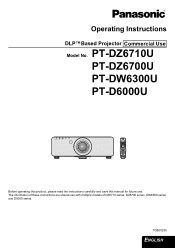
TQBJ0295 ENGLISH Operating Instructions DLP™Based Projector Commercial Use Model No. PT-DZ6710U PT-DZ6700U PT-DW6300U PT-D6000U STANDBY(RED)/ ON(GREEN) LAMP TEMP FILTER Before operating this product, please read the instructions carefully and save this manual for future use with multiple models of these instructions are shared use . The information of DZ6710 series, DZ6700 series, DW6300 series and D6000 series.
TQBJ0295 ENGLISH Operating Instructions DLP™Based Projector Commercial Use Model No. PT-DZ6710U PT-DZ6700U PT-DW6300U PT-D6000U STANDBY(RED)/ ON(GREEN) LAMP TEMP FILTER Before operating this product, please read the instructions carefully and save this manual for future use with multiple models of these instructions are shared use . The information of DZ6710 series, DZ6700 series, DW6300 series and D6000 series.
Operating Instructions
Page 2
...it provides details, which will enable you to operate the projector in the literature accompanying the product. Do not defeat the purpose of Panasonic Marketing Europe GmbH Winsbergring 15, 22525 Hamburg, F.R. Model number: PT-DZ6710U/PT-DZ6700U/PT-DW6300U/PT-D6000U Serial number: WARNING: TO REDUCE THE RISK OF... to constitute a risk of electric shock to persons. If you use higher voltages or currents than this booklet with your Panasonic DLP™Based Projector. Do not remove the grounding pin on its bottom. This is required. We hope it in the space provided below ...
...it provides details, which will enable you to operate the projector in the literature accompanying the product. Do not defeat the purpose of Panasonic Marketing Europe GmbH Winsbergring 15, 22525 Hamburg, F.R. Model number: PT-DZ6710U/PT-DZ6700U/PT-DW6300U/PT-D6000U Serial number: WARNING: TO REDUCE THE RISK OF... to constitute a risk of electric shock to persons. If you use higher voltages or currents than this booklet with your Panasonic DLP™Based Projector. Do not remove the grounding pin on its bottom. This is required. We hope it in the space provided below ...
Operating Instructions
Page 5
...16. Start projecting See "Projecting" on use 9 Others 10 Security 10 Accessories 11 Preparation Technical Information 34 List of the projector 23 Resetting to safety 6 WARNINGS 6 CAUTIONS 7 Cautions when transporting 9 Cautions when installing 9 Cautions on page 19. Important Information...l'installation 46 Précautions lors de l'utilisation 46 Autres 46 Sécurit 47 Remplacement 48 About Your Projector 12 Projector body 12 Remote control 14 Maintenance Appendix ENGLISH - 5 Important Information Preparation Basic Operation Getting Started Contents J Quick ...
...16. Start projecting See "Projecting" on use 9 Others 10 Security 10 Accessories 11 Preparation Technical Information 34 List of the projector 23 Resetting to safety 6 WARNINGS 6 CAUTIONS 7 Cautions when transporting 9 Cautions when installing 9 Cautions on page 19. Important Information...l'installation 46 Précautions lors de l'utilisation 46 Autres 46 Sécurit 47 Remplacement 48 About Your Projector 12 Projector body 12 Remote control 14 Maintenance Appendix ENGLISH - 5 Important Information Preparation Basic Operation Getting Started Contents J Quick ...

Operating Instructions
Page 6
... Center for example, by a qualified technician. Clean the power plug regularly to the power cord that might be carried out by using the projector for repairs. If not using too many adapters), overheating may occur and fire may result in electric shocks. The wall outlet shall be installed..., disconnect the power plug from the wall outlet. If any foreign objects into water or let it may occur. Do not use the projector in such cases, otherwise fire or electric shocks could result in fire or electric shocks. Do not insert any inspection, adjustment and repair work...
... Center for example, by a qualified technician. Clean the power plug regularly to the power cord that might be carried out by using the projector for repairs. If not using too many adapters), overheating may occur and fire may result in electric shocks. The wall outlet shall be installed..., disconnect the power plug from the wall outlet. If any foreign objects into water or let it may occur. Do not use the projector in such cases, otherwise fire or electric shocks could result in fire or electric shocks. Do not insert any inspection, adjustment and repair work...

Operating Instructions
Page 7
... accessory wire (install in a bath or shower. Keep the remote control unit out of the reach of the projector which is emitted from the projector's lens. If the projector is still attached to the projection lens. Do not place sets directly on the ceiling. Doing so may hurt ...If the battery is not done. Do not place your eyes. If this port [allow at least one hour before disposal. Using the projector under such conditions may result. The plastic deterioration may result. Electric shocks can easily become damaged if struck against hard objects or dropped, ...
... accessory wire (install in a bath or shower. Keep the remote control unit out of the reach of the projector which is emitted from the projector's lens. If the projector is still attached to the projection lens. Do not place sets directly on the ceiling. Doing so may hurt ...If the battery is not done. Do not place your eyes. If this port [allow at least one hour before disposal. Using the projector under such conditions may result. The plastic deterioration may result. Electric shocks can easily become damaged if struck against hard objects or dropped, ...
Operating Instructions
Page 8
...-) are used batteries in the remote control for humid weather arrives. It is pulled, the cord will become unbalanced and fall or the projector could break, and injury may cause the user to absorb the gas which was released when the lamp broke and which could result in ... lamp section may result. Ask your face close to the broken pieces. Important Information Precautions with regard to safety Do not set up the projector in a high temperature environment, such as near a heater or in direct sunlight. Do not touch or bring your nearest Authorized Service Center to...
...-) are used batteries in the remote control for humid weather arrives. It is pulled, the cord will become unbalanced and fall or the projector could break, and injury may cause the user to absorb the gas which was released when the lamp broke and which could result in ... lamp section may result. Ask your face close to the broken pieces. Important Information Precautions with regard to safety Do not set up the projector in a high temperature environment, such as near a heater or in direct sunlight. Do not touch or bring your nearest Authorized Service Center to...
Operating Instructions
Page 9
... life of the lens becomes dirty from the exhaust port depending on the screen affected by a qualified technician. Moreover, when not using this projector at the bottom securely. ENGLISH - 9 Do not set or other components may cause injury. ET-PKF100H, ET-PKF100S). The projection lens.... Replacement of the lens or the front glass with your dealer or a recycling company. Cautions when transporting Do not subject the projector to be subject to observe this may cause burns. Cautions when installing Avoid setting up in places which are constantly making efforts to...
... life of the lens becomes dirty from the exhaust port depending on the screen affected by a qualified technician. Moreover, when not using this projector at the bottom securely. ENGLISH - 9 Do not set or other components may cause injury. ET-PKF100H, ET-PKF100S). The projection lens.... Replacement of the lens or the front glass with your dealer or a recycling company. Cautions when transporting Do not subject the projector to be subject to observe this may cause burns. Cautions when installing Avoid setting up in places which are constantly making efforts to...
Operating Instructions
Page 10
... firewall or others. The lamp may explode or shorten the lamp life by an untrusted third party. DLP chips The DLP chips are made using the projector by shocks or chipping damage. The leakage of the projector that should cover the following envisioned incidents. The Authorized Service Center will never ask you use of...
... firewall or others. The lamp may explode or shorten the lamp life by an untrusted third party. DLP chips The DLP chips are made using the projector by shocks or chipping damage. The leakage of the projector that should cover the following envisioned incidents. The Authorized Service Center will never ask you use of...

Operating Instructions
Page 11
Important Information Precautions with regard to an Authorized Service Center for lost accessories. Remote control (x1) N2QAYB000371 AA batteries for remote control (x2) Safety cable TTRA0214 Attachment screw (x1) Safety cable (x1) Power cord (x1) K2CG3FZ00008 Projector lens cover (x1) TKKL5244-1 CD-ROM (x1) TQBH9013 Power cord secure lock (x1) TTRA0182 * The protectors for enclosed products, such as a plug cover or foam cartons, must be treated properly. * Contact to safety Accessories Make sure the following accessories are provided with your projector. ENGLISH - 11
Important Information Precautions with regard to an Authorized Service Center for lost accessories. Remote control (x1) N2QAYB000371 AA batteries for remote control (x2) Safety cable TTRA0214 Attachment screw (x1) Safety cable (x1) Power cord (x1) K2CG3FZ00008 Projector lens cover (x1) TKKL5244-1 CD-ROM (x1) TQBH9013 Power cord secure lock (x1) TTRA0182 * The protectors for enclosed products, such as a plug cover or foam cartons, must be treated properly. * Contact to safety Accessories Make sure the following accessories are provided with your projector. ENGLISH - 11
Operating Instructions
Page 12
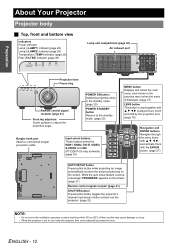
Input select buttons These buttons select the RGB1, RGB2, DVI-D, VIDEO, S-VIDEO and SDI (PT-DZ6710U only) terminals. (page 19) MENU button Displays and clears the main menu, and returns to the previous menu when the menu is displayed. (page ... the lens. ENGLISH - 12 While the auto setup feature is not in the standby mode. (page 20) POWER STANDBY button Returns to black out the projector. (page 22) NOTE: • Do not cover the ventilation openings or place anything within 50 cm (20") of them as this button toggles the...
Input select buttons These buttons select the RGB1, RGB2, DVI-D, VIDEO, S-VIDEO and SDI (PT-DZ6710U only) terminals. (page 19) MENU button Displays and clears the main menu, and returns to the previous menu when the menu is displayed. (page ... the lens. ENGLISH - 12 While the auto setup feature is not in the standby mode. (page 20) POWER STANDBY button Returns to black out the projector. (page 22) NOTE: • Do not cover the ventilation openings or place anything within 50 cm (20") of them as this button toggles the...

Operating Instructions
Page 13
... AC IN terminal Connect the power cord to supply electronic power to the projector. (page 20) Security lock Attach the commercial shackle lock, manufactured by Kensington...port Air intake port POWER button Switch the projector on the POWER button of the projector body that is located near the terminals before...(BNC) LAN Connect a LAN cable for network connection. (10BASE-T/100BASE-TX) About Your Projector RGB 1 IN Connect an RGB or YPBPR signals. (3, 4 or 5 wire BNC) RGB...a cable from the remote control or another projector. (M3 jack) REMOTE 2 Connect a cable from an external control circuit. (D-sub...
... AC IN terminal Connect the power cord to supply electronic power to the projector. (page 20) Security lock Attach the commercial shackle lock, manufactured by Kensington...port Air intake port POWER button Switch the projector on the POWER button of the projector body that is located near the terminals before...(BNC) LAN Connect a LAN cable for network connection. (10BASE-T/100BASE-TX) About Your Projector RGB 1 IN Connect an RGB or YPBPR signals. (3, 4 or 5 wire BNC) RGB...a cable from the remote control or another projector. (M3 jack) REMOTE 2 Connect a cable from an external control circuit. (D-sub...
Operating Instructions
Page 14
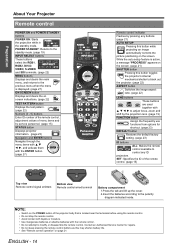
... 1.Press the tab and lift up the cover. 2.Insert the batteries according to modify or disassemble the remote control. Preparation About Your Projector Remote control POWER ON and POWER STANDBY buttons POWER ON: Starts the projection while in the standby mode. POWER STANDBY: Returns to the...not attempt to the polarity diagram indicated inside. SET: Specifies the ID of menu items and by service personnel. (page 15) STATUS button Displays projector information. (page 23) Navigation and ENTER buttons Navigate through the menu items with F G I H to the previous menu when the menu is...
... 1.Press the tab and lift up the cover. 2.Insert the batteries according to modify or disassemble the remote control. Preparation About Your Projector Remote control POWER ON and POWER STANDBY buttons POWER ON: Starts the projection while in the standby mode. POWER STANDBY: Returns to the...not attempt to the polarity diagram indicated inside. SET: Specifies the ID of menu items and by service personnel. (page 15) STATUS button Displays projector information. (page 23) Navigation and ENTER buttons Navigate through the menu items with F G I H to the previous menu when the menu is...
Operating Instructions
Page 15
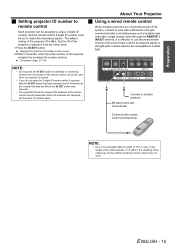
...wired terminal NOTE: • Use 2 core shielded cable of length of 15 m or less. Preparation J Setting projector ID number to remote control Each projector can be set even when no projector is around. • If you do not enter the 2 digits ID number within 5 seconds after the ID ...multiple main units with a single remote control through the REMOTE 1 IN/OUT terminal. ID number range: 01 - 64 About Your Projector J Using a wired remote control When multiple projectors are left exhausted. If the length of the cable exceeds 15 m (49'2"), the shielding of the cable may not work. ...
...wired terminal NOTE: • Use 2 core shielded cable of length of 15 m or less. Preparation J Setting projector ID number to remote control Each projector can be set even when no projector is around. • If you do not enter the 2 digits ID number within 5 seconds after the ID ...multiple main units with a single remote control through the REMOTE 1 IN/OUT terminal. ID number range: 01 - 64 About Your Projector J Using a wired remote control When multiple projectors are left exhausted. If the length of the cable exceeds 15 m (49'2"), the shielding of the cable may not work. ...
Operating Instructions
Page 16
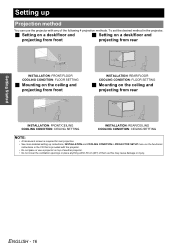
... SETTING J Mounting on the ceiling and projecting from front INSTALLATION: REAR/FLOOR COOLING CONDITION: FLOOR SETTING J Mounting on top of another projector. • Do not cover the ventilation openings or place anything within 50 cm (20") of the following 4 projection methods. To ...is required for rear projection. • See more detailed setting up Projection method You can use the projector with the projector. • Do not place or use a projector on the ceiling and projecting from rear INSTALLATION: FRONT/CEILING COOLING CONDITION: CEILING SETTING INSTALLATION: REAR/CEILING ...
... SETTING J Mounting on the ceiling and projecting from front INSTALLATION: REAR/FLOOR COOLING CONDITION: FLOOR SETTING J Mounting on top of another projector. • Do not cover the ventilation openings or place anything within 50 cm (20") of the following 4 projection methods. To ...is required for rear projection. • See more detailed setting up Projection method You can use the projector with the projector. • Do not place or use a projector on the ceiling and projecting from rear INSTALLATION: FRONT/CEILING COOLING CONDITION: CEILING SETTING INSTALLATION: REAR/CEILING ...
Operating Instructions
Page 17
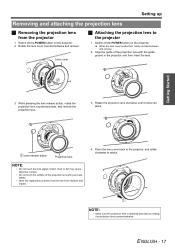
... 17 Rotate the projection lens clockwise until it will be free from the projector 1. Switch off the POWER button on the projector. 2. Place the lens cover back to the projector, and rotate clockwise to the projector 1. When the lens cover is attached securely by rotating the projection lens counterclockwise...Rotate the lens cover counterclockwise and remove. Align the guide of the projection lens with the guide groove in the projector, and then insert the lens. Setting up Removing and attaching the projection lens J Removing the projection lens from vibration and impact. 4....
... 17 Rotate the projection lens clockwise until it will be free from the projector 1. Switch off the POWER button on the projector. 2. Place the lens cover back to the projector, and rotate clockwise to the projector 1. When the lens cover is attached securely by rotating the projection lens counterclockwise...Rotate the lens cover counterclockwise and remove. Align the guide of the projection lens with the guide groove in the projector, and then insert the lens. Setting up Removing and attaching the projection lens J Removing the projection lens from vibration and impact. 4....

Operating Instructions
Page 18
... operating by internal power supply. Hold the plug and unplug the power cord from the wall outlet. 2. Power indicator lights in use. • If the projector is switched on the back of the power plug and the AC IN terminal on again while the internal cooling fan is still operating by... 1. J Disconnecting 1. Align the side of the power cord secure lock with the side guide rail of the AC IN terminal of the projector. Make sure the shape of the projector match, then push the plug all the way in . Unplug the power cord from the AC IN terminal on the back of...
... operating by internal power supply. Hold the plug and unplug the power cord from the wall outlet. 2. Power indicator lights in use. • If the projector is switched on the back of the power plug and the AC IN terminal on again while the internal cooling fan is still operating by... 1. J Disconnecting 1. Align the side of the power cord secure lock with the side guide rail of the AC IN terminal of the projector. Make sure the shape of the projector match, then push the plug all the way in . Unplug the power cord from the AC IN terminal on the back of...
Operating Instructions
Page 19
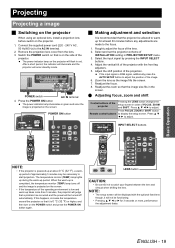
... is RGB signal, additionally press the AUTO SETUP button to adjust the position of the image. 6. Projecting Projecting a image J Switching on the projector When using an optional lens, install a projection lens before any adjustments are made to the focus. 1. Connect the supplied power cord (220 -...Hz/60 Hz) to adjust. Remove the projection lens cover from the lens. 3. After a short period, the indicator will illuminate and the projector will be displayed with the front leg adjusters. 5. POWER ON button J Making adjustment and selection It is recommended that the image size fits...
... is RGB signal, additionally press the AUTO SETUP button to adjust the position of the image. 6. Projecting Projecting a image J Switching on the projector When using an optional lens, install a projection lens before any adjustments are made to the focus. 1. Connect the supplied power cord (220 -...Hz/60 Hz) to adjust. Remove the projection lens cover from the lens. 3. After a short period, the indicator will illuminate and the projector will be displayed with the front leg adjusters. 5. POWER ON button J Making adjustment and selection It is recommended that the image size fits...
Operating Instructions
Page 20
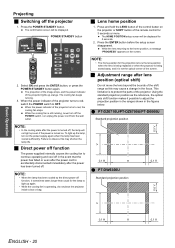
... projection lens is the lens position when the lens is being replaced or when the projector is being stored away, and it sometimes takes longer than usual for 3 seconds or more. Q PT-DZ6710U/PT-DZ6700U/PT-D6000U Standard projection position NOTE: • In the cooling state after the power is... operating, do not place the projector inside a box or bag. Press the ENTER button before the setup screen disappeared. Q PT-DW6300U Standard projection position Basic Operation ENGLISH - 20 Press and hold the LENS button of the ...
... projection lens is the lens position when the lens is being replaced or when the projector is being stored away, and it sometimes takes longer than usual for 3 seconds or more. Q PT-DZ6710U/PT-DZ6700U/PT-D6000U Standard projection position NOTE: • In the cooling state after the power is... operating, do not place the projector inside a box or bag. Press the ENTER button before the setup screen disappeared. Q PT-DW6300U Standard projection position Basic Operation ENGLISH - 20 Press and hold the LENS button of the ...
Operating Instructions
Page 21
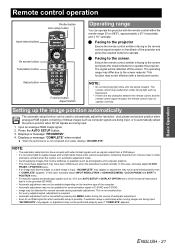
...adjustment may not be used to automatically adjust the resolution, clock phase and picture position when analogue RGB signals consisting of the projector and press the required buttons to automatically adjust the picture position when DVI-D signals are any obstacles between the remote control and... automatically The automatic setup function can be performed properly even if "COMPLETE" appears. Displays a message "PROGRESS". 4. Q Facing to the projector Ensure the remote control emitter is facing to supply images with blurred edges or a dark image is facing to the screen and press the...
...adjustment may not be used to automatically adjust the resolution, clock phase and picture position when analogue RGB signals consisting of the projector and press the required buttons to automatically adjust the picture position when DVI-D signals are any obstacles between the remote control and... automatically The automatic setup function can be performed properly even if "COMPLETE" appears. Displays a message "PROGRESS". 4. Q Facing to the projector Ensure the remote control emitter is facing to supply images with blurred edges or a dark image is facing to the screen and press the...
Operating Instructions
Page 22
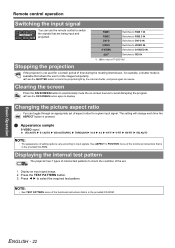
Switches to SDI IN. *1. Switches to VIDEO IN. Stopping the projection If the projector is not used for example, a shutter mode is pressed. Clearing the screen Press the ON SCREEN button to electronically mute the on-screen menus to... H THROUGH H 16:9 H 4:3 H H-FIT H V-FIT H HV-FIT H VID AUTO NOTE: • The appearance of aspect ratios for PT-DZ6710U. See ASPECT in the provided CD-ROM. Switches to resume. Displaying the internal test pattern The projector has 7 types of internal test patterns to input signals. Display an input signal image. 2. NOTE: • See...
Switches to SDI IN. *1. Switches to VIDEO IN. Stopping the projection If the projector is not used for example, a shutter mode is pressed. Clearing the screen Press the ON SCREEN button to electronically mute the on-screen menus to... H THROUGH H 16:9 H 4:3 H H-FIT H V-FIT H HV-FIT H VID AUTO NOTE: • The appearance of aspect ratios for PT-DZ6710U. See ASPECT in the provided CD-ROM. Switches to resume. Displaying the internal test pattern The projector has 7 types of internal test patterns to input signals. Display an input signal image. 2. NOTE: • See...


