Operating Instructions
Page 12
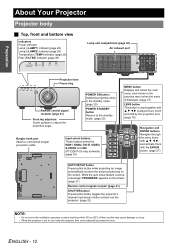
...projector lens cover attached to adjust focus, zoom and shift by the projection lens. (page 19) Navigation and ENTER buttons Navigate through the menu items with F G I H to protect the lens. Input select buttons These buttons select the RGB1, RGB2, DVI-D, VIDEO, S-VIDEO and SDI (PT... G I H, and activate them as this button while projecting an image automatically corrects the picture positioning on the screen. Preparation About Your Projector Projector body J Top, front and bottom view Indicators Power indicator Lamp1 (LAMP1) indicator (page 28) Lamp2 (LAMP2) indicator (page 28) ...
...projector lens cover attached to adjust focus, zoom and shift by the projection lens. (page 19) Navigation and ENTER buttons Navigate through the menu items with F G I H to protect the lens. Input select buttons These buttons select the RGB1, RGB2, DVI-D, VIDEO, S-VIDEO and SDI (PT... G I H, and activate them as this button while projecting an image automatically corrects the picture positioning on the screen. Preparation About Your Projector Projector body J Top, front and bottom view Indicators Power indicator Lamp1 (LAMP1) indicator (page 28) Lamp2 (LAMP2) indicator (page 28) ...

Operating Instructions
Page 13
Preparation J Side views S-VIDEO IN Connect an S-VIDEO signals. (Mini DIN 4 pin) VIDEO IN Connect a video signals. (BNC) LAN Connect a LAN cable for network connection. (10BASE-T/100BASE-TX) About Your Projector RGB 1 IN Connect an RGB or YPBPR signals. (3, 4 or 5 wire BNC) RGB 2 IN Connect an RGB or ... a cable from an external control circuit. (D-sub 9 pin female) SERIAL IN/SERIAL OUT SDI IN (PT-DZ6710U only) Connect an RS-232C cable Connect a cable from a from/to protect your projector. computer. Auto Cleaning Filter (ACF) compartment (page 31) NOTE: • Switch on /off. (...
Preparation J Side views S-VIDEO IN Connect an S-VIDEO signals. (Mini DIN 4 pin) VIDEO IN Connect a video signals. (BNC) LAN Connect a LAN cable for network connection. (10BASE-T/100BASE-TX) About Your Projector RGB 1 IN Connect an RGB or YPBPR signals. (3, 4 or 5 wire BNC) RGB 2 IN Connect an RGB or ... a cable from an external control circuit. (D-sub 9 pin female) SERIAL IN/SERIAL OUT SDI IN (PT-DZ6710U only) Connect an RS-232C cable Connect a cable from a from/to protect your projector. computer. Auto Cleaning Filter (ACF) compartment (page 31) NOTE: • Switch on /off. (...
Operating Instructions
Page 14
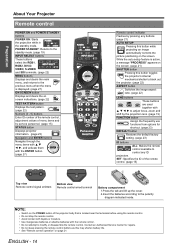
...remote control. POWER STANDBY: Returns to the standby mode. (page 19) INPUT SELECT buttons These buttons select the RGB1, RGB2, DVI-D, VIDEO, S-VIDEO and SDI terminals. (page 22) MENU buttons Displays and clears the main menu, and returns to control any buttons. (page 21) ...Use manganese batteries or alkaline batteries with the ENTER button. (page 27) Remote control indicator Flashes by service personnel. (page 15) STATUS button Displays projector information. (page 23) Navigation and ENTER buttons Navigate through the menu items with F G I H, and activate them with the remote control. &#...
...remote control. POWER STANDBY: Returns to the standby mode. (page 19) INPUT SELECT buttons These buttons select the RGB1, RGB2, DVI-D, VIDEO, S-VIDEO and SDI terminals. (page 22) MENU buttons Displays and clears the main menu, and returns to control any buttons. (page 21) ...Use manganese batteries or alkaline batteries with the ENTER button. (page 27) Remote control indicator Flashes by service personnel. (page 15) STATUS button Displays projector information. (page 23) Navigation and ENTER buttons Navigate through the menu items with F G I H, and activate them with the remote control. &#...
Operating Instructions
Page 21
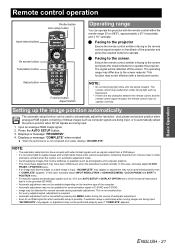
... setup button Input select buttons On screen button Test pattern button Status button Function button Aspect button Operating range You can operate the projector with a translucent screen. The signal will be available for synchronisation signal of automatic adjustment. • Even for an RGB signal ...for several seconds during automatic adjustment. NOTE: • The automatic setup function does not work with video format signals such as signals output from a DVD player. • It is facing to the screen and press the required buttons to ...
... setup button Input select buttons On screen button Test pattern button Status button Function button Aspect button Operating range You can operate the projector with a translucent screen. The signal will be available for synchronisation signal of automatic adjustment. • Even for an RGB signal ...for several seconds during automatic adjustment. NOTE: • The automatic setup function does not work with video format signals such as signals output from a DVD player. • It is facing to the screen and press the required buttons to ...
Operating Instructions
Page 22
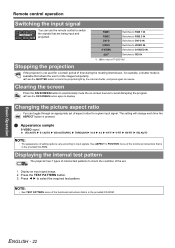
...to block the projected light by the internal shutter, and press again to VIDEO IN. Q Appearance sample S-VIDEO signal VID AUTO H S1 AUTO H VID AUTO(PRI.) H THROUGH H ... signals. Press I H to RGB 1 IN. RGB1 RGB2 DVI-D VIDEO S-VIDEO SDI*1 Switches to select the required test pattern. Switches to hide images... is in the provided CD-ROM. Stopping the projection If the projector is pressed. Press the TEST PATTERN button. 3. The setting will... instructions that allows the user to DVI-D IN. Switches to S-VIDEO IN. Switches to RGB 2 IN. Switches to check the condition...
...to block the projected light by the internal shutter, and press again to VIDEO IN. Q Appearance sample S-VIDEO signal VID AUTO H S1 AUTO H VID AUTO(PRI.) H THROUGH H ... signals. Press I H to RGB 1 IN. RGB1 RGB2 DVI-D VIDEO S-VIDEO SDI*1 Switches to select the required test pattern. Switches to hide images... is in the provided CD-ROM. Stopping the projection If the projector is pressed. Press the TEST PATTERN button. 3. The setting will... instructions that allows the user to DVI-D IN. Switches to S-VIDEO IN. Switches to RGB 2 IN. Switches to check the condition...
Operating Instructions
Page 25
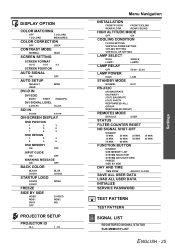
... GUIDE ON OFF WARNING MESSAGE ON OFF BACK COLOR BLACK LOGO1 BLUE LOGO2 STARTUP LOGO LOGO2 LOGO1 NONE FREEZE SIDE BY SIDE VIDEO RGB1 DVI-D OFF S-VIDEO RGB2 SDI PROJECTOR SETUP PROJECTOR ID ALL 1 - 64 Menu Navigation INSTALLATION FRONT/FLOOR FRONT/CEILING REAR/FLOOR REAR/CEILING HIGH ALTITUDE MODE OFF ON COOLING CONDITION FLOOR...
... GUIDE ON OFF WARNING MESSAGE ON OFF BACK COLOR BLACK LOGO1 BLUE LOGO2 STARTUP LOGO LOGO2 LOGO1 NONE FREEZE SIDE BY SIDE VIDEO RGB1 DVI-D OFF S-VIDEO RGB2 SDI PROJECTOR SETUP PROJECTOR ID ALL 1 - 64 Menu Navigation INSTALLATION FRONT/FLOOR FRONT/CEILING REAR/FLOOR REAR/CEILING HIGH ALTITUDE MODE OFF ON COOLING CONDITION FLOOR...
Operating Instructions
Page 33
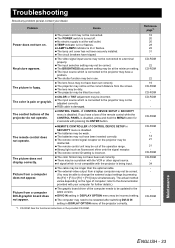
... in SECURITY menu is disabled. Problem Cause Power does not turn on the type of the projector do not operate. The POWER switch is damaged. The lamp unit cover has not been securely installed. The video signal input source may be restarted after switching DVI-D IN setting in SECURITY menu is not...
... in SECURITY menu is disabled. Problem Cause Power does not turn on the type of the projector do not operate. The POWER switch is damaged. The lamp unit cover has not been securely installed. The video signal input source may be restarted after switching DVI-D IN setting in SECURITY menu is not...
Operating Instructions
Page 36
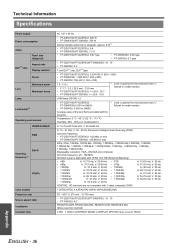
.../PT-DW6300U: 16 : 10 • PT-D6000U: 4:3 1 unit DLP™ chip, DLP™ type • PT-DZ6710U/PT-DZ6700U: 2 304 000 (1 920 x 1200) • PT-DW6300U: 1 024 000 (1 280 x 800) • PT-D6000U: 786 432 (1 024 x 768) 1.8 - 2.4:1 • F 1.7 - 2.0, f 25.6 mm - 33.8 mm • PT-DZ6710U/PT-DZ6700U: f = 26.8 - 35.7 • PT-DW6300U/PT-D6000U: f = 25.6 - 33.8 • Lens is optional for the projectors...
.../PT-DW6300U: 16 : 10 • PT-D6000U: 4:3 1 unit DLP™ chip, DLP™ type • PT-DZ6710U/PT-DZ6700U: 2 304 000 (1 920 x 1200) • PT-DW6300U: 1 024 000 (1 280 x 800) • PT-D6000U: 786 432 (1 024 x 768) 1.8 - 2.4:1 • F 1.7 - 2.0, f 25.6 mm - 33.8 mm • PT-DZ6710U/PT-DZ6700U: f = 26.8 - 35.7 • PT-DW6300U/PT-D6000U: f = 25.6 - 33.8 • Lens is optional for the projectors...
Operating Instructions
Page 37
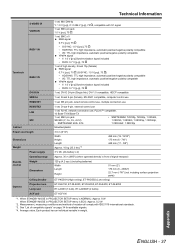
... ENGLISH - 37 Average value. Technical Information S-VIDEO IN VIDEO IN RGB 1 IN Terminals RGB 2 IN DVI-D IN 1 set, Mini DIN 4p Y: 1.0 V [p-p], C: 0.286 V [p-p], 75 Ω, compatible with ISO21118 international standards. *3. When STANDBY MODE in PROJECTOR SETUP menu is ECO: Approx. 0.2 W ... mm (19- 19/32") 175 mm (6 - 7/8") 448 mm (17 - 5/8") Operating range Approx. 30 m (98'5") (when operated directly in PROJECTOR SETUP menu is NORMAL: Approx. 8 W When STANDBY MODE in front of signal receptor) Remote control Weight Dimensions Ceiling bracket 120 g (4.2 ozs.) (including...
... ENGLISH - 37 Average value. Technical Information S-VIDEO IN VIDEO IN RGB 1 IN Terminals RGB 2 IN DVI-D IN 1 set, Mini DIN 4p Y: 1.0 V [p-p], C: 0.286 V [p-p], 75 Ω, compatible with ISO21118 international standards. *3. When STANDBY MODE in PROJECTOR SETUP menu is ECO: Approx. 0.2 W ... mm (19- 19/32") 175 mm (6 - 7/8") 448 mm (17 - 5/8") Operating range Approx. 30 m (98'5") (when operated directly in PROJECTOR SETUP menu is NORMAL: Approx. 8 W When STANDBY MODE in front of signal receptor) Remote control Weight Dimensions Ceiling bracket 120 g (4.2 ozs.) (including...


