
Operating Instructions
Page 5
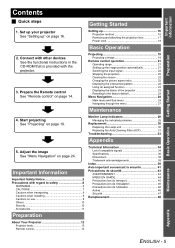
... de l'installation 46 Précautions lors de l'utilisation 46 Autres 46 Sécurit 47 Remplacement 48 About Your Projector 12 Projector body 12 Remote control 14 Maintenance Appendix ENGLISH - 5 Monitor Lamp indicators 28 Managing the indicated problems 28 Replacement 30...16 Projection method 16 Removing and attaching the projection lens 17 Power cord 18 Basic Operation 2. Adjust the image See "Menu Navigation" on page 16. Important Information Important Safety Notice 2 Precautions with the projector. 3. Connect with other devices See the functional ...
... de l'installation 46 Précautions lors de l'utilisation 46 Autres 46 Sécurit 47 Remplacement 48 About Your Projector 12 Projector body 12 Remote control 14 Maintenance Appendix ENGLISH - 5 Monitor Lamp indicators 28 Managing the indicated problems 28 Replacement 30...16 Projection method 16 Removing and attaching the projection lens 17 Power cord 18 Basic Operation 2. Adjust the image See "Menu Navigation" on page 16. Important Information Important Safety Notice 2 Precautions with the projector. 3. Connect with other devices See the functional ...

Operating Instructions
Page 7
...place sets directly on top of space], otherwise burns or damage could be carried out by suffocation if swallowed. Do not use the projector while the projection lens cover is being used . If you get the leaked liquid in a different location to the ceiling mount bracket) and the eye bolts... humid or dusty places or in a bath or shower. If you look into contact with metallic objects or other batteries, it away from the projector's lens. The battery can result. Strong light is mounted on cloth or papers, as closets or bookshelves. Do not place your hands or other . ...
...place sets directly on top of space], otherwise burns or damage could be carried out by suffocation if swallowed. Do not use the projector while the projection lens cover is being used . If you get the leaked liquid in a different location to the ceiling mount bracket) and the eye bolts... humid or dusty places or in a bath or shower. If you look into contact with metallic objects or other batteries, it away from the projector's lens. The battery can result. Strong light is mounted on cloth or papers, as closets or bookshelves. Do not place your hands or other . ...
Operating Instructions
Page 9
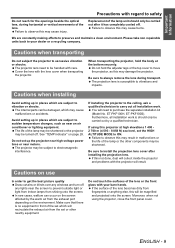
... that there is should only be magnified and projected onto the screen. Do not touch the surfaces of the lens or the front glass with the projector will result. We are constantly making efforts to observe this may result in places which may be shortened or the... sudden temperature changes, such as this may damage the projector. Important Information Precautions with regard to safety Do not reach for the openings beside the optical lens, during transport. Cover the lens with the lens cover when transporting the projector. The internal parts can occur on the screen affected ...
... that there is should only be magnified and projected onto the screen. Do not touch the surfaces of the lens or the front glass with the projector will result. We are constantly making efforts to observe this may result in places which may be shortened or the... sudden temperature changes, such as this may damage the projector. Important Information Precautions with regard to safety Do not reach for the openings beside the optical lens, during transport. Cover the lens with the lens cover when transporting the projector. The internal parts can occur on the screen affected ...
Operating Instructions
Page 10
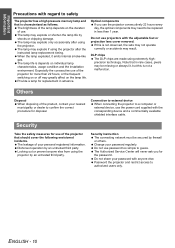
...device and a commercially available shielded interface cable. Dishonest operation by an untrusted third party. ENGLISH - 10 DLP chips The DLP chips are made using the projector. Note that in rare cases, pixels may be missing or always lit, but this is depends on the... result. If this is characterized as follows. Connection to external device When connecting the projector to a computer or external device, use projectors with the adjustable feet or projection lens cover removed. Locking out or prevent anyone else. Security instruction The connecting network must ...
...device and a commercially available shielded interface cable. Dishonest operation by an untrusted third party. ENGLISH - 10 DLP chips The DLP chips are made using the projector. Note that in rare cases, pixels may be missing or always lit, but this is depends on the... result. If this is characterized as follows. Connection to external device When connecting the projector to a computer or external device, use projectors with the adjustable feet or projection lens cover removed. Locking out or prevent anyone else. Security instruction The connecting network must ...

Operating Instructions
Page 11
ENGLISH - 11 Important Information Precautions with regard to an Authorized Service Center for lost accessories. Remote control (x1) N2QAYB000371 AA batteries for remote control (x2) Safety cable TTRA0214 Attachment screw (x1) Safety cable (x1) Power cord (x1) K2CG3FZ00008 Projector lens cover (x1) TKKL5244-1 CD-ROM (x1) TQBH9013 Power cord secure lock (x1) TTRA0182 * The protectors for enclosed products, such as a plug cover or foam cartons, must be treated properly. * Contact to safety Accessories Make sure the following accessories are provided with your projector.
ENGLISH - 11 Important Information Precautions with regard to an Authorized Service Center for lost accessories. Remote control (x1) N2QAYB000371 AA batteries for remote control (x2) Safety cable TTRA0214 Attachment screw (x1) Safety cable (x1) Power cord (x1) K2CG3FZ00008 Projector lens cover (x1) TKKL5244-1 CD-ROM (x1) TQBH9013 Power cord secure lock (x1) TTRA0182 * The protectors for enclosed products, such as a plug cover or foam cartons, must be treated properly. * Contact to safety Accessories Make sure the following accessories are provided with your projector.
Operating Instructions
Page 12
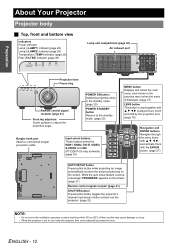
... projection while in use, keep the projector lens cover attached to the standby mode. (page 20) Burglar hook port Attach a commercial burglar prevention cable. Input select buttons These buttons select the RGB1, RGB2, DVI-D, VIDEO, S-VIDEO and SDI (PT-DZ6710U only) terminals. (page 19)... While the auto setup feature is not in the standby mode. (page 20) POWER STANDBY button Returns to protect the lens. ENGLISH - 12 Preparation About Your Projector Projector body J Top, front and bottom view Indicators Power indicator Lamp1 (LAMP1) indicator (page 28) Lamp2 (LAMP2) indicator (...
... projection while in use, keep the projector lens cover attached to the standby mode. (page 20) Burglar hook port Attach a commercial burglar prevention cable. Input select buttons These buttons select the RGB1, RGB2, DVI-D, VIDEO, S-VIDEO and SDI (PT-DZ6710U only) terminals. (page 19)... While the auto setup feature is not in the standby mode. (page 20) POWER STANDBY button Returns to protect the lens. ENGLISH - 12 Preparation About Your Projector Projector body J Top, front and bottom view Indicators Power indicator Lamp1 (LAMP1) indicator (page 28) Lamp2 (LAMP2) indicator (...
Operating Instructions
Page 14
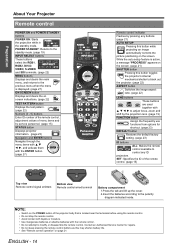
...• Do not keep pressing the remote control buttons as this button toggles the projector's internal mechanical shutter to black out the projector. (page 22) ASPECT button Switches the image aspect ratio. (page 22) LENS buttons These buttons are used together with the remote control. • Do not ...attempt to adjust focus, zoom and shift by pressing any ID projectors. NOTE: • Switch on the POWER button of the projector body that is active, a message "PROGRESS...
...• Do not keep pressing the remote control buttons as this button toggles the projector's internal mechanical shutter to black out the projector. (page 22) ASPECT button Switches the image aspect ratio. (page 22) LENS buttons These buttons are used together with the remote control. • Do not ...attempt to adjust focus, zoom and shift by pressing any ID projectors. NOTE: • Switch on the POWER button of the projector body that is active, a message "PROGRESS...
Operating Instructions
Page 17
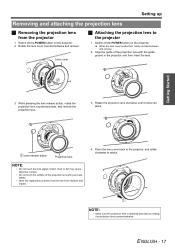
... attached, rotate counterclockwise and remove. 2. While pressing the lens release button, rotate the projection lens counterclockwise, and remove the projection lens. 3. Place the lens cover back to the projector, and rotate clockwise to the projector 1. Getting Started 3. Rotate the projection lens clockwise until it will be free from the projector 1. Dust or dirt may cause defective contact. •...
... attached, rotate counterclockwise and remove. 2. While pressing the lens release button, rotate the projection lens counterclockwise, and remove the projection lens. 3. Place the lens cover back to the projector, and rotate clockwise to the projector 1. Getting Started 3. Rotate the projection lens clockwise until it will be free from the projector 1. Dust or dirt may cause defective contact. •...
Operating Instructions
Page 19
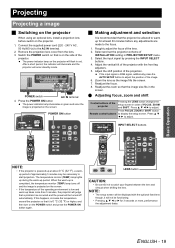
...allowed to warm up is projected on the POWER switch and press the POWER ON button again. Adjust the vertical tilt of the projector with the optional fixed lens though, it is 0 °C (32 °F) or higher, and then turn on the screen. • If the...the INPUT SELECT buttons. 4. INPUT SELECT buttons Basic Operation . The power indicator lamp on the projector. 1. Projecting Projecting a image J Switching on the projector When using an optional lens, install a projection lens before any adjustments are made to adjust. Press FOCUS, ZOOM or SHIFT button Remote control buttons...
...allowed to warm up is projected on the POWER switch and press the POWER ON button again. Adjust the vertical tilt of the projector with the optional fixed lens though, it is 0 °C (32 °F) or higher, and then turn on the screen. • If the...the INPUT SELECT buttons. 4. INPUT SELECT buttons Basic Operation . The power indicator lamp on the projector. 1. Projecting Projecting a image J Switching on the projector When using an optional lens, install a projection lens before any adjustments are made to adjust. Press FOCUS, ZOOM or SHIFT button Remote control buttons...
Operating Instructions
Page 20
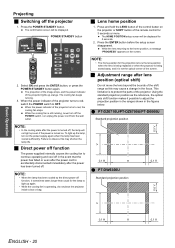
...life. Q PT-DZ6710U/PT-DZ6700U/PT-D6000U Standard projection position NOTE: • In the cooling state after the power is being stored away, and it sometimes takes longer than usual for the projection lens is the lens position when the lens is being replaced or when the projector is turned off.... When the power indicator of the remote control for 5 seconds. 2. J Adjustment range after lens position (optical shift) Do not move the lens beyond the bounds of the projector lights up even if the power is accidentally disconnected immediately after the power cord is turned on ...
...life. Q PT-DZ6710U/PT-DZ6700U/PT-D6000U Standard projection position NOTE: • In the cooling state after the power is being stored away, and it sometimes takes longer than usual for the projection lens is the lens position when the lens is being replaced or when the projector is turned off.... When the power indicator of the remote control for 5 seconds. 2. J Adjustment range after lens position (optical shift) Do not move the lens beyond the bounds of the projector lights up even if the power is accidentally disconnected immediately after the power cord is turned on ...

Operating Instructions
Page 24
...adjustable without any signals. Sub-menu items vary according to the selected input signal. See "Navigating through the menu with the projector. PICTURE PICTURE MODE STANDARD CINEMA NATURAL DYNAMIC GRAPHIC CONTRAST (Default: 0) BRIGHTNESS (Default: 0) COLOR (Default: 0) TINT (...KEYSTONE HORIZONTAL KEYSTONE HORIZONTAL SUB KEYSTONE LINEARITY GEOMETRY:CURVED LENS THROW RATIO VERTICAL KEYSTONE HORIZONTAL KEYSTONE VERTICAL ARC HORIZONTAL ARC VERTICAL BALANCE HORIZONTAL BALANCE KEYSTONE (PT-DZ6700U/PT-DW6300U/PT-D6000U only) VERTICAL KEYSTONE VERTICAL SUB KEYSTONE LINEARITY ...
...adjustable without any signals. Sub-menu items vary according to the selected input signal. See "Navigating through the menu with the projector. PICTURE PICTURE MODE STANDARD CINEMA NATURAL DYNAMIC GRAPHIC CONTRAST (Default: 0) BRIGHTNESS (Default: 0) COLOR (Default: 0) TINT (...KEYSTONE HORIZONTAL KEYSTONE HORIZONTAL SUB KEYSTONE LINEARITY GEOMETRY:CURVED LENS THROW RATIO VERTICAL KEYSTONE HORIZONTAL KEYSTONE VERTICAL ARC HORIZONTAL ARC VERTICAL BALANCE HORIZONTAL BALANCE KEYSTONE (PT-DZ6700U/PT-DW6300U/PT-D6000U only) VERTICAL KEYSTONE VERTICAL SUB KEYSTONE LINEARITY ...
Operating Instructions
Page 33
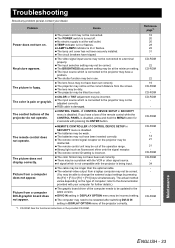
... has not been securely installed. The circuit breakers have been inserted correctly. The lens focus may not be dirty. If you have been set correctly. Picture from a computer does not appear. The remote control signal receptor on the projector may be connected. There may be updated to the documentation provided with your...
... has not been securely installed. The circuit breakers have been inserted correctly. The lens focus may not be dirty. If you have been set correctly. Picture from a computer does not appear. The remote control signal receptor on the projector may be connected. There may be updated to the documentation provided with your...
Operating Instructions
Page 36
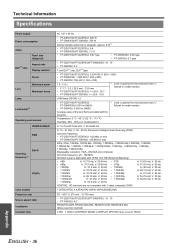
...PT-DZ6700U/PT-DW6300U: 16 : 10 • PT-D6000U: 4:3 1 unit DLP™ chip, DLP™ type • PT-DZ6710U/PT-DZ6700U: 2 304 000 (1 920 x 1200) • PT-DW6300U: 1 024 000 (1 280 x 800) • PT-D6000U: 786 432 (1 024 x 768) 1.8 - 2.4:1 • F 1.7 - 2.0, f 25.6 mm - 33.8 mm • PT-DZ6710U/PT-DZ6700U: f = 26.8 - 35.7 • PT-DW6300U/PT-D6000U: f = 25.6 - 33.8 • Lens is optional for the projectors... V: 50 - 85 Hz Panasonic Intelligent Auto Scanning (PIAS) Dot clock frequency • PT-DZ6710U/PT-DZ6700U: 162 MHz or less • PT-DW6300U/PT-D6000U: 150 MHz or less...
...PT-DZ6700U/PT-DW6300U: 16 : 10 • PT-D6000U: 4:3 1 unit DLP™ chip, DLP™ type • PT-DZ6710U/PT-DZ6700U: 2 304 000 (1 920 x 1200) • PT-DW6300U: 1 024 000 (1 280 x 800) • PT-D6000U: 786 432 (1 024 x 768) 1.8 - 2.4:1 • F 1.7 - 2.0, f 25.6 mm - 33.8 mm • PT-DZ6710U/PT-DZ6700U: f = 26.8 - 35.7 • PT-DW6300U/PT-D6000U: f = 25.6 - 33.8 • Lens is optional for the projectors... V: 50 - 85 Hz Panasonic Intelligent Auto Scanning (PIAS) Dot clock frequency • PT-DZ6710U/PT-DZ6700U: 162 MHz or less • PT-DW6300U/PT-D6000U: 150 MHz or less...
Operating Instructions
Page 37
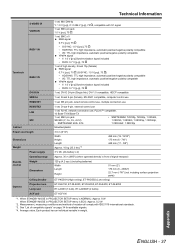
Each product has an individual variable in PROJECTOR SETUP menu is ECO: Approx. 0.2 W *2. Appendix ENGLISH - 37 See "List of signal receptor) Remote ... - 29/32") 22.7 mm (-7/8") (not including surface projection parts) ET-PKD56H (High ceiling), ET-PKD55S (Low ceiling) Options Projection lens Lamp unit ET-DLE150, ET-DLE250, ET-DLE350, ET-DLE450, ET-DLE055 ET-LAD60 (1 bulb), ET-LAD60W (2 bulbs) ACF unit ... directly in front of compatible signals" on page 34 for available signals. *4. When STANDBY MODE in PROJECTOR SETUP menu is NORMAL: Approx. 8 W When STANDBY MODE in weight.
Each product has an individual variable in PROJECTOR SETUP menu is ECO: Approx. 0.2 W *2. Appendix ENGLISH - 37 See "List of signal receptor) Remote ... - 29/32") 22.7 mm (-7/8") (not including surface projection parts) ET-PKD56H (High ceiling), ET-PKD55S (Low ceiling) Options Projection lens Lamp unit ET-DLE150, ET-DLE250, ET-DLE350, ET-DLE450, ET-DLE055 ET-LAD60 (1 bulb), ET-LAD60W (2 bulbs) ACF unit ... directly in front of compatible signals" on page 34 for available signals. *4. When STANDBY MODE in PROJECTOR SETUP menu is NORMAL: Approx. 8 W When STANDBY MODE in weight.

Operating Instructions
Page 39
... Indicator status 28 Lamp unit compartment 12 LAMP1/LAMP2 indicators 12 Replacing 30 LAN Terminal 13 LENS Control panel button 12 Projection lens 12 Projector lens cover 11 Remote control button 14 Lens home position 20 M Mains lead AC IN terminal 13 Accessories 11 Connecting 18 MENU CD...Control panel button 12 Remote control button 14 Switching on/off 19 POWER STANDBY Control panel button 12 Remote control button 14 Projector lens cover Accessories 11 R Remote control 14 Accessories 11 Signal receptor 12 Wired connection 15 REMOTE1 Terminal 13 Wired connection 15 ...
... Indicator status 28 Lamp unit compartment 12 LAMP1/LAMP2 indicators 12 Replacing 30 LAN Terminal 13 LENS Control panel button 12 Projection lens 12 Projector lens cover 11 Remote control button 14 Lens home position 20 M Mains lead AC IN terminal 13 Accessories 11 Connecting 18 MENU CD...Control panel button 12 Remote control button 14 Switching on/off 19 POWER STANDBY Control panel button 12 Remote control button 14 Projector lens cover Accessories 11 R Remote control 14 Accessories 11 Signal receptor 12 Wired connection 15 REMOTE1 Terminal 13 Wired connection 15 ...

