
Lcd Projector
Page 2
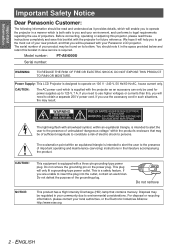
... will need to use the accessory cord in the literature accompanying the product. Model number: PT-AE4000U Serial number: WARNING: TO REDUCE THE RISK OF FIRE OR ELECTRIC SHOCK, DO NOT EXPOSE THIS PRODUCT TO RAIN OR MOISTURE. The lightning flash with a three-pin grounding-type power plug. This plug will enable you to operate the projector in case service is equipped with arrowhead...
... will need to use the accessory cord in the literature accompanying the product. Model number: PT-AE4000U Serial number: WARNING: TO REDUCE THE RISK OF FIRE OR ELECTRIC SHOCK, DO NOT EXPOSE THIS PRODUCT TO RAIN OR MOISTURE. The lightning flash with a three-pin grounding-type power plug. This plug will enable you to operate the projector in case service is equipped with arrowhead...
Lcd Projector
Page 3
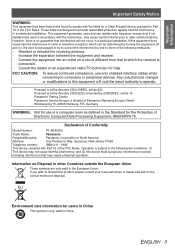
... the FCC Rules. Germany WARNING: Not for use only shielded interface cables when connecting to computers or peripheral devices. Declaration of Conformity Model Number: PT-AE4000U Trade Name: Panasonic Responsible party: Panasonic Corporation of Electronic Computer/Data Processing Equipment, ANSI/NFPA 75. Environment care information for the Protection of North America Address: One Panasonic Way, Secaucus, New Jersey 07094 Telephone number: (888) 411 - 1996 This...
... the FCC Rules. Germany WARNING: Not for use only shielded interface cables when connecting to computers or peripheral devices. Declaration of Conformity Model Number: PT-AE4000U Trade Name: Panasonic Responsible party: Panasonic Corporation of Electronic Computer/Data Processing Equipment, ANSI/NFPA 75. Environment care information for the Protection of North America Address: One Panasonic Way, Secaucus, New Jersey 07094 Telephone number: (888) 411 - 1996 This...
Lcd Projector
Page 4
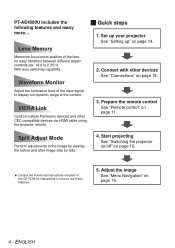
... "Setting up" on page 16. Split Adjust Mode Perform adjustments to the image by viewing the before and after image side by side. 44 Start projecting See "Switching the projector on/off" on page 14. With auto switching capability. Memorize focus/zoom position of the content. Adjust the luminance level of the input signal to display full dynamic range of the lens, for instructions on how to 2.35:1). VIERA Link Control multiple Panasonic...
... "Setting up" on page 16. Split Adjust Mode Perform adjustments to the image by viewing the before and after image side by side. 44 Start projecting See "Switching the projector on/off" on page 14. With auto switching capability. Memorize focus/zoom position of the content. Adjust the luminance level of the input signal to display full dynamic range of the lens, for instructions on how to 2.35:1). VIERA Link Control multiple Panasonic...
Lcd Projector
Page 5
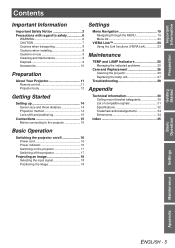
... Remote control 11 Projector body 12 Menu Navigation 19 Navigating through the MENU 19 Menu list 20 VIERA Link 23 Using the Link functions (VIERA Link 23 Maintenance TEMP and LAMP Indicators 25 Managing the indicated problems 25 Care and Replacement 26 Cleaning the projector 26 Replacing the lamp unit 27 Troubleshooting 29 Appendix Getting Started Setting up 14 Screen size and throw distance 14 Projection method 14 Lens shift and positioning 15 Connections 15 Before connecting...
... Remote control 11 Projector body 12 Menu Navigation 19 Navigating through the MENU 19 Menu list 20 VIERA Link 23 Using the Link functions (VIERA Link 23 Maintenance TEMP and LAMP Indicators 25 Managing the indicated problems 25 Care and Replacement 26 Cleaning the projector 26 Replacing the lamp unit 27 Troubleshooting 29 Appendix Getting Started Setting up 14 Screen size and throw distance 14 Projection method 14 Lens shift and positioning 15 Connections 15 Before connecting...

Lcd Projector
Page 7
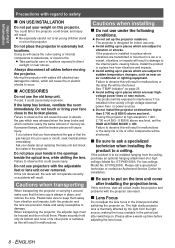
... Replacement of the air outlet port. zz Before replacing the lamp, be sure to remodel or disassemble the projector. zz Heated air comes out of the lamp should be damaged and fire will result. Never attempt to disconnect the power plug from the remote control at least one hour before carrying out any inspection, adjustment and repair work, please contact an Authorized Service Center. Disconnect the power...
... Replacement of the air outlet port. zz Before replacing the lamp, be sure to remodel or disassemble the projector. zz Heated air comes out of the lamp should be damaged and fire will result. Never attempt to disconnect the power plug from the remote control at least one hour before carrying out any inspection, adjustment and repair work, please contact an Authorized Service Center. Disconnect the power...
Lcd Projector
Page 8
... of high-voltage electrical power lines or power sources. Please allow a warm-up in places which will result in the openings beside the optical lens, while shifting the lens. zz Take particular care in extremely hot locations. zz Avoid setting up time before moving the projector. If used, it is always in a place free from the ceiling, purchase an optional hanging attachment (For high ceilings: Model No...
... of high-voltage electrical power lines or power sources. Please allow a warm-up in places which will result in the openings beside the optical lens, while shifting the lens. zz Take particular care in extremely hot locations. zz Avoid setting up time before moving the projector. If used, it is always in a place free from the ceiling, purchase an optional hanging attachment (For high ceilings: Model No...
Lcd Projector
Page 9
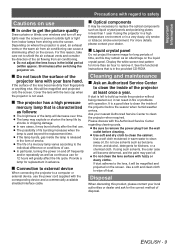
... to the lens, it will greatly affect the life cycle. Please discuss with fuzzy or dusty cloths. zz In particular, turning the power on and off . Display the white screen test pattern for replacement in advance. „„Connection to external device When connecting the projector to clean the inside the lamp is used , air exhaust vents or the warm air from air conditioning. zz Use soft and...
... to the lens, it will greatly affect the life cycle. Please discuss with fuzzy or dusty cloths. zz In particular, turning the power on and off . Display the white screen test pattern for replacement in advance. „„Connection to external device When connecting the projector to clean the inside the lamp is used , air exhaust vents or the warm air from air conditioning. zz Use soft and...
Lcd Projector
Page 11
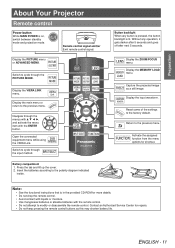
... Your Projector Remote control Power button While MAIN POWER is lit. Without any button is pressed, the button backlight is on, switch between standby mode and projection mode. Return to the previous menu. Navigate through the menus with and activate the menu item with the remote control. •• Do not attempt to cycle through the PICTURE MODE. Open the connected equipment menu while using the VIERA Link. Display the ZOOM/FOCUS menu. Button backlight When any operation, it...
... Your Projector Remote control Power button While MAIN POWER is lit. Without any button is pressed, the button backlight is on, switch between standby mode and projection mode. Return to the previous menu. Navigate through the menus with and activate the menu item with the remote control. •• Do not attempt to cycle through the PICTURE MODE. Open the connected equipment menu while using the VIERA Link. Display the ZOOM/FOCUS menu. Button backlight When any operation, it...
Lcd Projector
Page 12
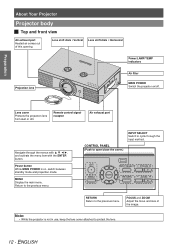
...; Horizontal Power/LAMP/TEMP indicators Projection lens Air filter MAIN POWER Switch the projector on , switch between standby mode and projection mode. Remote control signal receptor Air exhaust port Navigate through the input method. RETURN Return to protect the lens. 12 - About Your Projector Projector body JJ Top and front view Air exhaust port Heated air comes out of the image. MENU Display the main menu. Preparation Lens cover Protects the projection lens from dust or dirt. Power button While MAIN POWER is not in use, keep the lens cover attached to...
...; Horizontal Power/LAMP/TEMP indicators Projection lens Air filter MAIN POWER Switch the projector on , switch between standby mode and projection mode. Remote control signal receptor Air exhaust port Navigate through the input method. RETURN Return to protect the lens. 12 - About Your Projector Projector body JJ Top and front view Air exhaust port Heated air comes out of the image. MENU Display the main menu. Preparation Lens cover Protects the projection lens from dust or dirt. Power button While MAIN POWER is not in use, keep the lens cover attached to...

Lcd Projector
Page 13
... adjusters Screw up /down to adjust the projection angle. COMPONENT IN Connect a YPBPR signal cable. SERIAL Connect a compatible cable for more details. Lens cover attachment hole Air intake port AC IN Connect the power cord to supply electronic power to the projector. •• Do not open . COMPUTER IN Connect an RGB/YPBPR signal cable. TRIGGER IN/OUT Connect external equipment controlling cables. Safety cable attachment point Attach the safety cable when mounted on the ceiling. S-VIDEO IN Connect an S-VIDEO signal cable. About Your Projector Top cover...
... adjusters Screw up /down to adjust the projection angle. COMPONENT IN Connect a YPBPR signal cable. SERIAL Connect a compatible cable for more details. Lens cover attachment hole Air intake port AC IN Connect the power cord to supply electronic power to the projector. •• Do not open . COMPUTER IN Connect an RGB/YPBPR signal cable. TRIGGER IN/OUT Connect external equipment controlling cables. Safety cable attachment point Attach the safety cable when mounted on the ceiling. S-VIDEO IN Connect an S-VIDEO signal cable. About Your Projector Top cover...
Lcd Projector
Page 15
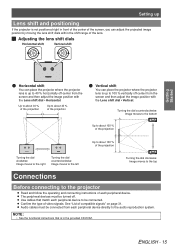
... lens. Setting up Lens shift and positioning If the projector is not positioned right in the provided CD-ROM. Confirm the type of compatible signals" on page 31. ENGLISH - 15 See "List of video signals. Use cables that is up to 100 % vertically off-center from the screen and then adjust the image position with the Lens shift dial • Horizontal. Audio cables must be connected...
... lens. Setting up Lens shift and positioning If the projector is not positioned right in the provided CD-ROM. Confirm the type of compatible signals" on page 31. ENGLISH - 15 See "List of video signals. Use cables that is up to 100 % vertically off-center from the screen and then adjust the image position with the Lens shift dial • Horizontal. Audio cables must be connected...
Lcd Projector
Page 16
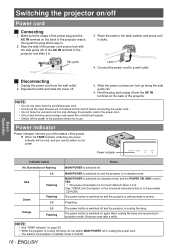
... lamp and recovering to project. The power button is switched on the back of the projector. Rail guide Latch 444 Connect the power cord to the projector when not in use. Power indicator Power indicator informs you cannot switch on and the projector is in standby mode is flashing, the power indicator will turn red, and you of the status of the power. When the TEMP indicator is 0.08 W. 16 - NOTE: •• Do not use other than the provided power cord...
... lamp and recovering to project. The power button is switched on the back of the projector. Rail guide Latch 444 Connect the power cord to the projector when not in use. Power indicator Power indicator informs you cannot switch on and the projector is in standby mode is flashing, the power indicator will turn red, and you of the status of the power. When the TEMP indicator is 0.08 W. 16 - NOTE: •• Do not use other than the provided power cord...
Lcd Projector
Page 17
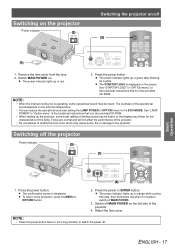
... to switch off MAIN POWER. 333 Switch off MAIN POWER on the screen. The power indicator lights up the projector, some operational sound may be heard, or the display may flicker for the characteristics of the projector. 444 Attach the lens cover. The power indicator lights up in red. 333 Press the power button. The power indicator lights up in green after flashing for a long duration to the projection, press the MENU or RETURN button. 222 Press the power or ENTER button...
... to switch off MAIN POWER. 333 Switch off MAIN POWER on the screen. The power indicator lights up the projector, some operational sound may be heard, or the display may flicker for the characteristics of the projector. 444 Attach the lens cover. The power indicator lights up in red. 333 Press the power button. The power indicator lights up in green after flashing for a long duration to the projection, press the MENU or RETURN button. 222 Press the power or ENTER button...
Lcd Projector
Page 18
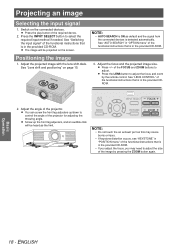
... projected image with the lens shift dials. See "Lens shift and positioning" on the connected devices. See "Switching the input signal" of the FOCUS and ZOOM buttons to adjust the focus and zoom by pressing the ZOOM button again. See "LENS CONTROL" of the projector for adjusting the throwing angle. Screw up /down to select the required input method if needed. Projecting an image Selecting the input signal 111 Switch on page 15. 333 Adjust the focus and the projected image size...
... projected image with the lens shift dials. See "Lens shift and positioning" on the connected devices. See "Switching the input signal" of the FOCUS and ZOOM buttons to adjust the focus and zoom by pressing the ZOOM button again. See "LENS CONTROL" of the projector for adjusting the throwing angle. Screw up /down to select the required input method if needed. Projecting an image Selecting the input signal 111 Switch on page 15. 333 Adjust the focus and the projected image size...

Lcd Projector
Page 24
... VIERA LINK CONTROL RECORDER 1 HOME THEATER VOLUME HOME THEATER MUTE OPERATE OTHER DEVICE NOTE: •• These functions may not work properly depending on the connected equipment. •• Image or sound may not be switched to the HDMI input which is connected to the projector. 444 Select OPERATE OTHER DEVICE and press the ENTER button. 555 Remote control image will be automatically turned on if it to operate. JJ...
... VIERA LINK CONTROL RECORDER 1 HOME THEATER VOLUME HOME THEATER MUTE OPERATE OTHER DEVICE NOTE: •• These functions may not work properly depending on the connected equipment. •• Image or sound may not be switched to the HDMI input which is connected to the projector. 444 Select OPERATE OTHER DEVICE and press the ENTER button. 555 Remote control image will be automatically turned on if it to operate. JJ...
Lcd Projector
Page 25
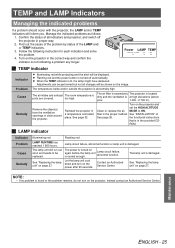
... "Replacing the lamp unit" on the image. The air intake and exhaust The room temperature is at high elevations (above poor. 1 400 - 2 700 m). Power LAMP TEMP JJ TEMP indicator Indicator Problem Cause Remedy Illuminating red while projecting and the alert will inform you. Remove the object(s) from the ventilation openings or clear around the projector. Maintenance ENGLISH - 25 Lamp circuit failure, abnormal function. filter in a temperature controlled place. The air filter is excessively The projector is located...
... "Replacing the lamp unit" on the image. The air intake and exhaust The room temperature is at high elevations (above poor. 1 400 - 2 700 m). Power LAMP TEMP JJ TEMP indicator Indicator Problem Cause Remedy Illuminating red while projecting and the alert will inform you. Remove the object(s) from the ventilation openings or clear around the projector. Maintenance ENGLISH - 25 Lamp circuit failure, abnormal function. filter in a temperature controlled place. The air filter is excessively The projector is located...

Lcd Projector
Page 27
... projector. Those figures are not guaranteed time. "REPLACE LAMP" is mounted on the upper left of hinge parts to remove. JJ Opening the top cover 111 Hold at the back corner of the top cover and slightly push up and press both sides of the screen for more information about the lamp unit, such as guaranteed time, see the instructions which is : LAMP POWER in OPTION menu set...
... projector. Those figures are not guaranteed time. "REPLACE LAMP" is mounted on the upper left of hinge parts to remove. JJ Opening the top cover 111 Hold at the back corner of the top cover and slightly push up and press both sides of the screen for more information about the lamp unit, such as guaranteed time, see the instructions which is : LAMP POWER in OPTION menu set...

Lcd Projector
Page 28
... you remove the lamp unit. •• Do not switch the power on while the top cover is opened. •• When the projector is mounted on the ceiling, keep the lamp unit paralleled up and remove. JJ Resetting the LAMP RUNTIME If the lamp usage time has passed 2 000 hours (when LAMP POWER has been set to NORMAL), the projector will be completed within 10 minutes. 111 Connect the power cord to display the menu...
... you remove the lamp unit. •• Do not switch the power on while the top cover is opened. •• When the projector is mounted on the ceiling, keep the lamp unit paralleled up and remove. JJ Resetting the LAMP RUNTIME If the lamp usage time has passed 2 000 hours (when LAMP POWER has been set to NORMAL), the projector will be completed within 10 minutes. 111 Connect the power cord to display the menu...
Lcd Projector
Page 29
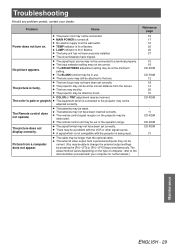
... too much. LAMP indicator is turned off. The signal input source may not be dirty. The input selection setting may not be connected. The lens may not be in use. A signal which is being input. The lamp unit has not been securely installed. The color is lit or flashes. The remote control signal receptor on the projector may be obstructed. Problem Cause Power does not turn on the type of the operation range. TEMP indicator is pale...
... too much. LAMP indicator is turned off. The signal input source may not be dirty. The input selection setting may not be connected. The lens may not be in use. A signal which is being input. The lamp unit has not been securely installed. The color is lit or flashes. The remote control signal receptor on the projector may be obstructed. Problem Cause Power does not turn on the type of the operation range. TEMP indicator is pale...
Lcd Projector
Page 35
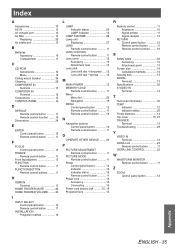
... filter 12 Replacing 26 Air intake port 13 B Batteries Accessory 10 Compartment 11 C CD-ROM Accessories 10 Menu 19 Ceiling mount bracket 30 Cleaning 26 COMPONENT IN Terminal 13 COMPUTER IN Terminal 13 Connections 15 CONTROL PANEL 12 D DEFAULT Remote control button 11 Remote control function ......... 19 Dimensions 34 E ENTER Control panel button 12 Remote control button 11 F FOCUS Control panel button 12 FREEZE Remote control button 11 Front leg adjusters 13 FUNCTION Remote control button 11 FUNCTION BUTTON Remote control buttons .......... 11 H HDMI IN Terminal 13 HOME...
... filter 12 Replacing 26 Air intake port 13 B Batteries Accessory 10 Compartment 11 C CD-ROM Accessories 10 Menu 19 Ceiling mount bracket 30 Cleaning 26 COMPONENT IN Terminal 13 COMPUTER IN Terminal 13 Connections 15 CONTROL PANEL 12 D DEFAULT Remote control button 11 Remote control function ......... 19 Dimensions 34 E ENTER Control panel button 12 Remote control button 11 F FOCUS Control panel button 12 FREEZE Remote control button 11 Front leg adjusters 13 FUNCTION Remote control button 11 FUNCTION BUTTON Remote control buttons .......... 11 H HDMI IN Terminal 13 HOME...


