
E-PM1 Instruction Manual (English)
Page 23
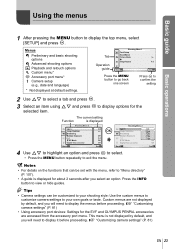
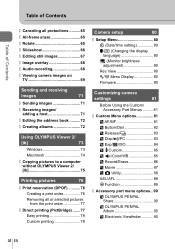
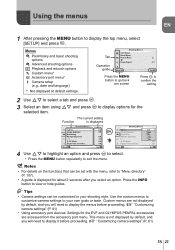
... shooting options X Advanced shooting options q Playback and retouch options c Custom menu* # Accessory port menu* d Camera setup (e.g., date and language) * Not displayed at default settings. Custom menus are accessed from the accessory port menu. Using the menus Basic guide Basic operations 1 After pressing the MENU button to display options for the EVF and OLYMPUS PENPAL accessories are not displayed by default, and you select an option. The current setting Function is displayed Shooting Menu 2 1 j /Y Image Stabilizer 2 Bracketing Multiple Exposure w # RC Mode Digital...
... shooting options X Advanced shooting options q Playback and retouch options c Custom menu* # Accessory port menu* d Camera setup (e.g., date and language) * Not displayed at default settings. Custom menus are accessed from the accessory port menu. Using the menus Basic guide Basic operations 1 After pressing the MENU button to display options for the EVF and OLYMPUS PENPAL accessories are not displayed by default, and you select an option. The current setting Function is displayed Shooting Menu 2 1 j /Y Image Stabilizer 2 Bracketing Multiple Exposure w # RC Mode Digital...
E-PM1 Instruction Manual (English)
Page 24
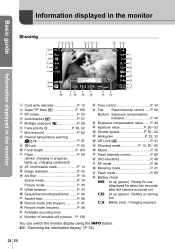
... a Flash P. 59 (blinks: charging in progress, lights up: charging completed) b AF confirmation mark P. 14 c Image stabilizer P. 42 d Art filter P. 18 Scene mode P. 19 Picture mode P. 45 e White balance P. 43 f Sequential shooting/self-timer ........P. 49 g Aspect ratio P. 48 h Record mode (still images P. 47 i Record mode (movies P. 48 j Available recording time k Number of storable still pictures ...P. 106 l Tone control P. 34 m Top: Flash intensity control ......P. 60 Bottom: Exposure compensation indicator P. 40 n Exposure compensation value........P. 40 o Aperture...
... a Flash P. 59 (blinks: charging in progress, lights up: charging completed) b AF confirmation mark P. 14 c Image stabilizer P. 42 d Art filter P. 18 Scene mode P. 19 Picture mode P. 45 e White balance P. 43 f Sequential shooting/self-timer ........P. 49 g Aspect ratio P. 48 h Record mode (still images P. 47 i Record mode (movies P. 48 j Available recording time k Number of storable still pictures ...P. 106 l Tone control P. 34 m Top: Flash intensity control ......P. 60 Bottom: Exposure compensation indicator P. 40 n Exposure compensation value........P. 40 o Aperture...
E-PM1 Instruction Manual (English)
Page 27
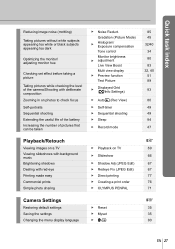
... battery Increasing the number of pictures that can be taken Playback/Retouch Viewing images on TV Slideshow Shadow Adj (JPEG Edit) Redeye Fix (JPEG Edit) Direct printing Creating a print order OLYMPUS PENPAL Reset Myset W g 69 66 67 67 77 76 71 g 35 35 80 EN 27 Gradation (Picture Mode) Histogram/ Exposure compensation Tone control Monitor brightness adjustment Live View Boost Multi view display Preview function Test Picture Displayed Grid (G/Info Settings) Autoq (Rec View) Self-timer Sequential shooting...
... battery Increasing the number of pictures that can be taken Playback/Retouch Viewing images on TV Slideshow Shadow Adj (JPEG Edit) Redeye Fix (JPEG Edit) Direct printing Creating a print order OLYMPUS PENPAL Reset Myset W g 69 66 67 67 77 76 71 g 35 35 80 EN 27 Gradation (Picture Mode) Histogram/ Exposure compensation Tone control Monitor brightness adjustment Live View Boost Multi view display Preview function Test Picture Displayed Grid (G/Info Settings) Autoq (Rec View) Self-timer Sequential shooting...
E-PM1 Instruction Manual (English)
Page 29
... shutter speed (S shutter-priority mode)...........52 Choosing aperture and shutter speed (M manual mode 53 Choosing when the exposure ends 53 Taking Panoramas 54 Taking pictures for a panorama 54 3D Photography 55 Recording multiple exposures in a single image (multiple exposure 56 Varying settings over a series of photographs (bracketing)..........57 Digital Zoom (Digital Tele-converter 58 Flash shooting 59 Using a flash (flash photography 59 Adjusting flash output (Flash intensity control 60 Using external flash units designated for use with this camera...
... shutter speed (S shutter-priority mode)...........52 Choosing aperture and shutter speed (M manual mode 53 Choosing when the exposure ends 53 Taking Panoramas 54 Taking pictures for a panorama 54 3D Photography 55 Recording multiple exposures in a single image (multiple exposure 56 Varying settings over a series of photographs (bracketing)..........57 Digital Zoom (Digital Tele-converter 58 Flash shooting 59 Using a flash (flash photography 59 Adjusting flash output (Flash intensity control 60 Using external flash units designated for use with this camera...
E-PM1 Instruction Manual (English)
Page 30
... Easy printing 78 Custom printing 78 Camera setup 80 Setup Menu 80 X (Date/time setting 80 W (Changing the display language 80 i (Monitor brightness adjustment 80 Rec View 80 c/# Menu Display 80 Firmware 80 Customizing camera settings 81 Before Using the Custom/ Accessory Port Menus ..........81 Custom Menu options 81 R AF/MF 81 S Button/Dial 82 T Release/j 83 U Disp/8/PC 83 V Exp/p/ISO 84 W #Custom 85 X K/Color/WB 85 Y Record/Erase 86 Z Movie 87 b K Utility 88 AEL/AFL 88 R Function...
... Easy printing 78 Custom printing 78 Camera setup 80 Setup Menu 80 X (Date/time setting 80 W (Changing the display language 80 i (Monitor brightness adjustment 80 Rec View 80 c/# Menu Display 80 Firmware 80 Customizing camera settings 81 Before Using the Custom/ Accessory Port Menus ..........81 Custom Menu options 81 R AF/MF 81 S Button/Dial 82 T Release/j 83 U Disp/8/PC 83 V Exp/p/ISO 84 W #Custom 85 X K/Color/WB 85 Y Record/Erase 86 Z Movie 87 b K Utility 88 AEL/AFL 88 R Function...
E-PM1 Instruction Manual (English)
Page 31
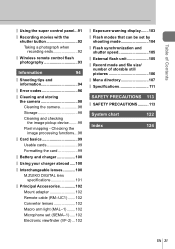
... adapter 102 Remote cable (RM-UC1) .......102 Converter lenses 102 Macro arm light (MAL-1) ........102 Microphone set (SEMA-1) .....102 Electronic viewfinder (VF-2) ...102 Exposure warning display.......103 Flash modes that can be set by shooting mode 104 Flash synchronization and shutter speed 105 External flash unit 105 Record mode and file size/ number of Contents Using the super control panel...91 Recording movies with the shutter button 92 Taking a photograph when recording ends 92 Wireless remote control...
... adapter 102 Remote cable (RM-UC1) .......102 Converter lenses 102 Macro arm light (MAL-1) ........102 Microphone set (SEMA-1) .....102 Electronic viewfinder (VF-2) ...102 Exposure warning display.......103 Flash modes that can be set by shooting mode 104 Flash synchronization and shutter speed 105 External flash unit 105 Record mode and file size/ number of Contents Using the super control panel...91 Recording movies with the shutter button 92 Taking a photograph when recording ends 92 Wireless remote control...
E-PM1 Instruction Manual (English)
Page 56
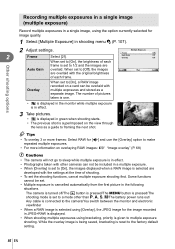
... battery power runs out/ Any cable is connected to multiple exposure shooting. The number of each frame is displayed in shooting menu X (P. 107). 2 Adjust settings. 2 Frame Select [2f]. LN HD • The previous shot is given to the camera/You switch between the monitor and electronic viewfinder • When a RAW image is selected using [Overlay], the JPEG image for the image recorded in a multiple exposure. • When [Overlay] is set the shooting functions, cancel multiple exposure shooting fi...
... battery power runs out/ Any cable is connected to multiple exposure shooting. The number of each frame is displayed in shooting menu X (P. 107). 2 Adjust settings. 2 Frame Select [2f]. LN HD • The previous shot is given to the camera/You switch between the monitor and electronic viewfinder • When a RAW image is selected using [Overlay], the JPEG image for the image recorded in a multiple exposure. • When [Overlay] is set the shooting functions, cancel multiple exposure shooting fi...
E-PM1 Instruction Manual (English)
Page 68
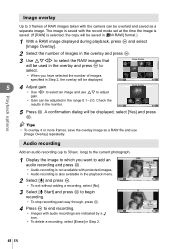
... image is saved with the camera can be adjusted in the range 0.1 - 2.0. JPEG JPEG Edit R Rotate m < Set R No R Start Erase Set 68 EN Playback options Image overlay Up to 3 frames of RAW images taken with the record mode set at the time the image is saved. (If [RAW] is selected, the copy will be saved in [YN+RAW] format.) 1 With a RAW image displayed during playback, press Q and select [Image Overlay]. 2 Select the number of images speci...
... image is saved with the camera can be adjusted in the range 0.1 - 2.0. JPEG JPEG Edit R Rotate m < Set R No R Start Erase Set 68 EN Playback options Image overlay Up to 3 frames of RAW images taken with the record mode set at the time the image is saved. (If [RAW] is selected, the copy will be saved in [YN+RAW] format.) 1 With a RAW image displayed during playback, press Q and select [Image Overlay]. 2 Select the number of images speci...
E-PM1 Instruction Manual (English)
Page 71
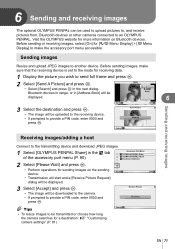
... images, select [On] for receiving data. 1 Display the picture you wish to make the accessory port menu accessible. Before sending images, make sure that the receiving device is set to the mode for [c/# Menu Display] > [# Menu Display] to send full frame and press Q. 2 Select [Send A Picture] and press Q. • Select [Search] and press Q in [Address Book] will be downloaded to the camera. • If prompted to provide a PIN code...
... images, select [On] for receiving data. 1 Display the picture you wish to make the accessory port menu accessible. Before sending images, make sure that the receiving device is set to the mode for [c/# Menu Display] > [# Menu Display] to send full frame and press Q. 2 Select [Send A Picture] and press Q. • Select [Search] and press Q in [Address Book] will be downloaded to the camera. • If prompted to provide a PIN code...
E-PM1 Instruction Manual (English)
Page 73
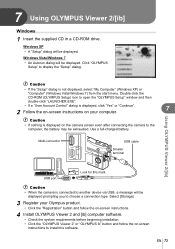
.... Use a full-charged battery. 7 Using OLYMPUS Viewer 2/[ib] Windows 1 Insert the supplied CD in a CD-ROM drive. Double-click the CD-ROM (OLYMPUS Setup) icon to open the "OLYMPUS Setup" window and then double-click "LAUNCHER.EXE". • If a "User Account Control" dialog is displayed, click "Yes" or "Continue". 7 2 Follow the on-screen instructions on your Olympus product. • Click the "Registration" button and follow the on-screen instructions. 4 Install OLYMPUS Viewer 2 and [ib] computer software...
.... Use a full-charged battery. 7 Using OLYMPUS Viewer 2/[ib] Windows 1 Insert the supplied CD in a CD-ROM drive. Double-click the CD-ROM (OLYMPUS Setup) icon to open the "OLYMPUS Setup" window and then double-click "LAUNCHER.EXE". • If a "User Account Control" dialog is displayed, click "Yes" or "Continue". 7 2 Follow the on-screen instructions on your Olympus product. • Click the "Registration" button and follow the on-screen instructions. 4 Install OLYMPUS Viewer 2 and [ib] computer software...
E-PM1 Instruction Manual (English)
Page 74
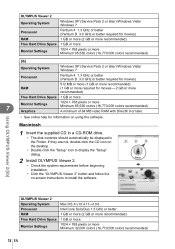
... more Minimum 65,536 colors (16,770,000 colors recommended) A minimum of 64 MB video RAM with DirectX 9 or later. • See online help for information on -screen instructions to install the software. OLYMPUS Viewer 2 Operating System Processor RAM Free Hard Drive Space Monitor Settings Windows XP (Service Pack 2 or later) /Windows Vista / Windows 7 Pentium 4 1.3 GHz or better (Pentium D 3.0 GHz or better required for movies) 1 GB or more...
... more Minimum 65,536 colors (16,770,000 colors recommended) A minimum of 64 MB video RAM with DirectX 9 or later. • See online help for information on -screen instructions to install the software. OLYMPUS Viewer 2 Operating System Processor RAM Free Hard Drive Space Monitor Settings Windows XP (Service Pack 2 or later) /Windows Vista / Windows 7 Pentium 4 1.3 GHz or better (Pentium D 3.0 GHz or better required for movies) 1 GB or more...
E-PM1 Instruction Manual (English)
Page 75
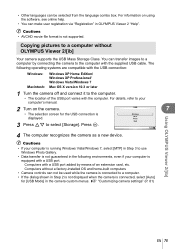
... format is equipped with the supplied USB cable. Computers with the computer. g "Customizing camera settings" (P. 81) EN 75 For details, refer to a computer without a factory-installed OS and home-built computers • Camera controls can make user registration via "Registration" in the following environments, even if your computer's manual. 2 Turn on using the software, see online help. • You can not be selected from the language combo box. Copying pictures...
... format is equipped with the supplied USB cable. Computers with the computer. g "Customizing camera settings" (P. 81) EN 75 For details, refer to a computer without a factory-installed OS and home-built computers • Camera controls can make user registration via "Registration" in the following environments, even if your computer's manual. 2 Turn on using the software, see online help. • You can not be selected from the language combo box. Copying pictures...
E-PM1 Instruction Manual (English)
Page 76
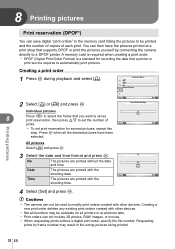
... a print order. * DPOF (Digital Print Order Format) is a standard for recording the data that supports DPOF or print the pictures yourself by connecting the camera directly to a DPOF printer. You can save digital "print orders" to the memory card listing the pictures to be printed and the number of copies of each print. Creating a print order 1 Press Q during playback and select [ 8 Printing pictures Print reservation (DPOF*) You can then have the pictures printed at a print shop that a printer or print service requires to automatically print pictures.
... a print order. * DPOF (Digital Print Order Format) is a standard for recording the data that supports DPOF or print the pictures yourself by connecting the camera directly to a DPOF printer. You can save digital "print orders" to the memory card listing the pictures to be printed and the number of copies of each print. Creating a print order 1 Press Q during playback and select [ 8 Printing pictures Print reservation (DPOF*) You can then have the pictures printed at a print shop that a printer or print service requires to automatically print pictures.
E-PM1 Instruction Manual (English)
Page 80
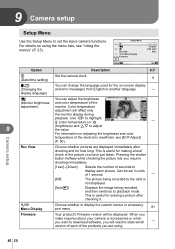
... download software, you are displayed immediately after checking it. Setup Menu 1X W 2 Rec View c/# Menu Display Firmware English j±0 k±0 5sec Back Set Option Description g X (Date/time setting) Set the camera clock. 9 W (Changing the display language) You can adjust the brightness (Monitor brightness and color temperature of the products you will need to adjust the value. For information on -screen display and error messages from English to the card is useful for erasing a picture after shooting and for the on adjusting the brightness and color...
... download software, you are displayed immediately after checking it. Setup Menu 1X W 2 Rec View c/# Menu Display Firmware English j±0 k±0 5sec Back Set Option Description g X (Date/time setting) Set the camera clock. 9 W (Changing the display language) You can adjust the brightness (Monitor brightness and color temperature of the products you will need to adjust the value. For information on -screen display and error messages from English to the card is useful for erasing a picture after shooting and for the on adjusting the brightness and color...

E-PM1 Instruction Manual (English)
Page 86
... Set Number of three sizes and four compression rates for each combination. Back Set Y Record/Erase MENU c Y Option Description g Quick Erase Images can be deleted immediately by pressing the Q or R button in the playback display. - Xiddle Wmall 2560×1920 1280×960 47 3) Choose a pixel count and press Q. Modifying JPEG record modes 1) Use HI to select a D Set combination ([K1] 47 - [K4]) and use FG 1 2 3 4 Y SF X F W N W SF to change. 2) Press Q. File numbering continues...
... Set Number of three sizes and four compression rates for each combination. Back Set Y Record/Erase MENU c Y Option Description g Quick Erase Images can be deleted immediately by pressing the Q or R button in the playback display. - Xiddle Wmall 2560×1920 1280×960 47 3) Choose a pixel count and press Q. Modifying JPEG record modes 1) Use HI to select a D Set combination ([K1] 47 - [K4]) and use FG 1 2 3 4 Y SF X F W N W SF to change. 2) Press Q. File numbering continues...
E-PM1 Instruction Manual (English)
Page 98
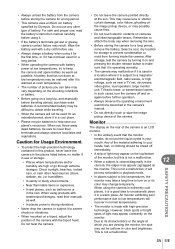
... the lens, wipe gently with a soft cloth. Before taking continuous shots, wait for a prolonged period, remove the battery and card. Wipe the camera with the damp cloth and then dry it operates correctly. 98 EN Be sure to be effective. Since dust reduction is activated every time the camera's power is left dirty. • Check each part of the camera before using the monitor or taking important pictures...
... the lens, wipe gently with a soft cloth. Before taking continuous shots, wait for a prolonged period, remove the battery and card. Wipe the camera with the damp cloth and then dry it operates correctly. 98 EN Be sure to be effective. Since dust reduction is activated every time the camera's power is left dirty. • Check each part of the camera before using the monitor or taking important pictures...
E-PM1 Instruction Manual (English)
Page 105
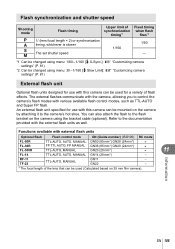
Flash synchronization and shutter speed Shooting mode Flash timing Upper limit of Fixed timing synchronization when flash timing*1 fires*2 P 1/ (lens focal length × 2) or synchronization A timing, whichever is slower 1/60 1/160 S The set shutter speed ― M *1 Can be changed using menu: 1/60 - 1/160 [# X-Sync.]: g "Customizing camera settings" (P. 81) *2 Can be changed using menu: 30 - 1/160 [# Slow Limit]: g "Customizing camera settings" (P. 81) External flash unit Optional flash units designed for use with this camera can...
Flash synchronization and shutter speed Shooting mode Flash timing Upper limit of Fixed timing synchronization when flash timing*1 fires*2 P 1/ (lens focal length × 2) or synchronization A timing, whichever is slower 1/60 1/160 S The set shutter speed ― M *1 Can be changed using menu: 1/60 - 1/160 [# X-Sync.]: g "Customizing camera settings" (P. 81) *2 Can be changed using menu: 30 - 1/160 [# Slow Limit]: g "Customizing camera settings" (P. 81) External flash unit Optional flash units designed for use with this camera can...
E-PM1 Instruction Manual (English)
Page 115
Direct sunlight, beaches, locked cars, or near a TV set, microwave, video game, loud speakers, large monitor unit, TV/radio tower, or transmission towers. This is warmed at room temperature. • The number of pictures you can take a long time to severe shocks or vibrations. • When mounted on a tripod, adjust the position of the camera with weatherproof designs, read the battery's instruction manual carefully...
Direct sunlight, beaches, locked cars, or near a TV set, microwave, video game, loud speakers, large monitor unit, TV/radio tower, or transmission towers. This is warmed at room temperature. • The number of pictures you can take a long time to severe shocks or vibrations. • When mounted on a tripod, adjust the position of the camera with weatherproof designs, read the battery's instruction manual carefully...
E-PM1 Basic Manual (English, Espa?ol, Fran栩s)
Page 23
... setting Function is not displayed by default, and you will need to display the top menu, select [SETUP] and press Q. g "Customizing camera settings" (P. 81) • Using accessory port devices: Settings for the selected item. Custom menus are accessed from the accessory port menu. Using the menus EN 1 After pressing the MENU button to display it before proceeding. Tab Operation guide Shooting Menu 1 1 Card Setup Reset/Myset 2 Picture Mode D Image Aspect Back j 4:3 Set Press the MENU button to go back one screen...
... setting Function is not displayed by default, and you will need to display the top menu, select [SETUP] and press Q. g "Customizing camera settings" (P. 81) • Using accessory port devices: Settings for the selected item. Custom menus are accessed from the accessory port menu. Using the menus EN 1 After pressing the MENU button to display it before proceeding. Tab Operation guide Shooting Menu 1 1 Card Setup Reset/Myset 2 Picture Mode D Image Aspect Back j 4:3 Set Press the MENU button to go back one screen...
E-PM1 Basic Manual (English, Espa?ol, Fran栩s)
Page 28
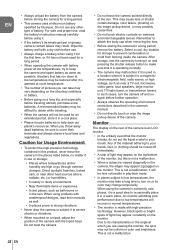
... battery power at the sun. When using it will recover in playback mode. • In places subject to keep the camera and spare battery as warm as bathrooms or in the camera's manual. • Do not directly touch or wipe the image pickup device of light may appear on or its characteristics or the angle at low temperatures may change temporarily. Direct sunlight, beaches, locked...
... battery power at the sun. When using it will recover in playback mode. • In places subject to keep the camera and spare battery as warm as bathrooms or in the camera's manual. • Do not directly touch or wipe the image pickup device of light may appear on or its characteristics or the angle at low temperatures may change temporarily. Direct sunlight, beaches, locked...


