
E-PM1 Instruction Manual (English)
Page 1
... additions and/or modifications of Contents Basic photography/frequently- 1. Before you for purchasing an Olympus digital camera. The screen and camera illustrations shown in a safe place for future reference. For the latest information, please visit the Olympus website. Flash shooting 4. Other shooting options 3. SAFETY PRECAUTIONS System chart Index Thank you start to...
... additions and/or modifications of Contents Basic photography/frequently- 1. Before you for purchasing an Olympus digital camera. The screen and camera illustrations shown in a safe place for future reference. For the latest information, please visit the Olympus website. Flash shooting 4. Other shooting options 3. SAFETY PRECAUTIONS System chart Index Thank you start to...

E-PM1 Instruction Manual (English)
Page 2
...;ed service personnel when service or repair work is chiefly directed to note when using your camera. Reference pages describing details or related information. Information for Your Safety IMPORTANT SAFETY INSTRUCTIONS When using the camera. ■ This notice concerns the supplied flash unit and is required. Useful information and hints...
...;ed service personnel when service or repair work is chiefly directed to note when using your camera. Reference pages describing details or related information. Information for Your Safety IMPORTANT SAFETY INSTRUCTIONS When using the camera. ■ This notice concerns the supplied flash unit and is required. Useful information and hints...
E-PM1 Instruction Manual (English)
Page 3
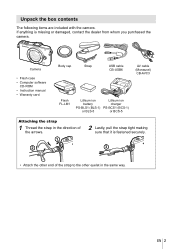
EN 3 Unpack the box contents The following items are included with the camera. Camera • Flash case • Computer software CD-ROM • Instruction manual • Warranty card Body cap Strap USB cable CB-USB6 AV cable (Monaural) CB-... end of the arrows. 1 2 2 Lastly, pull the strap tight making sure that it is missing or damaged, contact the dealer from whom you purchased the camera. If anything is fastened securely. 3 • Attach the other eyelet in the same way.
EN 3 Unpack the box contents The following items are included with the camera. Camera • Flash case • Computer software CD-ROM • Instruction manual • Warranty card Body cap Strap USB cable CB-USB6 AV cable (Monaural) CB-... end of the arrows. 1 2 2 Lastly, pull the strap tight making sure that it is missing or damaged, contact the dealer from whom you purchased the camera. If anything is fastened securely. 3 • Attach the other eyelet in the same way.

E-PM1 Instruction Manual (English)
Page 4
... in use force. $ Notes • It is complete. Battery/card compartment cover Direction indicating mark 3 2 1 Battery/card compartment lock Removing the battery Turn off the camera before opening or closing the battery/card compartment cover. BLS-1 batteries must be charged using the BCS-1, BLS-5 batteries using the BCS-5. 2 Loading the battery...
... in use force. $ Notes • It is complete. Battery/card compartment cover Direction indicating mark 3 2 1 Battery/card compartment lock Removing the battery Turn off the camera before opening or closing the battery/card compartment cover. BLS-1 batteries must be charged using the BCS-1, BLS-5 batteries using the BCS-5. 2 Loading the battery...

E-PM1 Instruction Manual (English)
Page 5
... the inserted card lightly and it locks in the direction shown 1 by the arrow. 2 # Cautions • Close the battery/card compartment cover when using the camera. Pull out the card. # Cautions • Do not remove the battery or card while the card write indicator (P. 24) is displayed. 2 Closing the battery/card.../SDHC/SDXC/Eye-Fi card (referred to as "card" in these instructions) until it will be ejected. g "Card basics" (P. 99) # Cautions • Turn off the camera before loading or removing the card.
... the inserted card lightly and it locks in the direction shown 1 by the arrow. 2 # Cautions • Close the battery/card compartment cover when using the camera. Pull out the card. # Cautions • Do not remove the battery or card while the card write indicator (P. 24) is displayed. 2 Closing the battery/card.../SDHC/SDXC/Eye-Fi card (referred to as "card" in these instructions) until it will be ejected. g "Card basics" (P. 99) # Cautions • Turn off the camera before loading or removing the card.

E-PM1 Instruction Manual (English)
Page 6
...button 2 1 6 EN Lens attachment mark Alignment mark • Align the lens attachment mark (red) on the camera with the alignment mark (red) on the lens, then insert the lens into the camera's body. • Rotate the lens in the direction indicated by the arrow until you hear it click. 3 ...Preparations for shooting 1 Remove the body cap from the camera and the rear cap from the camera While pressing the lens release button, rotate the lens in the direction of the camera. Attaching a lens to the camera. # Cautions • Make sure the camera is turned off. • Do not press the lens...
...button 2 1 6 EN Lens attachment mark Alignment mark • Align the lens attachment mark (red) on the camera with the alignment mark (red) on the lens, then insert the lens into the camera's body. • Rotate the lens in the direction indicated by the arrow until you hear it click. 3 ...Preparations for shooting 1 Remove the body cap from the camera and the rear cap from the camera While pressing the lens release button, rotate the lens in the direction of the camera. Attaching a lens to the camera. # Cautions • Make sure the camera is turned off. • Do not press the lens...

E-PM1 Instruction Manual (English)
Page 7
Removing the Flash Unit Press the UNLOCK switch while removing the flash unit. UNLOCK switch 2 1 EN 7 UNLOCK switch 1 2 2 To use the flash, raise the flash head. • Lower the flash head when the flash is securely in use. Basic guide Preparations for shooting Attaching the flash unit 1 Remove the terminal cover from the flash unit and attach the flash to the camera. • Slide the flash unit all the way in, stopping when it contacts the back of the shoe and is not in place.
Removing the Flash Unit Press the UNLOCK switch while removing the flash unit. UNLOCK switch 2 1 EN 7 UNLOCK switch 1 2 2 To use the flash, raise the flash head. • Lower the flash head when the flash is securely in use. Basic guide Preparations for shooting Attaching the flash unit 1 Remove the terminal cover from the flash unit and attach the flash to the camera. • Slide the flash unit all the way in, stopping when it contacts the back of the shoe and is not in place.

E-PM1 Instruction Manual (English)
Page 8
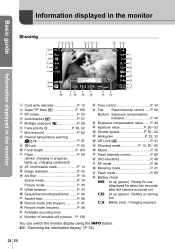
Displayed for shooting Power on Press the ON/OFF button to turn on the camera. • When the camera is turned on, the (blue) power lamp will light and the monitor will turn on. • When the camera is turned on , dust reduction will be performed to remove dust from the ...surface of storable still pictures 8 EN ON/OFF button ■ Monitor ISO-A 200 250 F5.6 Battery level 7 (green): Camera ready to shoot. Basic guide Preparations for about 10 seconds after the camera is turned on . 8 (green): Low battery 9 (blinks red): Charge the battery LN HD Available recording time 01:02...
Displayed for shooting Power on Press the ON/OFF button to turn on the camera. • When the camera is turned on, the (blue) power lamp will light and the monitor will turn on. • When the camera is turned on , dust reduction will be performed to remove dust from the ...surface of storable still pictures 8 EN ON/OFF button ■ Monitor ISO-A 200 250 F5.6 Battery level 7 (green): Camera ready to shoot. Basic guide Preparations for about 10 seconds after the camera is turned on . 8 (green): Low battery 9 (blinks red): Charge the battery LN HD Available recording time 01:02...

E-PM1 Instruction Manual (English)
Page 9
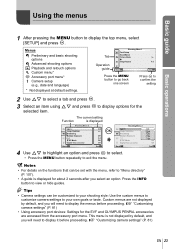
.... 5 Save settings and exit. • Press Q to set the correct date and time before using the camera. 1 Display the menus. • Press the MENU button to exit the menus. EN 9 Be sure to set the camera clock and exit to the main menu. • Press the MENU button to display the top...
.... 5 Save settings and exit. • Press Q to set the correct date and time before using the camera. 1 Display the menus. • Press the MENU button to exit the menus. EN 9 Be sure to set the camera clock and exit to the main menu. • Press the MENU button to display the top...

E-PM1 Instruction Manual (English)
Page 10
Basic guide Names of parts Camera 1 6 2 3 7 8 4 3 9 5 0 Names of parts and functions a b c e d f 1 Shutter button P. 13, 14, 36, 92 2 ON/OFF button P. 8 3 Strap eyelet P. 3 4 Lens attachment mark P. 6 5 Mount (Remove the body cap before ...
Basic guide Names of parts Camera 1 6 2 3 7 8 4 3 9 5 0 Names of parts and functions a b c e d f 1 Shutter button P. 13, 14, 36, 92 2 ON/OFF button P. 8 3 Strap eyelet P. 3 4 Lens attachment mark P. 6 5 Mount (Remove the body cap before ...

E-PM1 Instruction Manual (English)
Page 12
... settings automatically. • In these modes, default settings are restored if another shooting mode is selected or the camera is turned off. ■ Advanced shooting modes P Program shooting (P. 50) A Aperture priority shooting (P. 51) S Shutter priority shooting (P. 52) M Manual shooting (P. 53)...set the aperture value and shutter speed. • The settings made in the advanced shooting modes are retained even if the camera is selected, the camera automatically optimizes settings to suit the subject. • Select ART or SCN options according to select. % Tips • Resetting...
... settings automatically. • In these modes, default settings are restored if another shooting mode is selected or the camera is turned off. ■ Advanced shooting modes P Program shooting (P. 50) A Aperture priority shooting (P. 51) S Shutter priority shooting (P. 52) M Manual shooting (P. 53)...set the aperture value and shutter speed. • The settings made in the advanced shooting modes are retained even if the camera is selected, the camera automatically optimizes settings to suit the subject. • Select ART or SCN options according to select. % Tips • Resetting...

E-PM1 Instruction Manual (English)
Page 13
... Names of movie frame size. • The autofocus and metering used in movie mode may differ from that used to record movies in which the camera A automatically optimizes settings for the current scene. M You control aperture and shutter speed. A full auto mode in the following the photograph. • Only one photograph.... Press the R button to take a photograph during movie recording • To take photographs. • The R button can be used to end recording. Movies: R button The camera automatically adjusts settings and records a movie.
... Names of movie frame size. • The autofocus and metering used in movie mode may differ from that used to record movies in which the camera A automatically optimizes settings for the current scene. M You control aperture and shutter speed. A full auto mode in the following the photograph. • Only one photograph.... Press the R button to take a photograph during movie recording • To take photographs. • The R button can be used to end recording. Movies: R button The camera automatically adjusts settings and records a movie.
E-PM1 Instruction Manual (English)
Page 14
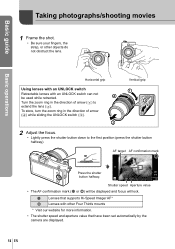
...:02:03 38 Shutter speed Aperture value • The AF confirmation mark (( or n) will lock. ( Lenses that have been set automatically by the camera are displayed. 14 EN To store, turn the zoom ring in the direction of arrow (4) while sliding the UNLOCK switch (3). 1 4 3 2 2 Adjust the focus. • Lightly...
...:02:03 38 Shutter speed Aperture value • The AF confirmation mark (( or n) will lock. ( Lenses that have been set automatically by the camera are displayed. 14 EN To store, turn the zoom ring in the direction of arrow (4) while sliding the UNLOCK switch (3). 1 4 3 2 2 Adjust the focus. • Lightly...

E-PM1 Instruction Manual (English)
Page 15
...fog may appear in images recorded at high ISO sensitivities. The camera activates again when you touch any button (the shutter button, q button, etc.). [Sleep]: g "Customizing camera settings" (P. 81) # Cautions • If the camera is taken. Choose a lower ISO sensitivity or turn off for ...a minute, the camera enters "sleep" (stand-by) mode to begin recording. Basic guide Basic operations ...
...fog may appear in images recorded at high ISO sensitivities. The camera activates again when you touch any button (the shutter button, q button, etc.). [Sleep]: g "Customizing camera settings" (P. 81) # Cautions • If the camera is taken. Choose a lower ISO sensitivity or turn off for ...a minute, the camera enters "sleep" (stand-by) mode to begin recording. Basic guide Basic operations ...

E-PM1 Instruction Manual (English)
Page 21
... R button. or under-exposed. • In P, A, S, and M modes, live guides can not be taken using live guide settings. [Button Function]: g "Customizing camera settings" (P. 81) EN 21 Guide item Change Color Saturation Cancel 3 Use FG on the arrow pad to highlight an item and press Q to select. Basic...selected, highlight an item and press Q to view a description. • Press the shutter button halfway to select. • The effect of the camera exposure meters may not be visible in the monitor. • The flash can be visible in pictures that are not applied to the RAW...
... R button. or under-exposed. • In P, A, S, and M modes, live guides can not be taken using live guide settings. [Button Function]: g "Customizing camera settings" (P. 81) EN 21 Guide item Change Color Saturation Cancel 3 Use FG on the arrow pad to highlight an item and press Q to select. Basic...selected, highlight an item and press Q to view a description. • Press the shutter button halfway to select. • The effect of the camera exposure meters may not be visible in the monitor. • The flash can be visible in pictures that are not applied to the RAW...
E-PM1 Instruction Manual (English)
Page 22
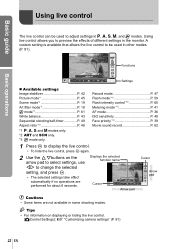
... P. 62 *1 P, A, S and M modes only. *2 ART and SCN only. *3 n mode only. 1 Press Q to display the live control. • To hide the live control. [KControl Settings]: g "Customizing camera settings" (P. 81) 22 EN Displays the selected function name Cursor Cursor P AAUTOO WB Auto IS OFF j Arrow WWBB AAUUTTOO 4:3 pad LF HD WB Arrow pad...
... P. 62 *1 P, A, S and M modes only. *2 ART and SCN only. *3 n mode only. 1 Press Q to display the live control. • To hide the live control. [KControl Settings]: g "Customizing camera settings" (P. 81) 22 EN Displays the selected function name Cursor Cursor P AAUTOO WB Auto IS OFF j Arrow WWBB AAUUTTOO 4:3 pad LF HD WB Arrow pad...
E-PM1 Instruction Manual (English)
Page 23
... customized to your shooting style: Use the custom menus to customize camera settings to display the menus before proceeding. g "Customizing camera settings" (P. 81) • Using accessory port devices: Settings for the EVF and OLYMPUS PENPAL accessories are not displayed by default, and you will need ...to display it before proceeding. g "Customizing camera settings" (P. 81) EN 23 This menu is displayed for the selected item. ...
... customized to your shooting style: Use the custom menus to customize camera settings to display the menus before proceeding. g "Customizing camera settings" (P. 81) • Using accessory port devices: Settings for the EVF and OLYMPUS PENPAL accessories are not displayed by default, and you will need ...to display it before proceeding. g "Customizing camera settings" (P. 81) EN 23 This menu is displayed for the selected item. ...
E-PM1 Instruction Manual (English)
Page 24
... P. 48 w AF mode P. 36 x Metering mode P. 41 y Flash mode P. 59 z Battery check 7 Lit up (green) : Ready for use (displayed for about ten seconds after the camera is turned on) 8 Lit up (green) : Battery is running low 9 Blinks (red) : Charging required You can switch the monitor display using the INFO button.
... P. 48 w AF mode P. 36 x Metering mode P. 41 y Flash mode P. 59 z Battery check 7 Lit up (green) : Ready for use (displayed for about ten seconds after the camera is turned on) 8 Lit up (green) : Battery is running low 9 Blinks (red) : Charging required You can switch the monitor display using the INFO button.

E-PM1 Instruction Manual (English)
Page 26
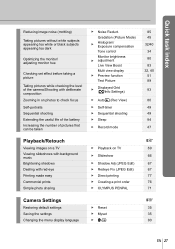
... Taking pictures with the correct color Processing pictures to match the subject/ Taking monotone pictures Focus/Focusing on one area When the camera won't focus on your subject Focusing on a small spot in the frame/ confirming focus before shooting Recomposing photographs after... focusing Turning off the beep speaker Disabling the flash/taking photos without the flash Reducing camera shake Taking pictures of a subject against backlight Photographing fireworks iAUTO (A) Art filter (ART) Aspect ratio Scene (SCN) ...
... Taking pictures with the correct color Processing pictures to match the subject/ Taking monotone pictures Focus/Focusing on one area When the camera won't focus on your subject Focusing on a small spot in the frame/ confirming focus before shooting Recomposing photographs after... focusing Turning off the beep speaker Disabling the flash/taking photos without the flash Reducing camera shake Taking pictures of a subject against backlight Photographing fireworks iAUTO (A) Art filter (ART) Aspect ratio Scene (SCN) ...
E-PM1 Instruction Manual (English)
Page 27
... 49 84 47 Playback on a TV Viewing slideshows with background music Brightening shadows Dealing with red-eye Printing made easy Commercial prints Simple photo sharing Camera Settings Restoring default settings Saving the settings Changing the menu display language Noise Reduct. Quick task index Reducing image noise (mottling) Taking pictures without white... pictures that can be taken Playback/Retouch Viewing images on TV Slideshow Shadow Adj (JPEG Edit) Redeye Fix (JPEG Edit) Direct printing Creating a print order OLYMPUS PENPAL Reset Myset W g 69 66 67 67 77 76 71 g 35 35 80 EN 27
... 49 84 47 Playback on a TV Viewing slideshows with background music Brightening shadows Dealing with red-eye Printing made easy Commercial prints Simple photo sharing Camera Settings Restoring default settings Saving the settings Changing the menu display language Noise Reduct. Quick task index Reducing image noise (mottling) Taking pictures without white... pictures that can be taken Playback/Retouch Viewing images on TV Slideshow Shadow Adj (JPEG Edit) Redeye Fix (JPEG Edit) Direct printing Creating a print order OLYMPUS PENPAL Reset Myset W g 69 66 67 67 77 76 71 g 35 35 80 EN 27


