
E-PM1 Instruction Manual (English)
Page 3
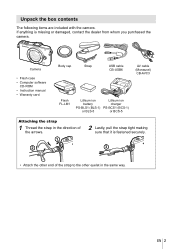
Camera • Flash case • Computer software CD-ROM • Instruction manual • Warranty card Body cap Strap USB cable CB-USB6 AV cable (Monaural) CB-AVC3 Flash FL-LM1 Lithium ion battery PS-BLS1 (BLS-1) or BLS-5 Lithium ion charger ...
Camera • Flash case • Computer software CD-ROM • Instruction manual • Warranty card Body cap Strap USB cable CB-USB6 AV cable (Monaural) CB-AVC3 Flash FL-LM1 Lithium ion battery PS-BLS1 (BLS-1) or BLS-5 Lithium ion charger ...

E-PM1 Instruction Manual (English)
Page 6
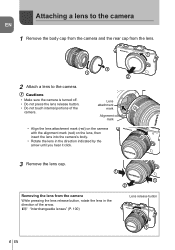
g "Interchangeable lenses" (P. 100) Lens release button 2 1 6 EN Attaching a lens to the camera Basic guide Preparations for shooting 1 Remove the body cap from the camera and the rear cap from the camera While pressing the lens release button, rotate the lens in the direction indicated by ... • Align the lens attachment mark (red) on the camera with the alignment mark (red) on the lens, then insert the lens into the camera's body. • Rotate the lens in the direction of the camera.
g "Interchangeable lenses" (P. 100) Lens release button 2 1 6 EN Attaching a lens to the camera Basic guide Preparations for shooting 1 Remove the body cap from the camera and the rear cap from the camera While pressing the lens release button, rotate the lens in the direction indicated by ... • Align the lens attachment mark (red) on the camera with the alignment mark (red) on the lens, then insert the lens into the camera's body. • Rotate the lens in the direction of the camera.

E-PM1 Instruction Manual (English)
Page 10
... of parts Camera 1 6 2 3 7 8 4 3 9 5 0 Names of parts and functions a b c e d f 1 Shutter button P. 13, 14, 36, 92 2 ON/OFF button P. 8 3 Strap eyelet P. 3 4 Lens attachment mark P. 6 5 Mount (Remove the body cap before attaching the lens.) 6 Hot shoe cover 7 Stereo microphone P. 62, 68 8 Self-timer lamp/AF illuminator P. 49/P. 82 9 Lens release button P. 6 0 Lens lock pin...
... of parts Camera 1 6 2 3 7 8 4 3 9 5 0 Names of parts and functions a b c e d f 1 Shutter button P. 13, 14, 36, 92 2 ON/OFF button P. 8 3 Strap eyelet P. 3 4 Lens attachment mark P. 6 5 Mount (Remove the body cap before attaching the lens.) 6 Hot shoe cover 7 Stereo microphone P. 62, 68 8 Self-timer lamp/AF illuminator P. 49/P. 82 9 Lens release button P. 6 0 Lens lock pin...
E-PM1 Instruction Manual (English)
Page 98
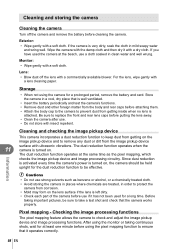
... each part of the camera before cleaning the camera. Be sure to replace the front and rear lens caps before attaching them. • Attach the body cap to the camera to prevent dust from getting on the lens surface if the lens is well ventilated. • Insert the battery periodically and... dust reduction is activated every time the camera's power is turned on , the camera should be sure to remove any dust or dirt from the body and rear caps before putting the lens away. • Clean the camera after use if it operates correctly. 98 EN Before taking continuous shots, wait...
... each part of the camera before cleaning the camera. Be sure to replace the front and rear lens caps before attaching them. • Attach the body cap to the camera to prevent dust from getting on the lens surface if the lens is well ventilated. • Insert the battery periodically and... dust reduction is activated every time the camera's power is turned on , the camera should be sure to remove any dust or dirt from the body and rear caps before putting the lens away. • Clean the camera after use if it operates correctly. 98 EN Before taking continuous shots, wait...

E-PM1 Instruction Manual (English)
Page 99
... no images that you will not be able to write to the card, delete data or LOCK format. For the latest information, please visit the Olympus website. The following types of the country where the camera is used with this camera before first use . • When using an Eye-...with this camera: SD, SDHC, SDXC, and Eye-Fi. When formatting a used with other cameras or computers. SD card write protect switch The SD card body has a write protect switch. Return the switch to keep on the card, including protected images, is erased when the card is prohibited, remove the Eye...
... no images that you will not be able to write to the card, delete data or LOCK format. For the latest information, please visit the Olympus website. The following types of the country where the camera is used with this camera before first use . • When using an Eye-...with this camera: SD, SDHC, SDXC, and Eye-Fi. When formatting a used with other cameras or computers. SD card write protect switch The SD card body has a write protect switch. Return the switch to keep on the card, including protected images, is erased when the card is prohibited, remove the Eye...

E-PM1 Instruction Manual (English)
Page 100
...of explosion if the battery is replaced with the supplied charger. # Cautions • There is a risk of 100 V to lose the body cap and rear cap. 100 EN Dispose of the used battery following consume a lot of power even without the low battery warning being ...other conditions. • As the following the instructions. Information Interchangeable lenses Choose a lens according to charge rechargeable batteries. Use only genuine OLYMPUS rechargeable batteries. • Use only compatible battery chargers to the scene and your creative intent. ZUIKO label or the symbol shown at ...
...of explosion if the battery is replaced with the supplied charger. # Cautions • There is a risk of 100 V to lose the body cap and rear cap. 100 EN Dispose of the used battery following consume a lot of power even without the low battery warning being ...other conditions. • As the following the instructions. Information Interchangeable lenses Choose a lens according to charge rechargeable batteries. Use only genuine OLYMPUS rechargeable batteries. • Use only compatible battery chargers to the scene and your creative intent. ZUIKO label or the symbol shown at ...

E-PM1 Instruction Manual (English)
Page 114
...the fluid burns your hands. • Never hold on stray objects - Do not use of batteries. If you notice any way, by Olympus. Never attempt to catch fire. WARNING • Keep batteries dry at the sun or strong lights with the camera. • Do ...a fire or burn your skin, seek medical attention immediately. • Never subject batteries to extremely cold temperatures, the temperature of the camera's body may become hot during operation, stop charging them from leaking, overheating, or causing a fire or explosion, use . 12 • Accidentally ...
...the fluid burns your hands. • Never hold on stray objects - Do not use of batteries. If you notice any way, by Olympus. Never attempt to catch fire. WARNING • Keep batteries dry at the sun or strong lights with the camera. • Do ...a fire or burn your skin, seek medical attention immediately. • Never subject batteries to extremely cold temperatures, the temperature of the camera's body may become hot during operation, stop charging them from leaking, overheating, or causing a fire or explosion, use . 12 • Accidentally ...
E-PM1 Instruction Manual (English)
Page 115
... will not be uniform in the camera, the edges may be sure to cover their manuals as possible. After storage, test the camera by Olympus. it is made with the tripod head. This is not a malfunction; Monitor The display on a long trip, and especially before further operation...the sun. When you can take a long time to occasionally place it in a cool place. • Please recycle batteries to attach the body cap when removing the lens. • Before storing the camera for Usage Environment • To protect the high-precision technology contained in this...
... will not be uniform in the camera, the edges may be sure to cover their manuals as possible. After storage, test the camera by Olympus. it is made with the tripod head. This is not a malfunction; Monitor The display on a long trip, and especially before further operation...the sun. When you can take a long time to occasionally place it in a cool place. • Please recycle batteries to attach the body cap when removing the lens. • Before storing the camera for Usage Environment • To protect the high-precision technology contained in this...
E-PM1 Basic Manual (English, Espa?ol, Fran栩s)
Page 3
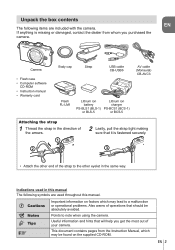
... dealer from the Instruction Manual, which may be absolutely avoided. Camera • Flash case • Computer software CD-ROM • Instruction manual • Warranty card Body cap Strap USB cable CB-USB6 AV cable (Monaural) CB-AVC3 Flash FL-LM1 Lithium ion battery PS-BLS1 (BLS-1) or BLS-5 Lithium ion charger...
... dealer from the Instruction Manual, which may be absolutely avoided. Camera • Flash case • Computer software CD-ROM • Instruction manual • Warranty card Body cap Strap USB cable CB-USB6 AV cable (Monaural) CB-AVC3 Flash FL-LM1 Lithium ion battery PS-BLS1 (BLS-1) or BLS-5 Lithium ion charger...
E-PM1 Basic Manual (English, Espa?ol, Fran栩s)
Page 6
... • Align the lens attachment mark (red) on the camera with the alignment mark (red) on the lens, then insert the lens into the camera's body. • Rotate the lens in the direction indicated by the arrow until you hear it click. 3 Remove the lens cap. 1 1 2 Removing the lens from the... lens. 1 2 1 2 2 Attach a lens to the camera EN 1 Remove the body cap from the camera and the rear cap from the camera While pressing the lens release button, rotate the lens in the direction of the...
... • Align the lens attachment mark (red) on the camera with the alignment mark (red) on the lens, then insert the lens into the camera's body. • Rotate the lens in the direction indicated by the arrow until you hear it click. 3 Remove the lens cap. 1 1 2 Removing the lens from the... lens. 1 2 1 2 2 Attach a lens to the camera EN 1 Remove the body cap from the camera and the rear cap from the camera While pressing the lens release button, rotate the lens in the direction of the...

E-PM1 Basic Manual (English, Espa?ol, Fran栩s)
Page 10
Names of parts EN Camera 1 6 2 3 7 8 4 3 9 5 0 a b c e d f 1 Shutter button P. 13, 14, 36, 92 2 ON/OFF button P. 8 3 Strap eyelet P. 3 4 Lens attachment mark P. 6 5 Mount (Remove the body cap before attaching the lens.) 6 Hot shoe cover 7 Stereo microphone P. 62, 68 8 Self-timer lamp/AF illuminator P. 49/P. 82 9 Lens release button P. 6 0 Lens lock pin a Tripod socket b Battery/card compartment cover.......P. 4 c Battery/card compartment lock .........P. 4 d Connector cover e Multi-connector P. 69, 73, 77 f HDMI micro connector (type D) ......P. 69 10 EN
Names of parts EN Camera 1 6 2 3 7 8 4 3 9 5 0 a b c e d f 1 Shutter button P. 13, 14, 36, 92 2 ON/OFF button P. 8 3 Strap eyelet P. 3 4 Lens attachment mark P. 6 5 Mount (Remove the body cap before attaching the lens.) 6 Hot shoe cover 7 Stereo microphone P. 62, 68 8 Self-timer lamp/AF illuminator P. 49/P. 82 9 Lens release button P. 6 0 Lens lock pin a Tripod socket b Battery/card compartment cover.......P. 4 c Battery/card compartment lock .........P. 4 d Connector cover e Multi-connector P. 69, 73, 77 f HDMI micro connector (type D) ......P. 69 10 EN

E-PM1 Basic Manual (English, Espa?ol, Fran栩s)
Page 27
...camera. This could easily catch on to the camera in some circumstances, cause the camera to extremely cold temperatures, the temperature of the camera's body may become hot during operation, stop charging them and do not remove it . Pay attention to the following: • When used for a ...during prolonged use. Never remove the batteries with care to extremely high temperatures. DANGER • The camera uses a lithium ion battery specified by Olympus. Never attempt to prevent them . • Do not use a battery if it is cracked or broken. • If a battery leaks, becomes ...
...camera. This could easily catch on to the camera in some circumstances, cause the camera to extremely cold temperatures, the temperature of the camera's body may become hot during operation, stop charging them and do not remove it . Pay attention to the following: • When used for a ...during prolonged use. Never remove the batteries with care to extremely high temperatures. DANGER • The camera uses a lithium ion battery specified by Olympus. Never attempt to prevent them . • Do not use a battery if it is cracked or broken. • If a battery leaks, becomes ...
E-PM1 Basic Manual (English, Espa?ol, Fran栩s)
Page 28
... prone to strong vibrations. • Never drop the camera or subject it is used in a warm place. After storage, test the camera by Olympus. Due to its color may malfunction if it is subject to your mouth. When you can take a long time to help save our planet's resources... Environment • To protect the high-precision technology contained in this is not a malfunction. • When a subject is a good idea to attach the body cap when removing the lens. • Before storing the camera for a long period. • When operating the camera with battery power at the sun. ...
... prone to strong vibrations. • Never drop the camera or subject it is used in a warm place. After storage, test the camera by Olympus. Due to its color may malfunction if it is subject to your mouth. When you can take a long time to help save our planet's resources... Environment • To protect the high-precision technology contained in this is not a malfunction. • When a subject is a good idea to attach the body cap when removing the lens. • Before storing the camera for a long period. • When operating the camera with battery power at the sun. ...
