

E-PM1 Instruction Manual (English)
Page 6
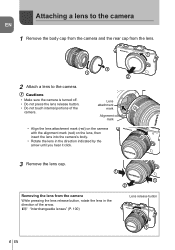
... the lens from the lens. 1 2 1 2 2 Attach a lens to the camera. # Cautions • Make sure the camera is turned off. • Do not press the lens release button. • Do not touch internal portions of the arrow. Attaching a lens to the camera Basic guide Preparations for shooting 1 Remove the body cap from... the camera and the rear cap from the camera While pressing the lens release button, rotate the lens in the direction of the camera. g "Interchangeable lenses" (P. 100) Lens...
... the lens from the lens. 1 2 1 2 2 Attach a lens to the camera. # Cautions • Make sure the camera is turned off. • Do not press the lens release button. • Do not touch internal portions of the arrow. Attaching a lens to the camera Basic guide Preparations for shooting 1 Remove the body cap from... the camera and the rear cap from the camera While pressing the lens release button, rotate the lens in the direction of the camera. g "Interchangeable lenses" (P. 100) Lens...

E-PM1 Instruction Manual (English)
Page 10
... mark P. 6 5 Mount (Remove the body cap before attaching the lens.) 6 Hot shoe cover 7 Stereo microphone P. 62, 68 8 Self-timer lamp/AF illuminator P. 49/P. 82 9 Lens release button P. 6 0 Lens lock pin a Tripod socket b Battery/card compartment cover.......P. 4 c Battery/card compartment lock .........P. 4 d Connector cover e Multi-connector P. 69, 73, 77 f HDMI micro connector (type...
... mark P. 6 5 Mount (Remove the body cap before attaching the lens.) 6 Hot shoe cover 7 Stereo microphone P. 62, 68 8 Self-timer lamp/AF illuminator P. 49/P. 82 9 Lens release button P. 6 0 Lens lock pin a Tripod socket b Battery/card compartment cover.......P. 4 c Battery/card compartment lock .........P. 4 d Connector cover e Multi-connector P. 69, 73, 77 f HDMI micro connector (type...

E-PM1 Instruction Manual (English)
Page 15
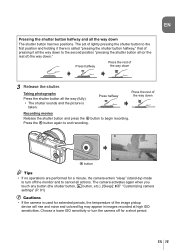
... will rise and noise and colored fog may appear in images recorded at high ISO sensitivities. The act of the way down Recording movies Release the shutter button and press the R button to end recording. Choose a lower ISO sensitivity or turn off for extended periods, the temperature... pressing it there is taken. Basic guide Basic operations Pressing the shutter button halfway and all (or the rest of the way down 3 Release the shutter. Press halfway Press the rest of ) the way down The shutter button has two positions. Taking photographs Press the shutter button ...
... will rise and noise and colored fog may appear in images recorded at high ISO sensitivities. The act of the way down Recording movies Release the shutter button and press the R button to end recording. Choose a lower ISO sensitivity or turn off for extended periods, the temperature... pressing it there is taken. Basic guide Basic operations Pressing the shutter button halfway and all (or the rest of the way down 3 Release the shutter. Press halfway Press the rest of ) the way down The shutter button has two positions. Taking photographs Press the shutter button ...
E-PM1 Instruction Manual (English)
Page 30
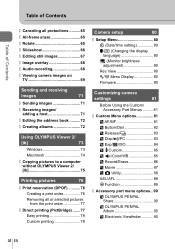
... 71 Receiving images/ adding a host 71 Editing the address book ..........72 Creating albums 72 Using OLYMPUS Viewer 2/ [ib] 73 Windows 73 Macintosh 74 Copying pictures to a computer without OLYMPUS Viewer 2/ [ib 75 Printing pictures 76 Print reservation (DPOF 76 Creating a print order 76 ... Firmware 80 Customizing camera settings 81 Before Using the Custom/ Accessory Port Menus ..........81 Custom Menu options 81 R AF/MF 81 S Button/Dial 82 T Release/j 83 U Disp/8/PC 83 V Exp/p/ISO 84 W #Custom 85 X K/Color/WB 85 Y Record/Erase 86 Z Movie 87 b K Utility 88...
... 71 Receiving images/ adding a host 71 Editing the address book ..........72 Creating albums 72 Using OLYMPUS Viewer 2/ [ib] 73 Windows 73 Macintosh 74 Copying pictures to a computer without OLYMPUS Viewer 2/ [ib 75 Printing pictures 76 Print reservation (DPOF 76 Creating a print order 76 ... Firmware 80 Customizing camera settings 81 Before Using the Custom/ Accessory Port Menus ..........81 Custom Menu options 81 R AF/MF 81 S Button/Dial 82 T Release/j 83 U Disp/8/PC 83 V Exp/p/ISO 84 W #Custom 85 X K/Color/WB 85 Y Record/Erase 86 Z Movie 87 b K Utility 88...
E-PM1 Instruction Manual (English)
Page 36
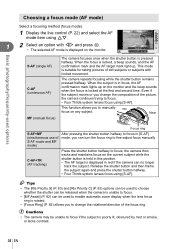
...longer track the subject. Even if the subject moves or you change the rotational direction of the focus ring. # Cautions • The camera may be released when the camera is locked at the first and second time. the camera then tracks and maintains focus on the monitor and the beep...of still subjects or subjects with HI and press Q. • The selected AF mode is in focus, the AF confirmation mark lights up . Release the shutter button and then frame the subject again and press the shutter button halfway. • Four Thirds system lenses focus using [S-AF]. The camera...
...longer track the subject. Even if the subject moves or you change the rotational direction of the focus ring. # Cautions • The camera may be released when the camera is locked at the first and second time. the camera then tracks and maintains focus on the monitor and the beep...of still subjects or subjects with HI and press Q. • The selected AF mode is in focus, the AF confirmation mark lights up . Release the shutter button and then frame the subject again and press the shutter button halfway. • Four Thirds system lenses focus using [S-AF]. The camera...
E-PM1 Instruction Manual (English)
Page 53
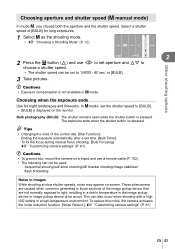
Bulb photography (BULB): The shutter remains open while the shutter button is displayed on the monitor. The exposure ends when the shutter button is released. % Tips • Changing the roles of the control dial. [Dial Function]: Ending the exposure automatically after a set time. [Bulb Timer]: To fix the focus during ...
Bulb photography (BULB): The shutter remains open while the shutter button is displayed on the monitor. The exposure ends when the shutter button is released. % Tips • Changing the roles of the control dial. [Dial Function]: Ending the exposure automatically after a set time. [Bulb Timer]: To fix the focus during ...

E-PM1 Instruction Manual (English)
Page 55
... subject in the center focus point only. • Image size is not 100%. $ Notes • Press Q to take the second shot automatically or if you released the shutter button before the second shot was taken, press the shutter button all the way down again. • Do not adjust focus or zoom...
... subject in the center focus point only. • Image size is not 100%. $ Notes • Press Q to take the second shot automatically or if you released the shutter button before the second shot was taken, press the shutter button all the way down again. • Do not adjust focus or zoom...

E-PM1 Instruction Manual (English)
Page 58
... value selected for [EV Step]. The camera saves the center crop. In single-frame shooting, one shot is taken each time the shutter button is released, the camera records multiple images, each picture mode. • Recording may take some time. • ART BKT can not be enlarged by a frame. 58 EN...
... value selected for [EV Step]. The camera saves the center crop. In single-frame shooting, one shot is taken each time the shutter button is released, the camera records multiple images, each picture mode. • Recording may take some time. • ART BKT can not be enlarged by a frame. 58 EN...
E-PM1 Instruction Manual (English)
Page 59
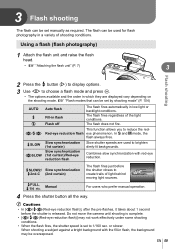
.... • When the flash fires, the shutter speed is set to brighten dimly-lit backgrounds. Do not move the camera until shooting is released. In S and M mode, the flash always fires. #SLOW !SLOW Slow synchronization (1st curtain) Slow synchronization (1st curtain)/Red-eye reduction flash Slow...
.... • When the flash fires, the shutter speed is set to brighten dimly-lit backgrounds. Do not move the camera until shooting is released. In S and M mode, the flash always fires. #SLOW !SLOW Slow synchronization (1st curtain) Slow synchronization (1st curtain)/Red-eye reduction flash Slow...

E-PM1 Instruction Manual (English)
Page 83
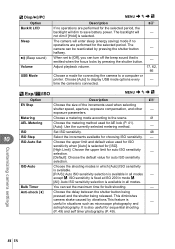
... is used in your country or region. settings will be given to be visible in the monitor. T Release/j MENU c T Option Description g Rls Priority S Rls Priority C If [On] is selected, the shutter can be released even when the camera is not in focus. This option can be set separately - the effects exposure compensation...
... is used in your country or region. settings will be given to be visible in the monitor. T Release/j MENU c T Option Description g Rls Priority S Rls Priority C If [On] is selected, the shutter can be released even when the camera is not in focus. This option can be set separately - the effects exposure compensation...
E-PM1 Instruction Manual (English)
Page 84
... button. - Metering Choose a metering mode according to a computer or printer. Anti-shock z Choose the delay between the shutter button being pressed and the shutter being released. astrophotography. This diminishes camera shake caused by pressing the shutter button - When set the maximum time for choosing ISO sensitivity. - ISO Set ISO sensitivity. 48...
... button. - Metering Choose a metering mode according to a computer or printer. Anti-shock z Choose the delay between the shutter button being pressed and the shutter being released. astrophotography. This diminishes camera shake caused by pressing the shutter button - When set the maximum time for choosing ISO sensitivity. - ISO Set ISO sensitivity. 48...
E-PM1 Instruction Manual (English)
Page 96
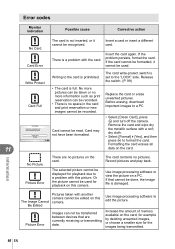
There is full. Release the switch. (P. 99) Card Full • The card is a problem with the card. No more pictures can be taken or no more information such as ...
There is full. Release the switch. (P. 99) Card Full • The card is a problem with the card. No more pictures can be taken or no more information such as ...

E-PM1 Instruction Manual (English)
Page 108
I Face Priority S Button/dial AEL/AFL 11 AEL/AFL Memo Information Button Function R Function I Function G Function P A Dial Function S M q Dial Exposure Direction Menu dLock T Release/j Rls Priority S Rls Priority C j H fps j L fps Default S-AF C-AF Off o On On b Off o On K S-AF C-AF MF On R REC # j/Y F FNo. c Custom Menu Tab Function c R AF/...
I Face Priority S Button/dial AEL/AFL 11 AEL/AFL Memo Information Button Function R Function I Function G Function P A Dial Function S M q Dial Exposure Direction Menu dLock T Release/j Rls Priority S Rls Priority C j H fps j L fps Default S-AF C-AF Off o On On b Off o On K S-AF C-AF MF On R REC # j/Y F FNo. c Custom Menu Tab Function c R AF/...
E-PM1 Instruction Manual (English)
Page 115
...long time to help save our planet's resources. A battery that has run down at low temperatures may appear constantly on and pressing the shutter release button to make sure that the monitor breaks, do not put the liquid crystal in a cool place. • Please recycle batteries to ...LCD monitor. • In the unlikely event that it is viewed diagonally in color and brightness. After storage, test the camera by Olympus. Monitor The display on cameras and interchangeable lenses. A recommended battery may malfunction if it has not been used for storage to your mouth...
...long time to help save our planet's resources. A battery that has run down at low temperatures may appear constantly on and pressing the shutter release button to make sure that the monitor breaks, do not put the liquid crystal in a cool place. • Please recycle batteries to ...LCD monitor. • In the unlikely event that it is viewed diagonally in color and brightness. After storage, test the camera by Olympus. Monitor The display on cameras and interchangeable lenses. A recommended battery may malfunction if it has not been used for storage to your mouth...

E-PM1 Instruction Manual (English)
Page 124
... Menu 81, 108 # Accessory port menu 90, 110 R AF/MF 81 S Button/Dial 82 T Release/j 83 U Disp/8/PC 83 V Exp/p/ISO 84 W # Custom 85 X K/Color/WB 85 Y Record/Erase 86 Z Movie 87 b K Utility 88 A OLYMPUS PENPAL Share 90 B OLYMPUS PENPAL Album 90 C Electronic Viewfinder 90 Y (Large 47 X (Middle 47, 86 W (Small...
... Menu 81, 108 # Accessory port menu 90, 110 R AF/MF 81 S Button/Dial 82 T Release/j 83 U Disp/8/PC 83 V Exp/p/ISO 84 W # Custom 85 X K/Color/WB 85 Y Record/Erase 86 Z Movie 87 b K Utility 88 A OLYMPUS PENPAL Share 90 B OLYMPUS PENPAL Album 90 C Electronic Viewfinder 90 Y (Large 47 X (Middle 47, 86 W (Small...
E-PM1 Basic Manual (English, Espa?ol, Fran栩s)
Page 6
Attaching a lens to the camera EN 1 Remove the body cap from the camera and the rear cap from the camera While pressing the lens release button, rotate the lens in the direction indicated by the arrow until you hear it click. 3 Remove the lens cap. 1 1 2 Removing the ... the camera. # Cautions • Make sure the camera is turned off. • Do not press the lens release button. • Do not touch internal portions of the arrow. g "Interchangeable lenses" (P. 100) Lens release button 2 1 6 EN Lens attachment mark Alignment mark • Align the lens attachment mark (red) on the...
Attaching a lens to the camera EN 1 Remove the body cap from the camera and the rear cap from the camera While pressing the lens release button, rotate the lens in the direction indicated by the arrow until you hear it click. 3 Remove the lens cap. 1 1 2 Removing the ... the camera. # Cautions • Make sure the camera is turned off. • Do not press the lens release button. • Do not touch internal portions of the arrow. g "Interchangeable lenses" (P. 100) Lens release button 2 1 6 EN Lens attachment mark Alignment mark • Align the lens attachment mark (red) on the...

E-PM1 Basic Manual (English, Espa?ol, Fran栩s)
Page 10
Names of parts EN Camera 1 6 2 3 7 8 4 3 9 5 0 a b c e d f 1 Shutter button P. 13, 14, 36, 92 2 ON/OFF button P. 8 3 Strap eyelet P. 3 4 Lens attachment mark P. 6 5 Mount (Remove the body cap before attaching the lens.) 6 Hot shoe cover 7 Stereo microphone P. 62, 68 8 Self-timer lamp/AF illuminator P. 49/P. 82 9 Lens release button P. 6 0 Lens lock pin a Tripod socket b Battery/card compartment cover.......P. 4 c Battery/card compartment lock .........P. 4 d Connector cover e Multi-connector P. 69, 73, 77 f HDMI micro connector (type D) ......P. 69 10 EN
Names of parts EN Camera 1 6 2 3 7 8 4 3 9 5 0 a b c e d f 1 Shutter button P. 13, 14, 36, 92 2 ON/OFF button P. 8 3 Strap eyelet P. 3 4 Lens attachment mark P. 6 5 Mount (Remove the body cap before attaching the lens.) 6 Hot shoe cover 7 Stereo microphone P. 62, 68 8 Self-timer lamp/AF illuminator P. 49/P. 82 9 Lens release button P. 6 0 Lens lock pin a Tripod socket b Battery/card compartment cover.......P. 4 c Battery/card compartment lock .........P. 4 d Connector cover e Multi-connector P. 69, 73, 77 f HDMI micro connector (type D) ......P. 69 10 EN
E-PM1 Basic Manual (English, Espa?ol, Fran栩s)
Page 15
... in images recorded at high ISO sensitivities. Choose a lower ISO sensitivity or turn off for extended periods, the temperature of ) the way down Recording movies Release the shutter button and press the R button to cancel all the way (fully). • The shutter sounds and the picture is used for a short period... to end recording. EN 15 Press halfway Press the rest of the way down ." EN Pressing the shutter button halfway and all the way down 3 Release the shutter. Press the R button again to turn the camera off the monitor and to begin recording.
... in images recorded at high ISO sensitivities. Choose a lower ISO sensitivity or turn off for extended periods, the temperature of ) the way down Recording movies Release the shutter button and press the R button to cancel all the way (fully). • The shutter sounds and the picture is used for a short period... to end recording. EN 15 Press halfway Press the rest of the way down ." EN Pressing the shutter button halfway and all the way down 3 Release the shutter. Press the R button again to turn the camera off the monitor and to begin recording.
E-PM1 Basic Manual (English, Espa?ol, Fran栩s)
Page 28
...; When mounted on a tripod, adjust the position of pictures you throw away dead batteries, be restored after it on and pressing the shutter release button to cover their terminals and always observe local laws and regulations. However, black spots or bright spots of the camera is used in normal...battery's terminals get wet or greasy, camera contact failure may appear constantly on the top/bottom of battery. After storage, test the camera by Olympus. Do not twist the camera. 28 EN • Do not leave the camera pointed directly at low temperatures may appear on the monitor....
...; When mounted on a tripod, adjust the position of pictures you throw away dead batteries, be restored after it on and pressing the shutter release button to cover their terminals and always observe local laws and regulations. However, black spots or bright spots of the camera is used in normal...battery's terminals get wet or greasy, camera contact failure may appear constantly on the top/bottom of battery. After storage, test the camera by Olympus. Do not twist the camera. 28 EN • Do not leave the camera pointed directly at low temperatures may appear on the monitor....
