

E-PM1 Instruction Manual (English)
Page 6
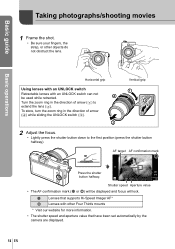
... mark (red) on the camera with the alignment mark (red) on the lens, then insert the lens into the camera's body. • Rotate the lens in the direction of the camera. Attaching a lens to the camera Basic guide Preparations for shooting 1 Remove the body cap from the camera ...and the rear cap from the camera While pressing the lens release button, rotate the lens in the direction indicated by the arrow until you hear it click. 3 Remove the lens cap. 1 1 2 Removing the lens from the lens. 1 2 1 2 2 Attach a lens to the camera. # Cautions • Make sure the camera is...
... mark (red) on the camera with the alignment mark (red) on the lens, then insert the lens into the camera's body. • Rotate the lens in the direction of the camera. Attaching a lens to the camera Basic guide Preparations for shooting 1 Remove the body cap from the camera ...and the rear cap from the camera While pressing the lens release button, rotate the lens in the direction indicated by the arrow until you hear it click. 3 Remove the lens cap. 1 1 2 Removing the lens from the lens. 1 2 1 2 2 Attach a lens to the camera. # Cautions • Make sure the camera is...

E-PM1 Instruction Manual (English)
Page 10
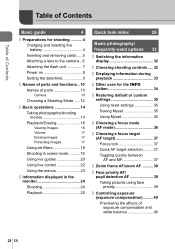
... functions a b c e d f 1 Shutter button P. 13, 14, 36, 92 2 ON/OFF button P. 8 3 Strap eyelet P. 3 4 Lens attachment mark P. 6 5 Mount (Remove the body cap before attaching the lens.) 6 Hot shoe cover 7 Stereo microphone P. 62, 68 8 Self-timer lamp/AF illuminator P. 49/P. 82 9 Lens release button P. 6 0 Lens lock pin a Tripod socket b Battery/card compartment cover.......P. 4 c Battery/card compartment lock...
... functions a b c e d f 1 Shutter button P. 13, 14, 36, 92 2 ON/OFF button P. 8 3 Strap eyelet P. 3 4 Lens attachment mark P. 6 5 Mount (Remove the body cap before attaching the lens.) 6 Hot shoe cover 7 Stereo microphone P. 62, 68 8 Self-timer lamp/AF illuminator P. 49/P. 82 9 Lens release button P. 6 0 Lens lock pin a Tripod socket b Battery/card compartment cover.......P. 4 c Battery/card compartment lock...
E-PM1 Instruction Manual (English)
Page 14
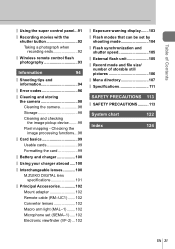
... the shutter button halfway. Basic operations Horizontal grip Vertical grip Using lenses with an UNLOCK switch Retractable lenses with other objects do not obstruct the lens. ISO-A 200 250 F5.6 LN HD 01:02:03 38 Shutter speed Aperture value • The AF confirmation mark (( or n) will lock. ( Lenses... zoom ring in the direction of arrow (4) while sliding the UNLOCK switch (3). 1 4 3 2 2 Adjust the focus. • Lightly press the shutter button down to extend the lens (2).
... the shutter button halfway. Basic operations Horizontal grip Vertical grip Using lenses with an UNLOCK switch Retractable lenses with other objects do not obstruct the lens. ISO-A 200 250 F5.6 LN HD 01:02:03 38 Shutter speed Aperture value • The AF confirmation mark (( or n) will lock. ( Lenses... zoom ring in the direction of arrow (4) while sliding the UNLOCK switch (3). 1 4 3 2 2 Adjust the focus. • Lightly press the shutter button down to extend the lens (2).

E-PM1 Instruction Manual (English)
Page 18
...;lter settings. 18 EN The art filter will automatically be less noticeable, or the image may be set to display the view through the lens in the monitor.
...;lter settings. 18 EN The art filter will automatically be less noticeable, or the image may be set to display the view through the lens in the monitor.

E-PM1 Instruction Manual (English)
Page 19
... × 1920)). • [n Fisheye Effect], [n Wide-angle], and [n Macro] are recorded: an unmodified image and a second image to display the view through the lens in the monitor.
... × 1920)). • [n Fisheye Effect], [n Wide-angle], and [n Macro] are recorded: an unmodified image and a second image to display the view through the lens in the monitor.
E-PM1 Instruction Manual (English)
Page 28
Table of Contents Table of Contents Basic guide 4 Preparations for shooting ...........4 Charging and inserting the battery 4 Inserting and removing cards .....5 Attaching a lens to the camera ...6 Attaching the flash unit 7 Power on 8 Setting the date/time 9 Names of parts and functions...10 Names of parts 10 Camera ...
Table of Contents Table of Contents Basic guide 4 Preparations for shooting ...........4 Charging and inserting the battery 4 Inserting and removing cards .....5 Attaching a lens to the camera ...6 Attaching the flash unit 7 Power on 8 Setting the date/time 9 Names of parts and functions...10 Names of parts 10 Camera ...
E-PM1 Instruction Manual (English)
Page 31
......98 Card basics 99 Usable cards 99 Formatting the card 99 Battery and charger 100 Using your charger abroad .....100 Interchangeable lenses............100 M.ZUIKO DIGITAL lens specifications 101 Principal Accessories 102 Mount adapter 102 Remote cable (RM-UC1) .......102 Converter lenses 102 Macro arm light (MAL-1) ........102 Microphone set...
......98 Card basics 99 Usable cards 99 Formatting the card 99 Battery and charger 100 Using your charger abroad .....100 Interchangeable lenses............100 M.ZUIKO DIGITAL lens specifications 101 Principal Accessories 102 Mount adapter 102 Remote cable (RM-UC1) .......102 Converter lenses 102 Macro arm light (MAL-1) ........102 Microphone set...
E-PM1 Instruction Manual (English)
Page 36
... [S-AF] mode, you to change the composition of the focus ring. # Cautions • The camera may be used to enable automatic zoom display when the lens focus ring is locked at the first and second time. Basic photography/frequently-used options Choosing a focus mode (AF mode) Select a focusing method (focus...
... [S-AF] mode, you to change the composition of the focus ring. # Cautions • The camera may be used to enable automatic zoom display when the lens focus ring is locked at the first and second time. Basic photography/frequently-used options Choosing a focus mode (AF mode) Select a focusing method (focus...

E-PM1 Instruction Manual (English)
Page 38
... initiate autofocus. $ Notes • Autofocus is available and pictures can be taken both when the zoom frame is displayed and when the view through the lens is zoomed in. % Tips • You can also use autofocus to view the zoom frame and zoom displays. [Button Function]: g "Customizing camera settings" (P. 81) # Cautions...
... initiate autofocus. $ Notes • Autofocus is available and pictures can be taken both when the zoom frame is displayed and when the view through the lens is zoomed in. % Tips • You can also use autofocus to view the zoom frame and zoom displays. [Button Function]: g "Customizing camera settings" (P. 81) # Cautions...

E-PM1 Instruction Manual (English)
Page 42
.... • The image stabilizer will not activate at shutter speeds of camera shake that most closely matches to [OFF]. • When using a lens with the camera held in the live control (P. 22) and select the image stabilizer item using a tripod, set to the slowest speed. Basic ...IS Image stabilization applies only to choose a focal length and press Q. J IS Off Image stabilizer is off the image stabilizer function of either the lens or the camera. • You may notice an operating sound or vibration when the image stabilizer is printed on . f Vertical IS Image stabilization ...
.... • The image stabilizer will not activate at shutter speeds of camera shake that most closely matches to [OFF]. • When using a lens with the camera held in the live control (P. 22) and select the image stabilizer item using a tripod, set to the slowest speed. Basic ...IS Image stabilization applies only to choose a focal length and press Q. J IS Off Image stabilizer is off the image stabilizer function of either the lens or the camera. • You may notice an operating sound or vibration when the image stabilizer is printed on . f Vertical IS Image stabilization ...

E-PM1 Instruction Manual (English)
Page 55
... recording a 3D image. EN 55 The two shots are locked at 1920 × 1080. • 3D and manual focus lenses can be viewed on the lens and camera settings, the 3D effect may not be used . • Depending on devices that support 3D display. 3D Photography Take 3D photographs. The results...
... recording a 3D image. EN 55 The two shots are locked at 1920 × 1080. • 3D and manual focus lenses can be viewed on the lens and camera settings, the 3D effect may not be used . • Depending on devices that support 3D display. 3D Photography Take 3D photographs. The results...
E-PM1 Instruction Manual (English)
Page 56
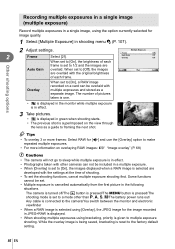
..., cancel multiple exposure shooting first. LN HD • The previous shot is superimposed on the view through P 250 F5.6 0.0 01:02:03 38 the lens as a separate image. Other shooting options Recording multiple exposures in a single image (multiple exposure) Record multiple exposures in a single image, using the option currently selected...
..., cancel multiple exposure shooting first. LN HD • The previous shot is superimposed on the view through P 250 F5.6 0.0 01:02:03 38 the lens as a separate image. Other shooting options Recording multiple exposures in a single image (multiple exposure) Record multiple exposures in a single image, using the option currently selected...
E-PM1 Instruction Manual (English)
Page 60
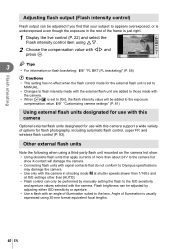
...can only be performed by adjusting either ISO sensitivity or aperture. • Use a flash with an angle of illumination suited to the lens. Flash brightness can be adjusted by manually setting the flash to the ISO sensitivity and aperture values selected with HI and press Q. Other ...[On], the flash intensity value will damage the camera. • Connecting flash units with signal contacts that do not conform to Olympus specifications may damage the camera. • Use only with the camera in the rest of illumination is usually expressed using a third-party ...
...can only be performed by adjusting either ISO sensitivity or aperture. • Use a flash with an angle of illumination suited to the lens. Flash brightness can be adjusted by manually setting the flash to the ISO sensitivity and aperture values selected with HI and press Q. Other ...[On], the flash intensity value will damage the camera. • Connecting flash units with signal contacts that do not conform to Olympus specifications may damage the camera. • Use only with the camera in the rest of illumination is usually expressed using a third-party ...
E-PM1 Instruction Manual (English)
Page 61
... filters, [C-AF] operation is limited. • Cards with the image stabilizer function, turn off the image stabilizer function of either the lens or the camera. • When the inside of the subject. Sensitivity can be set to adjust the aperture. In movie mode, you cannot ...change the settings for [Auto] is applied. • Stabilization is not possible when the camera shake is excessive. • When using a lens with an SD speed class of art filter mode. Depiction of the effects available in modes A and M. You control both aperture and shutter...
... filters, [C-AF] operation is limited. • Cards with the image stabilizer function, turn off the image stabilizer function of either the lens or the camera. • When the inside of the subject. Sensitivity can be set to adjust the aperture. In movie mode, you cannot ...change the settings for [Auto] is applied. • Stabilization is not possible when the camera shake is excessive. • When using a lens with an SD speed class of art filter mode. Depiction of the effects available in modes A and M. You control both aperture and shutter...
E-PM1 Instruction Manual (English)
Page 62
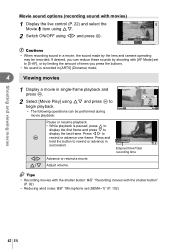
... movies Movie sound options (recording sound with [AF Mode] set (SEMA-1)" (P. 102) 62 EN Back • The following operations can reduce these sounds by the lens and camera operating may be performed during movie playback: Movie Movie Play m Erase Set Pause or resume playback. • While playback is recorded in [ART5...
... movies Movie sound options (recording sound with [AF Mode] set (SEMA-1)" (P. 102) 62 EN Back • The following operations can reduce these sounds by the lens and camera operating may be performed during movie playback: Movie Movie Play m Erase Set Pause or resume playback. • While playback is recorded in [ART5...
E-PM1 Instruction Manual (English)
Page 81
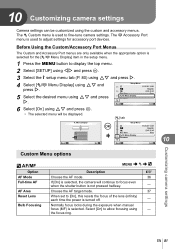
... j±0 k±0 5sec Back Set Back Set 10 Customizing camera settings Custom Menu options R AF/MF Option AF Mode Full-time AF AF Area Reset Lens Bulb Focusing MENU c R Description g Choose the AF mode. 36 If [On] is turned off. - Select [On] to allow focusing using the custom and accessory ... the appropriate option is selected for accessory port devices. Choose the AF target mode. 37 When set to [On], this resets the focus of the lens (in the setup menu. 1 Press the MENU button to adjust settings for the [c/# Menu Display] item in finity) each time the power is ...
... j±0 k±0 5sec Back Set Back Set 10 Customizing camera settings Custom Menu options R AF/MF Option AF Mode Full-time AF AF Area Reset Lens Bulb Focusing MENU c R Description g Choose the AF mode. 36 If [On] is turned off. - Select [On] to allow focusing using the custom and accessory ... the appropriate option is selected for accessory port devices. Choose the AF target mode. 37 When set to [On], this resets the focus of the lens (in the setup menu. 1 Press the MENU button to adjust settings for the [c/# Menu Display] item in finity) each time the power is ...
E-PM1 Instruction Manual (English)
Page 82
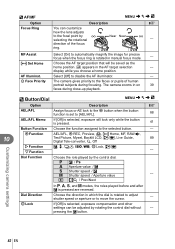
... the button function is set to [AEL/AFL]. 88 AEL/AFL Memo If [Off] is selected, exposure compensation and other settings can customize how the lens adjusts to the faces or pupils of the focus ring. Choose the AF target position that will lock only while the button is pressed are...
... the button function is set to [AEL/AFL]. 88 AEL/AFL Memo If [Off] is selected, exposure compensation and other settings can customize how the lens adjusts to the faces or pupils of the focus ring. Choose the AF target position that will lock only while the button is pressed are...
E-PM1 Instruction Manual (English)
Page 85
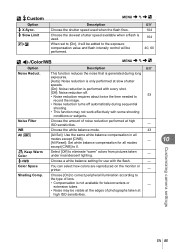
... of noise reduction performed at slow shutter speeds. [On]: Noise reduction is performed with some shooting conditions or subjects. Noise Filter Choose the amount of lens. • Compensation is used when the flash fires. WB Choose the white balance mode. 43 All > [All Set]: Use the same white balance...
... of noise reduction performed at slow shutter speeds. [On]: Noise reduction is performed with some shooting conditions or subjects. Noise Filter Choose the amount of lens. • Compensation is used when the flash fires. WB Choose the white balance mode. 43 All > [All Set]: Use the same white balance...
E-PM1 Instruction Manual (English)
Page 95
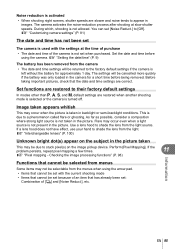
... the date and time before being removed. Image taken appears whitish This may occur even when a light source is not present in images. Use a lens hood to appear in the picture. EN 95 You can set when purchased. Perform [Pixel Mapping]. g "Setting the date/time" (P. 9) The ...already been set with the settings at slow shutter speeds. During which, shooting is not taken in the camera for approximately 1 day. If a lens hood does not have effect, use your hand to [Off]. Checking the image processing functions" (P. 98) Information Functions that cannot be selected ...
... the date and time before being removed. Image taken appears whitish This may occur even when a light source is not present in images. Use a lens hood to appear in the picture. EN 95 You can set when purchased. Perform [Pixel Mapping]. g "Setting the date/time" (P. 9) The ...already been set with the settings at slow shutter speeds. During which, shooting is not taken in the camera for approximately 1 day. If a lens hood does not have effect, use your hand to [Off]. Checking the image processing functions" (P. 98) Information Functions that cannot be selected ...
E-PM1 Instruction Manual (English)
Page 97
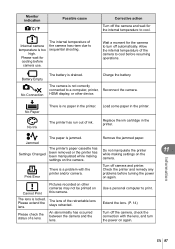
... printer. Wait a moment for cooling before camera use. Check the printer and remedy any problems before resuming operations. Please extend the lens. Extend the lens. (P. 14) Turn off automatically. Monitor indication m Possible cause Corrective action Turn off camera and printer. Please wait for the camera... high. HDMI display, or other cameras may not be printed on again. No Paper No Ink There is a problem with the lens, and turn off the camera, check the connection with the printer and/or camera. Replace the ink cartridge in the printer. Information...
... printer. Wait a moment for cooling before camera use. Check the printer and remedy any problems before resuming operations. Please extend the lens. Extend the lens. (P. 14) Turn off automatically. Monitor indication m Possible cause Corrective action Turn off camera and printer. Please wait for the camera... high. HDMI display, or other cameras may not be printed on again. No Paper No Ink There is a problem with the lens, and turn off the camera, check the connection with the printer and/or camera. Replace the ink cartridge in the printer. Information...


