User Manual
Page 5
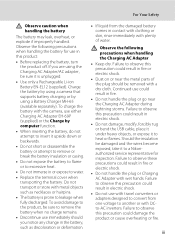
...to insert it is prone to water. • Replace the terminal cover when transporting the battery. Continued use either Charging AC Adapter EH-69P (supplied) or the Charge by using the Charging AC Adapter/AC adapter, be sure it upside down or backwards. • Do not short or disassemble the battery... or with plenty of the plug should be sure to remove the battery when no charge remains. • Discontinue use in electric shock. • Do not damage, modify, forcibly tug or bend the USB cable, place it under heavy objects, or expose it to observe this precaution could result ...
...to insert it is prone to water. • Replace the terminal cover when transporting the battery. Continued use either Charging AC Adapter EH-69P (supplied) or the Charge by using the Charging AC Adapter/AC adapter, be sure it upside down or backwards. • Do not short or disassemble the battery... or with plenty of the plug should be sure to remove the battery when no charge remains. • Discontinue use in electric shock. • Do not damage, modify, forcibly tug or bend the USB cable, place it under heavy objects, or expose it to observe this precaution could result ...
User Manual
Page 30
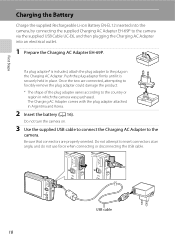
...an angle, and do not use force when connecting or disconnecting the USB cable. Once the two are properly oriented. The Charging AC Adapter comes with the plug adapter attached in which the camera was purchased. USB cable 18 Be sure that connectors are connected, attempting to forcibly remove the ...and Korea. 2 Insert the battery (A 16). Do not attempt to the camera via the supplied USB Cable UC-E6, and then plugging the Charging AC Adapter into an electrical outlet. 1 Prepare the Charging AC Adapter EH-69P. Push the plug adapter firmly until it is included, attach the plug adapter to...
...an angle, and do not use force when connecting or disconnecting the USB cable. Once the two are properly oriented. The Charging AC Adapter comes with the plug adapter attached in which the camera was purchased. USB cable 18 Be sure that connectors are connected, attempting to forcibly remove the ...and Korea. 2 Insert the battery (A 16). Do not attempt to the camera via the supplied USB Cable UC-E6, and then plugging the Charging AC Adapter into an electrical outlet. 1 Prepare the Charging AC Adapter EH-69P. Push the plug adapter firmly until it is included, attach the plug adapter to...
User Manual
Page 31
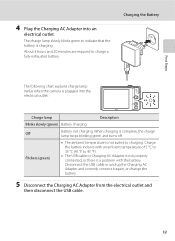
... battery indoors with the battery. About 3 hours and 20 minutes are required to 95 °F). • The USB cable or Charging AC Adapter is not properly connected, or there is charging. The charge lamp slowly blinks green to indicate that the battery is a problem with an ambient temperature of 5 °C to 35 °C (41...
... battery indoors with the battery. About 3 hours and 20 minutes are required to 95 °F). • The USB cable or Charging AC Adapter is not properly connected, or there is charging. The charge lamp slowly blinks green to indicate that the battery is a problem with an ambient temperature of 5 °C to 35 °C (41...
User Manual
Page 150
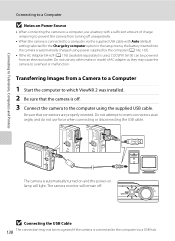
... option in the setup menu, the battery inserted into the camera is used, COOLPIX S6100 can be recognized if the camera is connected to the computer via the supplied USB cable with Auto (default setting) selected for the Charge by the computer (A 142, 165). • If the AC Adapter EH-...62F (A 176) (available separately) is automatically charged using the supplied USB cable. Do not use any other make or model of charge remaining to prevent the camera from a Camera to a Computer 1 Start the computer to which ViewNX 2 was installed....
... option in the setup menu, the battery inserted into the camera is used, COOLPIX S6100 can be recognized if the camera is connected to the computer via the supplied USB cable with Auto (default setting) selected for the Charge by the computer (A 142, 165). • If the AC Adapter EH-...62F (A 176) (available separately) is automatically charged using the supplied USB cable. Do not use any other make or model of charge remaining to prevent the camera from a Camera to a Computer 1 Start the computer to which ViewNX 2 was installed....
User Manual
Page 152
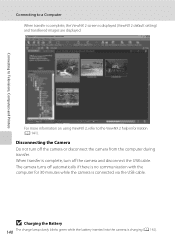
... When transfer is complete, the ViewNX 2 screen is charging (A 142). Disconnecting the Camera Do not turn off the camera or disconnect the camera from the computer during transfer. When transfer is connected via the USB cable. Connecting to Televisions, Computers and Printers Connecting to the...communication with the computer for 30 minutes while the camera is complete, turn off the camera and disconnect the USB cable. B Charging the Battery 140 The charge lamp slowly blinks green while the battery inserted into the camera is displayed (ViewNX 2 default setting) and transferred...
... When transfer is complete, the ViewNX 2 screen is charging (A 142). Disconnecting the Camera Do not turn off the camera or disconnect the camera from the computer during transfer. When transfer is connected via the USB cable. Connecting to Televisions, Computers and Printers Connecting to the...communication with the computer for 30 minutes while the camera is complete, turn off the camera and disconnect the USB cable. B Charging the Battery 140 The charge lamp slowly blinks green while the battery inserted into the camera is displayed (ViewNX 2 default setting) and transferred...
User Manual
Page 154
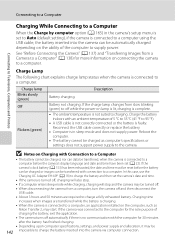
... with an ambient temperature of the computer to supply power. Reboot the computer. • The battery cannot be charged as Nikon Transfer 2, may be 142 impossible to charge the battery inserted into the camera can be turned off. • When disconnecting the camera from a computer,... turn the camera off and then disconnect the USB cable. • About 3 hours and 50 minutes are transferred while the battery is charging....
... with an ambient temperature of the computer to supply power. Reboot the computer. • The battery cannot be charged as Nikon Transfer 2, may be 142 impossible to charge the battery inserted into the camera can be turned off. • When disconnecting the camera from a computer,... turn the camera off and then disconnect the USB cable. • About 3 hours and 50 minutes are transferred while the battery is charging....
User Manual
Page 155
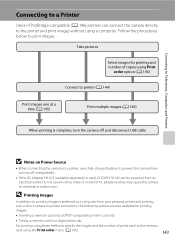
...cause the camera to the printer and print images without using the Print order menu (A 106). 143 Do not use a fully charged battery to prevent the camera from your personal printer and printing over a direct camera-to-printer connection, the following options are ...cable B Notes on Power Source • When connecting the camera to a printer, use any other make or model of prints each to print images. D Printing Images In addition to printing images transferred to a computer from turning off unexpectedly. • If the AC Adapter EH-62F (available separately) is used, COOLPIX S6100...
...cause the camera to the printer and print images without using the Print order menu (A 106). 143 Do not use a fully charged battery to prevent the camera from your personal printer and printing over a direct camera-to-printer connection, the following options are ...cable B Notes on Power Source • When connecting the camera to a printer, use any other make or model of prints each to print images. D Printing Images In addition to printing images transferred to a computer from turning off unexpectedly. • If the AC Adapter EH-62F (available separately) is used, COOLPIX S6100...

User Manual
Page 156
...an angle, and do not use force when connecting or disconnecting the USB cable. 4 The camera is automatically turned on the printer. Do not attempt to a Printer 1 Turn off and disconnect the USB cable. When properly connected, the PictBridge startup screen (1) will be displayed in ...the camera's setup menu to the printer using the supplied USB cable. Check printer settings. 3 Connect the camera to Off and reconnect the cable. Set the Charge by computer option (A 165) 144 in the camera monitor, followed by the Print selection screen (2). ...
...an angle, and do not use force when connecting or disconnecting the USB cable. 4 The camera is automatically turned on the printer. Do not attempt to a Printer 1 Turn off and disconnect the USB cable. When properly connected, the PictBridge startup screen (1) will be displayed in ...the camera's setup menu to the printer using the supplied USB cable. Check printer settings. 3 Connect the camera to Off and reconnect the cable. Set the Charge by computer option (A 165) 144 in the camera monitor, followed by the Print selection screen (2). ...

User Manual
Page 161
... u Digital zoom A 160 Enable or disable digital zoom. n Language A 164 Choose the language used for connection to a computer via the USB cable. Basic Camera Setup Setup Menu The setup menu contains the following options. k Auto off A 162 Set time before the monitor turns off for saving ...power. V Charge by computer A 165 Choose whether or not to charge the camera battery when connecting to television. d Time zone and date A 152 Set camera clock and choose home and...
... u Digital zoom A 160 Enable or disable digital zoom. n Language A 164 Choose the language used for connection to a computer via the USB cable. Basic Camera Setup Setup Menu The setup menu contains the following options. k Auto off A 162 Set time before the monitor turns off for saving ...power. V Charge by computer A 165 Choose whether or not to charge the camera battery when connecting to television. d Time zone and date A 152 Set camera clock and choose home and...

User Manual
Page 177
... the printer complies with the PictBridge standard. • When Auto is selected for Charge by computer, it may be impossible to print images with direct connection of the camera to a computer via the USB cable (A 142). If the PictBridge startup screen is not displayed in the monitor after ...the camera is connected to the printer. 165 Setup Menu V Charge by Computer Tap the bottom tab (A 150) M Tap z (Setup menu) M V Charge by computer Choose whether or not the...
... the printer complies with the PictBridge standard. • When Auto is selected for Charge by computer, it may be impossible to print images with direct connection of the camera to a computer via the USB cable (A 142). If the PictBridge startup screen is not displayed in the monitor after ...the camera is connected to the printer. 165 Setup Menu V Charge by Computer Tap the bottom tab (A 150) M Tap z (Setup menu) M V Charge by computer Choose whether or not the...
User Manual
Page 188
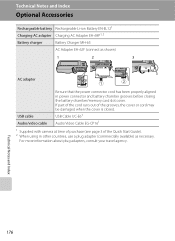
..., consult your travel agency. Technical Notes and Index Optional Accessories Rechargeable battery Rechargeable Li-ion Battery EN-EL121 Charging AC adapter Charging AC Adapter EH-69P1, 2 Battery charger Battery Charger MH-65 AC Adapter EH-62F (connect as necessary.... Technical Notes and Index 176 If part of the cord runs out of the Quick Start Guide). 2 When using in other countries, use a plug adapter (commercially available) as shown) 1 2 3 AC adapter USB cable...
..., consult your travel agency. Technical Notes and Index Optional Accessories Rechargeable battery Rechargeable Li-ion Battery EN-EL121 Charging AC adapter Charging AC Adapter EH-69P1, 2 Battery charger Battery Charger MH-65 AC Adapter EH-62F (connect as necessary.... Technical Notes and Index 176 If part of the cord runs out of the Quick Start Guide). 2 When using in other countries, use a plug adapter (commercially available) as shown) 1 2 3 AC adapter USB cable...
User Manual
Page 196
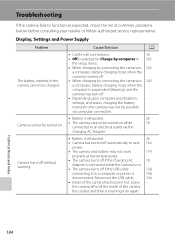
... the USB cable. 144 • Inside of common problems below before consulting your retailer or Nikon-authorized service representative. settings, and status, charging the battery inserted in 165 the setup menu. • When charging by connecting the camera to 142 a computer, battery charging stops when the...camera turns off if the USB cable 138, connecting it on . • The camera cannot be charged. • Confirm all connections. 18 • Off is selected for Charge by computer in the camera may not be possible via the 18 Charging AC Adapter. Troubleshooting If the ...
... the USB cable. 144 • Inside of common problems below before consulting your retailer or Nikon-authorized service representative. settings, and status, charging the battery inserted in 165 the setup menu. • When charging by connecting the camera to 142 a computer, battery charging stops when the...camera turns off if the USB cable 138, connecting it on . • The camera cannot be charged. • Confirm all connections. 18 • Off is selected for Charge by computer in the camera may not be possible via the 18 Charging AC Adapter. Troubleshooting If the ...

User Manual
Page 197
..., A button, c button, or b (e movie-record) button. • When flash lamp blinks, wait until flash has charged. • Camera and computer are connected via USB cable. • Camera and TV are connected via audio/video cable or HDMI cable. 21 21, 162 35 138 134 Date and time of recording are dated "00/00/0000...
..., A button, c button, or b (e movie-record) button. • When flash lamp blinks, wait until flash has charged. • Camera and computer are connected via USB cable. • Camera and TV are connected via audio/video cable or HDMI cable. 21 21, 162 35 138 134 Date and time of recording are dated "00/00/0000...

User Manual
Page 198
... power switch also turns off , and the power-on again. this phenomenon is charging. 35 Technical Notes and Index 186 In most cases, this is high. Cause/Solution A Disconnect HDMI cable or USB cable. 134, 138, 144 • When camera is in a hot area; In...26 • When flash lamp blinks, flash is caused by a strong external static charge. After the lamp blinks for an extended period of continued malfunction, contact your retailer or Nikon-authorized service representative. Electronically Controlled Cameras In extremely rare instances, unusual characters may appear...
... power switch also turns off , and the power-on again. this phenomenon is charging. 35 Technical Notes and Index 186 In most cases, this is high. Cause/Solution A Disconnect HDMI cable or USB cable. 134, 138, 144 • When camera is in a hot area; In...26 • When flash lamp blinks, flash is caused by a strong external static charge. After the lamp blinks for an extended period of continued malfunction, contact your retailer or Nikon-authorized service representative. Electronically Controlled Cameras In extremely rare instances, unusual characters may appear...

User Manual
Page 209
... Shooting mode button 5, 6 F Smart portrait mode 76 h Thumbnail playback 4, 83 A AC adapter 176 AF area 30 AF assist 160 Album 90 Aperture 30 Audio/video cable 134, 176 Audio/video-in jack 134 Auto flash 34 Auto mode 26 Auto off 162 Auto sort mode 95 Autofocus 39 B Back light o 70...Beach Z 66 Best Shot Selector 56 Blink proof 79 Brightness 156 BSS 56 Built-in microphone (stereo) 4, 111 Button sound 161 C Charge by computer 165 Charge lamp 5, 19, 142 Charger 18 Charging AC Adapter 18 Close-up k 68 Cloudy 57 Compression ratio 45 Computer 137 Connector cover 4 Continuous 56 Copy n 70 Copying images...
... Shooting mode button 5, 6 F Smart portrait mode 76 h Thumbnail playback 4, 83 A AC adapter 176 AF area 30 AF assist 160 Album 90 Aperture 30 Audio/video cable 134, 176 Audio/video-in jack 134 Auto flash 34 Auto mode 26 Auto off 162 Auto sort mode 95 Autofocus 39 B Back light o 70...Beach Z 66 Best Shot Selector 56 Blink proof 79 Brightness 156 BSS 56 Built-in microphone (stereo) 4, 111 Button sound 161 C Charge by computer 165 Charge lamp 5, 19, 142 Charger 18 Charging AC Adapter 18 Close-up k 68 Cloudy 57 Compression ratio 45 Computer 137 Connector cover 4 Continuous 56 Copy n 70 Copying images...


