

User Manual
Page 4
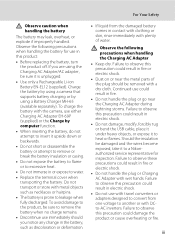
... of the camera or Charging AC Adapter could result in injury. After removing or disconnecting the power source, take the product to a Nikon-authorized service representative for inspection. ii This icon marks warnings, information that should be taken to prevent infants from the camera or Charging ..., to prevent possible injury. For Your Safety To prevent damage to your Nikon product or injury to yourself or to others, read the following safety precautions in explosion or fire. WARNINGS Turn off in the event of an infant or child. Handle the camera strap with care Never...
... of the camera or Charging AC Adapter could result in injury. After removing or disconnecting the power source, take the product to a Nikon-authorized service representative for inspection. ii This icon marks warnings, information that should be taken to prevent infants from the camera or Charging ..., to prevent possible injury. For Your Safety To prevent damage to your Nikon product or injury to yourself or to others, read the following safety precautions in explosion or fire. WARNINGS Turn off in the event of an infant or child. Handle the camera strap with care Never...
User Manual
Page 5
... attempt to insert it to water. • Replace the terminal cover when transporting the battery. Failure to observe this product: • Before replacing the battery, turn the product off.
... attempt to insert it to water. • Replace the terminal cover when transporting the battery. Failure to observe this product: • Before replacing the battery, turn the product off.

User Manual
Page 6
... eyes or mouth. Avoid contact with liquid crystal Should the monitor break, care should not be no less than 1 m (3 ft. 4 in burns or fire. Turn the power off when using while in a hospital. Playing CDROMs on audio CD equipment. Do not operate the flash with the flash window touching a person...cables to the input and output jacks, use only the cables provided or sold by the lens cover or other objects are not pinched by Nikon for the purpose, to maintain compliance with product regulations. CD-ROMs The CD-ROMs supplied with this precaution could cause hearing loss or damage ...
... eyes or mouth. Avoid contact with liquid crystal Should the monitor break, care should not be no less than 1 m (3 ft. 4 in burns or fire. Turn the power off when using while in a hospital. Playing CDROMs on audio CD equipment. Do not operate the flash with the flash window touching a person...cables to the input and output jacks, use only the cables provided or sold by the lens cover or other objects are not pinched by Nikon for the purpose, to maintain compliance with product regulations. CD-ROMs The CD-ROMs supplied with this precaution could cause hearing loss or damage ...
User Manual
Page 7
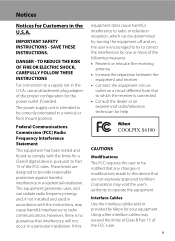
...• Consult the dealer or an experienced radio/television technician for the power outlet if needed. These limits are not expressly approved by Nikon Corporation may void the user's authority to be correctly orientated in a vertical or floor mount position. Interface Cables Use the interface cables... plug adapter of the FCC rules. Notices Notices for your equipment. CAUTIONS Modifications The FCC requires the user to be determined by turning the equipment off and on a circuit different from that to which the receiver is no guarantee that are designed to Part 15 ...
...• Consult the dealer or an experienced radio/television technician for the power outlet if needed. These limits are not expressly approved by Nikon Corporation may void the user's authority to be correctly orientated in a vertical or floor mount position. Interface Cables Use the interface cables... plug adapter of the FCC rules. Notices Notices for your equipment. CAUTIONS Modifications The FCC requires the user to be determined by turning the equipment off and on a circuit different from that to which the receiver is no guarantee that are designed to Part 15 ...
User Manual
Page 9
...Operation Controls)...13 Operating the Tabs...14 First Steps ...16 Inserting the Battery ...16 Removing the Battery ...17 Charging the Battery ...18 Turning On and Off the Camera...21 Setting Display Language, Date and Time 22 Inserting Memory Cards ...24 Removing Memory Cards...24 Basic Photography ...and Playback: A (Auto) Mode 26 Step 1 Turn the Camera On and Select A (Auto) Mode 26 Indicators Displayed in A (Auto) Mode 27 Step 2 Frame a Picture ...28 Using the Zoom...29...
...Operation Controls)...13 Operating the Tabs...14 First Steps ...16 Inserting the Battery ...16 Removing the Battery ...17 Charging the Battery ...18 Turning On and Off the Camera...21 Setting Display Language, Date and Time 22 Inserting Memory Cards ...24 Removing Memory Cards...24 Basic Photography ...and Playback: A (Auto) Mode 26 Step 1 Turn the Camera On and Select A (Auto) Mode 26 Indicators Displayed in A (Auto) Mode 27 Step 2 Frame a Picture ...28 Using the Zoom...29...
User Manual
Page 18
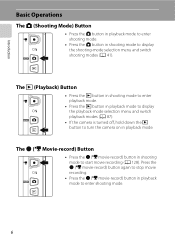
... the c button in playback mode to display the playback-mode selection menu and switch playback modes (A 87). • If the camera is turned off, hold down the c button to turn the camera on in playback mode to stop movie recording. • Press the b (e movie-record) button in playback mode. Press the b (e movie...
... the c button in playback mode to display the playback-mode selection menu and switch playback modes (A 87). • If the camera is turned off, hold down the c button to turn the camera on in playback mode to stop movie recording. • Press the b (e movie-record) button in playback mode. Press the b (e movie...

User Manual
Page 24
... and camera status. • The displayed information varies depending on the image played back and the current camera status. • Indicators below are displayed when turning on the camera or operating the camera, and turn off after a few seconds elapse (A 155). 12 3 4567 15/05/2011 15 : 30 12 0003.
... and camera status. • The displayed information varies depending on the image played back and the current camera status. • Indicators below are displayed when turning on the camera or operating the camera, and turn off after a few seconds elapse (A 155). 12 3 4567 15/05/2011 15 : 30 12 0003.
User Manual
Page 29
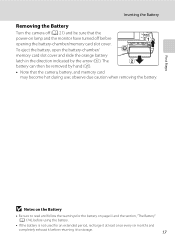
... camera off before returning it to read and follow the warnings for the battery on lamp and the monitor have turned off (A 21) and be removed by the arrow (1). The battery can then be sure that the camera, battery, and memory card may become hot during ...
... camera off before returning it to read and follow the warnings for the battery on lamp and the monitor have turned off (A 21) and be removed by the arrow (1). The battery can then be sure that the camera, battery, and memory card may become hot during ...
User Manual
Page 30
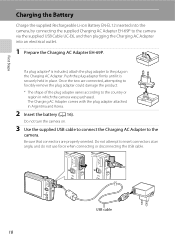
... insert connectors at an angle, and do not use force when connecting or disconnecting the USB cable. Once the two are properly oriented. Do not turn the camera on the Charging AC Adapter. First Steps Charging the Battery Charge the supplied Rechargeable Li-ion Battery EN-EL12 inserted into an electrical...
... insert connectors at an angle, and do not use force when connecting or disconnecting the USB cable. Once the two are properly oriented. Do not turn the camera on the Charging AC Adapter. First Steps Charging the Battery Charge the supplied Rechargeable Li-ion Battery EN-EL12 inserted into an electrical...
User Manual
Page 31
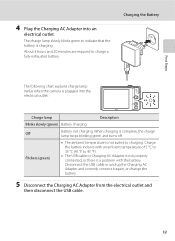
... chart explains charge lamp status when the camera is not suited to indicate that the battery is complete, the charge lamp stops blinking green and turns off. Off Battery not charging. Flickers (green) • The ambient temperature is plugged into an electrical outlet. Disconnect the USB cable or unplug the Charging...
... chart explains charge lamp status when the camera is not suited to indicate that the battery is complete, the charge lamp stops blinking green and turns off. Off Battery not charging. Flickers (green) • The ambient temperature is plugged into an electrical outlet. Disconnect the USB cable or unplug the Charging...
User Manual
Page 32
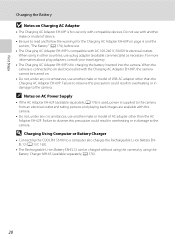
...). • The Rechargeable Li-ion Battery EN-EL12 can be turned on page iii and the section, "The Battery" (A 174), before use only with AC 100-240 V, 50/60 Hz electrical outlets. D Charging Using Computer or Battery Charger • Connecting the COOLPIX S6100 to an electrical outlet with the Charging AC Adapter EH...
...). • The Rechargeable Li-ion Battery EN-EL12 can be turned on page iii and the section, "The Battery" (A 174), before use only with AC 100-240 V, 50/60 Hz electrical outlets. D Charging Using Computer or Battery Charger • Connecting the COOLPIX S6100 to an electrical outlet with the Charging AC Adapter EH...
User Manual
Page 33
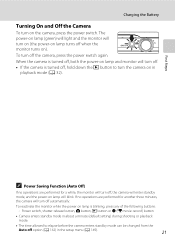
...record) button • Camera enters standby mode in about a minute (default setting) during shooting or playback mode. • The time allowed to turn off, the camera will turn off option (A 162) in playback mode (A 32). First Steps C Power Saving Function (Auto Off) If no operations are performed for another ...three minutes, the camera will enter standby mode, and the power-on lamp is turned off, hold down the c button to elapse before the camera enters standby mode can be changed from the Auto off the camera, ...
...record) button • Camera enters standby mode in about a minute (default setting) during shooting or playback mode. • The time allowed to turn off, the camera will turn off option (A 162) in playback mode (A 32). First Steps C Power Saving Function (Auto Off) If no operations are performed for another ...three minutes, the camera will enter standby mode, and the power-on lamp is turned off, hold down the c button to elapse before the camera enters standby mode can be changed from the Auto off the camera, ...

User Manual
Page 34
... the camera is displayed at the top of the monitor. The power-on lamp (green) will light and the monitor will turn off when the monitor turns on lamp turns off the daylight saving time option, tap p again. 22 Home time zone London Casablanca Language Čeština Dansk Deutsch ...Panel" (A 8). . 3 Tap Yes. Yes No Home time zone London Casablanca D Daylight Saving Time If daylight saving time is not displayed, tap B or C to turn on the daylight saving time option. If the desired language is in effect, tap p in the time zone selection screen displayed in step 4 to view...
... the camera is displayed at the top of the monitor. The power-on lamp (green) will light and the monitor will turn off when the monitor turns on lamp turns off the daylight saving time option, tap p again. 22 Home time zone London Casablanca Language Čeština Dansk Deutsch ...Panel" (A 8). . 3 Tap Yes. Yes No Home time zone London Casablanca D Daylight Saving Time If daylight saving time is not displayed, tap B or C to turn on the daylight saving time option. If the desired language is in effect, tap p in the time zone selection screen displayed in step 4 to view...
User Manual
Page 36
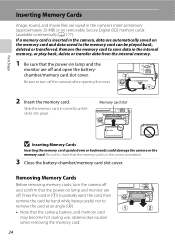
... (1) to partially eject the card, then remove the card by hand while being careful not to turn the camera off and open the batterychamber/memory card slot cover. Removing Memory Cards Before removing memory cards, turn off . Memory card slot B Inserting Memory Cards Inserting the memory card upside down or backwards could...
... (1) to partially eject the card, then remove the card by hand while being careful not to turn the camera off and open the batterychamber/memory card slot cover. Removing Memory Cards Before removing memory cards, turn off . Memory card slot B Inserting Memory Cards Inserting the memory card upside down or backwards could...
User Manual
Page 37
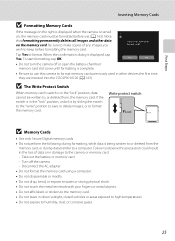
...memory card slot cover until formatting is being written to a computer. When the confirmation dialog is not formatted. Ye s No • Do not turn the camera off the camera - Write protect switch B Memory Cards • Use only Secure Digital memory cards. • Do not perform the...to or deleted from , the memory card. Note that formatting permanently deletes all images and other devices the first time they are inserted into the COOLPIX S6100 (A 163). Disconnect the AC adapter • Do not format the memory card using a computer. • Do not disassemble or modify. •...
...memory card slot cover until formatting is being written to a computer. When the confirmation dialog is not formatted. Ye s No • Do not turn the camera off the camera - Write protect switch B Memory Cards • Use only Secure Digital memory cards. • Do not perform the...to or deleted from , the memory card. Note that formatting permanently deletes all images and other devices the first time they are inserted into the COOLPIX S6100 (A 163). Disconnect the AC adapter • Do not format the memory card using a computer. • Do not disassemble or modify. •...
User Manual
Page 38
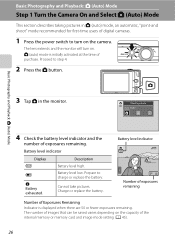
...Battery level low. Cannot take pictures. Battery level indicator 3 Number of exposures remaining Number of exposures remaining. The lens extends and the monitor will turn on the camera. Basic Photography and Playback: A (Auto) Mode 3 Tap A in A (auto) mode, an automatic, "point-and shoot... Display b B N Battery exhausted. Basic Photography and Playback: A (Auto) Mode Step 1 Turn the Camera On and Select A (Auto) Mode This section describes taking pictures in the monitor. Proceed to turn on the capacity of purchase. The number of images that can be saved varies depending on ....
...Battery level low. Cannot take pictures. Battery level indicator 3 Number of exposures remaining Number of exposures remaining. The lens extends and the monitor will turn on the camera. Basic Photography and Playback: A (Auto) Mode 3 Tap A in A (auto) mode, an automatic, "point-and shoot... Display b B N Battery exhausted. Basic Photography and Playback: A (Auto) Mode Step 1 Turn the Camera On and Select A (Auto) Mode This section describes taking pictures in the monitor. Proceed to turn on the capacity of purchase. The number of images that can be saved varies depending on ....

User Manual
Page 39
...camera's internal memory (approximately 20 MB). Shooting mode A displayed in the setup menu (A 149) for more information. 27 When the monitor has turned off in standby mode to save power (the power-on lamp is blinking) (A 162), press the following buttons to display the setting controls. ...B Note on the memory card. Take care that you do not release the shutter accidently. Basic Photography and Playback: A (Auto) Mode Step 1 Turn the Camera On and Select A (Auto) Mode Indicators Displayed in the camera, C does not appear and images will be released by tapping the left ...
...camera's internal memory (approximately 20 MB). Shooting mode A displayed in the setup menu (A 149) for more information. 27 When the monitor has turned off in standby mode to save power (the power-on lamp is blinking) (A 162), press the following buttons to display the setting controls. ...B Note on the memory card. Take care that you do not release the shutter accidently. Basic Photography and Playback: A (Auto) Mode Step 1 Turn the Camera On and Select A (Auto) Mode Indicators Displayed in the camera, C does not appear and images will be released by tapping the left ...

User Manual
Page 40
... to the camera will not be detected. A face detected by the camera will be framed by a single border. 3 When taking pictures in portrait ("tall") orientation, turn the camera so that the intended subject is detected, a focus area will be framed by a double border, and the others by a yellow double border (focus...
... to the camera will not be detected. A face detected by the camera will be framed by a single border. 3 When taking pictures in portrait ("tall") orientation, turn the camera so that the intended subject is detected, a focus area will be framed by a double border, and the others by a yellow double border (focus...
User Manual
Page 41
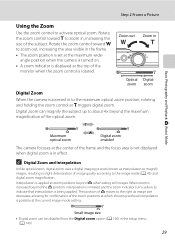
... be disabled from the Digital zoom option (A 160) in effect. Rotate the zoom control toward g to indicate that interpolation is initiated and the zoom indicator turns yellow to zoom in the frame. • The zoom position is set at the maximum wideangle position when the camera is... turned on. • A zoom indicator is displayed at the top of the monitor when the zoom control is possible at which shooting without interpolation is rotated. C ...
... be disabled from the Digital zoom option (A 160) in effect. Rotate the zoom control toward g to indicate that interpolation is initiated and the zoom indicator turns yellow to zoom in the frame. • The zoom position is set at the maximum wideangle position when the camera is... turned on. • A zoom indicator is displayed at the top of the monitor when the zoom control is possible at which shooting without interpolation is rotated. C ...
User Manual
Page 42
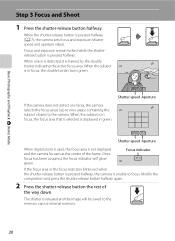
... is selected is displayed in green. 1/ 250 F3.7 Shutter speed Aperture When digital zoom is used, the focus area is in focus, the double border turns green. 1/ 250 F3.7 Shutter speed Aperture If the camera does not detect any faces, the camera selects the focus areas (up to nine areas) containing...
... is selected is displayed in green. 1/ 250 F3.7 Shutter speed Aperture When digital zoom is used, the focus area is in focus, the double border turns green. 1/ 250 F3.7 Shutter speed Aperture If the camera does not detect any faces, the camera selects the focus areas (up to nine areas) containing...


