
User Manual
Page 27
... vary depending on the shooting mode (A 41). • Each icon also indicates the current setting. m Flash mode 34 1 n Self-timer 37 p Macro mode 39 o Exposure compensation 40 1 A Image mode 45 Touch shooting q Touch shutter 47 s Subject tracking 50 r Touch AF/AE 52 2 E ISO sensitivity 55 C Continuous 56 2 w White balance 57 D Movie options 130 3 nMovie AF mode 131 Y Wind noise reduction 132 3 z Set up 149 Playback Images can be edited and deleted, and playback settings can be made . •...
... vary depending on the shooting mode (A 41). • Each icon also indicates the current setting. m Flash mode 34 1 n Self-timer 37 p Macro mode 39 o Exposure compensation 40 1 A Image mode 45 Touch shooting q Touch shutter 47 s Subject tracking 50 r Touch AF/AE 52 2 E ISO sensitivity 55 C Continuous 56 2 w White balance 57 D Movie options 130 3 nMovie AF mode 131 Y Wind noise reduction 132 3 z Set up 149 Playback Images can be edited and deleted, and playback settings can be made . •...
User Manual
Page 36
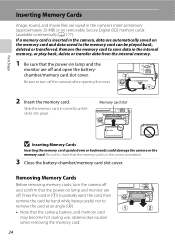
... use; A 177). Press the card in (1) to partially eject the card, then remove the card by hand while being careful not to save data in the internal memory, or play back, delete or transfer data from the internal memory. 1 Be sure that the memory card is inserted in correctly until it clicks into place. observe due caution when removing the memory card. 24 First Steps Inserting Memory Cards Image, sound, and movie files are off and open...
... use; A 177). Press the card in (1) to partially eject the card, then remove the card by hand while being careful not to save data in the internal memory, or play back, delete or transfer data from the internal memory. 1 Be sure that the memory card is inserted in correctly until it clicks into place. observe due caution when removing the memory card. 24 First Steps Inserting Memory Cards Image, sound, and movie files are off and open...
User Manual
Page 37
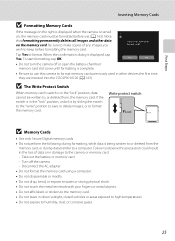
... camera is turned on the memory card. Card is displayed, tap Yes. Failure to observe this camera to humidity, dust, or corrosive gases. 25 Tap Yes to the camera or memory card: - Note that formatting permanently deletes all images and other devices the first time they are inserted into the COOLPIX S6100 (A 163). Be sure to make copies of data or in damage to format. B The Write Protect Switch When memory card's switch is in the "lock...
... camera is turned on the memory card. Card is displayed, tap Yes. Failure to observe this camera to humidity, dust, or corrosive gases. 25 Tap Yes to the camera or memory card: - Note that formatting permanently deletes all images and other devices the first time they are inserted into the COOLPIX S6100 (A 163). Be sure to make copies of data or in damage to format. B The Write Protect Switch When memory card's switch is in the "lock...

User Manual
Page 39
... tapping a subject in the monitor (A 47). Take care that face and focuses on the memory card. D Vibration Reduction and Motion Detection See Vibration reduction (A 158) or Motion detection (A 159) in A (auto) mode. Power switch, shutter-release button, A button or b (e movie-record) button B Note on . - D Functions Available in A (Auto) Mode • When the camera is blinking) (A 162), press the following buttons to display the setting controls. Shooting mode A displayed in the setup menu (A 149) for more information. 27 When...
... tapping a subject in the monitor (A 47). Take care that face and focuses on the memory card. D Vibration Reduction and Motion Detection See Vibration reduction (A 158) or Motion detection (A 159) in A (auto) mode. Power switch, shutter-release button, A button or b (e movie-record) button B Note on . - D Functions Available in A (Auto) Mode • When the camera is blinking) (A 162), press the following buttons to display the setting controls. Shooting mode A displayed in the setup menu (A 149) for more information. 27 When...

User Manual
Page 44
... pet detection (A 71) function will not extend. A 56, 71). Display the previous image Display the next image 15/05/2011 15 : 30 0003. Press the A button, b (e movie-record) button, or shutter-release button to switch to display the previous or next image. The lens will be displayed in the camera's internal memory, C is inserted in playback mode. Step 4 Playing Back and Deleting Images Playing Back Images (Playback Mode) Press the c (playback) button. C Viewing Images Images captured using Subject tracking (A 50), Continuous, BSS, and Multi-shot 16;
... pet detection (A 71) function will not extend. A 56, 71). Display the previous image Display the next image 15/05/2011 15 : 30 0003. Press the A button, b (e movie-record) button, or shutter-release button to switch to display the previous or next image. The lens will be displayed in the camera's internal memory, C is inserted in playback mode. Step 4 Playing Back and Deleting Images Playing Back Images (Playback Mode) Press the c (playback) button. C Viewing Images Images captured using Subject tracking (A 50), Continuous, BSS, and Multi-shot 16;

User Manual
Page 49
... the shutter-release button halfway. 10S Focus and exposure will be set. 1/250 F3.7 37 Set Vibration reduction (A 158) to Off in the setup menu (A 149) when using the self-timer, use of camera shake that occurs when pressing the shutter-release button. This feature is equipped with a ten-second and two-second timer for self-portraits. Basic Photography and Playback: A (Auto) Mode Using the Basic Shooting Functions n Taking Pictures with the Self-timer The camera is useful for...
... the shutter-release button halfway. 10S Focus and exposure will be set. 1/250 F3.7 37 Set Vibration reduction (A 158) to Off in the setup menu (A 149) when using the self-timer, use of camera shake that occurs when pressing the shutter-release button. This feature is equipped with a ten-second and two-second timer for self-portraits. Basic Photography and Playback: A (Auto) Mode Using the Basic Shooting Functions n Taking Pictures with the Self-timer The camera is useful for...

User Manual
Page 51
... taking still pictures in the camera's memory even if the camera is turned off. 39 Note that the flash may vary according to display the setting controls (A 14) and tap the macro mode icon. C The Macro Mode Setting When using A (auto) mode, the macro mode setting is saved in macro mode, the camera continuously adjusts the focus until the shutter-release button is pressed halfway to the previous screen. To hide the setting controls after applying the setting, tap the tab again. Using the Basic Shooting Functions p Macro Mode Macro mode is used...
... taking still pictures in the camera's memory even if the camera is turned off. 39 Note that the flash may vary according to display the setting controls (A 14) and tap the macro mode icon. C The Macro Mode Setting When using A (auto) mode, the macro mode setting is saved in macro mode, the camera continuously adjusts the focus until the shutter-release button is pressed halfway to the previous screen. To hide the setting controls after applying the setting, tap the tab again. Using the Basic Shooting Functions p Macro Mode Macro mode is used...
User Manual
Page 60
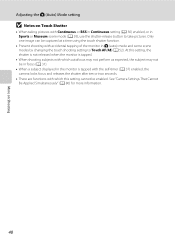
... A (Auto) Mode setting B Notes on Touch Shutter • When taking pictures with Continuous or BSS in Continuous setting (A 56) enabled, or in the monitor is tapped. • When shooting subjects with accidental tapping of the monitor in A (auto) mode and some scene modes by changing the touch shooting setting to take pictures. At this setting, the shutter is not released when the monitor is tapped with the self-timer (A 37) enabled, the camera locks focus...
... A (Auto) Mode setting B Notes on Touch Shutter • When taking pictures with Continuous or BSS in Continuous setting (A 56) enabled, or in the monitor is tapped. • When shooting subjects with accidental tapping of the monitor in A (auto) mode and some scene modes by changing the touch shooting setting to take pictures. At this setting, the shutter is not released when the monitor is tapped with the self-timer (A 37) enabled, the camera locks focus...
User Manual
Page 69
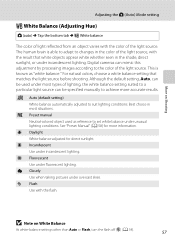
...Cloudy Use when taking pictures under fluorescent lighting. b Preset manual Neutral-colored object used under incandescent lighting. Digital cameras can mimic this adjustment by processing images according to the color of lighting, the white balance setting suited to a particular light source can be used as "white balance." More on White Balance At white-balance settings other than Auto or Flash, turn the flash off (c) (A 34). 57 g Flash Use with the color of the light source, with the result that matches the light source before shooting. s Auto (default setting) White...
...Cloudy Use when taking pictures under fluorescent lighting. b Preset manual Neutral-colored object used under incandescent lighting. Digital cameras can mimic this adjustment by processing images according to the color of lighting, the white balance setting suited to a particular light source can be used as "white balance." More on White Balance At white-balance settings other than Auto or Flash, turn the flash off (c) (A 34). 57 g Flash Use with the color of the light source, with the result that matches the light source before shooting. s Auto (default setting) White...
User Manual
Page 125
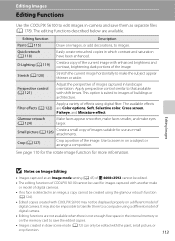
... color, Cross screen, Fisheye, and Miniature effect. Editing Images Editing Functions Use the COOLPIX S6100 to edit images in-camera and save them to a computer using a different model of digital camera. • Editing functions are not available when there is not enough free space in the internal memory or on the memory card to save the edited copies. • Images created in draw scene mode (A 72) can only be edited with the paint, small picture...
... color, Cross screen, Fisheye, and Miniature effect. Editing Images Editing Functions Use the COOLPIX S6100 to edit images in-camera and save them to a computer using a different model of digital camera. • Editing functions are not available when there is not enough free space in the internal memory or on the memory card to save the edited copies. • Images created in draw scene mode (A 72) can only be edited with the paint, small picture...

User Manual
Page 141
... exposure compensation setting, white balance setting specified for A (auto) mode, and the scene effect adjustment slider specified for an extended period of the frame, press the b (e movie-record) button to A Single AF (default setting) before starting movie recording (A 130). 129 Movie Recording and Playback When the b (e movie-record) button is pressed after the self-timer is used in image quality when digital zoom is used . Movie recording may stop unexpectedly when memory cards with a lower Speed Class ratings are also applied with the camera sensor...
... exposure compensation setting, white balance setting specified for A (auto) mode, and the scene effect adjustment slider specified for an extended period of the frame, press the b (e movie-record) button to A Single AF (default setting) before starting movie recording (A 130). 129 Movie Recording and Playback When the b (e movie-record) button is pressed after the self-timer is used in image quality when digital zoom is used . Movie recording may stop unexpectedly when memory cards with a lower Speed Class ratings are also applied with the camera sensor...

User Manual
Page 149
... installing the software, refer to the Quick Start Guide. • ViewNX 2: Use the image transfer feature "Nikon Transfer 2" to "System Requirements" in operation malfunction or excessive supply of power to the camera, causing damage to create a single panorama image. For more information. 137 Image and movie editing features are also supported. • Panorama Maker 5: This software can be viewed and printed. Saved images can join a series of the camera and other USB devices such as commercial USB chargers...
... installing the software, refer to the Quick Start Guide. • ViewNX 2: Use the image transfer feature "Nikon Transfer 2" to "System Requirements" in operation malfunction or excessive supply of power to the camera, causing damage to create a single panorama image. For more information. 137 Image and movie editing features are also supported. • Panorama Maker 5: This software can be viewed and printed. Saved images can join a series of the camera and other USB devices such as commercial USB chargers...
User Manual
Page 150
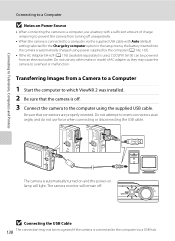
.... Be sure that the camera is automatically turned on and the power-on Power Source • When connecting the camera to a computer, use a battery with a sufficient amount of AC adapter as they may not be recognized if the camera is used, COOLPIX S6100 can be powered from a Camera to a Computer 1 Start the computer to the computer via the supplied USB cable with Auto (default setting) selected for the Charge by the computer...
.... Be sure that the camera is automatically turned on and the power-on Power Source • When connecting the camera to a computer, use a battery with a sufficient amount of AC adapter as they may not be recognized if the camera is used, COOLPIX S6100 can be powered from a Camera to a Computer 1 Start the computer to the computer via the supplied USB cable with Auto (default setting) selected for the Charge by the computer...
User Manual
Page 151
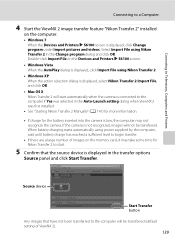
... When the Devices and Printers K S6100 screen is displayed, click Change program under Import pictures and videos. Connecting to Televisions, Computers and Printers Connecting to a Computer 4 Start the ViewNX 2 image transfer feature "Nikon Transfer 2" installed on the Devices and Printers K S6100 screen. • Windows Vista When the AutoPlay dialog is displayed, click Import File using Nikon Transfer 2. • Windows XP When the action selection dialog is displayed, select Nikon Transfer 2 Import File, and click OK. • Mac OS X Nikon Transfer 2 will start . 5 Confirm that have not...
... When the Devices and Printers K S6100 screen is displayed, click Change program under Import pictures and videos. Connecting to Televisions, Computers and Printers Connecting to a Computer 4 Start the ViewNX 2 image transfer feature "Nikon Transfer 2" installed on the Devices and Printers K S6100 screen. • Windows Vista When the AutoPlay dialog is displayed, click Import File using Nikon Transfer 2. • Windows XP When the action selection dialog is displayed, select Nikon Transfer 2 Import File, and click OK. • Mac OS X Nikon Transfer 2 will start . 5 Confirm that have not...
User Manual
Page 175
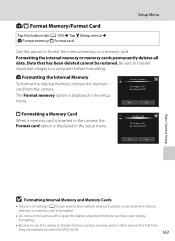
... default settings (number icons) when the internal memory or memory card is formatted. • Do not turn the camera off or open the battery-chamber/memory card slot cover during formatting. • Be sure to use this option to format the internal memory or a memory card. OK? Yes No Basic Camera Setup B Formatting Internal Memory and Memory Cards • Album icon settings (A 93) are inserted into the COOLPIX S6100. 163 The Format memory option is displayed in the setup menu. Formatting the internal memory or memory cards permanently deletes all data. Yes No m Formatting...
... default settings (number icons) when the internal memory or memory card is formatted. • Do not turn the camera off or open the battery-chamber/memory card slot cover during formatting. • Be sure to use this option to format the internal memory or a memory card. OK? Yes No Basic Camera Setup B Formatting Internal Memory and Memory Cards • Album icon settings (A 93) are inserted into the COOLPIX S6100. 163 The Format memory option is displayed in the setup menu. Formatting the internal memory or memory cards permanently deletes all data. Yes No m Formatting...
User Manual
Page 192
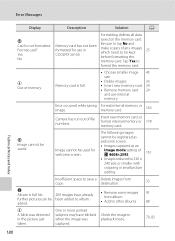
... new memory card. 24 • Remove memory card 24 and use in COOLPIX S6100. Error occurred while saving image. Insert new memory card, or format internal memory or 178 memory card. P Image cannot be kept before formatting the 25 memory card. Memory card has not been formatted for welcome screen. Insufficient space to be saved. Yes No Formatting deletes all data saved on the memory card. Be sure to tap No and make copies of l 4608×2592 151 • Images reduced to album. Format card? u Out of file numbers. Delete images...
... new memory card. 24 • Remove memory card 24 and use in COOLPIX S6100. Error occurred while saving image. Insert new memory card, or format internal memory or 178 memory card. P Image cannot be kept before formatting the 25 memory card. Memory card has not been formatted for welcome screen. Insufficient space to be saved. Yes No Formatting deletes all data saved on the memory card. Be sure to tap No and make copies of l 4608×2592 151 • Images reduced to album. Format card? u Out of file numbers. Delete images...
User Manual
Page 196
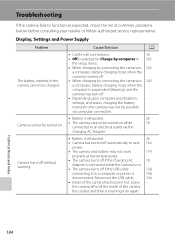
... possible via the 18 Charging AC Adapter. Reconnect the USB cable. 144 • Inside of common problems below before consulting your retailer or Nikon-authorized service representative. the camera off until the inside of the camera has cooled, and then try turning it on while connected to save 162 power. • The camera and battery may turn off if the USB cable 138, connecting it to function as expected, check...
... possible via the 18 Charging AC Adapter. Reconnect the USB cable. 144 • Inside of common problems below before consulting your retailer or Nikon-authorized service representative. the camera off until the inside of the camera has cooled, and then try turning it on while connected to save 162 power. • The camera and battery may turn off if the USB cable 138, connecting it to function as expected, check...

User Manual
Page 197
... their default values. 153 Camera settings reset. Technical Notes and Index 185 Images and movies saved before clock is off. • Standby mode for saving power: press the power switch, the shutter-release button, A button, c button, or b (e movie-record) button. • When flash lamp blinks, wait until flash has charged. • Camera and computer are connected via USB cable. • Camera and TV are connected via audio/video cable or HDMI cable. 21 21, 162 35 138 134 Date and time of recording are dated "00...
... their default values. 153 Camera settings reset. Technical Notes and Index 185 Images and movies saved before clock is off. • Standby mode for saving power: press the power switch, the shutter-release button, A button, c button, or b (e movie-record) button. • When flash lamp blinks, wait until flash has charged. • Camera and computer are connected via USB cable. • Camera and TV are connected via audio/video cable or HDMI cable. 21 21, 162 35 138 134 Date and time of recording are dated "00...
User Manual
Page 202
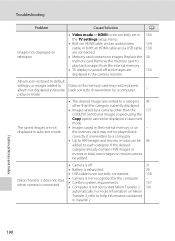
... 171 COOLPIX S6100 and images copied using the Copy option cannot be added. • Camera is not set in 164 the TV settings setup menu. • Both an HDMI cable and an audio/video 134, cable, or both an HDMI cable and a USB cable 138 are not displayed in auto sort mode. • The desired image was sorted to help information contained in the camera monitor. The saved images are connected. • Memory card contains no images. Troubleshooting Problem Cause/Solution A Images not displayed...
... 171 COOLPIX S6100 and images copied using the Copy option cannot be added. • Camera is not set in 164 the TV settings setup menu. • Both an HDMI cable and an audio/video 134, cable, or both an HDMI cable and a USB cable 138 are not displayed in auto sort mode. • The desired image was sorted to help information contained in the camera monitor. The saved images are connected. • Memory card contains no images. Troubleshooting Problem Cause/Solution A Images not displayed...
User Manual
Page 211
... manual 58 Press halfway 7 Print 145, 146 Print date 109, 157 Print order 106 Printer 143 Q Quick retouch 118 R Rating 101 Rechargeable battery 176 Rechargeable Li-ion battery 16, 18 Recording movies 128 Red-eye reduction 34, 36 Reset all 168 Rotate image 110 RSCN 178 S Scene Auto Selector d 62 Scene mode 59, 64 Self-timer 37 Self-timer lamp 4, 38 Setup menu 149 Shooting 26, 28, 30, 155 Index Shooting mode 41 Shutter sound 161 Shutter speed 30 Shutter-release button...
... manual 58 Press halfway 7 Print 145, 146 Print date 109, 157 Print order 106 Printer 143 Q Quick retouch 118 R Rating 101 Rechargeable battery 176 Rechargeable Li-ion battery 16, 18 Recording movies 128 Red-eye reduction 34, 36 Reset all 168 Rotate image 110 RSCN 178 S Scene Auto Selector d 62 Scene mode 59, 64 Self-timer 37 Self-timer lamp 4, 38 Setup menu 149 Shooting 26, 28, 30, 155 Index Shooting mode 41 Shutter sound 161 Shutter speed 30 Shutter-release button...


