

User Manual
Page 4
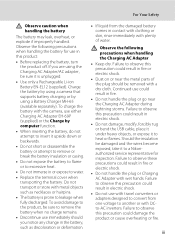
...battery or other accident, take the equipment to a Nikonauthorized service representative for inspection, after unplugging the product and/or removing the battery. WARNINGS Turn off in the event of a fall or other small parts into their entirety before using this could result in injury. Should the camera or...the strap around the neck of flammable gas Do not use the product will read them. For Your Safety To prevent damage to your Nikon product or injury to yourself or to others, read the following safety precautions in their mouths. This icon marks warnings, information that ...
...battery or other accident, take the equipment to a Nikonauthorized service representative for inspection, after unplugging the product and/or removing the battery. WARNINGS Turn off in the event of a fall or other small parts into their entirety before using this could result in injury. Should the camera or...the strap around the neck of flammable gas Do not use the product will read them. For Your Safety To prevent damage to your Nikon product or injury to yourself or to others, read the following safety precautions in their mouths. This icon marks warnings, information that ...
User Manual
Page 5
... Adapter with a dry cloth. iii Failure to heat or flames. Should the insulation be sure it to observe this product: • Before replacing the battery, turn the product off. Do not transport or store with travel converters or adapters designed to convert from the damaged battery comes in this precaution could...
... Adapter with a dry cloth. iii Failure to heat or flames. Should the insulation be sure it to observe this product: • Before replacing the battery, turn the product off. Do not transport or store with travel converters or adapters designed to convert from the damaged battery comes in this precaution could...

User Manual
Page 6
... observed if photographing infants, when the flash should be played back on an audio CD player could cause hearing loss or damage the equipment. Turn the power off or landing. The electromagnetic waves given out by this precaution could cause temporary visual impairment. CD-ROMs The CD-ROMs supplied.... iv For Your Safety Use appropriate cables When connecting cables to the input and output jacks, use only the cables provided or sold by Nikon for the purpose, to prevent liquid crystal from the subject. Observe caution when using the flash Using the flash close to observe this camera...
... observed if photographing infants, when the flash should be played back on an audio CD player could cause hearing loss or damage the equipment. Turn the power off or landing. The electromagnetic waves given out by this precaution could cause temporary visual impairment. CD-ROMs The CD-ROMs supplied.... iv For Your Safety Use appropriate cables When connecting cables to the input and output jacks, use only the cables provided or sold by Nikon for the purpose, to prevent liquid crystal from the subject. Observe caution when using the flash Using the flash close to observe this camera...
User Manual
Page 7
..., uses, and can be correctly orientated in a residential installation. DANGER - If this device that are designed to be determined by turning the equipment off and on a circuit different from that interference will not occur in accordance with the limits for a Class B digital... device, pursuant to radio communications. These limits are not expressly approved by Nikon Corporation may cause harmful interference to Part 15 of the FCC rules. v IMPORTANT SAFETY INSTRUCTIONS - Federal Communications Commission (FCC) Radio...
..., uses, and can be correctly orientated in a residential installation. DANGER - If this device that are designed to be determined by turning the equipment off and on a circuit different from that interference will not occur in accordance with the limits for a Class B digital... device, pursuant to radio communications. These limits are not expressly approved by Nikon Corporation may cause harmful interference to Part 15 of the FCC rules. v IMPORTANT SAFETY INSTRUCTIONS - Federal Communications Commission (FCC) Radio...
User Manual
Page 9
...Operation Controls)...13 Operating the Tabs...14 First Steps ...16 Inserting the Battery ...16 Removing the Battery ...17 Charging the Battery ...18 Turning On and Off the Camera...21 Setting Display Language, Date and Time 22 Inserting Memory Cards ...24 Removing Memory Cards...24 Basic Photography ...and Playback: A (Auto) Mode 26 Step 1 Turn the Camera On and Select A (Auto) Mode 26 Indicators Displayed in A (Auto) Mode 27 Step 2 Frame a Picture ...28 Using the Zoom...29...
...Operation Controls)...13 Operating the Tabs...14 First Steps ...16 Inserting the Battery ...16 Removing the Battery ...17 Charging the Battery ...18 Turning On and Off the Camera...21 Setting Display Language, Date and Time 22 Inserting Memory Cards ...24 Removing Memory Cards...24 Basic Photography ...and Playback: A (Auto) Mode 26 Step 1 Turn the Camera On and Select A (Auto) Mode 26 Indicators Displayed in A (Auto) Mode 27 Step 2 Frame a Picture ...28 Using the Zoom...29...
User Manual
Page 18
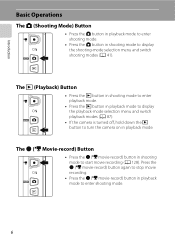
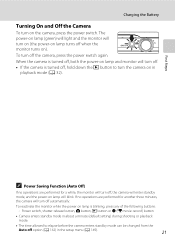
... mode. • Press the c button in playback mode to display the playback-mode selection menu and switch playback modes (A 87). • If the camera is turned off, hold down the c button to turn the camera on in shooting mode to display the shooting-mode selection menu and switch shooting modes (A 41).
... mode. • Press the c button in playback mode to display the playback-mode selection menu and switch playback modes (A 87). • If the camera is turned off, hold down the c button to turn the camera on in shooting mode to display the shooting-mode selection menu and switch shooting modes (A 41).

User Manual
Page 24
... and camera status. • The displayed information varies depending on the image played back and the current camera status. • Indicators below are displayed when turning on the camera or operating the camera, and turn off after a few seconds elapse (A 155). 12 3 4567 15/05/2011 15 : 30 12 0003.
... and camera status. • The displayed information varies depending on the image played back and the current camera status. • Indicators below are displayed when turning on the camera or operating the camera, and turn off after a few seconds elapse (A 155). 12 3 4567 15/05/2011 15 : 30 12 0003.
User Manual
Page 29
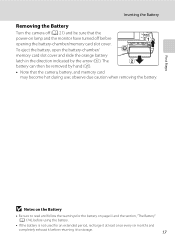
... • Be sure to read and follow the warnings for the battery on lamp and the monitor have turned off (A 21) and be removed by the arrow (1). Inserting the Battery Removing the Battery Turn the camera off before returning it to storage. 17 The battery can then be sure that the camera...
... • Be sure to read and follow the warnings for the battery on lamp and the monitor have turned off (A 21) and be removed by the arrow (1). Inserting the Battery Removing the Battery Turn the camera off before returning it to storage. 17 The battery can then be sure that the camera...
User Manual
Page 30
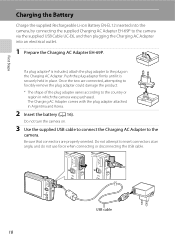
The Charging AC Adapter comes with the plug adapter attached in place. Do not turn the camera on the Charging AC Adapter. Push the plug adapter firmly until it is included, attach the plug adapter to the plug on . 3 Use ...
The Charging AC Adapter comes with the plug adapter attached in place. Do not turn the camera on the Charging AC Adapter. Push the plug adapter firmly until it is included, attach the plug adapter to the plug on . 3 Use ...
User Manual
Page 31
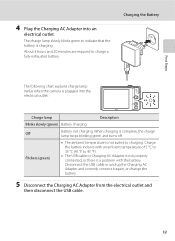
... battery is charging. Charging the Battery The following chart explains charge lamp status when the camera is complete, the charge lamp stops blinking green and turns off. When charging is plugged into an electrical outlet. Off Battery not charging. Disconnect the USB cable or unplug the Charging AC Adapter and correctly...
... battery is charging. Charging the Battery The following chart explains charge lamp status when the camera is complete, the charge lamp stops blinking green and turns off. When charging is plugged into an electrical outlet. Off Battery not charging. Disconnect the USB cable or unplug the Charging AC Adapter and correctly...
User Manual
Page 32
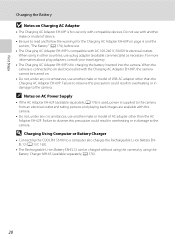
... EN-EL12 can be turned on. • Do not, under any circumstances, use another make or model of AC adapter other countries, use another make or model of USB-AC adapter other than the AC Adapter EH-62F. D Charging Using Computer or Battery Charger • Connecting the COOLPIX S6100 to read and follow...
... EN-EL12 can be turned on. • Do not, under any circumstances, use another make or model of AC adapter other countries, use another make or model of USB-AC adapter other than the AC Adapter EH-62F. D Charging Using Computer or Battery Charger • Connecting the COOLPIX S6100 to read and follow...
User Manual
Page 33
... camera enters standby mode can be changed from the Auto off option (A 162) in the setup menu (A 149). 21 When the camera is turned off, both the power-on lamp and monitor will blink. First Steps C Power Saving Function (Auto Off) If no operations are performed for... camera, press the power switch again. If no operations are performed for a while, the monitor will turn on the camera, press the power switch. The power-on lamp (green) will light and the monitor will turn off automatically. Power switch, shutter-release button, A button, c button or b (e movie-record) ...
... camera enters standby mode can be changed from the Auto off option (A 162) in the setup menu (A 149). 21 When the camera is turned off, both the power-on lamp and monitor will blink. First Steps C Power Saving Function (Auto Off) If no operations are performed for... camera, press the power switch again. If no operations are performed for a while, the monitor will turn on the camera, press the power switch. The power-on lamp (green) will light and the monitor will turn off automatically. Power switch, shutter-release button, A button, c button or b (e movie-record) ...

User Manual
Page 34
...time zone London Casablanca D Daylight Saving Time If daylight saving time is turned on. 1 Press the power switch to turn on the camera. Tap J to return to select your home time zone (A 154) and tap I. To turn off when the monitor turns on the daylight saving time option. The power-on lamp (green) ...will light and the monitor will turn on (the power-on lamp turns off the daylight saving time option, tap p again. 22 Home time zone...
...time zone London Casablanca D Daylight Saving Time If daylight saving time is turned on. 1 Press the power switch to turn on the camera. Tap J to return to select your home time zone (A 154) and tap I. To turn off when the monitor turns on the daylight saving time option. The power-on lamp (green) ...will light and the monitor will turn on (the power-on lamp turns off the daylight saving time option, tap p again. 22 Home time zone...
User Manual
Page 36
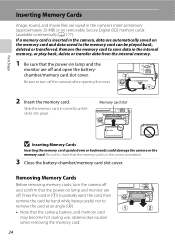
... Inserting Memory Cards Inserting the memory card upside down or backwards could damage the camera or the memory card. Remove the memory card to turn the camera off . Be sure to save data in (1) to partially eject the card, then remove the card by hand while being careful...memory card is inserted in the correct orientation. 3 Close the battery-chamber/memory card slot cover. Removing Memory Cards Before removing memory cards, turn off and open the batterychamber/memory card slot cover. First Steps Inserting Memory Cards Image, sound, and movie files are saved in correctly until...
... Inserting Memory Cards Inserting the memory card upside down or backwards could damage the camera or the memory card. Remove the memory card to turn the camera off . Be sure to save data in (1) to partially eject the card, then remove the card by hand while being careful...memory card is inserted in the correct orientation. 3 Close the battery-chamber/memory card slot cover. Removing Memory Cards Before removing memory cards, turn off and open the batterychamber/memory card slot cover. First Steps Inserting Memory Cards Image, sound, and movie files are saved in correctly until...
User Manual
Page 37
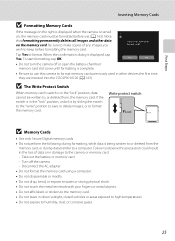
... vehicles or areas exposed to high temperatures. • Do not expose to a computer. Card is displayed, tap Yes. Ye s No • Do not turn the camera off the camera - Disconnect the AC adapter • Do not format the memory card using a computer. • Do not disassemble or modify. ... use (A 163). First Steps Inserting Memory Cards B Formatting Memory Cards If the message on the right is displayed when the camera is turned on the memory card. Note that formatting permanently deletes all images and other devices the first time they are inserted into the COOLPIX S6100 (A 163).
... vehicles or areas exposed to high temperatures. • Do not expose to a computer. Card is displayed, tap Yes. Ye s No • Do not turn the camera off the camera - Disconnect the AC adapter • Do not format the memory card using a computer. • Do not disassemble or modify. ... use (A 163). First Steps Inserting Memory Cards B Formatting Memory Cards If the message on the right is displayed when the camera is turned on the memory card. Note that formatting permanently deletes all images and other devices the first time they are inserted into the COOLPIX S6100 (A 163).
User Manual
Page 38
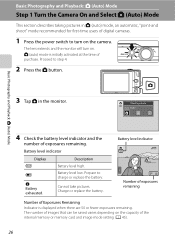
...Charge or replace the battery. Basic Photography and Playback: A (Auto) Mode Step 1 Turn the Camera On and Select A (Auto) Mode This section describes taking pictures in the monitor. Proceed to turn on. Battery level indicator 3 Number of exposures remaining Number of exposures remaining. The ...number of images that can be saved varies depending on the camera. The lens extends and the monitor will turn on the capacity of purchase. Prepare to charge or replace the battery. Description Battery level high. Battery level indicator Display b B N ...
...Charge or replace the battery. Basic Photography and Playback: A (Auto) Mode Step 1 Turn the Camera On and Select A (Auto) Mode This section describes taking pictures in the monitor. Proceed to turn on. Battery level indicator 3 Number of exposures remaining Number of exposures remaining. The ...number of images that can be saved varies depending on the camera. The lens extends and the monitor will turn on the capacity of purchase. Prepare to charge or replace the battery. Description Battery level high. Battery level indicator Display b B N ...

User Manual
Page 39
...back on Touch Shutter At the default setting, the shutter can be released by tapping the left or bottom tab to turn it , activates (A 30). • Shooting settings (A 44) can be saved in the camera's internal memory (approximately... by simply tapping a subject in the monitor (A 47). When the monitor has turned off in standby mode to save power (the power-on the memory card. Basic Photography and Playback: A ...(Auto) Mode Step 1 Turn the Camera On and Select A (Auto) Mode Indicators Displayed in A (Auto) Mode Motion detection ...
...back on Touch Shutter At the default setting, the shutter can be released by tapping the left or bottom tab to turn it , activates (A 30). • Shooting settings (A 44) can be saved in the camera's internal memory (approximately... by simply tapping a subject in the monitor (A 47). When the monitor has turned off in standby mode to save power (the power-on the memory card. Basic Photography and Playback: A ...(Auto) Mode Step 1 Turn the Camera On and Select A (Auto) Mode Indicators Displayed in A (Auto) Mode Motion detection ...

User Manual
Page 40
...-in flash is at or near the center of subjects other objects away from the lens, flash, AFassist illuminator, and built-in portrait ("tall") orientation, turn the camera so that the intended subject is above the lens. 2 Frame the picture. Hold the camera steadily in both hands, keeping your fingers and...
...-in flash is at or near the center of subjects other objects away from the lens, flash, AFassist illuminator, and built-in portrait ("tall") orientation, turn the camera so that the intended subject is above the lens. 2 Frame the picture. Hold the camera steadily in both hands, keeping your fingers and...
User Manual
Page 41
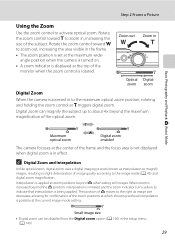
...enabled The camera focuses at g triggers digital zoom. When zoom is increased beyond the V position, interpolation is initiated and the zoom indicator turns yellow to indicate that interpolation is possible at zoom positions beyond the maximum magnification of the frame and the focus area is not displayed when...Use the zoom control to zoom in the frame. • The zoom position is set at the maximum wideangle position when the camera is turned on. • A zoom indicator is displayed at the top of the zoom positions at which shooting without interpolation is being applied. Digital ...
...enabled The camera focuses at g triggers digital zoom. When zoom is increased beyond the V position, interpolation is initiated and the zoom indicator turns yellow to indicate that interpolation is possible at zoom positions beyond the maximum magnification of the frame and the focus area is not displayed when...Use the zoom control to zoom in the frame. • The zoom position is set at the maximum wideangle position when the camera is turned on. • A zoom indicator is displayed at the top of the zoom positions at which shooting without interpolation is being applied. Digital ...
User Manual
Page 42
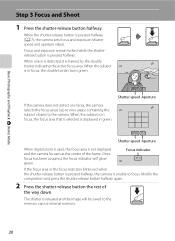
... button halfway. Once focus has been acquired, the focus indicator will be saved to the camera. The shutter is displayed in focus, the double border turns green. 1/ 250 F3.7 Shutter speed Aperture If the camera does not detect any faces, the camera selects the focus areas (up to nine areas) containing...
... button halfway. Once focus has been acquired, the focus indicator will be saved to the camera. The shutter is displayed in focus, the double border turns green. 1/ 250 F3.7 Shutter speed Aperture If the camera does not detect any faces, the camera selects the focus areas (up to nine areas) containing...


