

User Manual
Page 4
... service representative for inspection, after unplugging the product and/or removing the battery. Keep out of reach of malfunction Should you notice smoke or an unusual smell coming from putting the battery or other accident, take the equipment to a Nikon-authorized service representative for inspection. Continued operation could result in the presence of...
... service representative for inspection, after unplugging the product and/or removing the battery. Keep out of reach of malfunction Should you notice smoke or an unusual smell coming from putting the battery or other accident, take the equipment to a Nikon-authorized service representative for inspection. Continued operation could result in the presence of...
User Manual
Page 5
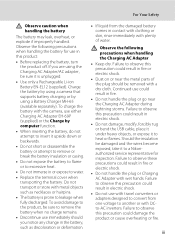
... insulation be sure it to a Nikonauthorized service representative for use with travel converters or adapters designed to convert from the damaged battery comes in or expose to observe this precaution could result in this precaution could damage the product or cause overheating or fire.... wires become exposed, take it is prone to observe this product: • Before replacing the battery, turn the product off. For Your Safety Observe caution when handling the battery The battery may leak, overheat, or explode if improperly handled. Failure to water. • Replace the terminal...
... insulation be sure it to a Nikonauthorized service representative for use with travel converters or adapters designed to convert from the damaged battery comes in or expose to observe this precaution could result in this precaution could damage the product or cause overheating or fire.... wires become exposed, take it is prone to observe this product: • Before replacing the battery, turn the product off. For Your Safety Observe caution when handling the battery The battery may leak, overheat, or explode if improperly handled. Failure to water. • Replace the terminal...

User Manual
Page 8
... reproductive harm. The following apply only to users in Europe CAUTIONS RISK OF EXPLOSION IF BATTERY IS REPLACED BY AN INCORRECT TYPE. This symbol indicates that the battery is designated for separate collection at an appropriate collection point. Nikon Inc., 1300 Walt Whitman Road Melville, New York 11747-3064 USA Tel: 631-547...
... reproductive harm. The following apply only to users in Europe CAUTIONS RISK OF EXPLOSION IF BATTERY IS REPLACED BY AN INCORRECT TYPE. This symbol indicates that the battery is designated for separate collection at an appropriate collection point. Nikon Inc., 1300 Walt Whitman Road Melville, New York 11747-3064 USA Tel: 631-547...
User Manual
Page 9
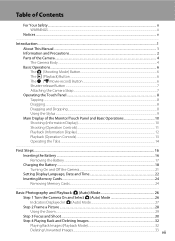
...)...10 Shooting (Operation Controls)...11 Playback (Information Display)...12 Playback (Operation Controls)...13 Operating the Tabs...14 First Steps ...16 Inserting the Battery ...16 Removing the Battery ...17 Charging the Battery ...18 Turning On and Off the Camera...21 Setting Display Language, Date and Time 22 Inserting Memory Cards ...24 Removing Memory Cards...
...)...10 Shooting (Operation Controls)...11 Playback (Information Display)...12 Playback (Operation Controls)...13 Operating the Tabs...14 First Steps ...16 Inserting the Battery ...16 Removing the Battery ...17 Charging the Battery ...18 Turning On and Off the Camera...21 Setting Display Language, Date and Time 22 Inserting Memory Cards ...24 Removing Memory Cards...
User Manual
Page 14
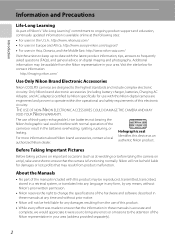
... malfunction. The use of third-party rechargeable Li-ion batteries not bearing the Nikon holographic seal could interfere with normal operation of the camera or result in any form, by Nikon specifically for contact information: http://imaging.nikon.com/ Use Only Nikon Brand Electronic Accessories Nikon COOLPIX cameras are engineered and proven to operate within the operational...
... malfunction. The use of third-party rechargeable Li-ion batteries not bearing the Nikon holographic seal could interfere with normal operation of the camera or result in any form, by Nikon specifically for contact information: http://imaging.nikon.com/ Use Only Nikon Brand Electronic Accessories Nikon COOLPIX cameras are engineered and proven to operate within the operational...

User Manual
Page 17
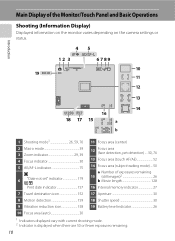
Introduction Parts of the Camera 11 1 10 2 3 4 9 5 1 b (e movie-record) button....... 6, 128 2 Charge lamp 19, 165 Flash lamp 35 3 A (shooting mode) button 6, 41 4 c (playback) button 6, 32, 87 5 Battery-chamber/ memory card slot cover 16, 24 8 76 6 Battery latch 16, 17 7 Battery chamber 16 8 Memory card slot 24 9 Tripod socket 10 Monitor/touch panel 10 11 Speaker 112, 133 5
Introduction Parts of the Camera 11 1 10 2 3 4 9 5 1 b (e movie-record) button....... 6, 128 2 Charge lamp 19, 165 Flash lamp 35 3 A (shooting mode) button 6, 41 4 c (playback) button 6, 32, 87 5 Battery-chamber/ memory card slot cover 16, 24 8 76 6 Battery latch 16, 17 7 Battery chamber 16 8 Memory card slot 24 9 Tripod socket 10 Monitor/touch panel 10 11 Speaker 112, 133 5
User Manual
Page 22
... 157 16 Internal memory indicator 27 7 Travel destination icon 152 17 Aperture 30 8 Motion detection 159 18 Shutter speed 30 9 Vibration reduction icon 158 19 Battery level indicator 26 10 Focus area (auto 30 1 Indicators displayed vary with current shooting mode. 2 Indicator is displayed when there are 50 or fewer exposures...
... 157 16 Internal memory indicator 27 7 Travel destination icon 152 17 Aperture 30 8 Motion detection 159 18 Shutter speed 30 9 Vibration reduction icon 158 19 Battery level indicator 26 10 Focus area (auto 30 1 Indicators displayed vary with current shooting mode. 2 Indicator is displayed when there are 50 or fewer exposures...

User Manual
Page 24
Introduction Main Display of frames 32 b Movie length 133 10 Internal memory indicator 27 11 Rating indicator 101 12 Battery level indicator 26 1 Indicators displayed vary with current playback mode. 2 Indicators displayed vary depending on the camera or operating the camera, and turn off after a ...
Introduction Main Display of frames 32 b Movie length 133 10 Internal memory indicator 27 11 Rating indicator 101 12 Battery level indicator 26 1 Indicators displayed vary with current playback mode. 2 Indicators displayed vary depending on the camera or operating the camera, and turn off after a ...

User Manual
Page 28
... direction indicated by the arrow (1) and fully insert the battery (2). When the battery is running low (A 18). 1 Open the battery-chamber/memory card slot cover. 2 Insert the battery. Battery chamber B Inserting the Battery Inserting the battery upside down or backwards could damage the camera. Use the battery to check that the battery is in the correct orientation. 3 Close the...
... direction indicated by the arrow (1) and fully insert the battery (2). When the battery is running low (A 18). 1 Open the battery-chamber/memory card slot cover. 2 Insert the battery. Battery chamber B Inserting the Battery Inserting the battery upside down or backwards could damage the camera. Use the battery to check that the battery is in the correct orientation. 3 Close the...
User Manual
Page 29
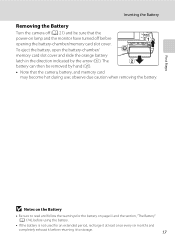
... months and completely exhaust it before opening the battery-chamber/memory card slot cover. Inserting the Battery Removing the Battery Turn the camera off (A 21) and be removed by the arrow (1). To eject the battery, open the battery-chamber/ memory card slot cover and slide the orange battery latch in the direction indicated by hand (2). •...
... months and completely exhaust it before opening the battery-chamber/memory card slot cover. Inserting the Battery Removing the Battery Turn the camera off (A 21) and be removed by the arrow (1). To eject the battery, open the battery-chamber/ memory card slot cover and slide the orange battery latch in the direction indicated by hand (2). •...
User Manual
Page 30
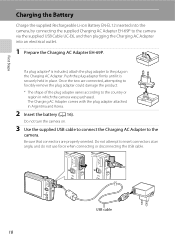
.... 1 Prepare the Charging AC Adapter EH-69P. If a plug adapter* is securely held in Argentina and Korea. 2 Insert the battery (A 16). First Steps Charging the Battery Charge the supplied Rechargeable Li-ion Battery EN-EL12 inserted into the camera, by connecting the supplied Charging AC Adapter EH-69P to insert connectors at an...
.... 1 Prepare the Charging AC Adapter EH-69P. If a plug adapter* is securely held in Argentina and Korea. 2 Insert the battery (A 16). First Steps Charging the Battery Charge the supplied Rechargeable Li-ion Battery EN-EL12 inserted into the camera, by connecting the supplied Charging AC Adapter EH-69P to insert connectors at an...
User Manual
Page 31
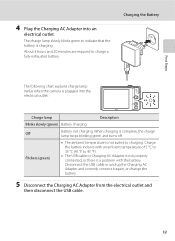
... Adapter is not properly connected, or there is not suited to charging. The charge lamp slowly blinks green to charge a fully exhausted battery. Charging the Battery The following chart explains charge lamp status when the camera is charging. When charging is complete, the charge lamp stops blinking green and ...turns off. First Steps 4 Plug the Charging AC Adapter into the electrical outlet. Charge lamp Description Blinks slowly (green) Battery charging. Disconnect the USB cable or unplug the Charging AC Adapter and correctly connect it again, or change the...
... Adapter is not properly connected, or there is not suited to charging. The charge lamp slowly blinks green to charge a fully exhausted battery. Charging the Battery The following chart explains charge lamp status when the camera is charging. When charging is complete, the charge lamp stops blinking green and ...turns off. First Steps 4 Plug the Charging AC Adapter into the electrical outlet. Charge lamp Description Blinks slowly (green) Battery charging. Disconnect the USB cable or unplug the Charging AC Adapter and correctly connect it again, or change the...
User Manual
Page 32
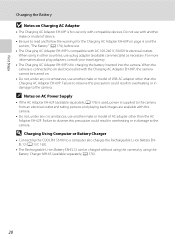
... precaution could result in overheating or in damage to the camera. D Charging Using Computer or Battery Charger • Connecting the COOLPIX S6100 to a computer also charges the Rechargeable Li-ion Battery ENEL12 (A 137, 165). • The Rechargeable Li-ion Battery EN-EL12 can be turned on AC Power Supply • If the AC Adapter EH...
... precaution could result in overheating or in damage to the camera. D Charging Using Computer or Battery Charger • Connecting the COOLPIX S6100 to a computer also charges the Rechargeable Li-ion Battery ENEL12 (A 137, 165). • The Rechargeable Li-ion Battery EN-EL12 can be turned on AC Power Supply • If the AC Adapter EH...
User Manual
Page 33
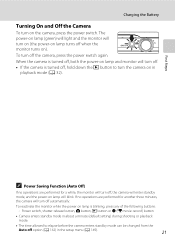
...) If no operations are performed for another three minutes, the camera will turn off when the monitor turns on lamp turns off automatically. Charging the Battery Turning On and Off the Camera To turn on lamp is blinking, press any of the following buttons: - When the camera is turned off , the...
...) If no operations are performed for another three minutes, the camera will turn off when the monitor turns on lamp turns off automatically. Charging the Battery Turning On and Off the Camera To turn on lamp is blinking, press any of the following buttons: - When the camera is turned off , the...
User Manual
Page 36
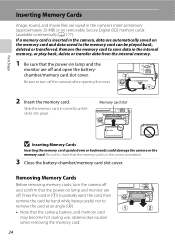
... (1) to partially eject the card, then remove the card by hand while being careful not to save data in the correct orientation. 3 Close the battery-chamber/memory card slot cover. observe due caution when removing the memory card. 24 Be sure to check that the power-on lamp and monitor.... If a memory card is in the internal memory, or play back, delete or transfer data from the internal memory. 1 Be sure that the camera, battery, and memory card may become hot during use; First Steps Inserting Memory Cards Image, sound, and movie files are automatically saved on the memory card...
... (1) to partially eject the card, then remove the card by hand while being careful not to save data in the correct orientation. 3 Close the battery-chamber/memory card slot cover. observe due caution when removing the memory card. 24 Be sure to check that the power-on lamp and monitor.... If a memory card is in the internal memory, or play back, delete or transfer data from the internal memory. 1 Be sure that the camera, battery, and memory card may become hot during use; First Steps Inserting Memory Cards Image, sound, and movie files are automatically saved on the memory card...
User Manual
Page 37
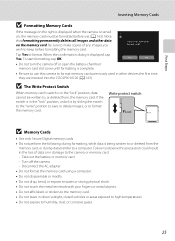
... only Secure Digital memory cards. • Do not perform the following during data transfer to use (A 163). Turn off or open the battery-chamber/ memory card slot cover until formatting is being written to format memory cards previously used in direct sunlight, closed vehicles or areas exposed ...and other devices the first time they are inserted into the COOLPIX S6100 (A 163). Ye s No • Do not turn the camera off the camera - B The Write Protect Switch When memory card's switch is not formatted. Take out the battery or memory card - Be sure to make copies of ...
... only Secure Digital memory cards. • Do not perform the following during data transfer to use (A 163). Turn off or open the battery-chamber/ memory card slot cover until formatting is being written to format memory cards previously used in direct sunlight, closed vehicles or areas exposed ...and other devices the first time they are inserted into the COOLPIX S6100 (A 163). Ye s No • Do not turn the camera off the camera - B The Write Protect Switch When memory card's switch is not formatted. Take out the battery or memory card - Be sure to make copies of ...
User Manual
Page 38
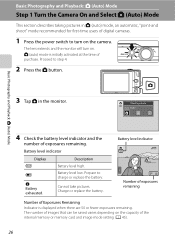
... the number of digital cameras. 1 Press the power switch to turn on. Prepare to step 4. 2 Press the A button. Battery level indicator 3 Number of exposures remaining Number of Exposures Remaining Indicator is initially activated at the time of purchase. A (auto) ...Auto) Mode Step 1 Turn the Camera On and Select A (Auto) Mode This section describes taking pictures in the monitor. Battery level indicator Display b B N Battery exhausted. Description Battery level high. The lens extends and the monitor will turn on the capacity of images that can be saved varies depending on...
... the number of digital cameras. 1 Press the power switch to turn on. Prepare to step 4. 2 Press the A button. Battery level indicator 3 Number of exposures remaining Number of Exposures Remaining Indicator is initially activated at the time of purchase. A (auto) ...Auto) Mode Step 1 Turn the Camera On and Select A (Auto) Mode This section describes taking pictures in the monitor. Battery level indicator Display b B N Battery exhausted. Description Battery level high. The lens extends and the monitor will turn on the capacity of images that can be saved varies depending on...

User Manual
Page 40
... • When attaching the camera to a tripod, be detected. When taking pictures in microphone. Up to 12 faces can be careful not to open the battery-chamber/memory card slot cover and tighten the tripod screw. • Set Vibration reduction (A 158) to Off when using a tripod to the camera will be...
... • When attaching the camera to a tripod, be detected. When taking pictures in microphone. Up to 12 faces can be careful not to open the battery-chamber/memory card slot cover and tighten the tripod screw. • Set Vibration reduction (A 158) to Off when using a tripod to the camera will be...
User Manual
Page 43
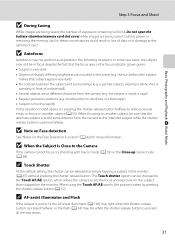
... on the monitor. C Touch Shutter At the default setting, the shutter can be released by pressing the shutter-release button (A 52). Do not open the battery-chamber/memory card slot cover while images are being saved, the number of sharply differing brightness are at the same distance from the camera (e.g. the...
... on the monitor. C Touch Shutter At the default setting, the shutter can be released by pressing the shutter-release button (A 52). Do not open the battery-chamber/memory card slot cover while images are being saved, the number of sharply differing brightness are at the same distance from the camera (e.g. the...

User Manual
Page 47
... flash status when the shutterrelease button is pressed halfway. • On: Flash will not fire when a picture is taken. • Blinks: Flash charging. If the battery is fully charged. Set Vibration reduction (A 158) to c (off ) when On is selected for Blink proof (A 79) • There are functions with which noise reduction...
... flash status when the shutterrelease button is pressed halfway. • On: Flash will not fire when a picture is taken. • Blinks: Flash charging. If the battery is fully charged. Set Vibration reduction (A 158) to c (off ) when On is selected for Blink proof (A 79) • There are functions with which noise reduction...


