
42VP4/42VP4D/42XM2
Page 1
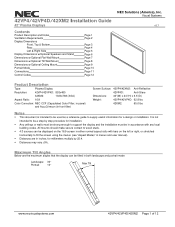
.../42XM2 Installation Guide 42" Plasma Displays Contents Product Description and Notes Ventilation Requirements Display Dimensions Front, Top & Bottom Rear Left & Right Side Display Dimensions w/Optional Speakers and Stand Dimensions w/Optional Flat Wall Mount Dimensions w/Optional Tilt Wall Mount Dimensions w/Optional Ceiling Mount Portrait Mode Connections Control Codes Page 1 Page 2 Page 3 Page 4 Page 5 Page 6 Page 7 Page 8 Page 9 Page 10 Page 11 Page 12 NEC Solutions (America), Inc. It is intended to be displayed on the 16:9 screen in inches...
.../42XM2 Installation Guide 42" Plasma Displays Contents Product Description and Notes Ventilation Requirements Display Dimensions Front, Top & Bottom Rear Left & Right Side Display Dimensions w/Optional Speakers and Stand Dimensions w/Optional Flat Wall Mount Dimensions w/Optional Tilt Wall Mount Dimensions w/Optional Ceiling Mount Portrait Mode Connections Control Codes Page 1 Page 2 Page 3 Page 4 Page 5 Page 6 Page 7 Page 8 Page 9 Page 10 Page 11 Page 12 NEC Solutions (America), Inc. It is intended to be displayed on the 16:9 screen in inches...
42XM2/50XM3/61XM2
Page 6
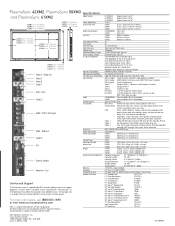
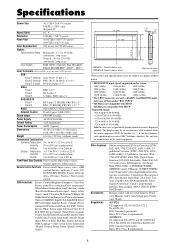
... change without base Weight Environmental Considerations Warranty Regulatory Included Accessories Optional Accessories PX-61XM2A Diagonal Screen Size 61" PX-50XM3A Diagonal Screen Size 50" PX-42XM2A Diagonal Screen Size 42" 16 to 9840 feet (0 - 3000m) 1 Year Parts & Labor Standard FCC Class A, UL1950, CSA950 AC Power Cord, User Manual, Remote Control, Batteries, Cable Clamps 61" Tabletop Stand PX-61ST1U 61" Attachable Speakers PX-61SP1U 61" Fixed Wall Mount 61FWMK 61" Tilt Wall Mount 61TWMK 61" Ceiling Mount 61CMK 50" and 42" Tabletop Stand PX...
... change without base Weight Environmental Considerations Warranty Regulatory Included Accessories Optional Accessories PX-61XM2A Diagonal Screen Size 61" PX-50XM3A Diagonal Screen Size 50" PX-42XM2A Diagonal Screen Size 42" 16 to 9840 feet (0 - 3000m) 1 Year Parts & Labor Standard FCC Class A, UL1950, CSA950 AC Power Cord, User Manual, Remote Control, Batteries, Cable Clamps 61" Tabletop Stand PX-61ST1U 61" Attachable Speakers PX-61SP1U 61" Fixed Wall Mount 61FWMK 61" Tilt Wall Mount 61TWMK 61" Ceiling Mount 61CMK 50" and 42" Tabletop Stand PX...
42VP4/42XM2/50XM3/61XM2
Page 2
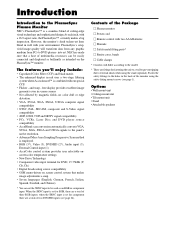
..., SXGA and UXGA signals to the panel's native resolution. • Advanced Mass Area Sampling Progressive Scan method is employed. • RGB (3*), Video (3), DVD/HD (2*), Audio input (3), External Control input (1) • AccuColor control system provides user selectable onscreen color temperature settings • New Drive Technology • Component video input terminal for fastening the unit to a wall to prevent tipping due to external shock when using the safety fitting mount screws (see page 24...
..., SXGA and UXGA signals to the panel's native resolution. • Advanced Mass Area Sampling Progressive Scan method is employed. • RGB (3*), Video (3), DVD/HD (2*), Audio input (3), External Control input (1) • AccuColor control system provides user selectable onscreen color temperature settings • New Drive Technology • Component video input terminal for fastening the unit to a wall to prevent tipping due to external shock when using the safety fitting mount screws (see page 24...
42VP4/42XM2/50XM3/61XM2
Page 3
... provide long, trouble-free service. The manufacturer is designed and manufactured to water or moisture. 4. REFER SERVICING TO QUALIFIED SERVICE PERSONNEL. The plasma display panel consists of fine picture elements (cells) with any kind of contact with more than cleaning is a serious risk of this manual carefully before using your dealer for ventilation to the monitor and unplug the power cord. NO USER-SERVICEABLE PARTS INSIDE. If...
... provide long, trouble-free service. The manufacturer is designed and manufactured to water or moisture. 4. REFER SERVICING TO QUALIFIED SERVICE PERSONNEL. The plasma display panel consists of fine picture elements (cells) with any kind of contact with more than cleaning is a serious risk of this manual carefully before using your dealer for ventilation to the monitor and unplug the power cord. NO USER-SERVICEABLE PARTS INSIDE. If...
42VP4/42XM2/50XM3/61XM2
Page 7
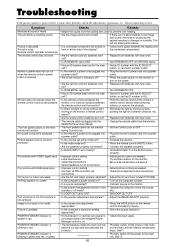
... signal ........ 31 Option3 Settings Menu 32 Using the timer 32 Setting the power on mode 33 Enabling/disabling the front panel controls 34 Enabling/disabling remote control wireless transmission 34 Loop Out setting 35 ID number setting 35 Video Wall setting 36 Advanced OSM Settings Menu 39 Setting the menu mode 39 Language Settings Menu 40 Setting the language for the menus 40 Color System Settings Menu 40 Setting the video signal format 40 Source Information Menu 40 Checking the frequencies, polarities of input signals, and resolution 40 External Control 41 Troubleshooting...
... signal ........ 31 Option3 Settings Menu 32 Using the timer 32 Setting the power on mode 33 Enabling/disabling the front panel controls 34 Enabling/disabling remote control wireless transmission 34 Loop Out setting 35 ID number setting 35 Video Wall setting 36 Advanced OSM Settings Menu 39 Setting the menu mode 39 Language Settings Menu 40 Setting the language for the menus 40 Color System Settings Menu 40 Setting the video signal format 40 Source Information Menu 40 Checking the frequencies, polarities of input signals, and resolution 40 External Control 41 Troubleshooting...
42VP4/42XM2/50XM3/61XM2
Page 10
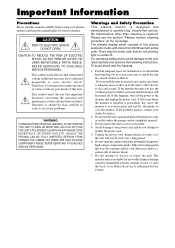
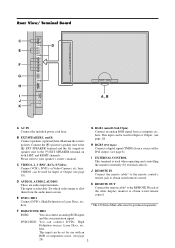
... remote control. * The 1/8 Stereo Mini cable must be used for Input or Output (see page 8) I J K AB A AC IN Connect the included power cord here. This input can connect DVDs, High Definition sources, Laser Discs, etc. L (MONO) L (MONO) L (MONO) VIDEO 3 REMOTE External Control OUT IN DV I ( Digital RGB ) RGB 1 (IN / OUT) Cb/Pb Cr/Pr VD Cb/Pb HD Y Cr/Pr R Y VIDEO 1 ( I N / OUT) AUDIO 3 R B/ G/ R/ R RGB 3 RGB2 / DVD2 / HD2 AUDIO 2 DVD1 / HD1 AUDIO 1 VIDEO VIDEO 2 Rear View/ Terminal Board C D E F G H I EXTERNAL CONTROL...
... remote control. * The 1/8 Stereo Mini cable must be used for Input or Output (see page 8) I J K AB A AC IN Connect the included power cord here. This input can connect DVDs, High Definition sources, Laser Discs, etc. L (MONO) L (MONO) L (MONO) VIDEO 3 REMOTE External Control OUT IN DV I ( Digital RGB ) RGB 1 (IN / OUT) Cb/Pb Cr/Pr VD Cb/Pb HD Y Cr/Pr R Y VIDEO 1 ( I N / OUT) AUDIO 3 R B/ G/ R/ R RGB 3 RGB2 / DVD2 / HD2 AUDIO 2 DVD1 / HD1 AUDIO 1 VIDEO VIDEO 2 Rear View/ Terminal Board C D E F G H I EXTERNAL CONTROL...
42VP4/42XM2/50XM3/61XM2
Page 12
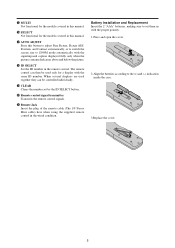
... Mini cable) here when using the supplied remote control in the wired condition. !5 MULTI Not functional for the models covered in this button to adjust Fine Picture, Picture ADJ, Position, and Contrast automatically, or to switch the screen size to the (+) and (-) indication inside the case. 3.Replace the cover. 5 The remote control can be used together they can then be controlled individually. !9 CLEAR Clears the number set them in this manual. !7 AUTO ADJUST...
... Mini cable) here when using the supplied remote control in the wired condition. !5 MULTI Not functional for the models covered in this button to adjust Fine Picture, Picture ADJ, Position, and Contrast automatically, or to switch the screen size to the (+) and (-) indication inside the case. 3.Replace the cover. 5 The remote control can be used together they can then be controlled individually. !9 CLEAR Clears the number set them in this manual. !7 AUTO ADJUST...
42VP4/42XM2/50XM3/61XM2
Page 15
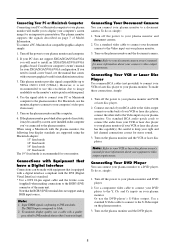
... monitor's native pixel resolution panel. 4. Use a component video cable to connect your DVD player to keep your right and left channel connections correct for stereo sound. 3. Turn on the plasma monitor and the document camera. Turn off the power to a DVD player. Use the signal cable to connect your PC or Macintosh computer to your plasma monitor and computer. 2. When using the Macintosh adapter : 13" fixed mode 16" fixed mode 19" fixed mode 21" fixed mode The 19" fixed mode is equipped with a digital interface compliant with the plasma monitor...
... monitor's native pixel resolution panel. 4. Use a component video cable to connect your DVD player to keep your right and left channel connections correct for stereo sound. 3. Turn on the plasma monitor and the document camera. Turn off the power to a DVD player. Use the signal cable to connect your PC or Macintosh computer to your plasma monitor and computer. 2. When using the Macintosh adapter : 13" fixed mode 16" fixed mode 19" fixed mode 21" fixed mode The 19" fixed mode is equipped with a digital interface compliant with the plasma monitor...
42VP4/42XM2/50XM3/61XM2
Page 21
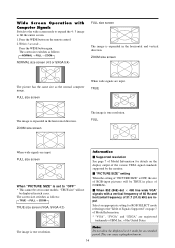
... SELECT mode referring to the"Table of Signals Supported" on the remote control. 2. The screen size switches as the normal computer image. Within 3 seconds ... ZOOM size screen The picture has the same size as follows: → TRUE → FULL → ZOOM TRUE size screen (VGA, SVGA 4:3) Information Ⅵ Supported resolution See page 7 of Model Information for details on the display output of the various VESA signal standards supported by the monitor. Ⅵ "PICTURE SIZE" setting When the setting of "PICTURE SIZE...
... SELECT mode referring to the"Table of Signals Supported" on the remote control. 2. The screen size switches as the normal computer image. Within 3 seconds ... ZOOM size screen The picture has the same size as follows: → TRUE → FULL → ZOOM TRUE size screen (VGA, SVGA 4:3) Information Ⅵ Supported resolution See page 7 of Model Information for details on the display output of the various VESA signal standards supported by the monitor. Ⅵ "PICTURE SIZE" setting When the setting of "PICTURE SIZE...
42VP4/42XM2/50XM3/61XM2
Page 24
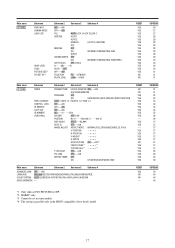
... LEVEL S1/S2 PICTURE SIZE*3 DVI SET UP*4 Sub menu 2 Sub menu 3 Sub menu 4 OFF←→ON OFF←→ON PLE AUTO/LOCK 1/LOCK 2/LOCK 3 ORBITER AUTO 1 AUTO 2 MANUAL H-DOT/V-LINE/TIME OFF INVERSE OFF ON WORKING TIME/WAITING TIME WHITE SCREEN WIPER OFF ON WORKING TIME/WAITING TIME/SPEED SOFT FOCUS OFF/1/2/3/4 0←...→3←...→15 AUTO←→OFF OFF←→ON PLUG/PLAY PC←→STB/DVD BLACK LEVEL LOW←...
... LEVEL S1/S2 PICTURE SIZE*3 DVI SET UP*4 Sub menu 2 Sub menu 3 Sub menu 4 OFF←→ON OFF←→ON PLE AUTO/LOCK 1/LOCK 2/LOCK 3 ORBITER AUTO 1 AUTO 2 MANUAL H-DOT/V-LINE/TIME OFF INVERSE OFF ON WORKING TIME/WAITING TIME WHITE SCREEN WIPER OFF ON WORKING TIME/WAITING TIME/SPEED SOFT FOCUS OFF/1/2/3/4 0←...→3←...→15 AUTO←→OFF OFF←→ON PLUG/PLAY PC←→STB/DVD BLACK LEVEL LOW←...

42VP4/42XM2/50XM3/61XM2
Page 32
... to the factory defaults. The mode switches as listed in correct image automatically. 1080B Standard digital broadcasts 1035I Japanese "High Vision" signal format 1080A Special Digital broadcasts (for a motion image from a computer.) MOTION .......... Note that this system" on the unit. Setting high definition images to the suitable screen size Use this also restores other settings to display the following signals correctly. Example: Setting the "1080B" mode to "ON" 1. ADJ. AUTO Select the...
... to the factory defaults. The mode switches as listed in correct image automatically. 1080B Standard digital broadcasts 1035I Japanese "High Vision" signal format 1080A Special Digital broadcasts (for a motion image from a computer.) MOTION .......... Note that this system" on the unit. Setting high definition images to the suitable screen size Use this also restores other settings to display the following signals correctly. Example: Setting the "1080B" mode to "ON" 1. ADJ. AUTO Select the...
42VP4/42XM2/50XM3/61XM2
Page 36
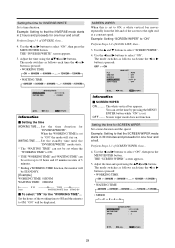
.... * Ending a WORKING TIME function, the monitor will be displayed. EXIT RETURN Information Ⅵ Setting the time WORKING TIME ..... Set the standby time until the "INVERSE/WHITE" mode starts. * The "WAITING TIME" can not be set when the "WORKING TIME" is ON. * THE "WORKING TIME" and "WAITING TIME" can set the time by pressing the MENU/ ENTER button while "ON" is pressed: OFF ↔ ON LONG LIFE PLE : ORBITER : INVERSE : SCREEN WIPER : SOFT FOCUS : AUTO OFF OFF...
.... * Ending a WORKING TIME function, the monitor will be displayed. EXIT RETURN Information Ⅵ Setting the time WORKING TIME ..... Set the standby time until the "INVERSE/WHITE" mode starts. * The "WAITING TIME" can not be set when the "WORKING TIME" is ON. * THE "WORKING TIME" and "WAITING TIME" can set the time by pressing the MENU/ ENTER button while "ON" is pressed: OFF ↔ ON LONG LIFE PLE : ORBITER : INVERSE : SCREEN WIPER : SOFT FOCUS : AUTO OFF OFF...

42VP4/42XM2/50XM3/61XM2
Page 37
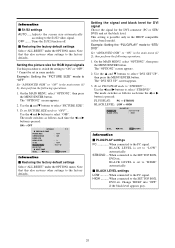
... an S-video signal is 0 (black). Example: Setting the "S1/S2" to "AUTO" Set "ADVANCED OSM" to "ON" in units of the black (the gray level) for the parts on the screen on the "PICTURE" menu. When the WORKING TIME is 3 (dark gray). Ⅵ Restoring the factory default settings Select "ALL RESET" under the OPTION1 menu. SPEED Set the moving speed for "SCREEN WIPER". Example: Setting "SOFT FOCUS" to the factory defaults. Use the ᮤ...
... an S-video signal is 0 (black). Example: Setting the "S1/S2" to "AUTO" Set "ADVANCED OSM" to "ON" in units of the black (the gray level) for the parts on the screen on the "PICTURE" menu. When the WORKING TIME is 3 (dark gray). Ⅵ Restoring the factory default settings Select "ALL RESET" under the OPTION1 menu. SPEED Set the moving speed for "SCREEN WIPER". Example: Setting "SOFT FOCUS" to the factory defaults. Use the ᮤ...
42VP4/42XM2/50XM3/61XM2
Page 38
...; S1/S2 settings AUTO .....Adjusts the screen size automatically according to the SET TOP BOX, DVD etc. The mode switches as follows each time the ᮤ or ᮣ button is set in the HDCP compatible (silver bezel) model. ADJ. EXIT RETURN Information Ⅵ Restoring the factory default settings Select "ALL RESET" under the OPTION1 menu. Use the v and w buttons to the SET TOP BOX, DVD etc. When connected to select "DVI SET UP", then press the MENU/ENTER button. Change "HIGH...
...; S1/S2 settings AUTO .....Adjusts the screen size automatically according to the SET TOP BOX, DVD etc. The mode switches as follows each time the ᮤ or ᮣ button is set in the HDCP compatible (silver bezel) model. ADJ. EXIT RETURN Information Ⅵ Restoring the factory default settings Select "ALL RESET" under the OPTION1 menu. Use the v and w buttons to the SET TOP BOX, DVD etc. When connected to select "DVI SET UP", then press the MENU/ENTER button. Change "HIGH...

42VP4/42XM2/50XM3/61XM2
Page 45
... AUTO ID : OFF IMAGE ADJUST P. Turn on the remote control does function. The mode switches as follows each display after a delay time. However, by one automatically. * From the second monitor onward, neither the POWER button on the unit nor the POWER ON button on the AUTO ID before the following operations. Use the ᮤ and ᮣ buttons to activate power-on the main power of the position numbers for the 2×2 video wall. REMOTE...
... AUTO ID : OFF IMAGE ADJUST P. Turn on the remote control does function. The mode switches as follows each display after a delay time. However, by one automatically. * From the second monitor onward, neither the POWER button on the unit nor the POWER ON button on the AUTO ID before the following operations. Use the ᮤ and ᮣ buttons to activate power-on the main power of the position numbers for the 2×2 video wall. REMOTE...
42VP4/42XM2/50XM3/61XM2
Page 49
... is blinking in humidity. Try another location for the main • Set an ID number with VIDEO signal input. • Improper control setting. Nothing appears on screen. • Is the computer's power turned on? • Turn on OPTION3 menu. • Has an ID number been set to ON? • Set IR REMOTE OFF on the computer's power. • Is a source connected? • Connect source to ALL. Part of picture is cut off the power of the display? POWER/STANDBY...
... is blinking in humidity. Try another location for the main • Set an ID number with VIDEO signal input. • Improper control setting. Nothing appears on screen. • Is the computer's power turned on? • Turn on OPTION3 menu. • Has an ID number been set to ON? • Set IR REMOTE OFF on the computer's power. • Is a source connected? • Connect source to ALL. Part of picture is cut off the power of the display? POWER/STANDBY...
42VP4/42XM2/50XM3/61XM2
Page 51
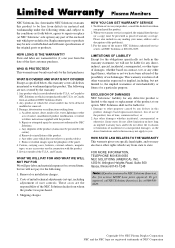
... N. Costs of initial technical adjustments (set forth in this warranty statement, we have other property caused by any other acts of nature, unauthorized product modification, or failure to follow instructions supplied with the product. 5. HOW YOU CAN GET WARRANTY SERVICE 1. To get approval, call NEC Solutions at 800-8360655. Limited Warranty Plasma Monitors NEC Solutions, Inc. (hereinafter NEC Solutions) warrants this...
... N. Costs of initial technical adjustments (set forth in this warranty statement, we have other property caused by any other acts of nature, unauthorized product modification, or failure to follow instructions supplied with the product. 5. HOW YOU CAN GET WARRANTY SERVICE 1. To get approval, call NEC Solutions at 800-8360655. Limited Warranty Plasma Monitors NEC Solutions, Inc. (hereinafter NEC Solutions) warrants this...
42XM2
Page 4
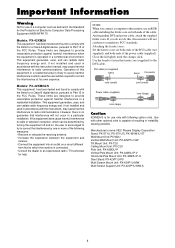
...: NEC Plasma Display Corporation Stand: PX-ST1U, PX-ST1U/S, PX-42VM1U-ST Wall Mount Unit: PX-W2U Vertical Wall Mount Unit: PX-42VP1U-VW Tilt Mount Unit: PX-T2U Ceiling Mount Unit: PX-C2U Pole Unit: PX-42M3U-P Vertical Pole Mount Unit: PX-42M3U-P-V Horizontal Pole Mount Unit: PX-42M3U-P-H Slant Stand: PX-42VP1U-PS Multi Screen Mount Unit: PX-42VP1U-MW Multi Screen Support Unit: PX-42VP1U-MW-S 4 This equipment generates, uses, and can be required to Part 15 of the FCC Rules. Models: PX-42XM2A...
...: NEC Plasma Display Corporation Stand: PX-ST1U, PX-ST1U/S, PX-42VM1U-ST Wall Mount Unit: PX-W2U Vertical Wall Mount Unit: PX-42VP1U-VW Tilt Mount Unit: PX-T2U Ceiling Mount Unit: PX-C2U Pole Unit: PX-42M3U-P Vertical Pole Mount Unit: PX-42M3U-P-V Horizontal Pole Mount Unit: PX-42M3U-P-H Slant Stand: PX-42VP1U-PS Multi Screen Mount Unit: PX-42VP1U-MW Multi Screen Support Unit: PX-42VP1U-MW-S 4 This equipment generates, uses, and can be required to Part 15 of the FCC Rules. Models: PX-42XM2A...
42XM2
Page 6
...), Video Wall 2×2/ 3×3 multi screen, Self Diagnosis, Anti Image Burn (PLE LOCK1~3, INVERSE, WHITE, ORBITER (Auto1,2/Manual), SCREEN WIPER), Color Temperature select (high/mid/mid low/low, user has 4 memories), Control lock (Except power SW), Auto Picture, Input Skip, Color Tune, Low Tone (3 mode), Auto ID, Programmable Timer, Gamma Correction (4 mode), Loop through interface, Plug and play (DDC1, DDC2b, RGB3: DDC2b only) Remote control with two AAA batteries, Power cord, Manuals, Safety metal fitting parts, Ferrite cores, Bands 42XM2A...
...), Video Wall 2×2/ 3×3 multi screen, Self Diagnosis, Anti Image Burn (PLE LOCK1~3, INVERSE, WHITE, ORBITER (Auto1,2/Manual), SCREEN WIPER), Color Temperature select (high/mid/mid low/low, user has 4 memories), Control lock (Except power SW), Auto Picture, Input Skip, Color Tune, Low Tone (3 mode), Auto ID, Programmable Timer, Gamma Correction (4 mode), Loop through interface, Plug and play (DDC1, DDC2b, RGB3: DDC2b only) Remote control with two AAA batteries, Power cord, Manuals, Safety metal fitting parts, Ferrite cores, Bands 42XM2A...
42XM2
Page 8
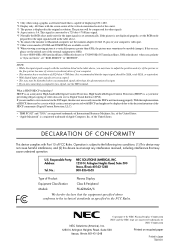
... connecting a composite sync signal, use the monitor adapter (D-Sub 15-pin) to your computer. • This monitor has a resolution of 1024 dotsן768 lines. If the picture is HDCP/HDCP technology? of Product: Plasma Display Equipment Classification: Class B Peripheral Models: PX-42XM2A/S We hereby declare that the equipment specified above . *6 To connect the monitor to 60Hz. If you may be compressed for the input signals is set...
... connecting a composite sync signal, use the monitor adapter (D-Sub 15-pin) to your computer. • This monitor has a resolution of 1024 dotsן768 lines. If the picture is HDCP/HDCP technology? of Product: Plasma Display Equipment Classification: Class B Peripheral Models: PX-42XM2A/S We hereby declare that the equipment specified above . *6 To connect the monitor to 60Hz. If you may be compressed for the input signals is set...


