User Guide
Page 2
... service names are registered in any form or by any means or used to make any derivative work (such as translation, transformation, or adaptation) without warranty of any kind, either implied or expressed, including but not limited to provide notification of such revision or change. Motorola provides this guide without written permission from time to time without obligation on the part of Motorola...
... service names are registered in any form or by any means or used to make any derivative work (such as translation, transformation, or adaptation) without warranty of any kind, either implied or expressed, including but not limited to provide notification of such revision or change. Motorola provides this guide without written permission from time to time without obligation on the part of Motorola...
User Guide
Page 4
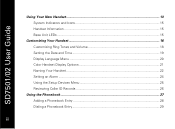
SD7501/02 User Guide Using Your New Handset...13 System Indicators and Icons 15 Handset Information ...15 Base Unit LEDs...15 Customizing Your Handset 16 Customizing Ring Tones and Volume 18 Setting the Date and Time 19 Display Language Menu 20 Color Handset Display Options 21 Naming Your Handset...22 Setting an Alarm ...24 Using the Setup Devices Menu 25 Reviewing Caller ID Records 26 Using the Phonebook ...27 Adding a Phonebook Entry 28 Dialing a Phonebook Entry 29 ii
SD7501/02 User Guide Using Your New Handset...13 System Indicators and Icons 15 Handset Information ...15 Base Unit LEDs...15 Customizing Your Handset 16 Customizing Ring Tones and Volume 18 Setting the Date and Time 19 Display Language Menu 20 Color Handset Display Options 21 Naming Your Handset...22 Setting an Alarm ...24 Using the Setup Devices Menu 25 Reviewing Caller ID Records 26 Using the Phonebook ...27 Adding a Phonebook Entry 28 Dialing a Phonebook Entry 29 ii
User Guide
Page 5
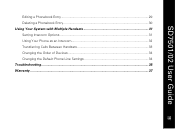
SD7501/02 User Guide Editing a Phonebook Entry 29 Deleting a Phonebook Entry 30 Using Your System with Multiple Handsets 31 Setting Intercom Options 31 Using Your Phone as an Intercom 32 Transferring Calls Between Handsets 33 Changing the Order of Devices 34 Changing the Default Phone Line Settings 34 Troubleshooting ...35 Warranty ...37 iii
SD7501/02 User Guide Editing a Phonebook Entry 29 Deleting a Phonebook Entry 30 Using Your System with Multiple Handsets 31 Setting Intercom Options 31 Using Your Phone as an Intercom 32 Transferring Calls Between Handsets 33 Changing the Order of Devices 34 Changing the Default Phone Line Settings 34 Troubleshooting ...35 Warranty ...37 iii
User Guide
Page 7
... may be connected to an incoming call. Federal Communications Commission (FCC) Part 68 Statement This Motorola cordless phone complies with Canadian ICES-003. The digits represented by ## are the REN without a decimal point (e.g., 03 is part of the product identifier that contains, among other information, a product identifier in response to the line, as Class B digital devices. The Ringer Equivalence Number (REN) is used to determine...
... may be connected to an incoming call. Federal Communications Commission (FCC) Part 68 Statement This Motorola cordless phone complies with Canadian ICES-003. The digits represented by ## are the REN without a decimal point (e.g., 03 is part of the product identifier that contains, among other information, a product identifier in response to the line, as Class B digital devices. The Ringer Equivalence Number (REN) is used to determine...
User Guide
Page 8
.... Contact the state public utility commission, public service commission, or corporation commission for repair or warranty information, please contact Motorola, Inc. If trouble is causing harm to the telephone network, the telephone company may request that the temporary discontinuance of the cordless phone does not disable your telephone company or a qualified installer. vi See installation instructions for you have questions about what will...
.... Contact the state public utility commission, public service commission, or corporation commission for repair or warranty information, please contact Motorola, Inc. If trouble is causing harm to the telephone network, the telephone company may request that the temporary discontinuance of the cordless phone does not disable your telephone company or a qualified installer. vi See installation instructions for you have questions about what will...
User Guide
Page 10
... product near water (for cleaning. 4. Do not use this product from the wall outlet before cleaning. This product should be followed to reduce the risk of power source indicated on an unstable surface, such as a bed, sofa, or rug. SD7501/02 User Guide Important Safety Instructions When using your dealer or local power company. Do not place this product on...
... product near water (for cleaning. 4. Do not use this product from the wall outlet before cleaning. This product should be followed to reduce the risk of power source indicated on an unstable surface, such as a bed, sofa, or rug. SD7501/02 User Guide Important Safety Instructions When using your dealer or local power company. Do not place this product on...
User Guide
Page 11
... not overload wall outlets and extension cords, as improper adjustment of the base or handset other risks. Instead, take it can cause electric shock when the product is damaged or frayed. • If liquid has been spilled onto the product. • If the product has been exposed to an authorized service facility. SD7501/02 User Guide 8. Opening or removing parts of other...
... not overload wall outlets and extension cords, as improper adjustment of the base or handset other risks. Instead, take it can cause electric shock when the product is damaged or frayed. • If liquid has been spilled onto the product. • If the product has been exposed to an authorized service facility. SD7501/02 User Guide 8. Opening or removing parts of other...
User Guide
Page 13
... coverage. Registering helps us facilitate warranty service, and permits us to confirm warranty status. 1 1 Check the contents listing on your purchase of the items listed. To register your product online, visit: http://broadbandregistration.motorola.com Product registration is not required for your records. Product registration is an important step toward enjoying your Motorola product require an update or other service. SD7501/02 User Guide Welcome Congratulations...
... coverage. Registering helps us facilitate warranty service, and permits us to confirm warranty status. 1 1 Check the contents listing on your purchase of the items listed. To register your product online, visit: http://broadbandregistration.motorola.com Product registration is not required for your records. Product registration is an important step toward enjoying your Motorola product require an update or other service. SD7501/02 User Guide Welcome Congratulations...
User Guide
Page 14
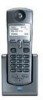
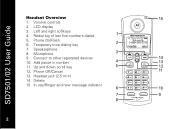
Redial log of last five numbers dialed 5. Phone Off/Cancel 13. In use/Ringer and new message indicator 2 2 SD7501/02 User Guide Handset Overview 1. Speakerphone 8. Delete 15. Phone On/Flash 6. Connect to other registered devices 10. Up and down scroll key 12. Microphone 9. Add pause in number 11. Temporary tone dialing key 7. Left and right softkeys 4. Headset jack (2.5 mm) 14. LCD display 3. Volume controls 2.
Redial log of last five numbers dialed 5. Phone Off/Cancel 13. In use/Ringer and new message indicator 2 2 SD7501/02 User Guide Handset Overview 1. Speakerphone 8. Delete 15. Phone On/Flash 6. Connect to other registered devices 10. Up and down scroll key 12. Microphone 9. Add pause in number 11. Temporary tone dialing key 7. Left and right softkeys 4. Headset jack (2.5 mm) 14. LCD display 3. Volume controls 2.
User Guide
Page 16
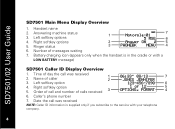
... softkey options 4. Battery charging icon (appears only when the handset is supplied only if you subscribe to the service with a LOW BATTERY message) SD7501 Caller ID Display Overview 1. Right softkey option 5. Number of caller 3. Ringer status 6. Answering machine status 3. Name of messages waiting 7. Left softkey option 4. Date the call was received 2. Right softkey options 5. Caller's phone number 7. SD7501/02 User Guide SD7501 Main Menu Display Overview 1. Time of day the call and number of call was received NOTE: Caller ID information...
... softkey options 4. Battery charging icon (appears only when the handset is supplied only if you subscribe to the service with a LOW BATTERY message) SD7501 Caller ID Display Overview 1. Right softkey option 5. Number of caller 3. Ringer status 6. Answering machine status 3. Name of messages waiting 7. Left softkey option 4. Date the call was received 2. Right softkey options 5. Caller's phone number 7. SD7501/02 User Guide SD7501 Main Menu Display Overview 1. Time of day the call and number of call was received NOTE: Caller ID information...
User Guide
Page 19
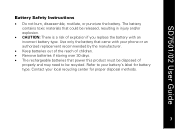
... an incorrect battery type. SD7501/02 User Guide Battery Safety Instructions • Do not burn, disassemble, mutilate, or puncture the battery. Use only the battery that power this product must be released, resulting in injury and/or explosion. • CAUTION: There is a risk of explosion if you replace the battery with your phone or an authorized replacement recommended by the manufacturer. • Keep batteries out of...
... an incorrect battery type. SD7501/02 User Guide Battery Safety Instructions • Do not burn, disassemble, mutilate, or puncture the battery. Use only the battery that power this product must be released, resulting in injury and/or explosion. • CAUTION: There is a risk of explosion if you replace the battery with your phone or an authorized replacement recommended by the manufacturer. • Keep batteries out of...

User Guide
Page 22
... battery charge time is blank and does not activate when you press the keys), charge the handset. 10 10 After the initial charge, a maintenance charge of the charger. 2. Be sure to insure maximum daily performance. Plug the power cord into the bottom of eight hours should be sufficient. NOTE: The handset charger does not require a phone line. SD7501/02 User Guide Connecting the Handset Charger 1. NOTE: If your handset displays a LOW BATTERY message, or the handset...
... battery charge time is blank and does not activate when you press the keys), charge the handset. 10 10 After the initial charge, a maintenance charge of the charger. 2. Be sure to insure maximum daily performance. Plug the power cord into the bottom of eight hours should be sufficient. NOTE: The handset charger does not require a phone line. SD7501/02 User Guide Connecting the Handset Charger 1. NOTE: If your handset displays a LOW BATTERY message, or the handset...

User Guide
Page 25
....) Press to dial the selected number. Use the softkeys to your base unit. Available functions change as you have an SD7581 base unit, all of your new handset. Press OFF/CANCEL to answer a call. SD7501/02 User Guide Using Your New Handset The features available on your new handset depend on the display. ON/FLASH OFF/CANCEL Left and right softkeys Scroll keys Redial Press to exit the redial review list without dialing a number. 1133 The...
....) Press to dial the selected number. Use the softkeys to your base unit. Available functions change as you have an SD7581 base unit, all of your new handset. Press OFF/CANCEL to answer a call. SD7501/02 User Guide Using Your New Handset The features available on your new handset depend on the display. ON/FLASH OFF/CANCEL Left and right softkeys Scroll keys Redial Press to exit the redial review list without dialing a number. 1133 The...

User Guide
Page 26
... the phonebook and caller ID list. To make or answer a call , dial the number first or after pressing the key. Press the corresponding softkey to connect to the device (e.g., press the PAGE softkey to initiate an intercom call , use the volume control keys to turn the ringer volume to make a call hands-free. SD7501/02 User Guide Delete Spkrphone Connect to Volume controls Use to edit phone numbers and names, and to switch between the speakerphone and the earpiece...
... the phonebook and caller ID list. To make or answer a call , dial the number first or after pressing the key. Press the corresponding softkey to connect to the device (e.g., press the PAGE softkey to initiate an intercom call , use the volume control keys to turn the ringer volume to make a call hands-free. SD7501/02 User Guide Delete Spkrphone Connect to Volume controls Use to edit phone numbers and names, and to switch between the speakerphone and the earpiece...

User Guide
Page 30
Alarm Tone Scroll through the list to ringer* When on, the keys beep when pressed. *Turns key beeps on when the ringer is on, and off when the ringer is off . Key Beeps • On • OFF • Link to hear samples of each available ring tone. SD7501/02 User Guide Customizing Ring Tones and Volume OPTIONS SETTINGS NOTES Phonebook Tone See Ringer Tone Plays when you receive a call from a number stored in your alarm goes off . 18 18 Sounds when your phonebook.
Alarm Tone Scroll through the list to ringer* When on, the keys beep when pressed. *Turns key beeps on when the ringer is on, and off when the ringer is off . Key Beeps • On • OFF • Link to hear samples of each available ring tone. SD7501/02 User Guide Customizing Ring Tones and Volume OPTIONS SETTINGS NOTES Phonebook Tone See Ringer Tone Plays when you receive a call from a number stored in your alarm goes off . 18 18 Sounds when your phonebook.

User Guide
Page 31
... caller ID with your local telephone company, the date and time set automatically with the night volume ringer setting (e.g., From 09:00 PM, To 06:00 AM). Night Time Enter the range of night time hours for use with the first incoming call. SD7501/02 User Guide Setting the Date and Time If you have caller ID. 1199 OPTIONS Time Time Format Date (MM/DD) or (DD/MM) Date Format Year (YYYY) SETTINGS Enter the current time...
... caller ID with your local telephone company, the date and time set automatically with the night volume ringer setting (e.g., From 09:00 PM, To 06:00 AM). Night Time Enter the range of night time hours for use with the first incoming call. SD7501/02 User Guide Setting the Date and Time If you have caller ID. 1199 OPTIONS Time Time Format Date (MM/DD) or (DD/MM) Date Format Year (YYYY) SETTINGS Enter the current time...

User Guide
Page 33
... Color Backlite timer Base Setting 10 images are supplied with the handset. You can modify the display wallpaper and color pallets from www.openLCR.com. The handset display backlight remains on during day time hours, or is always on when the handset is charging. 2211 OPTIONS Contrast SETTINGS Contrast levels 0-10 NOTES Use the scroll keys to black. SD7501/02 User Guide Color Handset Display Options If...
... Color Backlite timer Base Setting 10 images are supplied with the handset. You can modify the display wallpaper and color pallets from www.openLCR.com. The handset display backlight remains on during day time hours, or is always on when the handset is charging. 2211 OPTIONS Contrast SETTINGS Contrast levels 0-10 NOTES Use the scroll keys to black. SD7501/02 User Guide Color Handset Display Options If...

User Guide
Page 37
Press the SETUP softkey. 5. The available features will vary depending on the model of your base unit. Press the MENU softkey. 2. Scroll to the device you wish to change. 6. Scroll to and select the option you wish to configure. 4. Press the EXIT softkey after you have completed all changes. 2255 Scroll to and select Setup Devices. 3. To set up additional devices: 1. SD7501/02 User Guide Using the Setup Devices Menu The Setup Devices menu allows you to configure optional devices, such as cell docks and cameras, after you have registered them to your base unit.
Press the SETUP softkey. 5. The available features will vary depending on the model of your base unit. Press the MENU softkey. 2. Scroll to the device you wish to change. 6. Scroll to and select the option you wish to configure. 4. Press the EXIT softkey after you have completed all changes. 2255 Scroll to and select Setup Devices. 3. To set up additional devices: 1. SD7501/02 User Guide Using the Setup Devices Menu The Setup Devices menu allows you to configure optional devices, such as cell docks and cameras, after you have registered them to your base unit.
User Guide
Page 47
... the base unit and the telephone wall jack. • Make sure the battery is no dial tone on the display when the battery needs charging. If there is plugged firmly into the same circuit as the base unit can sometimes cause interference. If there is no dial tone: • First, try all : • Make sure the power cord is plugged firmly into the base unit and electrical outlet. • Make sure the phone cord...
... the base unit and the telephone wall jack. • Make sure the battery is no dial tone on the display when the battery needs charging. If there is plugged firmly into the same circuit as the base unit can sometimes cause interference. If there is no dial tone: • First, try all : • Make sure the power cord is plugged firmly into the base unit and electrical outlet. • Make sure the phone cord...

User Guide
Page 48
Disconnect the power to the base unit. 5. Connect power to the base. 2. Re-install the battery. 6. If you have the ringer turned on and loud enough to hear. (See the instructions on the ring tone and ringer volume for additional information.) • Make sure the telephone line cord is plugged firmly into the base unit and the telephone wall jack. • Make sure the power cord is plugged into the base unit and an electrical outlet. • Move closer to...
Disconnect the power to the base unit. 5. Connect power to the base. 2. Re-install the battery. 6. If you have the ringer turned on and loud enough to hear. (See the instructions on the ring tone and ringer volume for additional information.) • Make sure the telephone line cord is plugged firmly into the base unit and the telephone wall jack. • Make sure the power cord is plugged into the base unit and an electrical outlet. • Move closer to...

