User Guide
Page 1
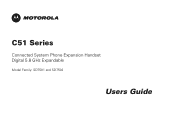
C51 Series Connected System Phone Expansion Handset Digital 5.8 GHz Expandable Model Family: SD7501 and SD7502 Users Guide
C51 Series Connected System Phone Expansion Handset Digital 5.8 GHz Expandable Model Family: SD7501 and SD7502 Users Guide
User Guide
Page 3
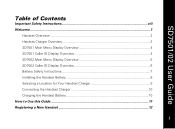
SD7501/02 User Guide Table of Contents Important Safety Instructions viii Welcome ...1 Handset Overview ...2 Handset Charger Overview 3 SD7501 Main Menu Display Overview 4 SD7501 Caller ID Display Overview 4 SD7502 Main Menu Display Overview 5 SD7502 Caller ID Display Overview 6 Battery Safety Instructions 7 Installing the Handset Battery 8 Selecting a Location for Your Handset Charger 9 Connecting the Handset Charger 10 Charging the Handset Battery 10 How to Use this Guide ...11 Registering a New Handset 12 i
SD7501/02 User Guide Table of Contents Important Safety Instructions viii Welcome ...1 Handset Overview ...2 Handset Charger Overview 3 SD7501 Main Menu Display Overview 4 SD7501 Caller ID Display Overview 4 SD7502 Main Menu Display Overview 5 SD7502 Caller ID Display Overview 6 Battery Safety Instructions 7 Installing the Handset Battery 8 Selecting a Location for Your Handset Charger 9 Connecting the Handset Charger 10 Charging the Handset Battery 10 How to Use this Guide ...11 Registering a New Handset 12 i
User Guide
Page 4
SD7501/02 User Guide Using Your New Handset...13 System Indicators and Icons 15 Handset Information ...15 Base Unit LEDs...15 Customizing Your Handset 16 Customizing Ring Tones and Volume 18 Setting the Date and Time 19 Display Language Menu 20 Color Handset Display Options 21 Naming Your Handset...22 Setting an Alarm ...24 Using the Setup Devices Menu 25 Reviewing Caller ID Records 26 Using the Phonebook ...27 Adding a Phonebook Entry 28 Dialing a Phonebook Entry 29 ii
SD7501/02 User Guide Using Your New Handset...13 System Indicators and Icons 15 Handset Information ...15 Base Unit LEDs...15 Customizing Your Handset 16 Customizing Ring Tones and Volume 18 Setting the Date and Time 19 Display Language Menu 20 Color Handset Display Options 21 Naming Your Handset...22 Setting an Alarm ...24 Using the Setup Devices Menu 25 Reviewing Caller ID Records 26 Using the Phonebook ...27 Adding a Phonebook Entry 28 Dialing a Phonebook Entry 29 ii
User Guide
Page 5
SD7501/02 User Guide Editing a Phonebook Entry 29 Deleting a Phonebook Entry 30 Using Your System with Multiple Handsets 31 Setting Intercom Options 31 Using Your Phone as an Intercom 32 Transferring Calls Between Handsets 33 Changing the Order of Devices 34 Changing the Default Phone Line Settings 34 Troubleshooting ...35 Warranty ...37 iii
SD7501/02 User Guide Editing a Phonebook Entry 29 Deleting a Phonebook Entry 30 Using Your System with Multiple Handsets 31 Setting Intercom Options 31 Using Your Phone as an Intercom 32 Transferring Calls Between Handsets 33 Changing the Order of Devices 34 Changing the Default Phone Line Settings 34 Troubleshooting ...35 Warranty ...37 iii
User Guide
Page 6
Privacy of communications may not be determined by turning the equipment off and on, the user is encouraged to try to correct the interference by Motorola for compliance could void the user's authority to operate the equipment. iv If this equipment does cause harmful interference to radio or ... a circuit different from that to which can radiate radio frequency energy and, if not installed and used in a residential installation. SD7501/02 User Guide FCC Information FCC Compliance Class B Digital Device This equipment has been tested and found to comply with Part 15 of the FCC Rules...
Privacy of communications may not be determined by turning the equipment off and on, the user is encouraged to try to correct the interference by Motorola for compliance could void the user's authority to operate the equipment. iv If this equipment does cause harmful interference to radio or ... a circuit different from that to which can radiate radio frequency energy and, if not installed and used in a residential installation. SD7501/02 User Guide FCC Information FCC Compliance Class B Digital Device This equipment has been tested and found to comply with Part 15 of the FCC Rules...
User Guide
Page 7
SD7501/02 User Guide FCC Declaration of Conformity Motorola, Inc., Connected Home Solutions, 101 Tournament Drive, Horsham, PA 19044, 1-215-323-1000, declares that this cordless phone complies with 47 CFR Parts 2 and 15 of devices that may be connected to the telephone line. ... point (e.g., 03 is a label that may result in the devices not ringing in format US: AAAEQ##TXXXX. Federal Communications Commission (FCC) Part 68 Statement This Motorola cordless phone complies with Canadian ICES-003. Canadian Compliance This Class B digital apparatus complies with Part 68 of 0.3). On the...
SD7501/02 User Guide FCC Declaration of Conformity Motorola, Inc., Connected Home Solutions, 101 Tournament Drive, Horsham, PA 19044, 1-215-323-1000, declares that this cordless phone complies with 47 CFR Parts 2 and 15 of devices that may be connected to the telephone line. ... point (e.g., 03 is a label that may result in the devices not ringing in format US: AAAEQ##TXXXX. Federal Communications Commission (FCC) Part 68 Statement This Motorola cordless phone complies with Canadian ICES-003. Canadian Compliance This Class B digital apparatus complies with Part 68 of 0.3). On the...
User Guide
Page 8
SD7501/02 User Guide This equipment uses the following USOC jack: RJ11C. See installation instructions for information. Also, you will notify the customer as soon as possible. If the equipment is solved. This equipment is not practical, the telephone company will be advised of the cordless ...services may request that you have questions about what will provide advance notice in order for repair or warranty information, please contact Motorola, Inc. vi If this equipment to maintain uninterrupted service. A plug and jack used to connect this happens, the telephone ...
SD7501/02 User Guide This equipment uses the following USOC jack: RJ11C. See installation instructions for information. Also, you will notify the customer as soon as possible. If the equipment is solved. This equipment is not practical, the telephone company will be advised of the cordless ...services may request that you have questions about what will provide advance notice in order for repair or warranty information, please contact Motorola, Inc. vi If this equipment to maintain uninterrupted service. A plug and jack used to connect this happens, the telephone ...
User Guide
Page 9
vii Industry Canada CS-03 Declaration of devices subject only to a telephone interface. SD7501/02 User Guide For body worn operation, this product. If this equipment does cause harmful interference to radio or television reception, which can be determined by turning the ... this phone has been tested and meets the FCC RF exposure guidelines when used with FCC RF exposure guidelines. The termination on and off, the user is encouraged to try to correct the interference with one or more of all the devices does not exceed five. The Ringer Equivalence Number (REN...
vii Industry Canada CS-03 Declaration of devices subject only to a telephone interface. SD7501/02 User Guide For body worn operation, this product. If this equipment does cause harmful interference to radio or television reception, which can be determined by turning the ... this phone has been tested and meets the FCC RF exposure guidelines when used with FCC RF exposure guidelines. The termination on and off, the user is encouraged to try to correct the interference with one or more of all the devices does not exceed five. The Ringer Equivalence Number (REN...
User Guide
Page 10
... equipment, basic safety precautions should be operated only from overheating, these openings must not be followed to reduce the risk of the base unit and handset are not sure of the type of power source indicated on a soft surface such as a table, shelf, or stand. This product should always be blocked... product. 3. This product should never be placed in the back or bottom of fire, electric shock, and injury: 1. Do not use liquid or aerosol cleaners. SD7501/02 User Guide Important Safety Instructions When using your dealer or local power company. viii
... equipment, basic safety precautions should be operated only from overheating, these openings must not be followed to reduce the risk of the base unit and handset are not sure of the type of power source indicated on a soft surface such as a table, shelf, or stand. This product should always be blocked... product. 3. This product should never be placed in the back or bottom of fire, electric shock, and injury: 1. Do not use liquid or aerosol cleaners. SD7501/02 User Guide Important Safety Instructions When using your dealer or local power company. viii
User Guide
Page 11
... overload wall outlets and extension cords, as improper adjustment of fire or electric shock. 10. Never push objects of any kind into this product. Never spill liquid of any kind on the product. 11. Opening or removing parts of fire or electric shock. 13. SD7501/02 User Guide 8. ix Instead, take...service facility. To reduce the risk of electric shock, do not disassemble this product through slots in the risk of the base or handset other than specified access doors may expose you to dangerous voltages or other controls may touch dangerous voltage points or short out parts that...
... overload wall outlets and extension cords, as improper adjustment of fire or electric shock. 10. Never push objects of any kind into this product. Never spill liquid of any kind on the product. 11. Opening or removing parts of fire or electric shock. 13. SD7501/02 User Guide 8. ix Instead, take...service facility. To reduce the risk of electric shock, do not disassemble this product through slots in the risk of the base or handset other than specified access doors may expose you to dangerous voltages or other controls may touch dangerous voltage points or short out parts that...
User Guide
Page 12
There is in the vicinity of electric shock from lightning. 15. Do not use the telephone to your ear when it is a remote risk of the leak. 16. x SD7501/02 User Guide 14. Only put the handset of your telephone next to report a gas leak in normal talk mode. Avoid using a telephone (other than cordless) during an electrical storm.
There is in the vicinity of electric shock from lightning. 15. Do not use the telephone to your ear when it is a remote risk of the leak. 16. x SD7501/02 User Guide 14. Only put the handset of your telephone next to report a gas leak in normal talk mode. Avoid using a telephone (other than cordless) during an electrical storm.
User Guide
Page 13
... toward enjoying your Motorola product require an update or other service. SD7501/02 User Guide Welcome Congratulations on the product packaging to confirm warranty status. 1 1 Check the contents listing on your purchase of your Motorola product, you should your new Motorola product. Registering helps... provide a copy of your dated sales receipt to ensure that your records. For warranty service of a Motorola SD7501 and SD7502 Series expansion handset. Product registration is not required for your purchase includes each of the items listed. Please retain your product...
... toward enjoying your Motorola product require an update or other service. SD7501/02 User Guide Welcome Congratulations on the product packaging to confirm warranty status. 1 1 Check the contents listing on your purchase of your Motorola product, you should your new Motorola product. Registering helps... provide a copy of your dated sales receipt to ensure that your records. For warranty service of a Motorola SD7501 and SD7502 Series expansion handset. Product registration is not required for your purchase includes each of the items listed. Please retain your product...
User Guide
Page 14
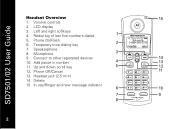
Microphone 9. Add pause in number 11. Phone On/Flash 6. Phone Off/Cancel 13. Delete 15. SD7501/02 User Guide Handset Overview 1. Left and right softkeys 4. Connect to other registered devices 10. Up and down scroll key 12. LCD display 3. Temporary tone dialing key 7. Volume controls 2. In use/Ringer and new message indicator 2 2 Redial log of last five numbers dialed 5. Speakerphone 8. Headset jack (2.5 mm) 14.
Microphone 9. Add pause in number 11. Phone On/Flash 6. Phone Off/Cancel 13. Delete 15. SD7501/02 User Guide Handset Overview 1. Left and right softkeys 4. Connect to other registered devices 10. Up and down scroll key 12. LCD display 3. Temporary tone dialing key 7. Volume controls 2. In use/Ringer and new message indicator 2 2 Redial log of last five numbers dialed 5. Speakerphone 8. Headset jack (2.5 mm) 14.
User Guide
Page 15
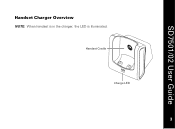
Handset Cradle Charge LED 3 3 SD7501/02 User Guide Handset Charger Overview NOTE: When handset is in the charger, the LED is illuminated.
Handset Cradle Charge LED 3 3 SD7501/02 User Guide Handset Charger Overview NOTE: When handset is in the charger, the LED is illuminated.
User Guide
Page 16
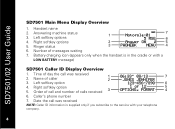
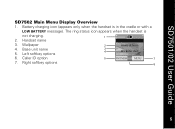
SD7501/02 User Guide SD7501 Main Menu Display Overview 1. Answering machine status 3. Time of calls received 6. Order of call and number of day the call was received 2. Battery charging icon (appears only when the handset is supplied only if you subscribe to the service with a LOW BATTERY message) SD7501 Caller ID Display Overview 1. Date the call was...
SD7501/02 User Guide SD7501 Main Menu Display Overview 1. Answering machine status 3. Time of calls received 6. Order of call and number of day the call was received 2. Battery charging icon (appears only when the handset is supplied only if you subscribe to the service with a LOW BATTERY message) SD7501 Caller ID Display Overview 1. Date the call was...
User Guide
Page 17
Caller ID option 5 PHONEBK cid MENU 7 7. Handset name 3. Right softkey options 6 5 5 Base unit name 5. Left softkey options 2 HANDSET-B-03 3 4 MY BASE UNIT 6. Battery charging icon (appears only when the handset is not charging. 1 2. Wallpaper 4. SD7501/02 User Guide SD7502 Main Menu Display Overview 1. The ring status icon appears when the handset is in the cradle or with a LOW BATTERY message).
Caller ID option 5 PHONEBK cid MENU 7 7. Handset name 3. Right softkey options 6 5 5 Base unit name 5. Left softkey options 2 HANDSET-B-03 3 4 MY BASE UNIT 6. Battery charging icon (appears only when the handset is not charging. 1 2. Wallpaper 4. SD7501/02 User Guide SD7502 Main Menu Display Overview 1. The ring status icon appears when the handset is in the cradle or with a LOW BATTERY message).
User Guide
Page 18
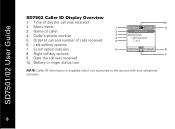
Order of call was received 2. Scroll option indicator 8. Caller's phone number 5. Right softkey options 9. Menu name 3. Name of 5 6 OPTIONS FORMAT 8 7 NOTE: Caller ID information is supplied only if you subscribe to the service with your telephone company. 6 6 Battery or ringer status icon 10 1 02:10pm 12/28 9 2 Recent Calls 3 MOTOROLA 4 1-800-xxx-xxxx 5 1 of caller 4. Date the call and number of day the call was received 10. Left softkey options 7. Time of calls received 6. SD7501/02 User Guide SD7502 Caller ID Display Overview 1.
Order of call was received 2. Scroll option indicator 8. Caller's phone number 5. Right softkey options 9. Menu name 3. Name of 5 6 OPTIONS FORMAT 8 7 NOTE: Caller ID information is supplied only if you subscribe to the service with your telephone company. 6 6 Battery or ringer status icon 10 1 02:10pm 12/28 9 2 Recent Calls 3 MOTOROLA 4 1-800-xxx-xxxx 5 1 of caller 4. Date the call and number of day the call was received 10. Left softkey options 7. Time of calls received 6. SD7501/02 User Guide SD7502 Caller ID Display Overview 1.
User Guide
Page 19
... out of the reach of explosion if you replace the battery with an incorrect battery type. Contact your battery's label for proper disposal methods. 7 7 SD7501/02 User Guide Battery Safety Instructions • Do not burn, disassemble, mutilate, or puncture the battery. The battery contains toxic materials that power this product must be disposed...
... out of the reach of explosion if you replace the battery with an incorrect battery type. Contact your battery's label for proper disposal methods. 7 7 SD7501/02 User Guide Battery Safety Instructions • Do not burn, disassemble, mutilate, or puncture the battery. The battery contains toxic materials that power this product must be disposed...

User Guide
Page 20
Remove the battery door by pressing down on the right.) 4. Insert the battery into the receptacle. (Make sure the black wire is on the indentation and sliding downward. 3. Attach the belt clip (optional). 8 8 Replace the battery door. 6. Plug the battery connector into the battery compartment. 5. Remove any stickers or inserts, if present. 2. SD7501/02 User Guide Installing the Handset Battery 1.
Remove the battery door by pressing down on the right.) 4. Insert the battery into the receptacle. (Make sure the black wire is on the indentation and sliding downward. 3. Attach the belt clip (optional). 8 8 Replace the battery door. 6. Plug the battery connector into the battery compartment. 5. Remove any stickers or inserts, if present. 2. SD7501/02 User Guide Installing the Handset Battery 1.

User Guide
Page 21
SD7501/02 User Guide Selecting a Location for Your Handset Charger 9 9
SD7501/02 User Guide Selecting a Location for Your Handset Charger 9 9

