
Technical Reference
Page 12
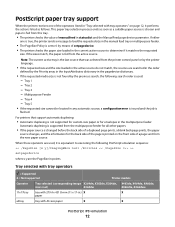
... the multipurpose feeder. PostScript paper tray support When the printer receives one is true, the printer sends a message to load the requested size in the manual feed tray or multipurpose feeder. • The PageSize Policy is set ) X364dw X466dte, X466dwe 11x17tray tray with 279.4 x 431.8-mm (11 x 17-in.) X X paper a3tray...
... the multipurpose feeder. PostScript paper tray support When the printer receives one is true, the printer sends a message to load the requested size in the manual feed tray or multipurpose feeder. • The PageSize Policy is set ) X364dw X466dte, X466dwe 11x17tray tray with 279.4 x 431.8-mm (11 x 17-in.) X X paper a3tray...
Technical Reference
Page 15
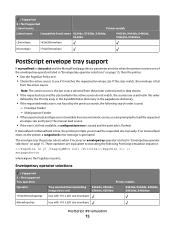
... if it receives an envelopetray operator is listed in "Envelopetray operator selections" on the printer, a rangecheck error message is used: - If no manual feed exists on page 15. Envelope Feeder - Multipurpose Feeder • If the requested size and type are not available from any automatic source,... you to load the requested size manually. These operators are equivalent to load the requested envelope size and type in the manual feed source. • If the size is still not available, a configurationerror is issued and...
... if it receives an envelopetray operator is listed in "Envelopetray operator selections" on the printer, a rangecheck error message is used: - If no manual feed exists on page 15. Envelope Feeder - Multipurpose Feeder • If the requested size and type are not available from any automatic source,... you to load the requested size manually. These operators are equivalent to load the requested envelope size and type in the manual feed source. • If the size is still not available, a configurationerror is issued and...
Technical Reference
Page 67
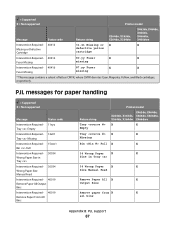
... Remove Paper All X X Output Bins Remove paper from X X all bins Appendix B: PJL support 67 Wrong Paper Size Manual Feed 30034 Intervention Required - 40019 Remove Paper All Output Bins Intervention Required - 40019 Remove Paper From All Bins Return string Tray Empty Printer model X463de, ...
... Remove Paper All X X Output Bins Remove paper from X X all bins Appendix B: PJL support 67 Wrong Paper Size Manual Feed 30034 Intervention Required - 40019 Remove Paper All Output Bins Intervention Required - 40019 Remove Paper From All Bins Return string Tray Empty Printer model X463de, ...
Technical Reference
Page 69
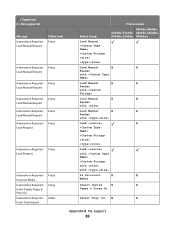
... Intervention Required - 4300x Insert Tray Request Printer model Return string X463de, X464de, X264dn, X363dn, X466de, X466dte, X364dn, X364dw X466dwe Load Manual Load Manual X X Feeder with Load Manual X X Feeder with Load Manual X X Feeder with Load Manual X X Feeder with Load X Load with with with 34 Incorrect X X Media Insert Duplex X X Pages & Press Go. Insert Tray X X Appendix B: PJL support...
... Intervention Required - 4300x Insert Tray Request Printer model Return string X463de, X464de, X264dn, X363dn, X466de, X466dte, X364dn, X364dw X466dwe Load Manual Load Manual X X Feeder with Load Manual X X Feeder with Load Manual X X Feeder with Load Manual X X Feeder with Load X Load with with with 34 Incorrect X X Media Insert Duplex X X Pages & Press Go. Insert Tray X X Appendix B: PJL support...
User Guide
Page 10
... Name not set up ...254 Fax Station Number not set up...255 Insert Tray ...255 Install Tray ...255 Invalid PIN...255 Load with ...255 Load manual feeder with ...255 Memory full, cannot print faxes...256 Network/Network ...256 No analog phone line connected to ...253 Check tray connection ...253 Clock battery...
... Name not set up ...254 Fax Station Number not set up...255 Insert Tray ...255 Install Tray ...255 Invalid PIN...255 Load with ...255 Load manual feeder with ...255 Memory full, cannot print faxes...256 Network/Network ...256 No analog phone line connected to ...253 Check tray connection ...253 Clock battery...
User Guide
Page 23
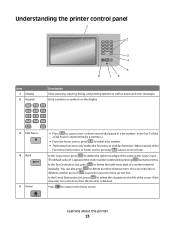
... menu, fax function, or home screen, pressing causes an error beep. In the Copy menu, press to delete the right-most digit of a number entered manually. In the E-mail Destination List, press to delete the character to the home screen. When outside of the cursor.
... menu, fax function, or home screen, pressing causes an error beep. In the Copy menu, press to delete the right-most digit of a number entered manually. In the E-mail Destination List, press to delete the character to the home screen. When outside of the cursor.
User Guide
Page 54
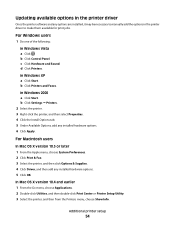
...-click the printer, and then select Properties. 4 Click the Install Options tab. 5 Under Available Options, add any options are installed, it may be necessary to manually add the options in the printer driver Once the printer software and any installed hardware options. 6 Click Apply. In Windows 2000 a Click Start. Updating available...
...-click the printer, and then select Properties. 4 Click the Install Options tab. 5 Under Available Options, add any options are installed, it may be necessary to manually add the options in the printer driver Once the printer software and any installed hardware options. 6 Click Apply. In Windows 2000 a Click Start. Updating available...
User Guide
Page 63
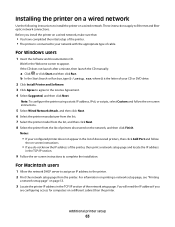
... than the printer. Wait for computers on the network, and then click Finish. If the CD does not launch after a minute, then launch the CD manually: a Click , or click Start and then click Run. Notes: • If your CD or DVD drive. 2 Click Install Printer and Software. 3 Click Agree to agree...
... than the printer. Wait for computers on the network, and then click Finish. If the CD does not launch after a minute, then launch the CD manually: a Click , or click Start and then click Run. Notes: • If your CD or DVD drive. 2 Click Install Printer and Software. 3 Click Agree to agree...
User Guide
Page 67
... Default Browser tab. i Select the printer from the list. e Save the new settings. If the CD does not launch after a minute, then launch the CD manually: 1 Click , or click Start and then click Run. 2 In the Start Search box, type D:\setup.exe, where D is transferred one bit at a time. f Click Add...
... Default Browser tab. i Select the printer from the list. e Save the new settings. If the CD does not launch after a minute, then launch the CD manually: 1 Click , or click Start and then click Run. 2 In the Start Search box, type D:\setup.exe, where D is transferred one bit at a time. f Click Add...
User Guide
Page 77
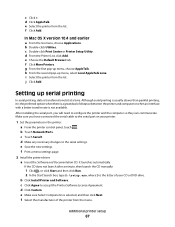
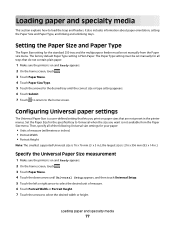
Setting the Paper Size and Paper Type The Paper Size setting for the standard 250 tray and the multipurpose feeder must be set manually for the desired tray until Universal Setup appears, and then touch Universal Setup. 5 Touch the left or right arrow to Universal when the size you... arrow until the correct size or type setting appears. 6 Touch Submit. 7 Touch to return to the home screen. The Paper Type setting must be set manually from the Paper Size menu. the largest size is 76 x 76 mm (3 x 3 in.); Loading paper and specialty media This section explains how to select ...
Setting the Paper Size and Paper Type The Paper Size setting for the standard 250 tray and the multipurpose feeder must be set manually for the desired tray until Universal Setup appears, and then touch Universal Setup. 5 Touch the left or right arrow to Universal when the size you... arrow until the correct size or type setting appears. 6 Touch Submit. 7 Touch to return to the home screen. The Paper Type setting must be set manually from the Paper Size menu. the largest size is 76 x 76 mm (3 x 3 in.); Loading paper and specialty media This section explains how to select ...
User Guide
Page 78
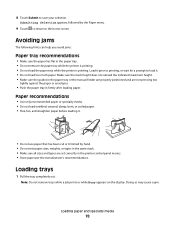
... is printing. Make sure the stack height does not exceed the indicated maximum height. • Make sure the guides in the paper tray or the manual feeder are properly positioned and are set correctly in the printer control panel menus. • Store paper per the manufacturer's recommendations. Loading trays 1 Pull the...
... is printing. Make sure the stack height does not exceed the indicated maximum height. • Make sure the guides in the paper tray or the manual feeder are properly positioned and are set correctly in the printer control panel menus. • Store paper per the manufacturer's recommendations. Loading trays 1 Pull the...

User Guide
Page 88
... is changed, the menus display the new name instead of Custom Type . The temperature of paper loaded in the tray. Paper may not be set manually from the Embedded Web Server: 1 Type the printer IP address into the address field of your custom name. Loading paper and specialty media 88 To...
... is changed, the menus display the new name instead of Custom Type . The temperature of paper loaded in the tray. Paper may not be set manually from the Embedded Web Server: 1 Type the printer IP address into the address field of your custom name. Loading paper and specialty media 88 To...
User Guide
Page 94
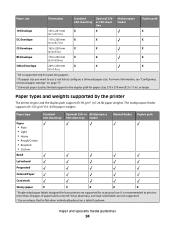
or Multipurpose 250-sheet tray 550-sheet tray feeder Manual feeder Duplex path Letterhead Preprinted Colored Paper Card stock Glossy paper X X X X X 1 Single-sided paper labels designed for laser printers are not supported. 2 Use envelopes that lie flat when individually placed on page 77. 3 Universal paper size has limited support in .) or larger. It...
or Multipurpose 250-sheet tray 550-sheet tray feeder Manual feeder Duplex path Letterhead Preprinted Colored Paper Card stock Glossy paper X X X X X 1 Single-sided paper labels designed for laser printers are not supported. 2 Use envelopes that lie flat when individually placed on page 77. 3 Universal paper size has limited support in .) or larger. It...
User Guide
Page 95
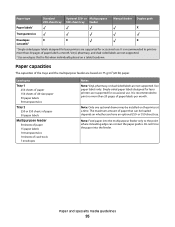
... based on the printer at a time. or Multipurpose 250-sheet tray 550-sheet tray feeder Manual feeder Duplex path X Transparencies Envelopes X X X (smooth)2 1 Single-sided paper labels designed for laser printers are not supported. Paper capacities The capacities of card stock 7 envelopes Notes Note: Vinyl... for occasional use . Vinyl, pharmacy, and dual-sided labels are supported for occasional use . Single-sided paper labels designed for laser printers are not supported. 2 Use envelopes that can contact the paper guides. The maximum amount of paper labels per month. It...
... based on the printer at a time. or Multipurpose 250-sheet tray 550-sheet tray feeder Manual feeder Duplex path X Transparencies Envelopes X X X (smooth)2 1 Single-sided paper labels designed for laser printers are not supported. Paper capacities The capacities of card stock 7 envelopes Notes Note: Vinyl... for occasional use . Vinyl, pharmacy, and dual-sided labels are supported for occasional use . Single-sided paper labels designed for laser printers are not supported. 2 Use envelopes that can contact the paper guides. The maximum amount of paper labels per month. It...
User Guide
Page 106
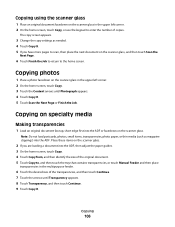
.... 4 Touch Copy from, and then identify the size of the original document. 5 Touch Copy to, and then touch the tray that contains transparencies, or touch Manual Feeder and then place transparencies in the multipurpose feeder. 6 Touch the desired size of copies. Copying 106 Place these items on the scanner glass. 2 If...
.... 4 Touch Copy from, and then identify the size of the original document. 5 Touch Copy to, and then touch the tray that contains transparencies, or touch Manual Feeder and then place transparencies in the multipurpose feeder. 6 Touch the desired size of copies. Copying 106 Place these items on the scanner glass. 2 If...
User Guide
Page 107
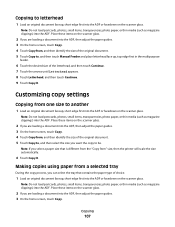
... Copy from " size, then the printer will scale the size automatically. 6 Touch Copy It. Customizing copy settings Copying from one size to , and then touch Manual Feeder and place letterhead face up, top edge first in the multipurpose feeder. 6 Touch the desired size of choice. 1 Load an original document faceup, short...
... Copy from " size, then the printer will scale the size automatically. 6 Touch Copy It. Customizing copy settings Copying from one size to , and then touch Manual Feeder and place letterhead face up, top edge first in the multipurpose feeder. 6 Touch the desired size of choice. 1 Load an original document faceup, short...
User Guide
Page 108
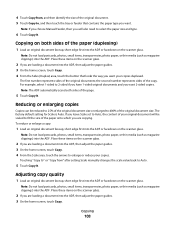
Note: If you choose Manual Feeder, then you want 2-sided copies. Note: Do not load postcards, photos, small items, transparencies, photo paper, or thin media (such as magazine clippings) into ... scanner glass. The factory default setting for Scale is Auto. The first number represents sides of the original documents; 4 Touch Copy from " after setting Scale manually changes the scale value back to Auto. 5 Touch Copy It.
Note: If you choose Manual Feeder, then you want 2-sided copies. Note: Do not load postcards, photos, small items, transparencies, photo paper, or thin media (such as magazine clippings) into ... scanner glass. The factory default setting for Scale is Auto. The first number represents sides of the original documents; 4 Touch Copy from " after setting Scale manually changes the scale value back to Auto. 5 Touch Copy It.
User Guide
Page 113
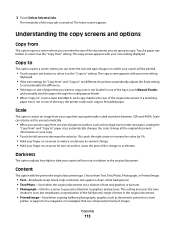
... size button to select it takes to scan, but emphasizes a reproduction of the full dynamic range of tones in one of the trays, touch Manual Feeder, and manually send the paper through the multipurpose feeder. • When "Copy to" is set for you automatically. • When you want to copy onto is... enter the size and type of paper on your copy. • Touch the left arrow to decrease the value by 1%. • Hold your finger on a laser printer, or pages from " and "Copy to" are a mixture of the change . • Hold your finger on an arrow to make a continuous increment change ...
... size button to select it takes to scan, but emphasizes a reproduction of the full dynamic range of tones in one of the trays, touch Manual Feeder, and manually send the paper through the multipurpose feeder. • When "Copy to" is set for you automatically. • When you want to copy onto is... enter the size and type of paper on your copy. • Touch the left arrow to decrease the value by 1%. • Hold your finger on a laser printer, or pages from " and "Copy to" are a mixture of the change . • Hold your finger on an arrow to make a continuous increment change ...
User Guide
Page 134
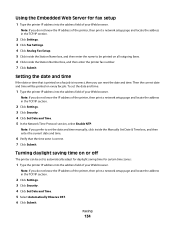
To set the date and time manually, click inside the Station Number box, and then enter the printer fax number. 7 Click Submit. Setting the date and time If the date or time ... address into the address field of your Web browser. Then the correct date and time will be printed on all outgoing faxes. 6 Click inside the Manually Set Date & Time box, and then enter the current date and time. 6 Verify that is printed on or off The printer can reset the date...
To set the date and time manually, click inside the Station Number box, and then enter the printer fax number. 7 Click Submit. Setting the date and time If the date or time ... address into the address field of your Web browser. Then the correct date and time will be printed on all outgoing faxes. 6 Click inside the Manually Set Date & Time box, and then enter the current date and time. 6 Verify that is printed on or off The printer can reset the date...

User Guide
Page 142
...9. b From the Action menu, select Hold faxes. Use Photo mode when faxing photos printed on a laser printer or taken from printing until they are released. Held faxes can be released manually or at a scheduled day or time. 1 Type the printer IP address into the address field of... Schedule. d From the Day(s) menu, select the day you selected Scheduled, then continue with the following : • Off • Always On • Manual • Scheduled 8 If you want the held faxes released. 9 Click Add. Faxing 142 When should I use Text mode? • Use Text mode when...
...9. b From the Action menu, select Hold faxes. Use Photo mode when faxing photos printed on a laser printer or taken from printing until they are released. Held faxes can be released manually or at a scheduled day or time. 1 Type the printer IP address into the address field of... Schedule. d From the Day(s) menu, select the day you selected Scheduled, then continue with the following : • Off • Always On • Manual • Scheduled 8 If you want the held faxes released. 9 Click Add. Faxing 142 When should I use Text mode? • Use Text mode when...


