

Technical Reference
Page 2
... will be made to the information herein; For information on supplies and downloads, visit www.lexmark.com. UNITED STATES GOVERNMENT RIGHTS This software and any accompanying documentation provided under this statement may be incorporated in certain transactions; therefore, ...this agreement are commercial computer software and documentation developed exclusively at any time. these available in all countries in conjunction with local law: LEXMARK INTERNATIONAL, INC., PROVIDES THIS PUBLICATION "AS IS" WITHOUT WARRANTY ...
... will be made to the information herein; For information on supplies and downloads, visit www.lexmark.com. UNITED STATES GOVERNMENT RIGHTS This software and any accompanying documentation provided under this statement may be incorporated in certain transactions; therefore, ...this agreement are commercial computer software and documentation developed exclusively at any time. these available in all countries in conjunction with local law: LEXMARK INTERNATIONAL, INC., PROVIDES THIS PUBLICATION "AS IS" WITHOUT WARRANTY ...
Technical Reference
Page 6
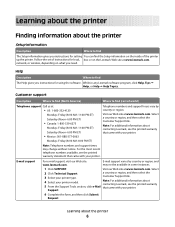
.... Monday-Friday (8:00 AM-8:00 PM ET) Note: Telephone numbers and support times may not be available in any Lexmark software program, click Help, Tips Help, or Help Help Topics. E-mail support varies by country or region. Select 2 Click Technical ... Submit Request. Help Description Where to find (rest of instructions for local, box or on what you instructions for using the software. Note: For additional information about contacting Lexmark, see the printed warranty 5 From the Support Tools section, click e-Mail that came with your printer. E-mail support For...
.... Monday-Friday (8:00 AM-8:00 PM ET) Note: Telephone numbers and support times may not be available in any Lexmark software program, click Help, Tips Help, or Help Help Topics. E-mail support varies by country or region. Select 2 Click Technical ... Submit Request. Help Description Where to find (rest of instructions for local, box or on what you instructions for using the software. Note: For additional information about contacting Lexmark, see the printed warranty 5 From the Support Tools section, click e-Mail that came with your printer. E-mail support For...
Technical Reference
Page 8
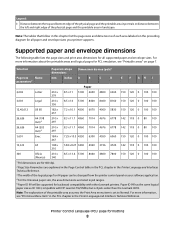
...of each area labeled on page 7. Note: The explanation of the printable area assumes the Print Area menu item is 8 pels wider than the Lexmark 4039. Printer Control Language (PCL) page formatting 8 For more information, see "Printable areas" on the preceding diagram for all supported paper and ...Normal. Supported paper and envelope dimensions The following table lists the page sizes and print area dimensions for all paper and envelope sizes your software application. 4 For the Universal paper size, the area dimensions are explained in the Page Control table in the PCL chapter in the ...
...of each area labeled on page 7. Note: The explanation of the printable area assumes the Print Area menu item is 8 pels wider than the Lexmark 4039. Printer Control Language (PCL) page formatting 8 For more information, see "Printable areas" on the preceding diagram for all supported paper and ...Normal. Supported paper and envelope dimensions The following table lists the page sizes and print area dimensions for all paper and envelope sizes your software application. 4 For the Universal paper size, the area dimensions are explained in the Page Control table in the PCL chapter in the ...
Technical Reference
Page 9
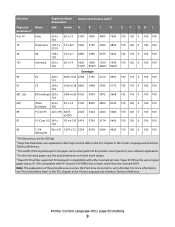
... pel ranges. 5 Paper ID 99 will be changed from the printer control panel or your software application. 4 For the Universal paper size, the area dimensions are explained in the Page Control...printable area assumes the Print Area menu item is 8 pels wider than the Lexmark 4039. Printer Control Language (PCL) page formatting 9 Paper ID 99 has the same logical ...paper size as ID 100 (compatible with other Lexmark printers. Selection Paper/envelope dimensions Dimensions by area (pels)1 Page size Name mm inches A B C D ...
... pel ranges. 5 Paper ID 99 will be changed from the printer control panel or your software application. 4 For the Universal paper size, the area dimensions are explained in the Page Control...printable area assumes the Print Area menu item is 8 pels wider than the Lexmark 4039. Printer Control Language (PCL) page formatting 9 Paper ID 99 has the same logical ...paper size as ID 100 (compatible with other Lexmark printers. Selection Paper/envelope dimensions Dimensions by area (pels)1 Page size Name mm inches A B C D ...

Technical Reference
Page 14
... is equivalent to 216 x 356 mm (8.5 x 14 in userdict. Therefore, when these literal names are used as operators in .) unless a size is specified by your software program. The following PostScript emulation sequence. When these operators are used , part of the image may be clipped.
... is equivalent to 216 x 356 mm (8.5 x 14 in userdict. Therefore, when these literal names are used as operators in .) unless a size is specified by your software program. The following PostScript emulation sequence. When these operators are used , part of the image may be clipped.

Technical Reference
Page 47
... 30018 Serial Option Error Intervention Required - 30018 Network Software Error Intervention Required - 30018 Standard Serial Error Intervention Required - 30018 Network Software Error Intervention Required - 30018 Network Software Error Intervention Required - 30018 Standard Serial Fax Connection Lost... 39 Complex Page 54 Parallel Error X X 54 Serial option X X error 54 Standard Network Software Error 54 Standard Serial X X Error 54 Standard network software error 54 Std Network Software Error 54 Std Ser Fax X X Connection Lost 56 Parallel Port X X Disabled 56 Parallel ...
... 30018 Serial Option Error Intervention Required - 30018 Network Software Error Intervention Required - 30018 Standard Serial Error Intervention Required - 30018 Network Software Error Intervention Required - 30018 Network Software Error Intervention Required - 30018 Standard Serial Fax Connection Lost... 39 Complex Page 54 Parallel Error X X 54 Serial option X X error 54 Standard Network Software Error 54 Standard Serial X X Error 54 Standard network software error 54 Std Network Software Error 54 Std Ser Fax X X Connection Lost 56 Parallel Port X X Disabled 56 Parallel ...
Technical Reference
Page 49
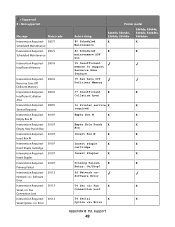
... - 30107 Insert Staple Cartridge Intervention Required - 30107 Insert Stapler Intervention Required - 30107 Priming Failed Intervention Required - 30112 Network Software Error Intervention Required - 30112 Serial Fax Connection Lost Intervention Required - 30112 Serial Option Error Return string 80 Scheduled Maintenance Printer model...Punch X X Box Insert Box M X X Insert staple X X cartridge Insert Stapler X X Priming Failed, X X Retry. Go/Stop? 54 Network Software Error 54 Ser Fax X X Connection Lost 54 Serial X X Option Error Appendix B: PJL support 49
... - 30107 Insert Staple Cartridge Intervention Required - 30107 Insert Stapler Intervention Required - 30107 Priming Failed Intervention Required - 30112 Network Software Error Intervention Required - 30112 Serial Fax Connection Lost Intervention Required - 30112 Serial Option Error Return string 80 Scheduled Maintenance Printer model...Punch X X Box Insert Box M X X Insert staple X X cartridge Insert Stapler X X Priming Failed, X X Retry. Go/Stop? 54 Network Software Error 54 Ser Fax X X Connection Lost 54 Serial X X Option Error Appendix B: PJL support 49
User Guide
Page 2
... drawer...50 Attaching cables...51 Verifying printer setup...52 Printing a menu settings page...52 Printing a network setup page ...53 Setting up the printer software...53 Installing printer software ...53 Updating available options in the printer driver...54 Setting up wireless printing...55 Follow these steps to set up your printer ...55 Information...
... drawer...50 Attaching cables...51 Verifying printer setup...52 Printing a menu settings page...52 Printing a network setup page ...53 Setting up the printer software...53 Installing printer software ...53 Updating available options in the printer driver...54 Setting up wireless printing...55 Follow these steps to set up your printer ...55 Information...
User Guide
Page 11
... busy, preparing resources for job...258 System busy, preparing resources for resources 260 53 Unformatted flash detected ...260 54 Network software error...260 54 Serial option error...260 54 Standard network software error...261 55 Unsupported option in slot ...261 56 Parallel port disabled...261 56 Serial port disabled ...261 56 Standard...
... busy, preparing resources for job...258 System busy, preparing resources for resources 260 53 Unformatted flash detected ...260 54 Network software error...260 54 Serial option error...260 54 Standard network software error...261 55 Unsupported option in slot ...261 56 Parallel port disabled...261 56 Serial port disabled ...261 56 Standard...

User Guide
Page 17
... on your printer model • Configuring printer settings • Viewing and printing documents and photos • Setting up and using printer software • Setting up and configuring the printer on a network, depending on your operating system. Learning about the printer 17 We're ...Setup documentation-The setup documentation came with the printer and is available on the Lexmark Web site at www.lexmark.com/publications/. User's Guide-The User's Guide is also available on the Software and Documentation CD. Learning about the printer Thank you looking for and maintaining ...
... on your printer model • Configuring printer settings • Viewing and printing documents and photos • Setting up and using printer software • Setting up and configuring the printer on a network, depending on your operating system. Learning about the printer 17 We're ...Setup documentation-The setup documentation came with the printer and is available on the Lexmark Web site at www.lexmark.com/publications/. User's Guide-The User's Guide is also available on the Software and Documentation CD. Learning about the printer Thank you looking for and maintaining ...
User Guide
Page 52
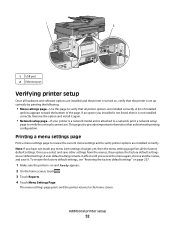
... settings from the menus, they replace the factory default settings as user default settings. 1 USB port 2 Ethernet port Verifying printer setup Once all hardware and software options are installed and the printer is turned on and Ready appears. 2 On the home screen, touch . 3 Touch Reports. 4 Touch Menu Settings Page. To restore...
... settings from the menus, they replace the factory default settings as user default settings. 1 USB port 2 Ethernet port Verifying printer setup Once all hardware and software options are installed and the printer is turned on and Ready appears. 2 On the home screen, touch . 3 Touch Reports. 4 Touch Menu Settings Page. To restore...
User Guide
Page 53
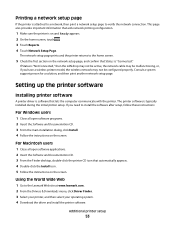
...person for a solution, and then print another network setup page. Additional printer setup 53 For Macintosh users 1 Close all open software applications. 2 Insert the Software and Documentation CD. 3 From the Finder desktop, double-click the printer CD icon that lets the computer communicate with the ...is "Connected." Printing a network setup page If the printer is attached to a network, then print a network setup page to the Lexmark Web site at www.lexmark.com. 2 From the Drivers & Downloads menu, click Driver Finder. 3 Select your printer, and then select your operating system. ...
...person for a solution, and then print another network setup page. Additional printer setup 53 For Macintosh users 1 Close all open software applications. 2 Insert the Software and Documentation CD. 3 From the Finder desktop, double-click the printer CD icon that lets the computer communicate with the ...is "Connected." Printing a network setup page If the printer is attached to a network, then print a network setup page to the Lexmark Web site at www.lexmark.com. 2 From the Drivers & Downloads menu, click Driver Finder. 3 Select your printer, and then select your operating system. ...
User Guide
Page 54
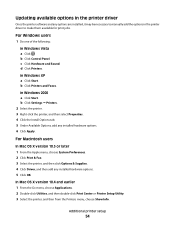
... printer setup 54 For Windows users 1 Do one of the following: In Windows Vista a Click . Updating available options in the printer driver Once the printer software and any options are installed, it may be necessary to manually add the options in the printer driver to make them available for print jobs.
... printer setup 54 For Windows users 1 Do one of the following: In Windows Vista a Click . Updating available options in the printer driver Once the printer software and any options are installed, it may be necessary to manually add the options in the printer driver to make them available for print jobs.
User Guide
Page 55
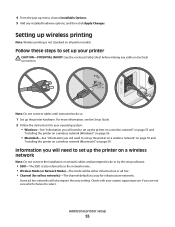
... your system support person if you will also require the auto setting. Note: Do not connect cables until prompted to do so by the setup software. • SSID-The SSID is not standard on page 56. • Macintosh-See "Information you will be either infrastructure or ad hoc. • Channel (for...
... your system support person if you will also require the auto setting. Note: Do not connect cables until prompted to do so by the setup software. • SSID-The SSID is not standard on page 56. • Macintosh-See "Information you will be either infrastructure or ad hoc. • Channel (for...
User Guide
Page 56
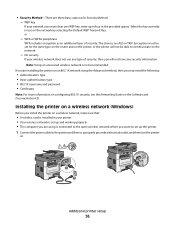
...; Certificates Note: For more than one WEP key, enter up the printer. 1 Connect the power cable to the printer and then to communicate on the Software and Documentation CD. Encryption must be set up to four in your printer. • Your wireless network is installed in the provided spaces. or - No...
...; Certificates Note: For more than one WEP key, enter up the printer. 1 Connect the power cable to the printer and then to communicate on the Software and Documentation CD. Encryption must be set up to four in your printer. • Your wireless network is installed in the provided spaces. or - No...
User Guide
Page 58
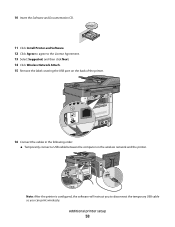
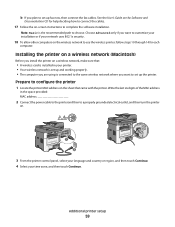
Additional printer setup 58 10 Insert the Software and Documentation CD. 11 Click Install Printer and Software. 12 Click Agree to agree to disconnect the temporary USB cable so you to the License Agreement. 13 Select Suggested, and then click Next. 14 Click Wireless Network Attach. 15 Remove the label covering the USB port on the back of the printer. 16 Connect the cables in the following order: a Temporarily connect a USB cable between the computer on the wireless network and the printer. Note: After the printer is configured, the software will instruct you can print wirelessly.
Additional printer setup 58 10 Insert the Software and Documentation CD. 11 Click Install Printer and Software. 12 Click Agree to agree to disconnect the temporary USB cable so you to the License Agreement. 13 Select Suggested, and then click Next. 14 Click Wireless Network Attach. 15 Remove the label covering the USB port on the back of the printer. 16 Connect the cables in the following order: a Temporarily connect a USB cable between the computer on the wireless network and the printer. Note: After the printer is configured, the software will instruct you can print wirelessly.
User Guide
Page 59
... printer. • Your wireless network is set up and working properly. • The computer you are using is the recommended path to complete the software installation. Additional printer setup 59 Choose Advanced only if you want to set up fax now, then connect the fax cables. Write the last six... network to use the wireless printer, follow steps 10 through 14 for help deciding how to connect the cables. 17 Follow the on the Software and Documentation CD for each computer. Note: Basic is connected to the same wireless network where you want to customize your installation or if ...
... printer. • Your wireless network is set up and working properly. • The computer you are using is the recommended path to complete the software installation. Additional printer setup 59 Choose Advanced only if you want to set up fax now, then connect the fax cables. Write the last six... network to use the wireless printer, follow steps 10 through 14 for help deciding how to connect the cables. 17 Follow the on the Software and Documentation CD for each computer. Note: Basic is connected to the same wireless network where you want to customize your installation or if ...
User Guide
Page 61
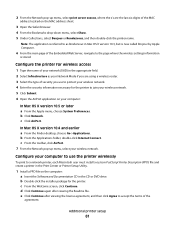
.... Additional printer setup 61 Note: The application is referred to join your wireless network. 5 Click Submit. 6 Open the AirPort application on the computer: a Insert the Software and Documentation CD in Mac OS X version 10.3, but is now called Bonjour by Apple Computer. 6 From the main page of your network (SSID) in...
.... Additional printer setup 61 Note: The application is referred to join your wireless network. 5 Click Submit. 6 Open the AirPort application on the computer: a Insert the Software and Documentation CD in Mac OS X version 10.3, but is now called Bonjour by Apple Computer. 6 From the main page of your network (SSID) in...
User Guide
Page 62
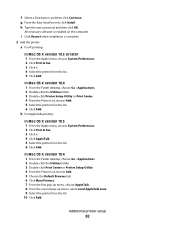
h Type the user password, and then click OK. All necessary software is complete. 2 Add the printer: a For IP printing: In Mac OS X version 10.5 or later 1 From the Apple menu, choose System Preferences. 2 Click Print & Fax. 3 ...
h Type the user password, and then click OK. All necessary software is complete. 2 Add the printer: a For IP printing: In Mac OS X version 10.5 or later 1 From the Apple menu, choose System Preferences. 2 Click Print & Fax. 3 ...
User Guide
Page 63
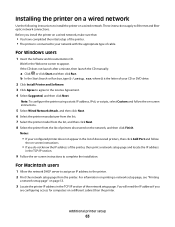
...the IP address in the TCP/IP section. 9 Follow the on a different subnet than the printer. Additional printer setup 63 For Windows users 1 Insert the Software and Documentation CD. b In the Start Search or Run box, type D:\setup.exe, where D is connected to complete the installation. Notes: • If... your CD or DVD drive. 2 Click Install Printer and Software. 3 Click Agree to agree to appear. You will need the IP address if you do not know the IP address of the network setup page.
...the IP address in the TCP/IP section. 9 Follow the on a different subnet than the printer. Additional printer setup 63 For Windows users 1 Insert the Software and Documentation CD. b In the Start Search or Run box, type D:\setup.exe, where D is connected to complete the installation. Notes: • If... your CD or DVD drive. 2 Click Install Printer and Software. 3 Click Agree to agree to appear. You will need the IP address if you do not know the IP address of the network setup page.


