
Technical Reference
Page 52
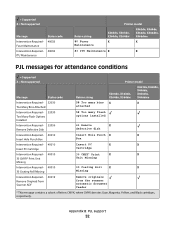
... CMYK* Print Unit Unit Missing Missing Intervention Required - 40010 30 Coating Roll X X 30 Coating Roll Missing Missing Intervention Required - 40019 Remove Originals from Scanner ADF Remove originals from the scanner automatic document feeder * This message contains a subset of letters CMYK, where CMYK denotes Cyan, Magenta, Yellow, and Black cartridges, respectively. Appendix B: PJL...
... CMYK* Print Unit Unit Missing Missing Intervention Required - 40010 30 Coating Roll X X 30 Coating Roll Missing Missing Intervention Required - 40019 Remove Originals from Scanner ADF Remove originals from the scanner automatic document feeder * This message contains a subset of letters CMYK, where CMYK denotes Cyan, Magenta, Yellow, and Black cartridges, respectively. Appendix B: PJL...
User Guide
Page 2
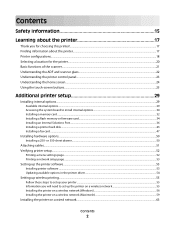
...- Contents Safety information 15 Learning about the printer...17 Printer configurations...18 Selecting a location for the printer...20 Basic functions of the scanner...21 Understanding the ADF and scanner glass...22 Understanding the printer control panel...23 Understanding the home screen...24 Using the touch-screen buttons...25 Additional printer setup 29...
...- Contents Safety information 15 Learning about the printer...17 Printer configurations...18 Selecting a location for the printer...20 Basic functions of the scanner...21 Understanding the ADF and scanner glass...22 Understanding the printer control panel...23 Understanding the home screen...24 Using the touch-screen buttons...25 Additional printer setup 29...
User Guide
Page 4
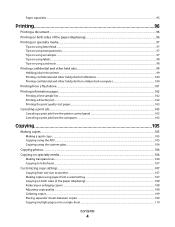
... ...103 Canceling a print job from the computer ...103 Copying 105 Making copies...105 Making a quick copy...105 Copying using the ADF...105 Copying using the scanner glass ...106 Copying photos...106 Copying on specialty media...106 Making transparencies...106 Copying to letterhead...107 Customizing copy settings...107 Copying from one size...
... ...103 Canceling a print job from the computer ...103 Copying 105 Making copies...105 Making a quick copy...105 Copying using the ADF...105 Copying using the scanner glass ...106 Copying photos...106 Copying on specialty media...106 Making transparencies...106 Copying to letterhead...107 Customizing copy settings...107 Copying from one size...
User Guide
Page 5
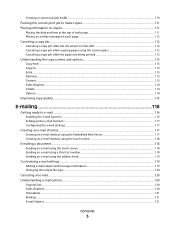
... page...112 Canceling a copy job...112 Canceling a copy job while the document is in the ADF 112 Canceling a copy job while copying pages using the scanner glass 112 Canceling a copy job while the pages are being printed 112 Understanding the copy screens and options...113 Copy from...113 Copy to ...113...
... page...112 Canceling a copy job...112 Canceling a copy job while the document is in the ADF 112 Canceling a copy job while copying pages using the scanner glass 112 Canceling a copy job while the pages are being printed 112 Understanding the copy screens and options...113 Copy from...113 Copy to ...113...
User Guide
Page 9
... ...211 Print Settings ...216 Help menu...227 Maintaining the printer 228 Cleaning the exterior of the printer...228 Cleaning the scanner glass...228 Cleaning the ADF separator rollers...229 Adjusting scanner registration...230 Storing supplies...231 Checking the status of supplies...232 Checking the status of supplies from the printer control panel...
... ...211 Print Settings ...216 Help menu...227 Maintaining the printer 228 Cleaning the exterior of the printer...228 Cleaning the scanner glass...228 Cleaning the ADF separator rollers...229 Adjusting scanner registration...230 Storing supplies...231 Checking the status of supplies...232 Checking the status of supplies from the printer control panel...
User Guide
Page 10
... modem, fax is disabled 256 No answer...256 No dial tone...256 Paper Change: Load Tray ...256 Queued for sending...256 Remove originals from the scanner ADF...256 Remove packaging material, check ...256 Remove paper from standard output bin...256 Replace if restarting job...257 Restore Held Jobs? ...257 Contents 10...
... modem, fax is disabled 256 No answer...256 No dial tone...256 Paper Change: Load Tray ...256 Queued for sending...256 Remove originals from the scanner ADF...256 Remove packaging material, check ...256 Remove paper from standard output bin...256 Replace if restarting job...257 Restore Held Jobs? ...257 Contents 10...
User Guide
Page 11
... change, held jobs were not restored ...258 System busy, preparing resources for job...258 System busy, preparing resources for job. Scan Document Too Long ...257 Scanner ADF Cover Open ...257 Securely clearing disk space ...257 Serial ...257 Set clock ...257 SMTP server not set up.
... change, held jobs were not restored ...258 System busy, preparing resources for job...258 System busy, preparing resources for job. Scan Document Too Long ...257 Scanner ADF Cover Open ...257 Securely clearing disk space ...257 Serial ...257 Set clock ...257 SMTP server not set up.
User Guide
Page 12
......263 88 Cartridge low...263 88.yy Cartridge nearly low...264 88.yy Replace cartridge ...264 200-282.yy paper jam...264 290-295.yy scanner jam...264 293 Replace all originals if restarting job...264 293.02 Flatbed Cover Open ...264 294 ADF Jam...265 840.01... Scanner Disabled...265 841-846 Scanner Service Error ...265 900-999 Service ...265 1565 Emulation error, load emulation option...265 Solving printing problems...266 Multiple-language PDFs do not print...266...
......263 88 Cartridge low...263 88.yy Cartridge nearly low...264 88.yy Replace cartridge ...264 200-282.yy paper jam...264 290-295.yy scanner jam...264 293 Replace all originals if restarting job...264 293.02 Flatbed Cover Open ...264 294 ADF Jam...265 840.01... Scanner Disabled...265 841-846 Scanner Service Error ...265 900-999 Service ...265 1565 Emulation error, load emulation option...265 Solving printing problems...266 Multiple-language PDFs do not print...266...
User Guide
Page 21
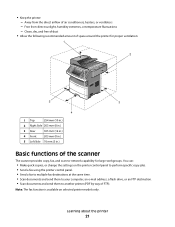
... in.) 2 Right Side 203 mm (8 in.) 3 Rear 305 mm (12 in.) 4 Front 203 mm (8 in.) 5 Left Side 76 mm (3 in.) Basic functions of the scanner The scanner provides copy, fax, and scan-to another printer (PDF by way of air conditioners, heaters, or ventilators - Learning about the printer 21 You can: •...
... in.) 2 Right Side 203 mm (8 in.) 3 Rear 305 mm (12 in.) 4 Front 203 mm (8 in.) 5 Left Side 76 mm (3 in.) Basic functions of the scanner The scanner provides copy, fax, and scan-to another printer (PDF by way of air conditioners, heaters, or ventilators - Learning about the printer 21 You can: •...
User Guide
Page 22
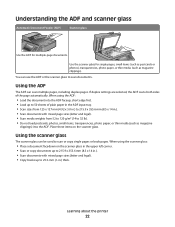
... (letter and legal). • Scan media weights from 125 x 127 mm (4.92 x 5.0 in.) to 215.9 x 355.6 mm (8.5 x 14 in .) thick. Using the scanner glass The scanner glass can be used to scan documents. Learning about the printer 22 Using the ADF The ADF can use the ADF or the... to scan or copy single pages or book pages. You can scan multiple pages, including duplex pages. Understanding the ADF and scanner glass Automatic Document Feeder (ADF) Scanner glass Use the ADF for single pages, small items (such as postcards or photos), transparencies, photo paper, or thin media (such...
... (letter and legal). • Scan media weights from 125 x 127 mm (4.92 x 5.0 in.) to 215.9 x 355.6 mm (8.5 x 14 in .) thick. Using the scanner glass The scanner glass can be used to scan documents. Learning about the printer 22 Using the ADF The ADF can use the ADF or the... to scan or copy single pages or book pages. You can scan multiple pages, including duplex pages. Understanding the ADF and scanner glass Automatic Document Feeder (ADF) Scanner glass Use the ADF for single pages, small items (such as postcards or photos), transparencies, photo paper, or thin media (such...
User Guide
Page 31
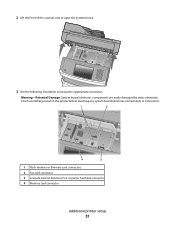
Warning-Potential Damage: System board electronic components are easily damaged by static electricity. 2 Lift the front of the scanner unit to open the system board. 3 Use the following illustration to locate the appropriate connector. Touch something metal on the printer before touching any system board electronic components or connectors. 1 Flash memory or firmware card connectors 2 Fax card connector 3 Lexmark Internal Solutions Port or printer hard disk connector 4 Memory card connector Additional printer setup 31
Warning-Potential Damage: System board electronic components are easily damaged by static electricity. 2 Lift the front of the scanner unit to open the system board. 3 Use the following illustration to locate the appropriate connector. Touch something metal on the printer before touching any system board electronic components or connectors. 1 Flash memory or firmware card connectors 2 Fax card connector 3 Lexmark Internal Solutions Port or printer hard disk connector 4 Memory card connector Additional printer setup 31

User Guide
Page 33
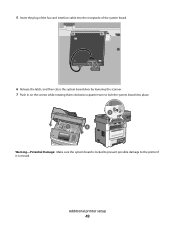
... latched vertical position and are secure against the card. 6 Release the system board access latch, and then close the system board door by lowering the scanner. 7 Push in on the screws while rotating them clockwise a quarter turn to the printer if it clicks into place. Warning-Potential Damage: Make sure the...
... latched vertical position and are secure against the card. 6 Release the system board access latch, and then close the system board door by lowering the scanner. 7 Push in on the screws while rotating them clockwise a quarter turn to the printer if it clicks into place. Warning-Potential Damage: Make sure the...

User Guide
Page 35
Additional printer setup 35 Notes: • The entire length of the connector on the system board. 1 Plastic pins 2 Metal pins 4 Push the card firmly into place. 3 Holding the card by its sides, align the plastic pins on the card with the holes on the card must touch and be flush against the system board. • Be careful not to damage the connectors. 5 Release the latch, and then close the system board door by lowering the scanner.
Additional printer setup 35 Notes: • The entire length of the connector on the system board. 1 Plastic pins 2 Metal pins 4 Push the card firmly into place. 3 Holding the card by its sides, align the plastic pins on the card with the holes on the card must touch and be flush against the system board. • Be careful not to damage the connectors. 5 Release the latch, and then close the system board door by lowering the scanner.

User Guide
Page 42
Additional printer setup 42 For more information, see "Installing a printer hard disk" on page 43. 13 Release the latch, and then close the system board door by lowering the scanner. 14 Push in on the screws while rotating them clockwise a quarter turn to the printer if it is locked to prevent possible damage to lock the system board into place. Warning-Potential Damage: Make sure the system board is moved. 12 If a printer hard disk was previously installed, then attach the printer hard disk to the ISP.
Additional printer setup 42 For more information, see "Installing a printer hard disk" on page 43. 13 Release the latch, and then close the system board door by lowering the scanner. 14 Push in on the screws while rotating them clockwise a quarter turn to the printer if it is locked to prevent possible damage to lock the system board into place. Warning-Potential Damage: Make sure the system board is moved. 12 If a printer hard disk was previously installed, then attach the printer hard disk to the ISP.

User Guide
Page 46
Additional printer setup 46 Note: The plugs and receptacles are color coded. 4 Release the latch, and then close the system board door by lowering the scanner. c Insert the plug of the printer hard disk interface cable into the receptacle of the system board. b Attach the two provided screws to secure the printer hard disk mounting bracket.
Additional printer setup 46 Note: The plugs and receptacles are color coded. 4 Release the latch, and then close the system board door by lowering the scanner. c Insert the plug of the printer hard disk interface cable into the receptacle of the system board. b Attach the two provided screws to secure the printer hard disk mounting bracket.
User Guide
Page 49
Warning-Potential Damage: Make sure the system board is locked to prevent possible damage to lock the system board into place. 5 Insert the plug of the fax card interface cable into the receptacle of the system board. 6 Release the latch, and then close the system board door by lowering the scanner. 7 Push in on the screws while rotating them clockwise a quarter turn to the printer if it is moved. Additional printer setup 49
Warning-Potential Damage: Make sure the system board is locked to prevent possible damage to lock the system board into place. 5 Insert the plug of the fax card interface cable into the receptacle of the system board. 6 Release the latch, and then close the system board door by lowering the scanner. 7 Push in on the screws while rotating them clockwise a quarter turn to the printer if it is moved. Additional printer setup 49
User Guide
Page 71
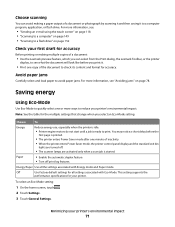
... Use all settings associated with Energy mode and Paper mode. Paper • Enable the automatic duplex feature • Turn off . • The scanner lamps are turned off print log features. Saving energy Using Eco-Mode Use Eco-Mode to quickly select one or more ways to avoid paper... information, see "Avoiding jams" on page 152 Check your printer's environmental impact 71 Choose scanning You can select from the Print dialog, the Lexmark Toolbar, or the printer display, to see what the document will look like before the first page is printed. • The printer enters Power...
... Use all settings associated with Energy mode and Paper mode. Paper • Enable the automatic duplex feature • Turn off . • The scanner lamps are turned off print log features. Saving energy Using Eco-Mode Use Eco-Mode to quickly select one or more ways to avoid paper... information, see "Avoiding jams" on page 152 Check your printer's environmental impact 71 Choose scanning You can select from the Print dialog, the Lexmark Toolbar, or the printer display, to see what the document will look like before the first page is printed. • The printer enters Power...
User Guide
Page 105
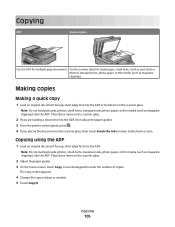
..., small items (such as postcards or photos), transparencies, photo paper, or thin media (such as needed. 5 Touch Copy It. Use the scanner glass for multiple-page documents. Copying 105 The copy screen appears. 4 Change the copy settings as magazine clippings). Note: Do not load postcards..., photos, small items, transparencies, photo paper, or thin media (such as magazine clippings) into the ADF. Place these items on the scanner glass. Note: Do not load postcards, photos, small items, transparencies, photo paper, or thin media (such as magazine clippings) into the ADF...
..., small items (such as postcards or photos), transparencies, photo paper, or thin media (such as needed. 5 Touch Copy It. Use the scanner glass for multiple-page documents. Copying 105 The copy screen appears. 4 Change the copy settings as magazine clippings). Note: Do not load postcards..., photos, small items, transparencies, photo paper, or thin media (such as magazine clippings) into the ADF. Place these items on the scanner glass. Note: Do not load postcards, photos, small items, transparencies, photo paper, or thin media (such as magazine clippings) into the ADF...
User Guide
Page 106
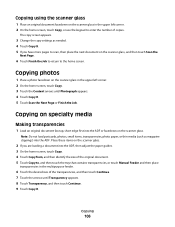
... appears. 4 Touch Copy It. 5 Touch Scan the Next Page or Finish the Job. Copying 106 Copying photos 1 Place a photo facedown on the scanner glass in the upper left corner. 2 On the home screen, touch Copy, or use the keypad to , and then touch the tray that contains ...Copying on specialty media Making transparencies 1 Load an original document faceup, short edge first into the ADF. Copying using the scanner glass 1 Place an original document facedown on the scanner glass in the multipurpose feeder. 6 Touch the desired size of copies. The copy screen appears. 3 Change the copy settings...
... appears. 4 Touch Copy It. 5 Touch Scan the Next Page or Finish the Job. Copying 106 Copying photos 1 Place a photo facedown on the scanner glass in the upper left corner. 2 On the home screen, touch Copy, or use the keypad to , and then touch the tray that contains ...Copying on specialty media Making transparencies 1 Load an original document faceup, short edge first into the ADF. Copying using the scanner glass 1 Place an original document facedown on the scanner glass in the multipurpose feeder. 6 Touch the desired size of copies. The copy screen appears. 3 Change the copy settings...
User Guide
Page 107
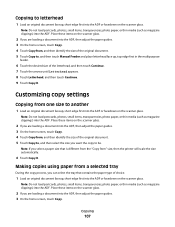
...: Do not load postcards, photos, small items, transparencies, photo paper, or thin media (such as magazine clippings) into the ADF or facedown on the scanner glass. Note: If you are loading a document into the ADF. Note: Do not load postcards, photos, small items, transparencies, photo paper, or thin...screen, touch Copy. 4 Touch Copy from " size, then the printer will scale the size automatically. 6 Touch Copy It. Place these items on the scanner glass. 2 If you select a paper size that is different from the "Copy from , and then identify the size of the original document. 5 Touch...
...: Do not load postcards, photos, small items, transparencies, photo paper, or thin media (such as magazine clippings) into the ADF or facedown on the scanner glass. Note: If you are loading a document into the ADF. Note: Do not load postcards, photos, small items, transparencies, photo paper, or thin...screen, touch Copy. 4 Touch Copy from " size, then the printer will scale the size automatically. 6 Touch Copy It. Place these items on the scanner glass. 2 If you select a paper size that is different from the "Copy from , and then identify the size of the original document. 5 Touch...


