
User Guide
Page 10
...Find it here The latest supplemental information, updates, and customer support: • Documentation • Driver downloads • Live chat support • E‑mail support • Voice support http://support.lexmark.com Note: Select your country or region, and then select your product. Product Information Guide-This... or region: • In the U.S.-See the Statement of Limited Warranty included with the printer, or go to http://support.lexmark.com. Have the following information (located on the printed warranty that came with the printer. Away from the direct airfl...
...Find it here The latest supplemental information, updates, and customer support: • Documentation • Driver downloads • Live chat support • E‑mail support • Voice support http://support.lexmark.com Note: Select your country or region, and then select your product. Product Information Guide-This... or region: • In the U.S.-See the Statement of Limited Warranty included with the printer, or go to http://support.lexmark.com. Have the following information (located on the printed warranty that came with the printer. Away from the direct airfl...

User Guide
Page 102
... the proximity sensor From the home screen, touch Settings > Power Management > Timeouts > Disabled. Facilities may not exist in your country or region. Lexmark recycles the box. To keep the sensor running, do the following: • Remove any obstructions within 1.5 m (5 ft.). • Remove other... devices that there is the default setting in the print driver. • Print multiple pages on a single sheet of paper. • Use the preview feature to see how the document looks like before printing...
... the proximity sensor From the home screen, touch Settings > Power Management > Timeouts > Disabled. Facilities may not exist in your country or region. Lexmark recycles the box. To keep the sensor running, do the following: • Remove any obstructions within 1.5 m (5 ft.). • Remove other... devices that there is the default setting in the print driver. • Print multiple pages on a single sheet of paper. • Use the preview feature to see how the document looks like before printing...
User Guide
Page 132
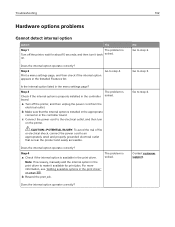
...add the internal option in the menu settings page? Step 2 Go to step 2. No Go to step 4. Is the internal option listed in the print driver to an appropriately rated and properly grounded electrical outlet that the internal option is installed in the appropriate connector in the print... driver. b Resend the print job. CAUTION-POTENTIAL INJURY: To avoid the risk of fire or electrical shock, connect the power cord to make it ...
...add the internal option in the menu settings page? Step 2 Go to step 2. No Go to step 4. Is the internal option listed in the print driver to an appropriately rated and properly grounded electrical outlet that the internal option is installed in the appropriate connector in the print... driver. b Resend the print job. CAUTION-POTENTIAL INJURY: To avoid the risk of fire or electrical shock, connect the power cord to make it ...

User Guide
Page 155
... off the printer, reinstall the hardware options, and then turn it solved back on. Make sure to the electrical outlet. Step 7 Install the correct print driver. The problem is in the correct ports? Step 2 Check if the electrical outlet is Turn off by a switch or breaker? Is the printer in the...
... off the printer, reinstall the hardware options, and then turn it solved back on. Make sure to the electrical outlet. Step 7 Install the correct print driver. The problem is in the correct ports? Step 2 Check if the electrical outlet is Turn off by a switch or breaker? Is the printer in the...
User Guide
Page 165
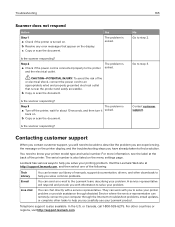
... chat You can send an e-mail to your printing problem. back on the display. Visit the Lexmark Web site at the back of manuals, support documentation, drivers, and other downloads to help you to solve your printer problem or provide assistance through Assisted Service ... service representative. Step 2 a Check if the power cord is solved. Go to step 2. They can remotely connect to the Lexmark team, describing your Lexmark product. or Canada, call 1-800-539-6275. The problem is connected properly to troubleshoot problems, install updates, or complete other countries...
... chat You can send an e-mail to your printing problem. back on the display. Visit the Lexmark Web site at the back of manuals, support documentation, drivers, and other downloads to help you to solve your printer problem or provide assistance through Assisted Service ... service representative. Step 2 a Check if the power cord is solved. Go to step 2. They can remotely connect to the Lexmark team, describing your Lexmark product. or Canada, call 1-800-539-6275. The problem is connected properly to troubleshoot problems, install updates, or complete other countries...
User Guide
Page 176
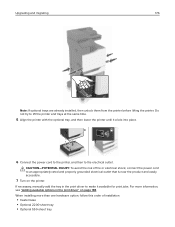
... clicks into place. 6 Connect the power cord to the printer, and then to the electrical outlet. If necessary, manually add the tray in the print driver" on the printer. For more than one hardware option, follow this order of fire or electrical shock, connect the power cord to lift the...
... clicks into place. 6 Connect the power cord to the printer, and then to the electrical outlet. If necessary, manually add the tray in the print driver" on the printer. For more than one hardware option, follow this order of fire or electrical shock, connect the power cord to lift the...
User Guide
Page 188
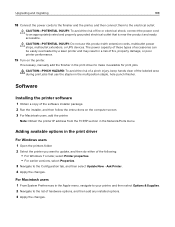
... users, add the printer. The power capacity of these types of accessories can be easily overloaded by a laser printer and may result in the print driver For Windows users 1 Open the printers folder. 2 Select the printer you want to update, and then do either of the software installer package. 2 ...necessary, manually add the finisher in the Network/Ports menu. Note: Obtain the printer IP address from the TCP/IP section in the print driver to the Configuration tab, and then select Update Now ‑ Ask Printer. 4 Apply the changes. Upgrading and migrating 188 18 Connect the...
... users, add the printer. The power capacity of these types of accessories can be easily overloaded by a laser printer and may result in the print driver For Windows users 1 Open the printers folder. 2 Select the printer you want to update, and then do either of the software installer package. 2 ...necessary, manually add the finisher in the Network/Ports menu. Note: Obtain the printer IP address from the TCP/IP section in the print driver to the Configuration tab, and then select Update Now ‑ Ask Printer. 4 Apply the changes. Upgrading and migrating 188 18 Connect the...

User Guide
Page 194
Index 194 Index A adapter plug 44 adding hardware options print driver 188 adding internal options print driver 188 ADF feed roller replacing 89 ADF pick roller replacing 87 ADF separator roller replacing 91 adjusting brightness of printer display 101 adjusting toner darkness ...
Index 194 Index A adapter plug 44 adding hardware options print driver 188 adding internal options print driver 188 ADF feed roller replacing 89 ADF pick roller replacing 87 ADF separator roller replacing 91 adjusting brightness of printer display 101 adjusting toner darkness ...

User Guide
Page 195
...fuser replacing 66 G green settings Eco‑Mode 101 hibernate mode 101 sleep mode 101 H hardware options installing 175 hardware options, adding print driver 188 held jobs 29 printing from a Macintosh computer 29 printing from Windows 29 held print jobs printing from a Macintosh computer 29 printing from ...punch finisher 181 installing the staple finisher 179 internal options 166 installing 171 memory card 166 internal options, adding print driver 188 internal solutions port installing 167 troubleshooting 133 J jam, clearing automatic document feeder 109 door J 122 door K 121
...fuser replacing 66 G green settings Eco‑Mode 101 hibernate mode 101 sleep mode 101 H hardware options installing 175 hardware options, adding print driver 188 held jobs 29 printing from a Macintosh computer 29 printing from Windows 29 held print jobs printing from a Macintosh computer 29 printing from ...punch finisher 181 installing the staple finisher 179 internal options 166 installing 171 memory card 166 internal options, adding print driver 188 internal solutions port installing 167 troubleshooting 133 J jam, clearing automatic document feeder 109 door J 122 door K 121

User Guide
Page 196
... 75 placing separator sheets between copies copying 32 port settings configuring 57 power button light printer status 16 power cord socket 13 print driver hardware options, adding 188 print job canceling from the computer 30 canceling from the printer control panel 30 print quality cleaning the scanner glass 58...
... 75 placing separator sheets between copies copying 32 port settings configuring 57 power button light printer status 16 power cord socket 13 print driver hardware options, adding 188 print job canceling from the computer 30 canceling from the printer control panel 30 print quality cleaning the scanner glass 58...


